How to Screen Record on Mac (2026 Guide)
4 ways to record your Mac screen — built-in tools, Screenify Studio, OBS, and Screen Studio compared side-by-side.

Your Mac already ships with a screen recorder — most people just don't know where it is. But the built-in tool covers the basics at best. Once you need system audio, webcam overlays, or auto-zoom, you'll outgrow it fast.
Here are four methods ranked by capability, so you can pick the right one for the job.
Quick Comparison
| Tool | Price | System Audio | Webcam | Editing | Difficulty |
|---|---|---|---|---|---|
| macOS Screenshot Toolbar | Free (built-in) | No | No | None | Easy |
| Screenify Studio | Free / Pro $9.99/mo | Yes | Yes | Auto-zoom, captions, backgrounds | Easy |
| OBS Studio | Free (open-source) | Yes (via plugin) | Yes | None (record only) | Moderate |
| Screen Studio | $89 one-time | Yes | Yes | Auto-zoom, backgrounds | Easy |
Method 1: macOS Screenshot Toolbar (Built-in)
Every Mac running macOS Mojave (10.14) or later has a screen recorder built into the Screenshot toolbar. No downloads required.
Steps
- Press ⌘ + Shift + 5 to open the Screenshot toolbar at the bottom of your screen
- You'll see three screenshot buttons on the left and two recording buttons in the center:
- Record Entire Screen (solid rectangle icon)
- Record Selected Portion (dotted rectangle icon)
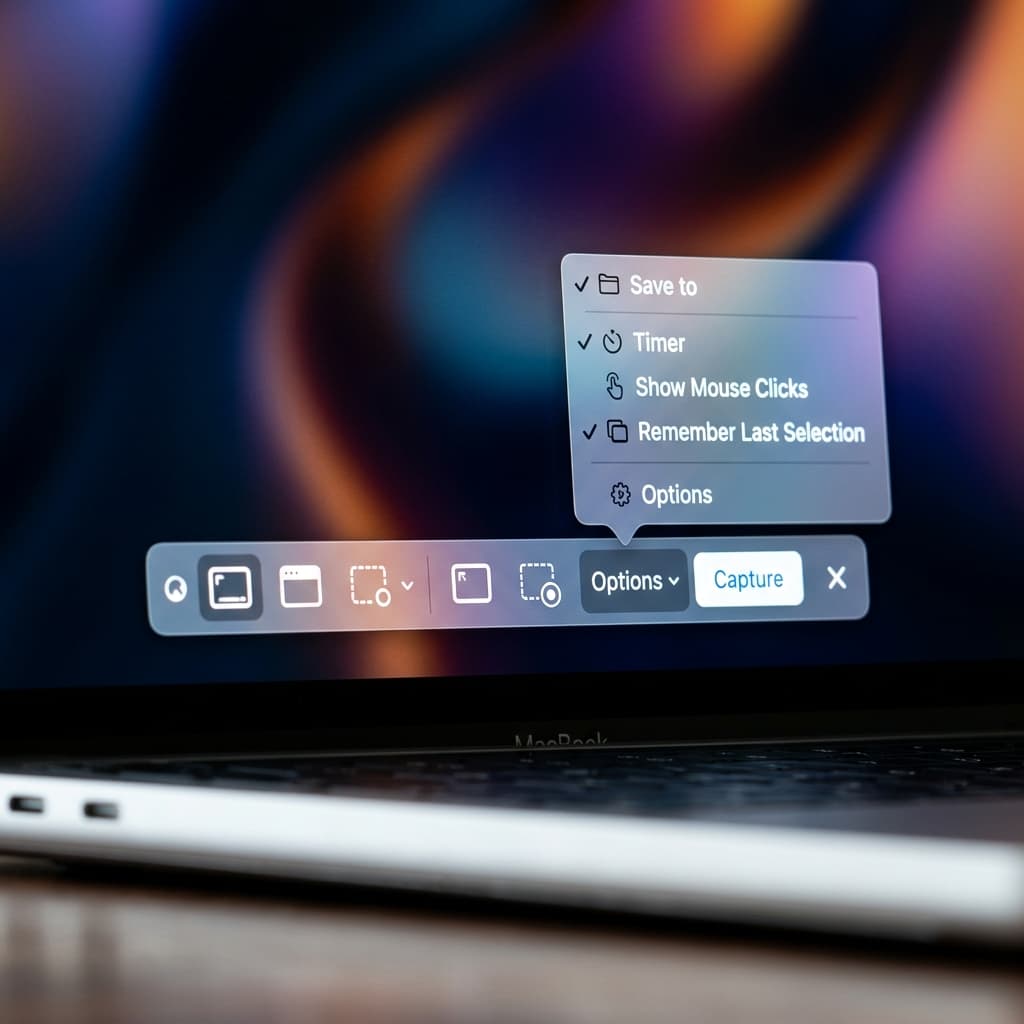
- Click Options to configure:
- Save to — choose Desktop, Documents, Clipboard, Mail, Messages, Preview, or a custom folder. Selecting a custom folder opens a Finder dialog where you can create a new folder specifically for your recordings.
- Timer — set a 5 or 10 second countdown before recording starts. The countdown appears as a large number overlay on your screen, giving you time to arrange windows or switch to the correct app.
- Microphone — select your input device from the list. If you have multiple audio inputs (Built-in Microphone, AirPods, an external USB mic), each appears as a separate option. Note: this captures mic audio only, not system audio.
- Show Mouse Clicks — displays a dark circle animation around each click during playback. Useful for tutorials where viewers need to see exactly where you clicked.
- Show Floating Thumbnail — when enabled, a preview thumbnail appears in the bottom-right corner after you stop recording. You can click it to quickly trim the clip, drag it to a Finder window or app, or swipe it right to dismiss.
- Remember Last Selection — the toolbar preserves your last recording area between sessions, so if you always record the same region, you won't need to redraw it
- Click Record (or press Enter)
- To stop recording, click the Stop button in the menu bar (⏹ icon) or press ⌘ + Control + Esc
- If you enabled the floating thumbnail, click it within 5 seconds to open a quick preview where you can trim the start and end of the clip using the yellow handles, then click Done to save
Output
Your recording saves as a .mov file. The file uses HEVC (H.265) compression on Apple Silicon Macs, which keeps file sizes reasonable for short recordings.
Limitations
- No system audio — the built-in recorder cannot capture what's playing through your speakers. You'll only get microphone input.
- No webcam overlay — there's no option to add a camera feed.
- No editing — the file is raw; you'll need a separate app to trim, annotate, or add effects.
- No auto-zoom — cursor movements stay at 1:1 scale, which makes small UI interactions hard to follow.
The Screenshot toolbar works fine for quick bug reports or sharing a short clip with a teammate. For anything polished — tutorials, demos, course content — you'll want more control.
Keyboard shortcuts reference
- ⌘ + Shift + 5 — open the Screenshot toolbar
- Enter — start recording (when toolbar is open)
- ⌘ + Control + Esc — stop recording
- Esc — cancel and close the toolbar without recording
- Space — toggle between region selection and window selection while in "Record Selected Portion" mode
Method 2: Screenify Studio
Screenify Studio records your screen and applies professional post-processing automatically. The key difference from the built-in tool: it captures system audio natively, adds a webcam overlay, and includes AI-powered editing features that eliminate manual work.
Steps
- Download Screenify Studio from screenify.studio/download — the free plan has no watermark and no time limit
- Open the app. The floating recording bar appears at the top of your screen.
- Choose your capture mode:
- Full Screen — records your entire display
- Window — records a single application window
- Custom Area — drag to select a region
- Toggle audio sources:
- System Audio — captures app sounds, music, video playback
- Microphone — captures your voice
- Both can be enabled simultaneously
- (Optional) Enable Webcam — choose a camera layout (circle, rectangle, or split-screen)
- Click the red Record button or press the global shortcut ⌃ + ⌘ + R
- When finished, press the same shortcut or click Stop in the menu bar
- The editor opens automatically with your recording
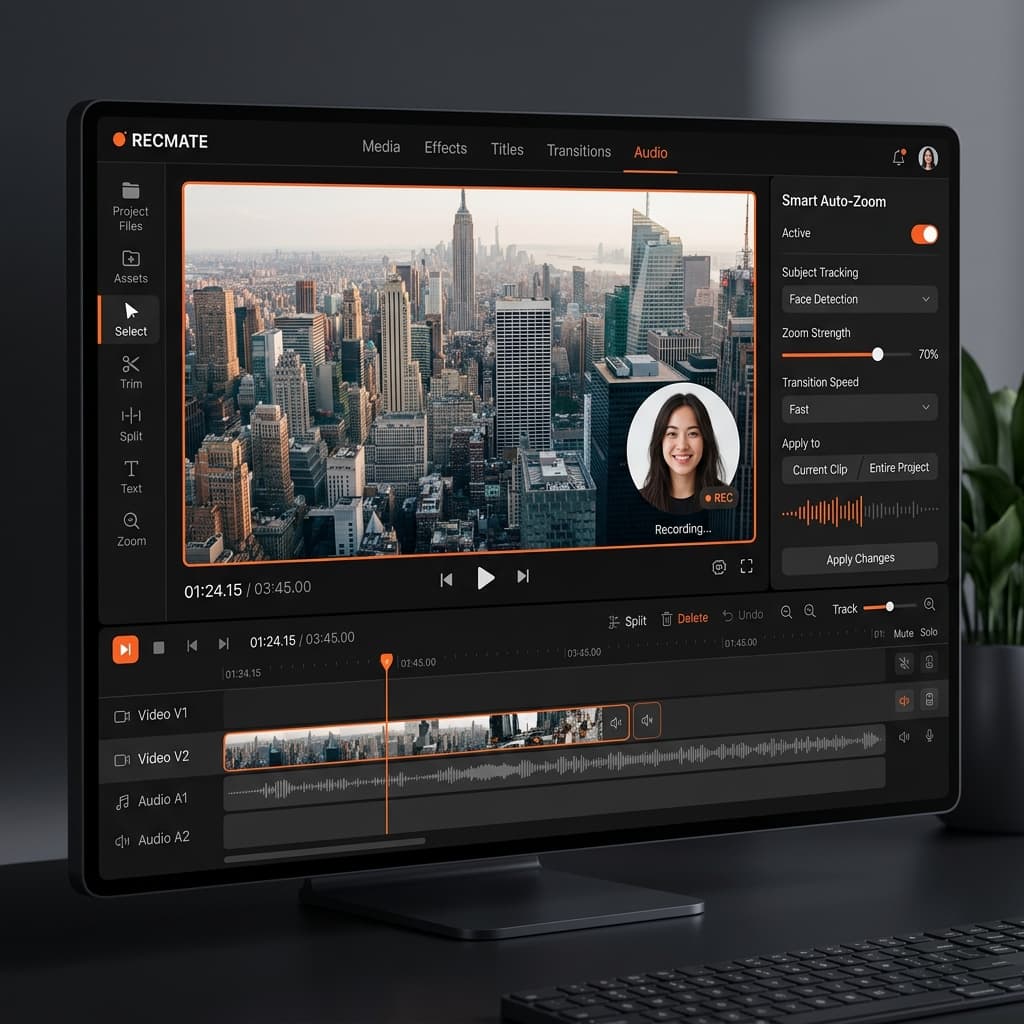
Post-recording features
After recording, Screenify Studio's editor lets you enhance the video without exporting to another app:
- Smart Auto-Zoom — analyzes your cursor movement and automatically creates zoom keyframes. Click-heavy workflows get close-ups; idle moments zoom back out.
- AI Captions — generates subtitles from your narration, fully offline using on-device transcription. Supports 90+ languages.
- Dynamic Backgrounds — replace the plain desktop wallpaper behind your window with gradients, images, or animated backgrounds.
- Cursor Highlight — adds a subtle glow or spotlight effect around your cursor to guide the viewer's eye.
Export
Screenify uses Metal GPU acceleration for export, which renders a 5-minute recording in roughly 15 seconds on an M-series Mac. Output formats include MP4 (H.264), MOV (HEVC), and GIF.
You can also upload directly to Screenify's sharing platform — copy the link and paste it in Slack, email, or Notion.
Try Screenify Studio — free, unlimited recordings
Auto-zoom, AI captions, dynamic backgrounds, and Metal-accelerated export.
Method 3: OBS Studio (Free, Open-Source)
OBS (Open Broadcaster Software) is the go-to tool for streamers, but it's also a capable screen recorder. It's free, cross-platform, and extremely configurable — at the cost of a steeper learning curve.
Steps
- Download OBS from obsproject.com and install it
- On first launch, run the Auto-Configuration Wizard — select "Optimize just for recording" when prompted
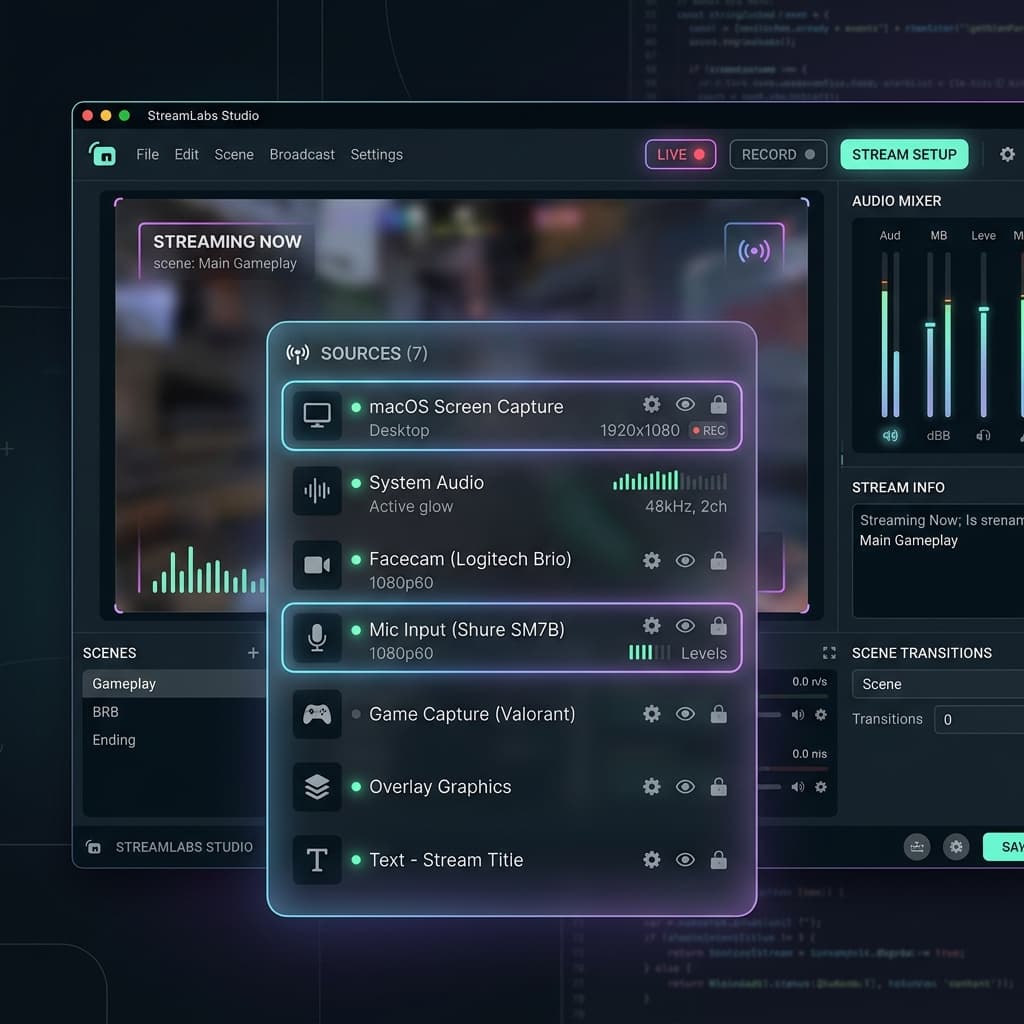
- In the Sources panel at the bottom, click + and add:
- macOS Screen Capture — captures your entire display or a single window
- Audio Output Capture — captures system audio (requires macOS 13+ for native support; on older versions you'll need BlackHole)
- Audio Input Capture — captures your microphone
- Video Capture Device — adds your webcam (optional)
- Arrange sources in the preview area by dragging and resizing
- Click Start Recording in the right panel
- When done, click Stop Recording
- Find your file in the output folder shown in Settings → Output → Recording Path
Configuring Recording Quality
By default, OBS records in MKV format. For better compatibility, go to Settings → Output → Recording Format and change to MP4 or MOV. Set the encoder to Apple VT H264 Hardware Encoder for GPU-accelerated recording with minimal CPU impact.
Limitations
- No post-processing — OBS records raw footage. There's no built-in editor, no auto-zoom, no caption generator. You'll need to edit in a separate app like iMovie, DaVinci Resolve, or Final Cut.
- Complex UI — the interface is designed for live streaming, with scenes, sources, and transition controls that are overkill for simple screen recording.
- System audio on older macOS — if you're running macOS 12 or earlier, capturing system audio requires installing a third-party audio loopback driver like BlackHole.
OBS is ideal if you need granular control over encoding settings, multi-source layouts, or if you're already using it for streaming and want to record locally.
Method 4: Screen Studio
Screen Studio is a paid Mac app ($89 one-time) focused on making screen recordings look cinematic with automatic zoom, motion effects, and backgrounds — similar to Screenify but with a different pricing model.
Steps
- Download Screen Studio from screenstudio.lemonsqueezy.com and run the installer
- On first launch, Screen Studio asks for Screen Recording and Accessibility permissions. Grant both in System Settings → Privacy & Security.
- Choose your recording area (full screen, window, or custom region)
- Enable system audio and microphone toggles as needed in the recording panel
- Click the Record button. A 3-second countdown appears before capture begins.
- After stopping, the editor opens with automatic zoom applied to your cursor movements
- Use the zoom intensity slider to control how aggressively the camera follows your cursor. Lower values produce subtle movement; higher values create dramatic close-ups on every click.
- Add a background (gradient, solid, or image) and resize for different aspect ratios using the crop presets
- Export as MP4 or GIF. Export times vary based on recording length and the number of zoom effects applied.
How it compares
Screen Studio was one of the first Mac apps to popularize the "auto-zoom" screen recording style. It handles the basics well, but there are a few areas where other tools have caught up or moved ahead:
- Pricing — $89 one-time is good value if you record frequently. But there's no free tier, so you can't try it on a real project before buying.
- Captions — Screen Studio doesn't include built-in caption generation. You'd need to use a separate tool for subtitles.
- Sharing — exports are local-only. There's no built-in upload or shareable link feature.
- Export speed — rendering can be slow on longer recordings, especially without Metal GPU optimization.
Troubleshooting
"Screen Recording" permission not appearing
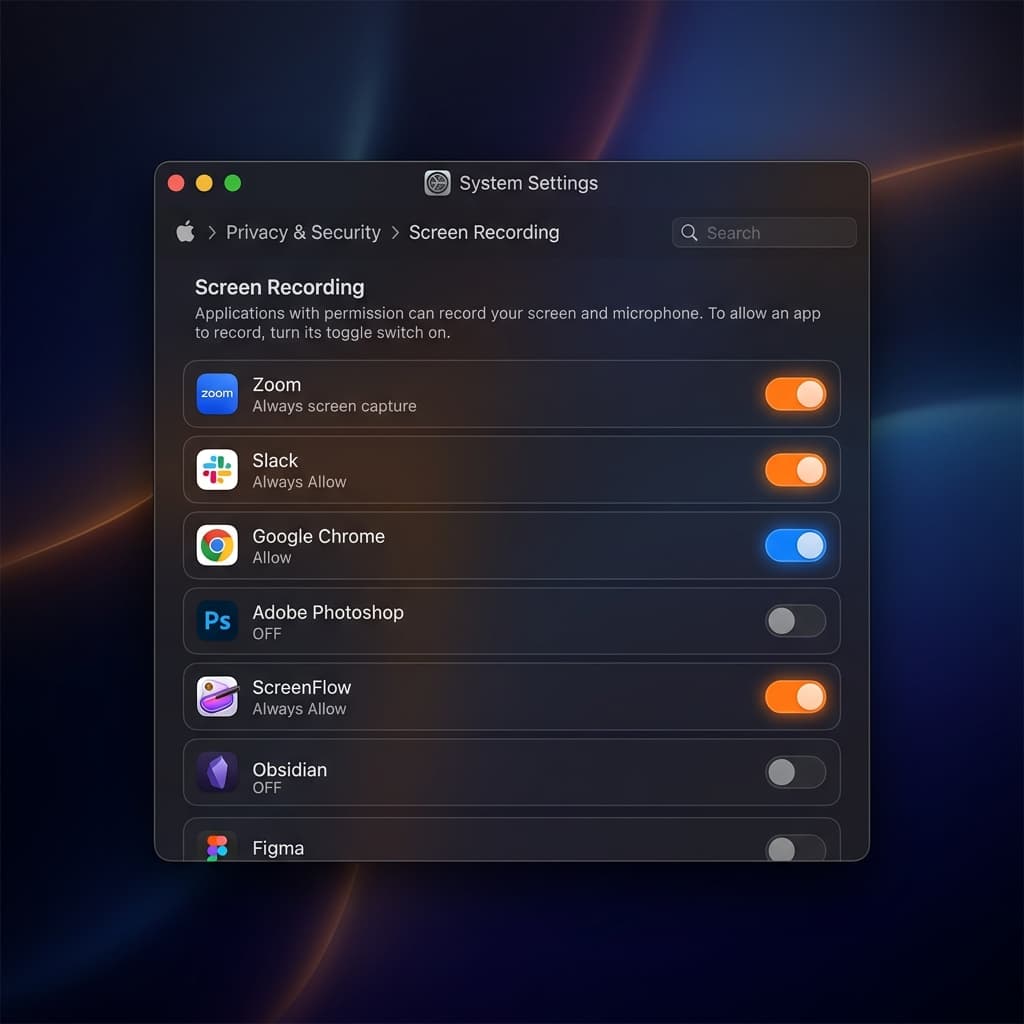
On macOS Ventura and later, apps must request Screen Recording permission explicitly. If a recording app can't capture your screen:
- Go to System Settings → Privacy & Security → Screen Recording
- Find the app in the list and toggle it on
- If the app isn't listed, open the app first — it should trigger a permission prompt
- You may need to quit and relaunch the app after granting permission
Recording saves as black screen
This usually happens with DRM-protected content (Netflix, Apple TV+, Disney+). macOS blocks screen capture for apps that use HDCP. There's no workaround — this is by design to protect copyrighted content.
If you see a black screen recording a non-DRM app, check that you've granted Screen Recording permission (see above).
Recording is laggy or choppy
- Close resource-heavy apps before recording
- On Intel Macs, try lowering the recording resolution — Retina displays push a lot of pixels
- In OBS, switch to hardware encoding (Apple VT H264) instead of software encoding (x264)
- If using an external display, record the built-in display instead — external displays at 4K or 5K require significant GPU bandwidth
File is too large
- Use HEVC (H.265) encoding instead of H.264 — file sizes are roughly 40% smaller at the same quality
- Lower the frame rate from 60fps to 30fps if smooth motion isn't critical
- Screenify Studio's Metal export pipeline produces optimized files by default
- For sharing, consider uploading to a platform with streaming playback rather than sending the raw file
Recording stops unexpectedly
- Check available disk space — macOS silently stops recording when storage runs out. Open Apple Menu → About This Mac → Storage to verify you have at least a few GB free.
- Some macOS power management features can interrupt recordings. Go to System Settings → Battery → Options and disable "Put hard disks to sleep when possible" before long recordings.
- If the recording stops right after starting, the app may not have Screen Recording permission. Verify in System Settings → Privacy & Security → Screen Recording.
No audio in the recording
- The macOS Screenshot toolbar only records mic audio if you explicitly select a microphone in the Options menu. No microphone selected means a silent recording.
- For OBS, check that your audio sources are not muted in the mixer panel at the bottom of the window. Each source has a speaker icon and a volume slider.
- In Screenify Studio, verify that both the System Audio and Microphone toggles show the correct devices. Click the dropdown arrow next to each toggle to select a specific input or output.
Tips for Better Recordings
Clean your desktop before recording. Close unnecessary apps, hide the Dock if it's visible (System Settings → Desktop & Dock → Automatically hide and show the Dock), and disable notification banners by enabling Focus mode (Control Center → Focus → Do Not Disturb). Stray notifications and cluttered desktops look unprofessional in recordings.
Use a consistent mouse speed. Viewers need time to track your cursor. Move deliberately between UI elements — fast, erratic cursor movements make screen recordings hard to follow. If your recording tool supports cursor highlighting (Screenify Studio does), enable it so the cursor stands out against busy interfaces.
Plan your clicks before recording. Open the apps you need, navigate to the starting screen, and rehearse the flow once. This avoids dead time in the recording where you're searching for a menu item or waiting for a page to load.
Record at native resolution and downscale in post. Retina Macs produce high-resolution captures that look sharp when exported at 1080p or 1440p. Recording at a lower resolution to save resources often creates blurry text that is hard to read.
Close bandwidth-heavy apps. Cloud sync tools (Dropbox, iCloud Drive, Google Drive), software updaters, and backup apps running in the background consume CPU and disk I/O that can cause frame drops during recording. Pause syncing before you hit Record.
Set a consistent aspect ratio for your content. If your recordings will go on YouTube, record in 16:9. For social media shorts, use 9:16. Deciding the aspect ratio before recording avoids awkward cropping later.
Try Screenify Studio — free, unlimited recordings
Auto-zoom, AI captions, dynamic backgrounds, and Metal-accelerated export.
FAQ
Can I screen record on Mac for free?
Yes. The built-in Screenshot toolbar (⌘ + Shift + 5) is completely free and requires no additional software. Screenify Studio also offers a free plan with no watermark or time limit. OBS Studio is free and open-source.
How do I record my Mac screen with audio?
The built-in Screenshot toolbar only captures microphone audio. To record system audio (what's playing through your speakers), use Screenify Studio, OBS (with macOS 13+ or BlackHole), or Screen Studio. All three capture both system audio and microphone simultaneously.
What's the best format to record in — MOV or MP4?
MOV (HEVC) produces smaller files on Apple Silicon Macs and is natively supported in macOS. MP4 (H.264) has broader compatibility — use it when sharing with Windows users or uploading to platforms that don't support HEVC. Most recording apps let you choose the format during export.
Does screen recording affect Mac performance?
Light screen recording (built-in tool, Screenify Studio) has minimal impact on modern Macs with Apple Silicon. OBS can use more CPU depending on your encoding settings. Recording at Retina resolution and 60fps will use more resources than 1080p at 30fps. Close unused apps if you notice frame drops.
How long can I screen record on Mac?
There's no built-in time limit. The only constraint is available disk space. A 1080p recording at 30fps typically uses 100-200MB per minute depending on screen content. A one-hour recording might be 6-12GB. Check your available storage before long recordings.
Can I record a specific window instead of the full screen?
Yes. The macOS Screenshot toolbar, Screenify Studio, OBS, and Screen Studio all support window-level capture. This is useful when you want to record a single app without capturing your desktop, dock, or notifications from other apps.
How do I add my webcam to a screen recording?
The built-in Screenshot toolbar doesn't support webcam overlays. Use Screenify Studio (built-in camera layouts), OBS (add a Video Capture Device source), or Screen Studio (webcam overlay option). Screenify offers pre-designed layouts including circle, rectangle, and split-screen arrangements.
Can I edit my screen recording without another app?
With the built-in tool or OBS, no — you'll need a separate editor. Screenify Studio and Screen Studio both include built-in editors with trimming, zoom adjustments, backgrounds, and (in Screenify's case) AI-generated captions.
Where are screen recordings saved on Mac?
The macOS Screenshot toolbar saves recordings to your Desktop by default. You can change this by clicking Options in the toolbar and selecting a different folder under "Save to." Screenify Studio saves recordings within the app and lets you export to any folder. OBS saves to the path specified in Settings → Output → Recording Path — the default is your Movies folder.
Can I schedule a screen recording to start automatically?
macOS and most recording apps don't have a built-in scheduling feature. However, you can use the Timer option in the Screenshot toolbar (5 or 10 seconds) to delay the start. For longer delays, Automator or Shortcuts on macOS can trigger QuickTime recording at a set time, but the setup requires scripting knowledge.
Related Guides
- How to Screen Record on Mac with Audio
- How to Record Internal Audio on Mac
- How to Screen Record with Webcam on Mac
- Best Free Screen Recorders for Mac (2026)
- How to Trim a Video on Mac — once you've captured the recording
- How to Add Captions to a Video on Mac — AI captions, SRT export, accessibility
- How to Convert MOV to MP4 on Mac — share-friendly format for the recording
Try Screenify Studio
Record your screen with auto-zoom, AI captions, dynamic backgrounds, and Metal-accelerated export. Free plan, unlimited recordings.
Download Free


