How to Record Internal Audio on Mac
Capture system audio on Mac — app sounds, browser tabs, video calls — using 4 proven methods with step-by-step setup.

"Internal audio" means the sound your Mac produces — a YouTube video playing in Safari, a Spotify track, notification sounds, or the audio from a Zoom call. Unlike microphone audio, macOS doesn't let you capture internal audio with its built-in tools. Apple blocks it at the system level.
That doesn't mean it's impossible. Every method below works by routing your Mac's audio output through a virtual device that your recording app can read. Some apps handle this automatically; others require manual setup.
Quick Comparison
| Method | Price | Setup Complexity | Audio Quality | Records Screen Too |
|---|---|---|---|---|
| Screenify Studio | Free / Pro $9.99/mo | Automatic (one click) | Lossless digital | Yes |
| BlackHole + QuickTime | Free | 15 min manual setup | Lossless digital | Yes |
| OBS + macOS Audio Capture | Free | 5 min (macOS 13+) | Lossless digital | Yes |
| Loopback by Rogue Amoeba | $118 one-time | 5 min | Lossless digital | Audio only (pair with screen recorder) |
Method 1: Screenify Studio (Automatic Setup)
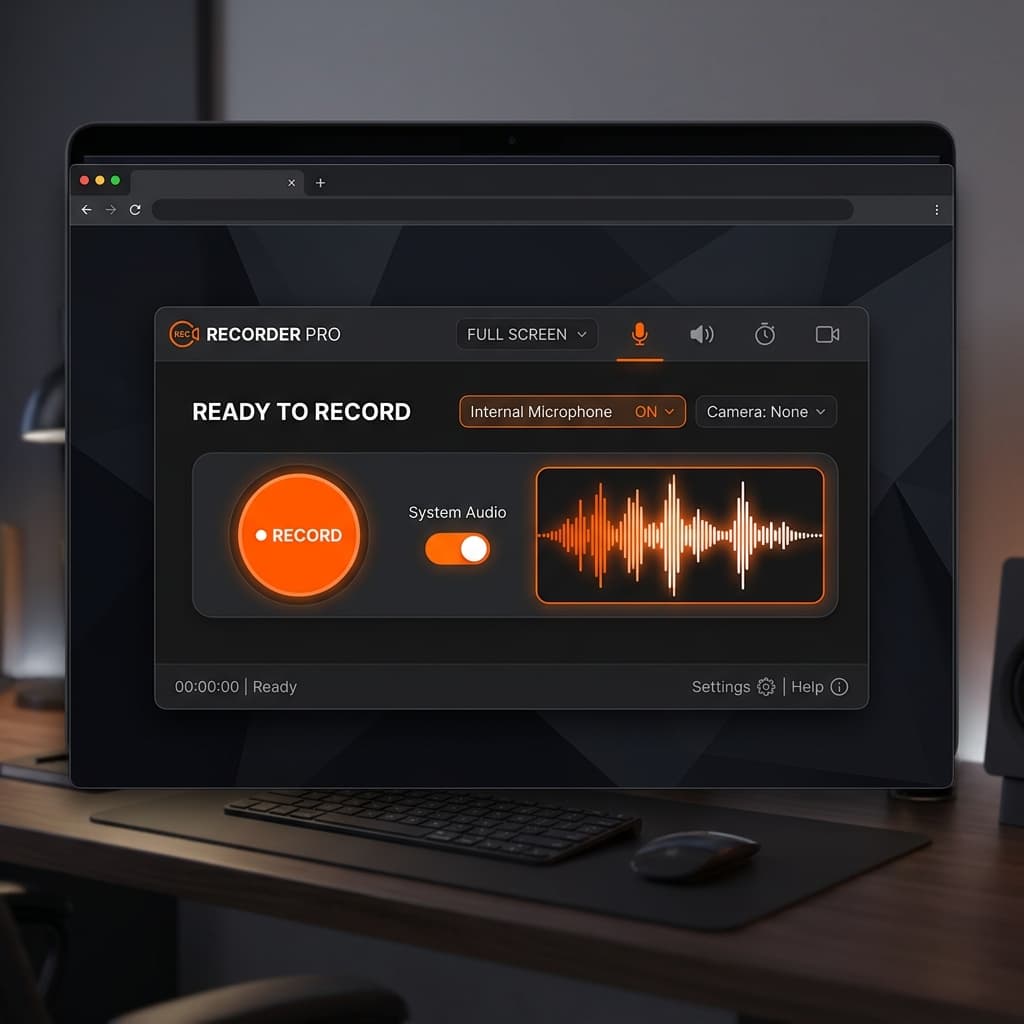
Screenify Studio installs a lightweight audio driver on first launch that captures internal audio without any manual configuration. You don't need to touch Audio MIDI Setup or create multi-output devices.
Steps
- Download Screenify Studio and open it
- On first launch, the app requests permission to install its audio driver. A macOS prompt appears asking for your password — click Allow and enter your credentials. The installation takes a few seconds and doesn't require a restart.
- In the recording panel, toggle System Audio on. A waveform indicator appears next to the toggle, showing real-time audio levels from your Mac's output.
- Optionally toggle Microphone to add your narration. When both are enabled, a balance slider appears between the two toggles so you can set the relative volume before recording starts.
- Play a sound from any app (a YouTube video, a Spotify track, or a notification) and verify the System Audio waveform responds. If the waveform stays flat, the audio driver may not have installed correctly — restart the app.
- Select your capture area (Full Screen, Window, or Custom Region) and press ⌃ + ⌘ + R to record
- Stop recording with the same shortcut. Both audio tracks appear as separate waveforms in the editor — system audio on one track, microphone on another.
What makes this different
- The audio driver runs only during recording. When Screenify isn't recording, the driver is inactive — it doesn't affect your normal audio playback or introduce latency.
- System audio and microphone are recorded as separate tracks. In the editor, you can adjust volume, mute, or trim each independently. If your mic picks up keyboard noise, you can reduce its level without affecting the clean system audio track.
- The audio is captured digitally at the source — there's no analog loopback, no quality loss, and no "hearing yourself through speakers" problem.
Per-app audio capture
Currently, Screenify captures all system audio output. If you want to isolate a single app's audio:
- Mute apps you don't want in the recording before pressing Record
- Or use headphones for monitoring — the virtual driver captures the output regardless of your physical output device
Try Screenify Studio — free, unlimited recordings
Auto-zoom, AI captions, dynamic backgrounds, and Metal-accelerated export.
Method 2: BlackHole + QuickTime (Free, Manual Setup)
BlackHole is a free, open-source virtual audio driver. Combined with macOS Audio MIDI Setup, it routes your internal audio to a virtual input that QuickTime (or any recording app) can capture.
Step 1: Install BlackHole
- Go to existential.audio/blackhole
- Download BlackHole 2ch (2-channel is sufficient for stereo screen recordings)
- Run the installer package
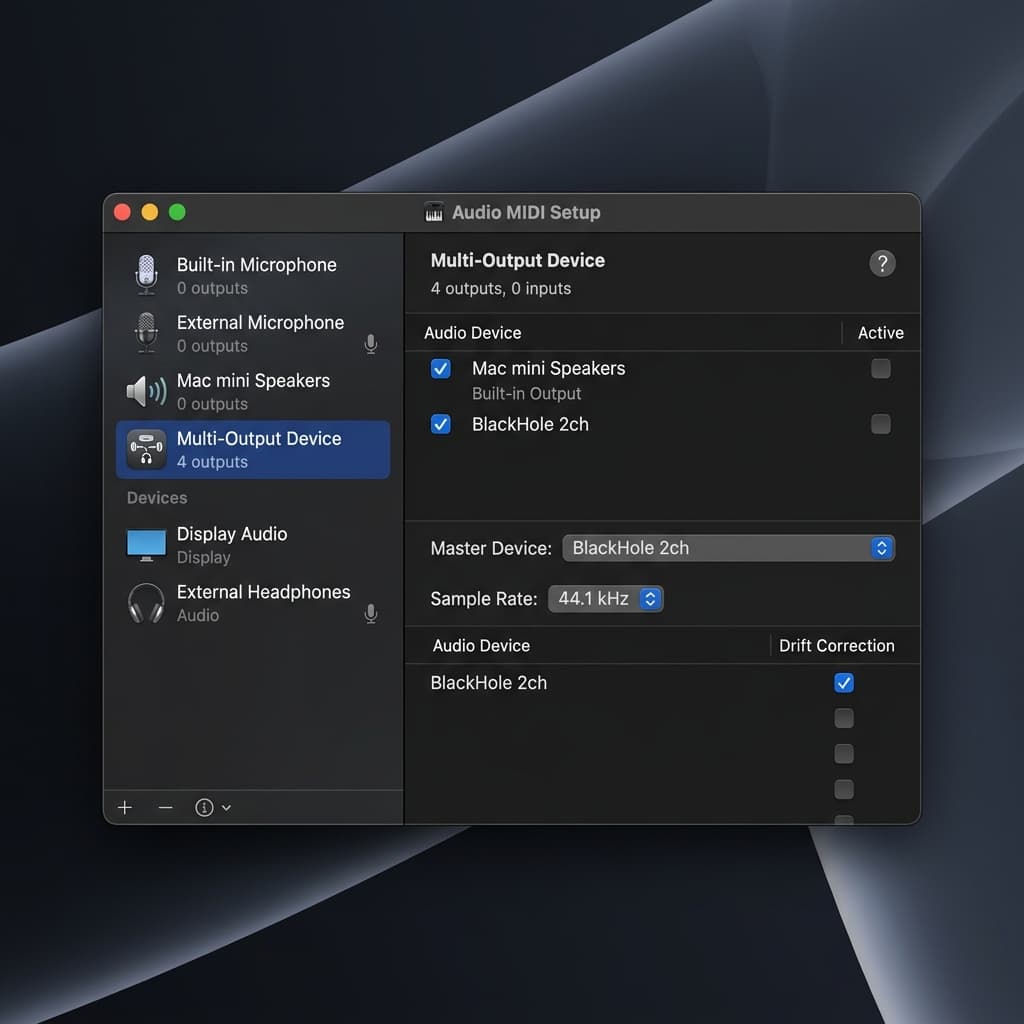
Step 2: Create a Multi-Output Device
This step is necessary so you can hear the audio while it's being captured. Without it, routing audio to BlackHole would make it silent through your speakers.
- Open Audio MIDI Setup (find it in Applications → Utilities, or search with Spotlight)
- Click the + button at the bottom-left corner
- Select Create Multi-Output Device
- In the right panel, check these devices:
- Built-in Output (or your headphones/speakers)
- BlackHole 2ch
- Make sure Built-in Output is listed first (drag to reorder if needed) — this ensures audio plays through your speakers
- Optionally, rename the device to something like "Screen Recording Audio" by double-clicking its name
Step 3: Route audio through the Multi-Output Device
- Open System Settings → Sound → Output
- Select your newly created Multi-Output Device
- Now all system audio goes to both your speakers AND BlackHole
Step 4: Record with QuickTime
- Open QuickTime Player (in Applications, or search with Spotlight)
- Go to File → New Screen Recording (or press ⌃ + ⌘ + N)
- Click the small dropdown arrow next to the Record button. If you don't see the dropdown, look for an Options button in the toolbar that appears at the bottom of the screen.
- Under Microphone, select BlackHole 2ch. This tells QuickTime to capture the audio routed through BlackHole — which is now your system audio.
- Click Record, perform your screen actions, then stop recording
- Play back the recording to confirm internal audio was captured. If the audio is silent, return to Step 3 and verify the Multi-Output Device is still selected as your sound output in System Settings.
Important: Switch audio back when done
After recording, go back to System Settings → Sound → Output and switch back to your normal speakers or headphones. If you leave the Multi-Output Device selected, some apps may have issues with volume control (the Multi-Output Device doesn't support the system volume slider).
Limitations
- Volume control doesn't work with the Multi-Output Device — you'll need to control volume from individual apps
- Setup is confusing for people who've never used Audio MIDI Setup
- You have to manually switch audio routing before and after each recording session
- No separate tracks — mic and system audio merge into one stream
Method 3: OBS Studio + macOS Audio Capture (macOS 13+)
Starting with macOS 13 Ventura, OBS added a native macOS Audio Capture source that captures internal audio without needing BlackHole or any third-party driver.
Steps
- Download OBS Studio (version 30+)
- Make sure you're running macOS 13 Ventura or later
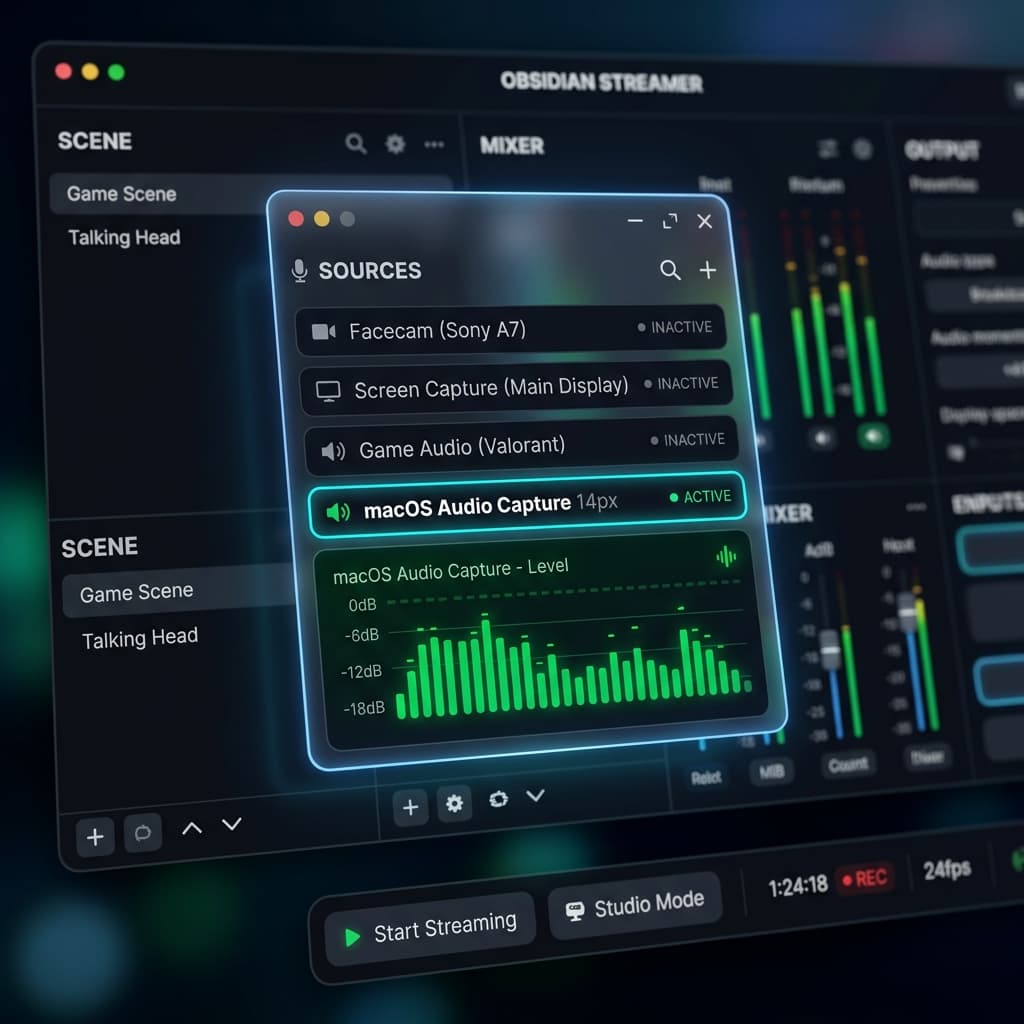
- In the Sources panel, click + → macOS Screen Capture for video
- Click + → macOS Audio Capture for internal audio
- Click + → Audio Input Capture if you also want microphone
- Set audio levels in the OBS mixer at the bottom
- Click Start Recording
For macOS 12 and earlier
You'll need BlackHole (see Method 2 for installation). In OBS:
- Create the Multi-Output Device as described above
- In OBS Sources, add Audio Input Capture → select BlackHole 2ch
- Add another Audio Input Capture for your physical microphone
Per-app audio capture (macOS 14+)
On macOS 14 Sonoma, OBS supports Application Audio Capture — you can select a specific app and only record its audio, without capturing sounds from other apps. This is the most granular option available:
- In Sources, click + → Application Audio Capture
- Select the app from the dropdown (e.g., Safari, Chrome, Zoom)
- Only that app's audio will be recorded
Limitations
- OBS has no editor — your recording needs post-processing in another app
- Audio mixing requires manual level adjustment; there's no automatic balancing
- The interface is complex for users who just want to record screen + audio
Method 4: Loopback by Rogue Amoeba (Pro-Grade Audio Routing)

Loopback is a commercial app ($118) that creates virtual audio devices with per-app routing. It's overkill for basic screen recording but powerful if you need precise control over which apps are captured.
Steps
- Download Loopback and install it
- Create a new virtual device in Loopback
- Add the specific apps whose audio you want to capture as sources
- Set the virtual device as the audio input in your screen recording app (QuickTime, OBS, Screenify, etc.)
- Record as usual
When Loopback makes sense
- You're a podcaster recording both your mic and a Zoom call as separate sources
- You need to capture audio from one specific app while ignoring everything else
- You're doing audio production work and need routing flexibility beyond screen recording
For most screen recording use cases, Loopback is significantly more expensive and complex than necessary. Screenify Studio or OBS handle the common scenario (capture all system audio + mic) without the $118 price tag.
Troubleshooting
No internal audio in the recording
- Check your audio output — Go to System Settings → Sound → Output. If using BlackHole, make sure the Multi-Output Device is selected. If using Screenify Studio, the app handles routing automatically.
- Check app-specific volume — some apps (Zoom, Spotify) have their own volume controls that are independent of the system volume. Make sure the app isn't muted.
- Restart the recording app — if you granted audio permissions after the app was already open, quit and relaunch it.
Audio plays through speakers but isn't in the recording
This means audio is reaching your speakers but not the virtual device:
- In the Multi-Output Device (Audio MIDI Setup), verify BlackHole 2ch is checked
- In your recording app, make sure the audio input is set to BlackHole 2ch, not your microphone
- In Screenify Studio, make sure the System Audio toggle is enabled (it's separate from Microphone)
Can hear myself talking through speakers during recording
This happens when your microphone audio is routed through the Multi-Output Device. Solutions:
- Use headphones instead of speakers during recording
- In Screenify Studio, this doesn't happen — the mic track is isolated from the system audio routing
Internal audio has echo or feedback
This typically occurs when a communication app (Zoom, Teams) receives its own output back through the virtual audio device:
- Use headphones to prevent speaker audio from being picked up by your microphone
- In Zoom, go to Settings → Audio → Suppress Background Noise and enable echo cancellation
BlackHole not showing up in Audio MIDI Setup
- Verify the installation completed successfully. Open Terminal (Applications → Utilities) and type: the BlackHole installer places files in /Library/Audio/Plug-Ins/HAL. If the folder is empty or missing, the install failed.
- Re-download the installer from existential.audio/blackhole and run it again. Make sure you enter your Mac password when prompted — without admin privileges the driver won't install.
- On macOS Sequoia and later, Apple tightened security for audio drivers. You may need to allow the driver in System Settings → Privacy & Security → Security — look for a message about blocked system software and click Allow.
Audio volume is different in the recording than what you heard
When using a Multi-Output Device, the system volume slider has no effect — it's grayed out. This means the audio is captured at full volume regardless of how quiet your speakers were. To control the volume in the recording:
- Adjust volume within individual apps before recording (e.g., lower the volume slider in Spotify or your browser tab)
- In OBS, use the Audio Mixer sliders to reduce the capture volume before you start
- In Screenify Studio, adjust the system audio level in the recording panel or in the editor after recording
Tips for Clean Internal Audio Capture
Mute notification sounds before recording. Go to System Settings → Notifications → Notification Centre and enable Do Not Disturb. macOS alert sounds (new email, Calendar reminders, Messages) are system audio and will be captured in your recording. Once embedded in the audio track, they're hard to remove without cutting that section.
Close apps with background sounds. Music players, video sites in background tabs, and communication apps (Slack, Discord, Teams) can produce unexpected sounds mid-recording. Quit or mute anything that might generate audio you don't want in the final file.
Test your setup with a short recording first. Before committing to a long session, record 15 seconds with audio playing from the app you want to capture. Play it back to confirm the internal audio is present and at the right volume. This catches routing issues, missing permissions, and wrong device selections before they waste your time.
Use headphones for monitoring. When you wear headphones during recording, you hear exactly what your Mac is outputting without speakers coloring the sound. If you're also recording your mic, headphones prevent system audio from leaking into the microphone track.
Check sample rates match. If your recording has clicks, pops, or pitch problems, the audio sample rate may be mismatched between your playback device and the virtual audio driver. Open Audio MIDI Setup, click each device (Built-in Output, BlackHole), and verify they both show the same format — 48,000 Hz is the standard for video work.
Try Screenify Studio — free, unlimited recordings
Auto-zoom, AI captions, dynamic backgrounds, and Metal-accelerated export.
FAQ
What's the difference between internal audio and system audio?
They mean the same thing. "Internal audio," "system audio," "desktop audio," and "computer audio" all refer to the sound output from your Mac — app sounds, media playback, notifications, and anything else your speakers would normally play.
Can I capture internal audio without recording my screen?
Yes. In QuickTime, go to File → New Audio Recording and select BlackHole as the input. In OBS, you can start an audio-only recording. Loopback creates virtual devices that any audio app can use as an input source. Screenify Studio is screen-focused and always records video with audio.
Does routing audio through BlackHole add latency?
BlackHole adds negligible latency (less than 1ms). You won't notice any delay in your audio playback or recording. The audio is digital pass-through, not processed.
Will this capture DRM-protected audio from Netflix or Spotify?
DRM-protected apps may output silence or static to virtual audio devices. Netflix and Apple TV+ actively block audio capture. Spotify's desktop app may work depending on your setup, but this varies by version and platform. Recording DRM content may violate terms of service.
Can I record internal audio from a specific browser tab?
Not directly with most tools. Browser-level audio isolation requires either OBS Application Audio Capture (macOS 14+, captures per-app but not per-tab) or browser-specific extensions. The simplest workaround: mute the tabs you don't want before recording.
Do I need to reinstall BlackHole after macOS updates?
Occasionally, yes. Major macOS updates (e.g., Ventura to Sonoma) may disable or remove third-party audio drivers. After a major update, check if BlackHole appears in Audio MIDI Setup. If not, reinstall it. This is one advantage of apps like Screenify Studio that manage their audio driver automatically.
Can I record internal audio from a Zoom or Google Meet call?
Yes. Communication apps output audio through your Mac's sound system like any other app. Screenify Studio, OBS, and BlackHole all capture call audio. However, be mindful of consent and privacy — recording someone without their knowledge may violate local laws and the platform's terms of service. Inform all participants before recording.
Does recording internal audio slow down my Mac?
The audio capture itself is negligible — virtual audio drivers add less than 1% CPU overhead. The performance impact comes from the screen recording and video encoding running alongside it. On Apple Silicon Macs, the combination of screen recording and audio capture runs smoothly even with resource-heavy apps open.
Related Guides
Try Screenify Studio
Record your screen with auto-zoom, AI captions, dynamic backgrounds, and Metal-accelerated export. Free plan, unlimited recordings.
Download Free


