How to Add Captions to a Video on Mac
Step-by-step methods to add captions and subtitles to video on Mac — auto-generated AI captions, SRT files, and manual options compared.

A video without captions loses 80% of mobile viewers who scroll with sound off. It also shuts out deaf and hard-of-hearing audiences, fails accessibility audits, and ranks lower on platforms that index spoken content. Captions are not a nice-to-have — they are the difference between a video people watch and one they skip.
macOS does not have a built-in "add captions to video" button. QuickTime Player plays existing subtitle tracks but cannot create them. iMovie has limited caption support through its title system. To get real captions — timed to speech, editable word-by-word, exportable as SRT — you need to pick one of the methods below.
This guide covers four approaches: iMovie's workaround using titles, Screenify Studio's AI-powered auto-captioning, DaVinci Resolve's dedicated subtitle track, and Adobe Premiere Pro's speech-to-text engine. Each method has different tradeoffs between automation, accuracy, and control.
Quick comparison
| Tool | Price | Captioning method | Difficulty |
|---|---|---|---|
| iMovie | Free (pre-installed) | Manual title overlays (no true subtitle track) | Easy but tedious |
| Screenify Studio | Free + Pro plans | AI auto-transcription, word-level timing | Easy |
| DaVinci Resolve | Free edition available | Manual subtitle track + SRT import/export | Medium |
| Adobe Premiere Pro | $23/month (Creative Cloud) | Speech-to-text AI, full subtitle panel | Medium |
The fundamental split is manual versus automatic. iMovie and DaVinci Resolve (free) require you to type every word and set every timestamp by hand. Screenify Studio and Premiere Pro use speech recognition to generate captions automatically, then let you correct mistakes. If your video has more than 30 seconds of speech, automatic transcription saves hours of work.
Captions vs. subtitles — a quick distinction
Captions transcribe all audio: speech, sound effects ("[door slams]"), music cues ("[upbeat jazz]"), and speaker identification. They are designed for viewers who cannot hear the audio. Subtitles translate spoken dialogue into another language, assuming the viewer can hear non-speech audio. In practice, most Mac tools use the terms interchangeably, and the workflow for creating both is identical — you are placing timed text over video. This guide uses "captions" throughout but every method works for subtitles too.
Method 1: iMovie (manual title-based captions)
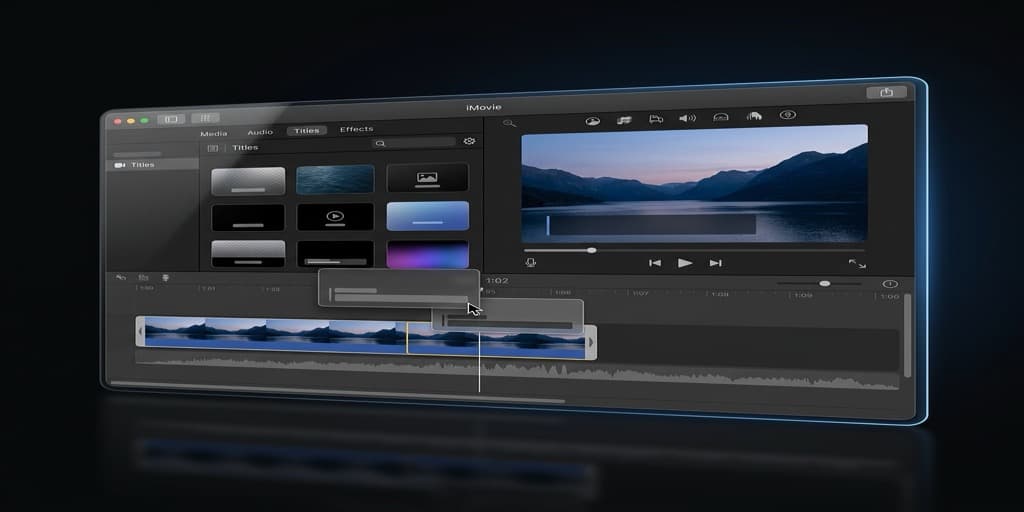
iMovie does not have a dedicated caption or subtitle feature. The workaround is using the Lower Third title template as a manual caption — you create one title block per sentence, position it at the bottom of the frame, and time each block to match the speech.
Step-by-step
- Open iMovie and create a new project: Create New > Movie.
- Import your video clip by clicking Import Media or dragging from Finder into the media browser.
- Drag the clip to the timeline.
- Click the Titles tab above the media browser.
- Find the Lower Third template. It places text in the bottom portion of the frame — the standard position for captions.
- Drag the Lower Third title onto the timeline, positioned above your clip at the exact point where the first sentence begins. Scrub the playhead to find the right frame.
- Double-click the title in the timeline to edit the text. Type the first caption line — keep it under 42 characters per line (two lines maximum) for readability.
- Drag the right edge of the title block to match the duration of the spoken sentence. Play back to verify timing.
- Repeat for every sentence in the video. For a 5-minute video with normal speech pacing, expect to create 50–80 individual title blocks.
- Adjust font and size. Click the title in the timeline, then use the font controls above the preview canvas. Choose a clean sans-serif font at a size large enough to read on mobile (the default iMovie sizes usually work).
Why this method is painful
There is no way around it: manually creating caption blocks in iMovie is extremely time-consuming. A 5-minute video takes 30–60 minutes of careful timing work. There is no SRT import, no auto-transcription, and no way to export the captions as a separate file. The text is burned into the video permanently — you cannot toggle captions on or off during playback.
Use this method only for very short clips (under 60 seconds) where you need captions and refuse to install another app. For anything longer, the tools below will save you significant time.
Method 2: Screenify Studio (AI auto-captioning)

Screenify Studio generates captions automatically using AI speech recognition. You click a button, wait a few seconds, and get word-level captions placed on the timeline — already synced to your narration. The workflow takes 90% less time than manual methods.
Step-by-step
- Open Screenify Studio. If you just recorded a screen capture, the editor loads automatically. Otherwise, open a recording from the dashboard.
- In the editor, click Captions in the right panel.
- Click Generate. Screenify sends the audio track through its AI transcription engine. Processing time depends on video length — a 5-minute recording typically takes 10–15 seconds.
- Captions appear on the timeline as individually timed word blocks. Each word has its own start and end timestamp, so the caption highlights words in sync with speech (karaoke-style) rather than displaying entire sentences at once.
- Review the transcript in the caption panel. Click any word to edit it — fix names, technical terms, or any misrecognized words. The AI handles conversational English well but may stumble on product names, acronyms, or heavily accented speech.
- Adjust the caption style. Choose from preset styles or customize: font family, font size, text color, background color (semi-transparent black is the standard), position (bottom center, top center, or custom coordinates), and animation (word-by-word highlight, fade, or static).
- For multi-line captions, set the maximum characters per line in the caption settings. Screenify auto-wraps based on this limit, so long sentences split naturally across two lines.
- If a timestamp is slightly off — a word appears 200ms too early — click the word on the timeline and drag its edges to adjust. You rarely need to do this; the AI timing is usually accurate within 100ms.
Exporting with captions
When you export from Screenify Studio, captions are burned into the video (hardcoded). This means they display on every platform without relying on the player's subtitle support — essential for social media where embedded SRT files are often ignored.
For recordings you share via Screenify's link sharing, viewers see captions automatically in the web player. They can toggle captions on or off using the CC button, giving them the choice without requiring you to upload separate SRT files.
The AI caption feature is included in the free plan for recordings up to 5 minutes. Longer recordings require a Pro plan.
Download Screenify Studio — AI captions included in the free plan.
Try Screenify Studio — free, unlimited recordings
Auto-zoom, AI captions, dynamic backgrounds, and Metal-accelerated export.
Method 3: DaVinci Resolve (subtitle track + SRT support)
DaVinci Resolve's free edition includes a proper subtitle track system — a dedicated lane on the timeline designed for timed text. It also supports importing and exporting SRT, VTT, and other subtitle formats, making it the right choice if you need to deliver caption files alongside your video.
Adding captions manually
- Launch DaVinci Resolve and open your project (or create a new one from the Project Manager).
- Switch to the Edit page (Shift + 4).
- Import your clip and drag it to the timeline.
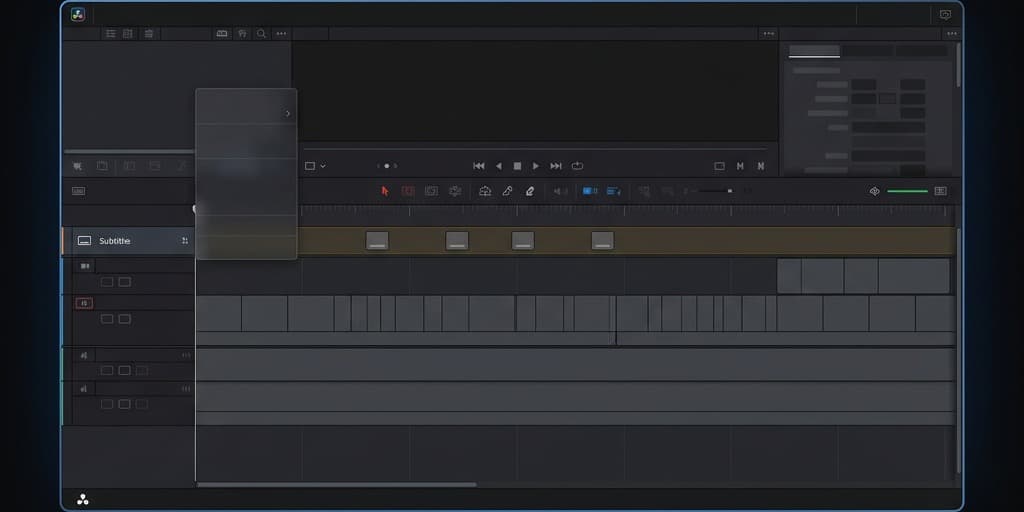
- Right-click on the timeline area above the video tracks and select Add Subtitle Track. A new lane labeled "Subtitle 1" appears above your video tracks.
- Position the playhead at the start of the first spoken sentence.
- Right-click on the subtitle track at the playhead position and select Add Subtitle. A subtitle block appears on the track.
- In the Inspector panel (top-right), the Captions tab shows the text field. Type the first caption line.
- Drag the edges of the subtitle block on the timeline to match the speech duration. Use the waveform on the audio track as a visual guide — speech segments are visible as peaks.
- Move the playhead to the next sentence and repeat. DaVinci Resolve lets you use keyboard shortcuts to speed this up: press Shift + S to add a new subtitle at the playhead position.
- Continue until all speech is captioned.
Importing an SRT file
If you already have captions in SRT format (from a transcription service, YouTube auto-captions, or another tool), you can import them directly:
- Ensure a subtitle track exists on your timeline (step 4 above).
- Right-click the subtitle track and select Import Subtitle > choose your .srt file.
- DaVinci Resolve places each caption at its designated timestamp. Review the timing and edit any text that needs correction.
Styling captions
Select any subtitle block, then use the Inspector's Style section to adjust:
- Font: Any font installed on your Mac
- Size: Measured in points; 48pt works well for 1080p output
- Color: Text color, background fill color, and background opacity
- Position: Vertical position from the bottom of the frame
- Outline: Stroke color and width — useful for readability over varied backgrounds
Style changes apply per-subtitle or globally (select all subtitles with Cmd + A first).
Exporting captions
DaVinci Resolve offers two export paths:
Burn-in (hardcoded): On the Deliver page, check Burn In Subtitles in the subtitle settings. Captions become part of the video file and display everywhere.
Separate file: On the Deliver page, check Export Subtitle and choose the format (SRT, VTT, etc.). This creates a sidecar file alongside the video. Use this when uploading to YouTube, Vimeo, or any platform that supports subtitle tracks — the viewer can toggle captions on or off.
Method 4: Adobe Premiere Pro ($23/month)
Adobe Premiere Pro includes a built-in Speech to Text engine that auto-transcribes audio and creates caption tracks. It is the most polished auto-captioning workflow among traditional video editors, but it requires an active Creative Cloud subscription.
Auto-generating captions
- Open Premiere Pro and create a new project. Import your video and drag it to the timeline.
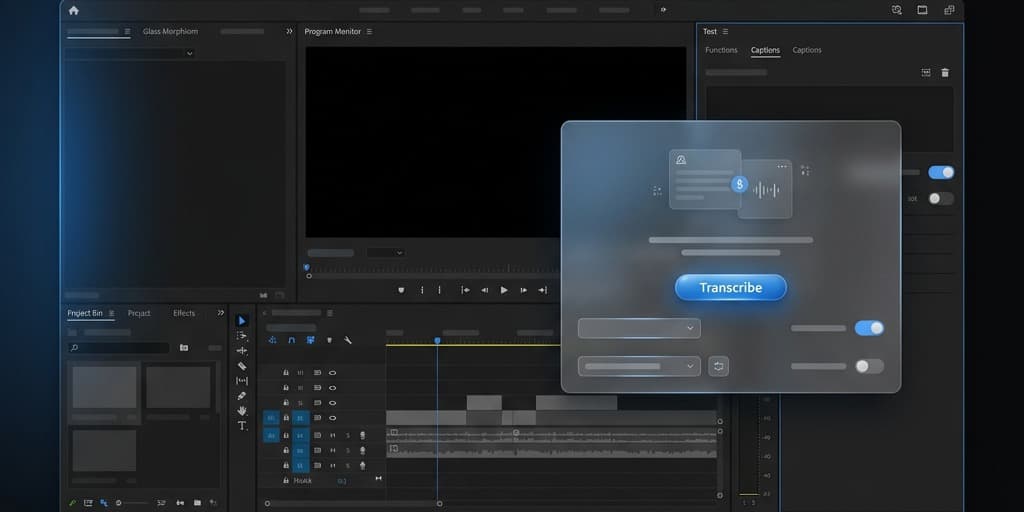
- Go to Window > Text to open the Text panel (or press Captions and Graphics workspace).
- In the Text panel, click Transcribe Sequence. Choose the language and the audio track to analyze. Click Transcribe.
- Premiere Pro processes the audio. Transcription time is roughly 1:1 with video duration — a 5-minute video takes about 5 minutes to transcribe. Results appear in the Text panel as a scrollable transcript with timestamps.
- Review and edit the transcript. Click any word to correct it. Premiere Pro highlights the corresponding audio region, so you can listen while editing.
- Once the transcript is clean, click Create Captions at the top of the Text panel. Choose your caption format:
- Subtitle: Standard caption track below the program monitor
- Teletext or CEA-608/CEA-708: Broadcast-standard caption formats (rarely needed for web content)
- Set line length (32–42 characters is standard), minimum duration (1.5 seconds), and gap between captions (2–4 frames).
- Click Create. Premiere Pro converts the transcript into timed captions on a dedicated caption track in the timeline.
- Each caption block can be individually selected and edited on the timeline or in the Text panel. Drag edges to adjust timing.
Styling captions in Premiere Pro
Select the caption track, then use the Essential Graphics panel to style:
- Font, size, and color
- Background: color and opacity (the classic semi-transparent black bar)
- Edge type: drop shadow, raised, depressed, or uniform outline
- Position: Premiere Pro defaults to bottom-center but you can reposition freely
Apply a style to all captions at once by selecting one, setting the style, then choosing Sync Style > Apply to All Captions.
Exporting
File > Export > Media (Cmd + M). In the Export Settings:
- Captions tab: Choose Burn Captions Into Video for hardcoded captions, or Create Sidecar File and pick SRT or VTT for a separate caption file.
- YouTube and social media: burn-in is safer since not all platforms handle sidecar files reliably.
- If delivering to a client or broadcaster: export as sidecar SRT so they can adjust timing or translate.
Try Screenify Studio — free, unlimited recordings
Auto-zoom, AI captions, dynamic backgrounds, and Metal-accelerated export.
Troubleshooting
AI captions misrecognize technical terms or names
Every speech recognition engine struggles with jargon, product names, and uncommon proper nouns. After auto-generating captions in Screenify Studio or Premiere Pro, search the transcript for known problem words. In Screenify, click any word in the caption panel to edit it. In Premiere Pro, use Cmd + F in the Text panel. Common fixes: "Screenify" misheard as "screen a fly," "macOS" transcribed as "Mac OS" (which may or may not match your style preference), API names rendered phonetically.
Captions are out of sync with speech
If captions consistently appear 500ms early or late, the issue is usually a mismatch between audio and video tracks. In DaVinci Resolve, right-click the audio clip and check Clip Attributes — confirm the sample rate matches your project setting (48kHz is standard). In Premiere Pro, check Sequence > Sequence Settings and verify the audio sample rate. In Screenify Studio, re-generate captions if timing drifts — the AI re-analyzes the audio from scratch.
Caption text overflows the frame on mobile
Mobile screens are narrow, so captions with long lines wrap unpredictably. Limit each caption line to 32 characters (42 max). Use a font size that fills roughly the bottom 15% of the frame at 1080p — anything larger gets cropped on phones. Test by previewing the video at phone resolution (1080x1920 vertical or 1920x1080 horizontal scaled to a 6-inch screen).
Exported SRT file has wrong timestamps
DaVinci Resolve and Premiere Pro use the timeline timecode as the reference for SRT timestamps. If your timeline starts at 01:00:00:00 (common in broadcast workflows) instead of 00:00:00:00, the SRT timestamps will be offset by one hour. In DaVinci Resolve, right-click the timeline and set Starting Timecode to 00:00:00:00 before exporting subtitles. In Premiere Pro, change the sequence start time in Sequence Settings.
Captions look different on YouTube than in the editor
When you upload a sidecar SRT to YouTube, YouTube applies its own default caption style — white text with a semi-transparent black box. Your editor's font, color, and positioning are ignored. To preserve your exact caption style, burn captions into the video before uploading. The tradeoff: viewers cannot turn them off or resize them. If accessibility flexibility matters more than visual consistency, upload the SRT separately and accept YouTube's styling.
FAQ
Q: Can I auto-generate captions on Mac for free?
Yes, with limitations. Screenify Studio's free plan includes AI captioning for recordings up to 5 minutes. DaVinci Resolve (free) supports SRT import but has no built-in auto-transcription — you would need to generate the SRT using a free web service (like YouTube's auto-captions, which you can download as SRT) and then import it. For unlimited auto-captioning without a subscription, Screenify Studio's Pro plan or a one-time purchase tool is the most cost-effective path.
Q: What is an SRT file and do I need one?
SRT (SubRip Subtitle) is a plain text file containing numbered captions with timestamps. Each entry has an index, a start/end time, and the caption text. SRT files are the universal subtitle format — YouTube, Vimeo, LinkedIn, Facebook, and most video players accept them. You need an SRT file if you are uploading to a platform that supports toggleable captions. If you are burning captions directly into the video, an SRT file is optional but useful as a backup or for future translations.
Q: How many characters should fit on one caption line?
The broadcast standard is 32 characters per line, with a maximum of two lines visible at once. For web video, you can stretch to 42 characters per line without readability issues on most screens. Avoid three-line captions — they cover too much of the frame and are hard to read quickly. If a sentence is too long, break it at natural pause points: after commas, conjunctions, or clause boundaries.
Q: Should I burn captions in or use a separate subtitle file?
It depends on the platform. Burn in when: posting to social media (Instagram, TikTok, Twitter/X) where sidecar subtitles are unreliable or unsupported; when visual style consistency matters; when your audience watches on mute by default. Separate SRT when: uploading to YouTube or Vimeo (viewers can toggle, resize, and translate captions); when accessibility compliance requires user-controlled captions; when you plan to localize the video into multiple languages.
Q: How do I add captions to a screen recording with narration?
Record your screen with a microphone active — see our guide to screen recording with narration for setup details. Then open the recording in Screenify Studio, click Captions > Generate, and the AI transcribes your voiceover. Edit any technical terms the AI missed, style the captions, and export. The entire workflow from raw recording to captioned video takes under 5 minutes for a typical tutorial.
Q: Can I translate captions into another language?
DaVinci Resolve and Premiere Pro let you duplicate the subtitle track and manually translate each entry. Premiere Pro's transcription engine supports multiple languages for initial transcription (Spanish, French, German, Japanese, and more). For translation of existing English captions, export the SRT file, translate it (using a professional translator or a translation tool), and import the translated SRT as a new subtitle track. Screenify Studio currently supports English captions with additional languages planned.
Q: Do captions improve video SEO?
Yes, on platforms that index caption content. YouTube parses SRT files and auto-generated transcripts to understand video content, which influences search ranking and suggested video placement. Burned-in captions do not provide this benefit because YouTube cannot OCR text from video frames — only uploaded SRT or auto-generated transcripts are indexed. For maximum SEO value, upload both: burn captions into the video for social sharing and upload a clean SRT for YouTube's search index.
Q: What caption style is most readable?
White text with a semi-transparent black background box is the industry standard because it guarantees contrast against any video content. Sans-serif fonts (like Helvetica, Arial, or Inter) at 48–56px for 1080p output provide the best legibility. Avoid fully opaque backgrounds — they block too much of the frame. An opacity of 60–75% for the background box balances readability with visual unobtrusiveness. For speaker identification, use a different color per speaker (yellow for Speaker A, cyan for Speaker B) with the same background style.
Related guides
- How to Add Text and Titles to a Video on Mac — titles, lower thirds, and text overlays (different from captions)
- How to Screen Record on Mac — capture the source video
- How to Record Screen with Narration — record the voiceover that captions will transcribe
Try Screenify Studio
Record your screen with auto-zoom, AI captions, dynamic backgrounds, and Metal-accelerated export. Free plan, unlimited recordings.
Download Free


