How to Screen Record on Mac with Audio
Record your Mac screen with system audio, mic, or both — 4 methods from built-in tools to dedicated recorders.

Recording your Mac screen is straightforward. Recording it with audio — especially system audio — is where most people get stuck. The built-in macOS recorder only captures your microphone. If you need to record a video call, a tutorial with background music, or an app that produces sound, you need a different approach.
Here are four methods, starting with what your Mac can do out of the box.
Quick Comparison
| Tool | Price | System Audio | Mic Audio | Both at Once | Setup Time |
|---|---|---|---|---|---|
| macOS Screenshot Toolbar | Free (built-in) | No | Yes | Mic only | 0 min |
| Screenify Studio | Free / Pro $9.99/mo | Yes | Yes | Yes | 2 min |
| OBS + BlackHole | Free (open-source) | Yes | Yes | Yes | 15 min |
| Screen Studio | $89 one-time | Yes | Yes | Yes | 2 min |
Method 1: macOS Screenshot Toolbar (Mic Only)
The built-in recorder handles microphone audio natively but cannot capture system audio. This method works when you only need voiceover narration.
Steps
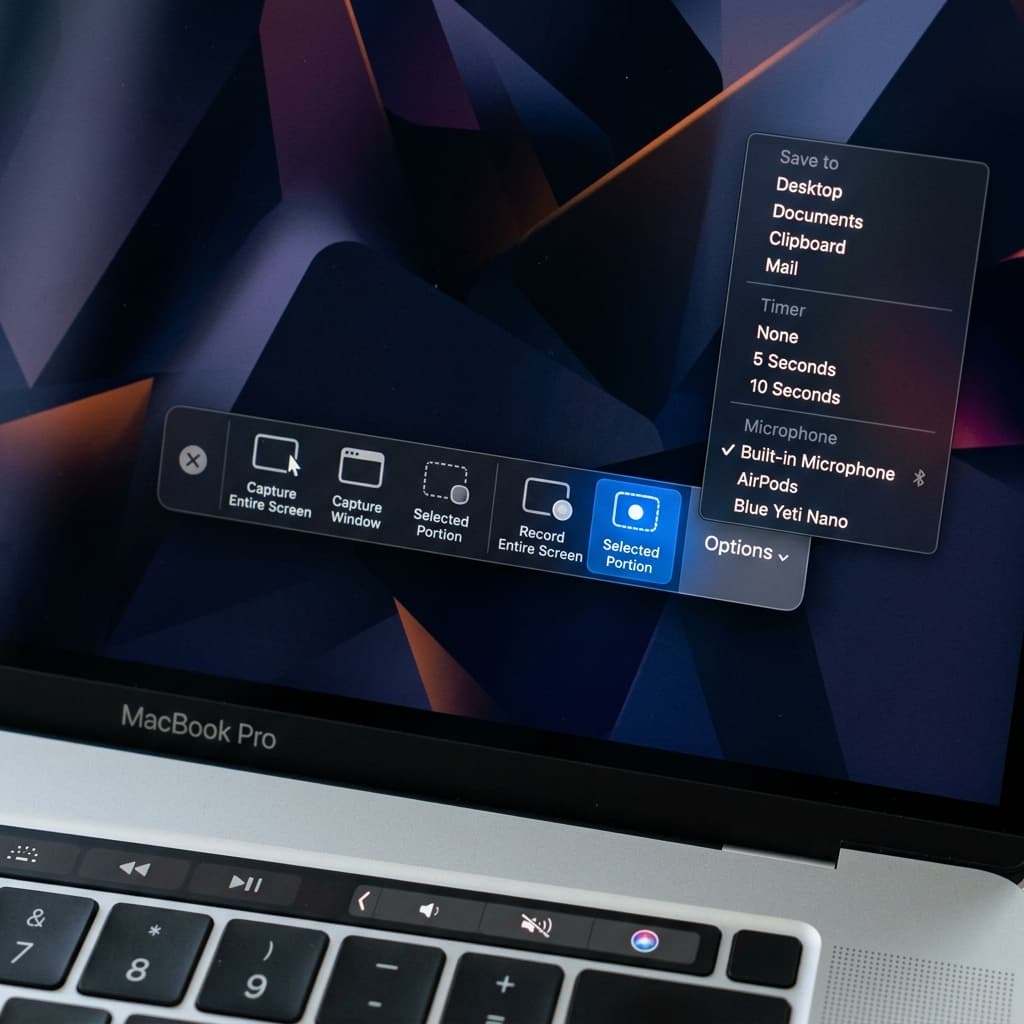
- Press ⌘ + Shift + 5 to open the Screenshot toolbar
- Choose Record Entire Screen or Record Selected Portion
- Click Options
- Under Microphone, select your input device from the list. Each available device shows separately:
- Built-in Microphone — the default Mac mic, located near the keyboard on MacBooks or near the top of the display on iMacs
- AirPods or other Bluetooth headsets — appear only when paired and connected
- External USB mic — shows the device name (e.g., "Blue Yeti", "Elgato Wave:3")
- If no microphone is selected, the recording will be completely silent
- Click Record or press Enter
- Speak at a consistent volume and distance from the mic during the recording. The built-in tool has no audio level meter, so you won't see whether your voice is actually being captured until playback.
- Stop recording with the ⏹ button in the menu bar or ⌘ + Control + Esc
- Play back the recording immediately to verify audio was captured. If the recording is silent, check that you selected a microphone in step 4.
Why there's no system audio option
Apple intentionally excludes system audio capture from the built-in recorder. This is partly for DRM protection — if the OS could trivially capture audio output, it would make it easy to rip music and video from streaming apps. The restriction applies to all apps at the OS level; recording apps that capture system audio use a virtual audio device to route the output.
When this method is enough
- Recording a voiceover walkthrough of a website or document
- Narrating code changes for a pull request
- Quick screen recordings where the audio is you talking, not the computer playing sounds
Method 2: Screenify Studio (System Audio + Mic)
Screenify Studio captures system audio without any additional setup. On first launch, it installs a lightweight audio driver that routes your Mac's sound output into the recording. You don't need to configure anything manually.
Steps
- Download Screenify Studio — the free plan includes audio capture with no limits
- Open the app. The recording controls appear in your menu bar.
- Choose your capture area: Full Screen, Window, or Custom Region
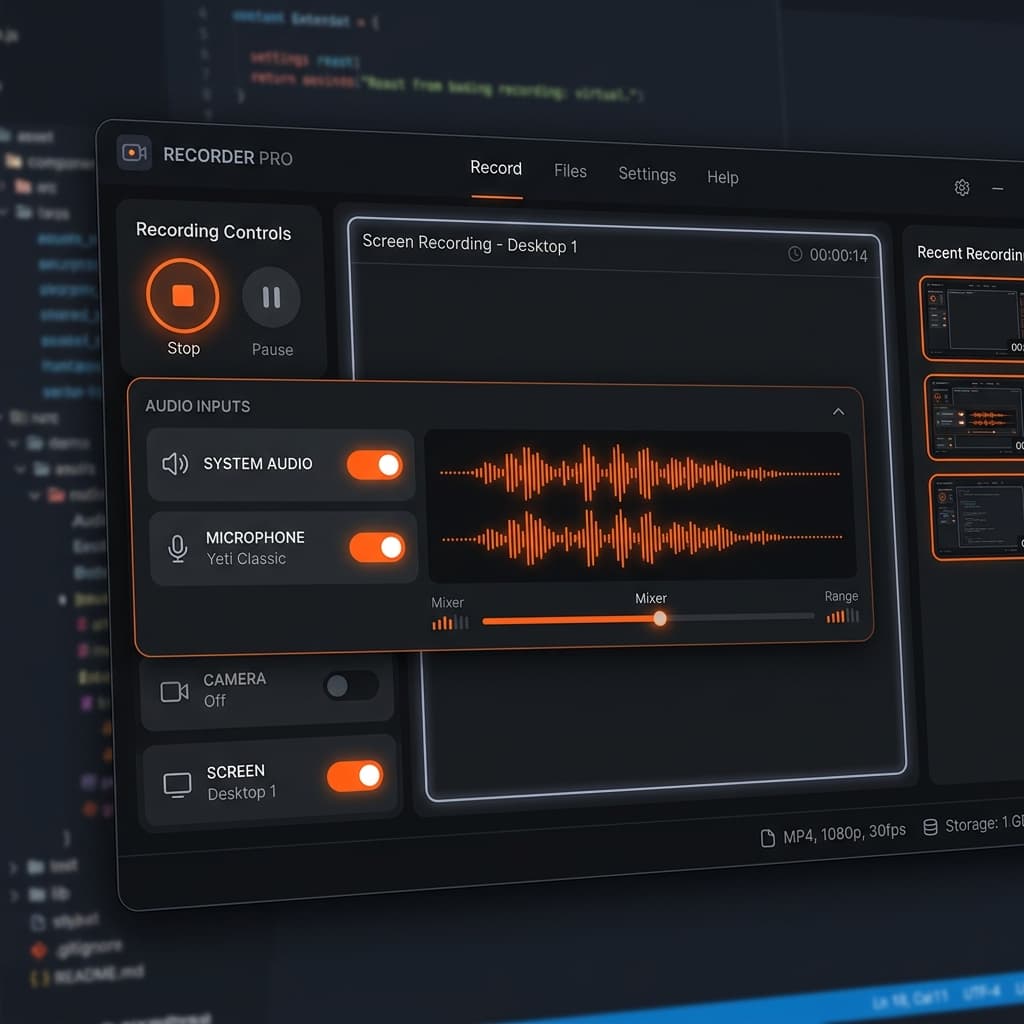
- In the audio panel, toggle:
- System Audio — captures everything your Mac is playing (apps, browser tabs, music)
- Microphone — captures your voice
- Enable both to record a narrated tutorial with app sounds
- Adjust the audio balance slider to set the relative volume between system audio and your mic — useful when you don't want app sounds to drown out your narration
- Press ⌃ + ⌘ + R or click Record
- Stop with the same shortcut
- In the editor, you'll see separate audio waveforms for system and mic — you can adjust levels, mute, or trim each track independently
Audio features in the editor
After recording, the editor gives you control over each audio source:
- Per-track volume — boost your mic if it was too quiet, lower system audio if it was too loud
- Noise reduction — reduces background hum, fan noise, and keyboard clatter from your mic track
- AI Captions — generates subtitles from your narration (on-device, no internet required). The caption engine works with the mic track specifically, so system audio doesn't interfere with transcription accuracy.
Export
Audio exports in AAC format embedded in your chosen video container (MP4 or MOV). The Metal-accelerated export pipeline processes both video and audio tracks simultaneously.
Try Screenify Studio — free, unlimited recordings
Auto-zoom, AI captions, dynamic backgrounds, and Metal-accelerated export.
Method 3: OBS Studio + BlackHole (Free, Open-Source)
OBS can capture system audio on macOS 13 Ventura and later using the native macOS Audio Capture source. On older macOS versions, you need BlackHole — a free, open-source virtual audio driver.
Steps for macOS 13+
- Download OBS Studio and open it
- On first launch, macOS will ask for Screen Recording permission. Click Open System Settings and toggle OBS on in Privacy & Security → Screen Recording. Quit and relaunch OBS after granting permission.
- In the Sources panel at the bottom of the OBS window, click + → macOS Screen Capture to add your display
- Click + → macOS Audio Capture — this captures desktop audio natively without any virtual driver
- Click + → Audio Input Capture for your microphone. In the properties dialog, select your mic from the Device dropdown.
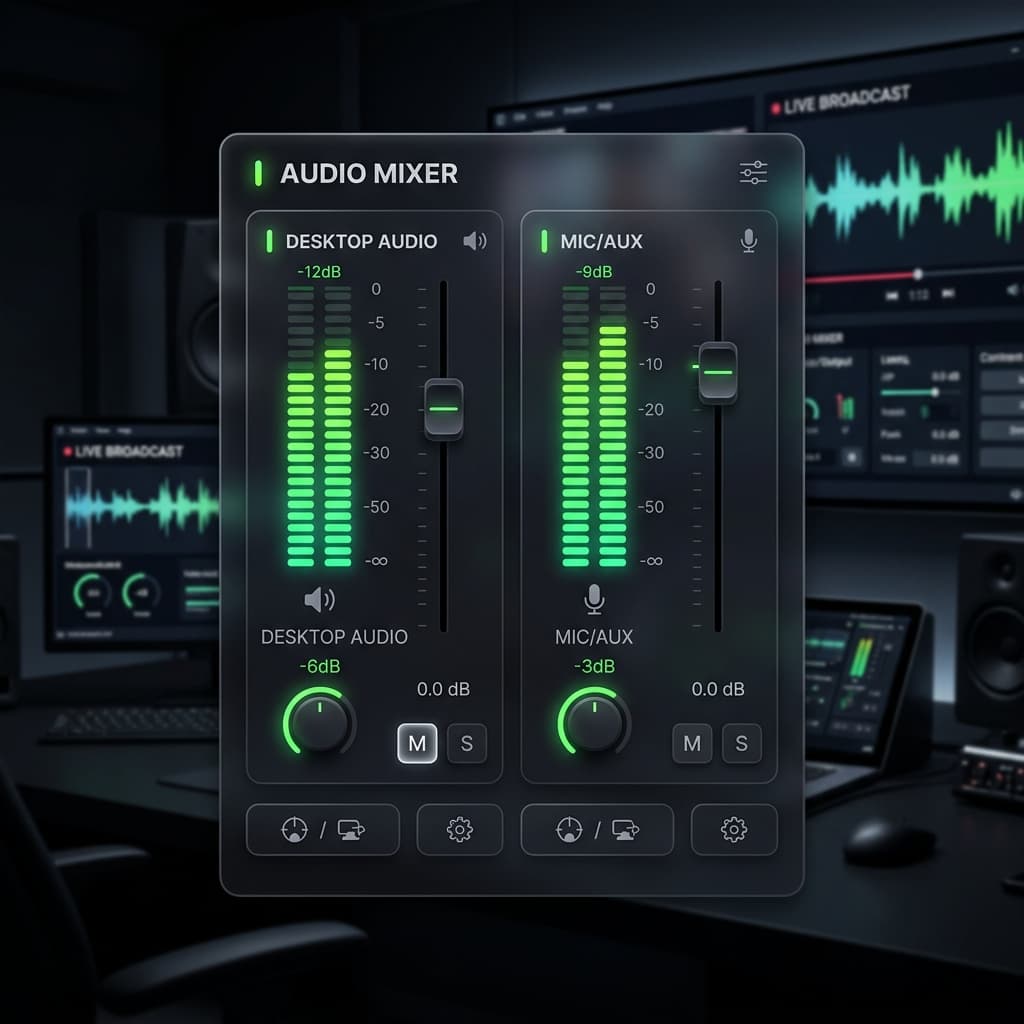
- Check the Audio Mixer panel at the bottom. You'll see volume meters for each audio source. Adjust the sliders so system audio and mic levels are balanced — the meters should peak in the yellow range during normal volume, never hitting red.
- Click Start Recording in the Controls panel on the right side
- When done, click Stop Recording. The file saves to the location set in Settings → Output → Recording Path.
Steps for macOS 12 and earlier (BlackHole required)
- Download BlackHole 2ch and install it. The installer requires your Mac password and a restart of the audio service.
- Open Audio MIDI Setup (find it in Applications → Utilities, or press ⌘ + Space and type "Audio MIDI Setup")
- Click the + button at the bottom-left corner of the window → Create Multi-Output Device
- In the right panel, check both your Built-in Output (or your speakers/headphones) and BlackHole 2ch. Make sure Built-in Output is listed first — this ensures sound still plays through your speakers.
- Right-click the new Multi-Output Device in the left sidebar → Use This Device for Sound Output
- In OBS, add an Audio Input Capture source and select BlackHole 2ch as the device in the properties dialog
- Add another Audio Input Capture source for your physical microphone
- Check levels in the Audio Mixer and start recording
Important: Undo the audio routing after recording
If you used the BlackHole Multi-Output Device method, remember to switch your sound output back to your normal speakers when you're done. Otherwise, some apps may behave unexpectedly with audio routing.
Limitations
- BlackHole setup is a one-time hassle, but it confuses people who aren't comfortable with Audio MIDI Setup
- OBS has no built-in editor — you'll need to edit your recording in another app
- Audio levels between system and mic aren't balanced automatically — you'll need to set input levels manually in the OBS mixer
Method 4: Screen Studio (System Audio Built-in)
Screen Studio handles system audio similarly to Screenify — it installs a virtual audio driver on first launch and captures system sound automatically.
Steps
- Download Screen Studio and launch it
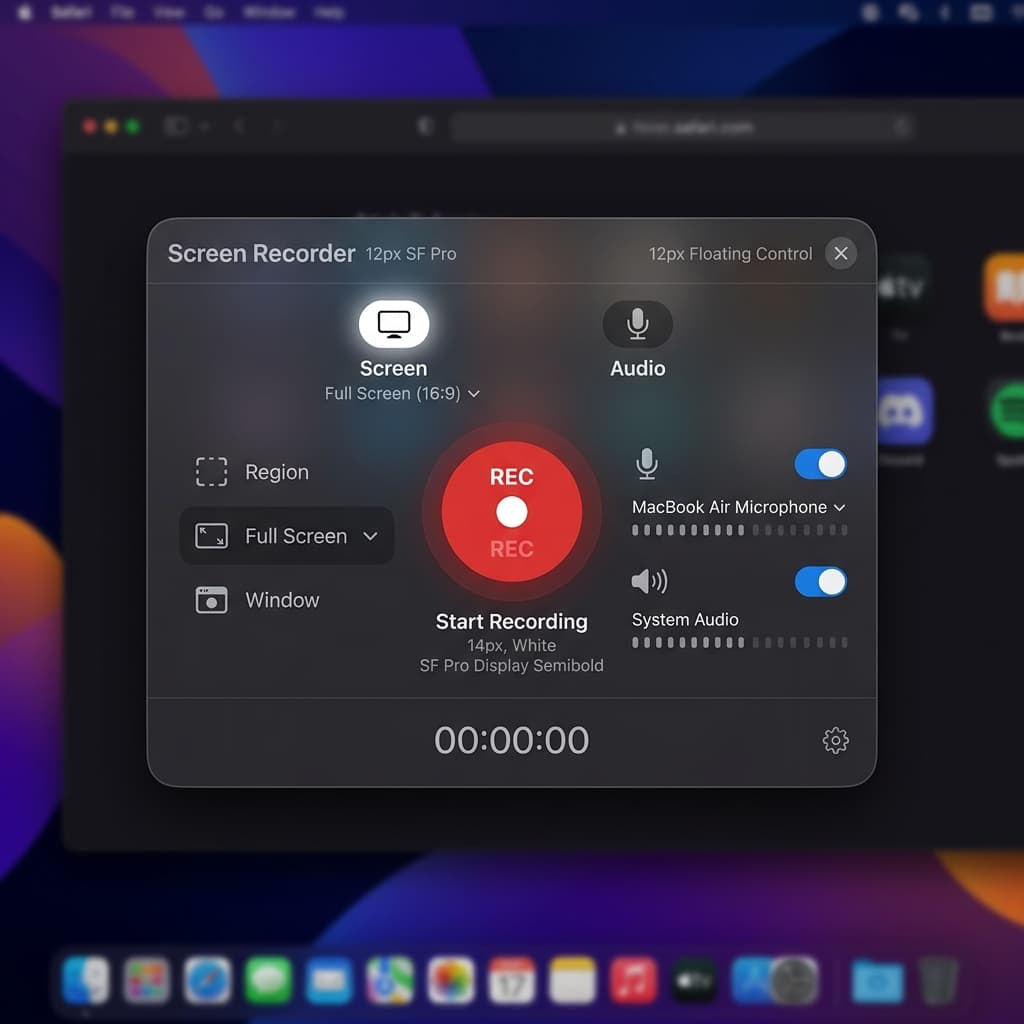
- Select your recording area
- Enable system audio and microphone in the recording panel
- Click Record
- Stop recording when done
- In the editor, adjust audio levels and apply zoom effects
- Export as MP4 or GIF
How it compares on audio
Screen Studio captures both system and mic audio reliably. The main differences from Screenify Studio:
- No per-track editing — you can adjust overall volume but can't independently control system vs. mic tracks after recording
- No AI captions — you'll need a separate tool to generate subtitles
- No noise reduction — background noise in your mic track stays in the final export
- Price — $89 one-time with no free tier. Screenify's free plan includes full audio capture.
Troubleshooting
System audio not being captured
If you've enabled system audio in your recording app but the output is silent:
- Check System Settings → Sound → Output — make sure it's set to the correct device (your speakers, headphones, or the app's virtual audio driver)
- Make sure the app producing sound isn't muted at the OS level. Open System Settings → Sound and check the output volume slider.
- Some apps (Zoom, FaceTime, Spotify) route audio through their own pipeline. Quit and reopen the app after starting your screen recorder.
- If using BlackHole, verify the Multi-Output Device is selected as your output in System Settings.
Microphone sounds distant or echoey
- Move closer to your mic, or use an external mic instead of the built-in one
- In Screenify Studio, enable noise reduction in the editor to clean up the mic track
- AirPods and Bluetooth headsets often produce lower quality mic audio than wired options — the Bluetooth HFP profile limits bandwidth
Audio is out of sync with video
Audio drift typically happens with long recordings (30+ minutes) or when using Bluetooth audio devices:
- Use a wired microphone instead of Bluetooth
- In OBS, set the audio sample rate to 48kHz (matching the video timeline)
- Screenify Studio and Screen Studio handle sync automatically through their recording engines
Recording is capturing audio from the wrong app
If you only want audio from a specific app (e.g., a browser tab), but your recorder captures everything:
- Screenify Studio captures all system audio — to isolate a single app, mute other apps before recording
- In OBS, use the Application Audio Capture source (macOS 13+) to select a specific app's audio output
- On older macOS, there's no native way to capture per-app audio without third-party tools
Mic audio is too quiet in the recording
- Check your input volume in System Settings → Sound → Input. Drag the Input Volume slider to the right to increase sensitivity.
- Move the microphone closer to your mouth. USB condenser mics work best at 6-12 inches distance. The built-in Mac microphone picks up more room noise the farther you sit.
- In OBS, right-click your mic source in the Audio Mixer → Advanced Audio Properties → increase the volume percentage above 100% for additional gain.
- If using AirPods or Bluetooth headsets, the Bluetooth HFP (Hands-Free Profile) limits audio bandwidth. Switch to a wired mic for better quality and higher volume.
System audio has crackling or popping sounds
- This usually means the system is under heavy CPU load while recording. Close unused applications and browser tabs.
- In OBS, go to Settings → Audio and make sure the sample rate is set to 48 kHz — mismatched sample rates between OBS and the audio source cause artifacts.
- If using BlackHole, check that your Multi-Output Device and BlackHole both use the same sample rate in Audio MIDI Setup. Click each device and verify the format shows the same Hz value.
Best Practices for Recording Audio
Do a 10-second test recording before the real take. Record a short clip, play it back, and listen for your mic level, system audio level, and any background noise. Catching problems in a test recording saves you from discovering a silent or distorted recording 20 minutes in.
Use headphones while recording with system audio. If you're narrating over app sounds, wearing headphones prevents the system audio from playing through your speakers and being picked up by your microphone. This eliminates echo and feedback loops.
Set your mic input level before recording, not after. Open System Settings → Sound → Input and speak at your normal recording volume. Adjust the input slider until the level meter shows consistent movement in the upper third without clipping. Screenify Studio and OBS both show real-time audio meters; watch these while doing your test.
Mute notifications and system sounds. Go to System Settings → Notifications and enable Do Not Disturb, or use Focus mode. macOS notification sounds, Mail alerts, and Calendar reminders will be captured in your system audio track and are nearly impossible to remove cleanly in post.
Record in a quiet room with soft surfaces. Hard walls, glass desks, and tile floors reflect sound and create reverb that makes your voice sound hollow. A room with carpet, curtains, or soft furniture absorbs sound reflections. Even draping a blanket over your desk improves mic quality noticeably.
Keep system audio and mic at similar levels. If app sounds are much louder than your narration, viewers constantly adjust their volume. In Screenify Studio, use the audio balance slider during recording. In OBS, set levels in the Audio Mixer so both sources peak at roughly the same height.
Try Screenify Studio — free, unlimited recordings
Auto-zoom, AI captions, dynamic backgrounds, and Metal-accelerated export.
FAQ
Can I record my Mac screen with system audio for free?
Yes. Screenify Studio's free plan captures system audio with no watermark or time limit. OBS Studio with the native macOS Audio Capture (macOS 13+) or BlackHole (older versions) is also completely free. The built-in macOS recorder cannot capture system audio at all.
Why doesn't the macOS built-in recorder capture system audio?
Apple restricts system audio capture at the OS level, primarily to prevent easy recording of DRM-protected content from streaming services. Third-party apps work around this by installing a virtual audio driver that routes system audio to the recording app.
Does capturing system audio reduce audio quality?
No. Virtual audio drivers like the ones used by Screenify Studio and Screen Studio capture the digital audio stream directly — there's no analog conversion or quality loss. The audio in your recording is identical to what your speakers would receive.
Can I record both system audio and microphone at the same time?
Yes, with Screenify Studio, OBS, and Screen Studio. All three support simultaneous capture. The built-in macOS recorder only supports microphone. In Screenify Studio, both tracks are recorded separately, so you can adjust their relative volume in the editor.
Will other people hear my recording in a Zoom call?
No. Screen recording apps capture your local audio output. Other participants in a Zoom or Google Meet call won't hear any difference. However, if you're using a Multi-Output Device (BlackHole method), make sure your Zoom audio input is set to your physical mic, not BlackHole.
How do I reduce background noise in my recording?
Screenify Studio includes a noise reduction filter in the editor that you can apply to your mic track after recording. For OBS, use the built-in Noise Suppression filter (RNNoise). Screen Studio doesn't include noise reduction — you'd need to use an external audio editor.
What audio format is best for screen recordings?
AAC at 128-256 kbps is the standard for screen recordings — it's compatible everywhere and sounds transparent for voice and app audio. Both MP4 and MOV containers support AAC. Avoid uncompressed audio (WAV/PCM) for screen recordings — the files are much larger with no perceptible quality improvement for spoken content.
Can I add audio to a screen recording after the fact?
Yes. If you recorded video without audio (or want to replace the audio), import the video file into iMovie, DaVinci Resolve, or any video editor and add a separate audio track. You can record a voiceover narration after the fact and sync it to the video. This approach works well when you want a polished script rather than ad-libbed narration.
How do I check if my recording has audio before sharing?
Open the recording file in QuickTime Player and look at the playback controls. If the file has an audio track, you'll see a volume slider. If the slider is missing or grayed out, the file has no audio. You can also right-click the file in Finder → Get Info and look under "More Info" for audio codec details.
Related Guides
Try Screenify Studio
Record your screen with auto-zoom, AI captions, dynamic backgrounds, and Metal-accelerated export. Free plan, unlimited recordings.
Download Free


