How to Auto-Zoom in Screen Recordings
Add automatic cursor-following zoom to Mac screen recordings — what auto-zoom is, when to use it, and 4 tools that do it.

You recorded a clean software walkthrough at 1440p. You preview it on your phone and — the buttons are unreadable, the form fields are tiny, and the menu you clicked is a blur of pixels. The fix isn't higher resolution. It's zoom. Specifically, zoom that moves with your cursor so viewers always see the thing you're interacting with, without you hand-animating keyframes in a timeline.
That's auto-zoom. And it has quietly become the single feature that separates "amateur screen capture" from "looks like a product demo the marketing team made." This guide breaks down what auto-zoom actually is, the three flavors you'll encounter, four tools that handle it (from fully automatic to fully manual), and the cases where you should turn it off entirely.
Quick Comparison
| Tool | Auto-Zoom Type | Price | Platform | Difficulty |
|---|---|---|---|---|
| Screenify Studio | Smart (click + cursor + ROI) | Free / Early Access | macOS | Easy |
| Screen Studio | Click-triggered keyframes | $89 one-time | macOS | Easy |
| Final Cut Pro / Premiere | Manual keyframes only | $299 / $22.99 mo | macOS / Cross | Hard |
| Tella | Preset zoom curves | Free / $15 mo | Web | Easy |
| QuickTime Player | None | Free | macOS | N/A |
| Screenshot Toolbar | None | Free | macOS | N/A |
Worth noting up front: the two recording tools built into macOS — QuickTime Player and the Screenshot Toolbar (Shift-Command-5) — have zero auto-zoom. They give you a flat capture of your screen and nothing else. If you need zoom, you need a different tool or a video editor. There's no hidden setting.
What Is Auto-Zoom (and Why It Matters)
Auto-zoom is a post-recording (or during-recording) effect that scales a portion of your video to fill the frame, then smoothly returns to full view. Think of it as a virtual camera operator pushing in on whatever your cursor is doing, then pulling back when the action stops.
The reason it matters has nothing to do with aesthetics and everything to do with where your viewers are watching. Analytics from most marketing dashboards show 50-70% of tutorial video traffic now comes from mobile devices. A 4-pixel-wide toggle in a settings panel, recorded at native Retina resolution, is literally invisible on a phone held at arm's length. You either zoom during editing or you accept that half your audience can't follow along.
There are three distinct flavors of auto-zoom, and they solve slightly different problems:
1. Click-triggered zoom. The tool watches for mouse clicks and generates a zoom-in keyframe at each click, holds for a beat, then zooms back out. Great for step-by-step UI tutorials where every click is a discrete action. Screen Studio popularized this approach. The downside: hovering demos (tooltips, menus, drag interactions) don't trigger zooms because there's no click.
2. Cursor-tracking zoom. The camera continuously follows your cursor with smooth interpolation — the viewport drifts wherever you point. Better for dragging, hover states, and long interactions. The risk is motion sickness if the interpolation is too aggressive. Done well, it feels like a steady camera op; done badly, it feels like someone shaking a GoPro.
3. Region-of-interest (ROI) detection. The most modern approach: the tool analyzes the full recording to figure out where the action actually is — click bursts, cursor velocity changes, UI regions that update — and generates zoom segments automatically. You still get to edit them. Screenify Studio's Smart Auto-Zoom falls in this category, and it's the one I'll spend the most time on because it's the least-understood.
A well-implemented auto-zoom system uses a blend: clicks as anchors, cursor velocity as a secondary signal, and holds long enough for viewers to read the UI before moving on.
Method 1: Screenify Studio — Smart Auto-Zoom
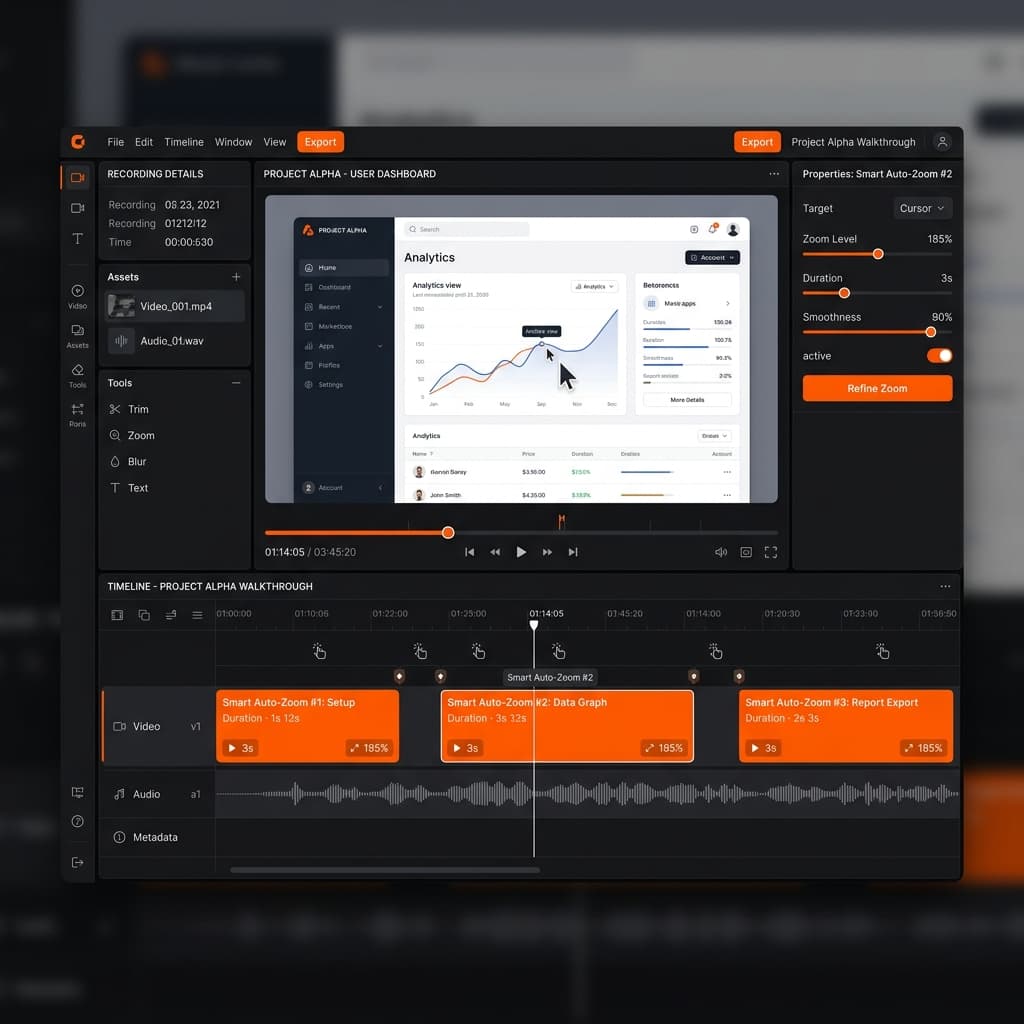
Screenify's approach is post-recording analysis. You record your screen normally, stop, and the app scans the recording for click events, cursor velocity changes, and dwell patterns. It then generates a zoom timeline you can preview and edit before export.
What Smart Auto-Zoom actually does:
- Detects every mouse click and generates a zoom-in segment anchored at the click point
- Reads cursor velocity — fast movements don't trigger zooms (you're in transit), slow deliberate movements do (you're showing something)
- Holds the zoom for a readable duration (default ~1.2s after the click) so viewers can actually see the result of the action
- Eases in and out with a configurable curve — the default is a symmetric ease-in-out that avoids the snap-zoom-snap feel of older tools
- Lets you drag, delete, or retarget any zoom segment on the timeline
How to use it:
- Open Screenify Studio and start a recording. If you need to narrow the capture area, see our guide on recording a specific area on Mac first.
- Record your walkthrough as normal — don't worry about where you click or how you move the cursor. The post-processor handles it.
- When you stop, Screenify drops you into the editor with Smart Auto-Zoom already applied. You'll see zoom segments marked on the timeline.
- Scrub through and preview. If a zoom is hitting the wrong area, drag the segment's anchor point. If you want more or fewer zooms, adjust the sensitivity slider.
- Pick a zoom level per segment (2x is the sweet spot for 1440p source; 3x starts to show pixels unless your source is 4K).
- Export.
The practical advantage here is that you don't have to think about zoom while recording. You can focus on the actual walkthrough, speaking naturally, clicking naturally. The editor figures out what needed zooming after the fact. If you've ever tried to narrate a demo and remember to pause at the right moments for manual emphasis, you know why this matters.
Download Screenify Studio to try Smart Auto-Zoom on your next recording.
Try Screenify Studio — free, unlimited recordings
Auto-zoom, AI captions, dynamic backgrounds, and Metal-accelerated export.
Combining auto-zoom with cursor highlight. Screenify lets you enable a cursor highlight effect alongside auto-zoom — a subtle soft ring around the pointer that pulses on click. On its own, cursor highlight helps viewers track where you are. Combined with auto-zoom, it's the clearest way to make small UI elements legible: the zoom makes the button visible, the highlight makes the click obvious. For a deeper look at combining effects, see our guide on screen recording with annotations.
Method 2: Screen Studio — Click-Triggered Keyframes
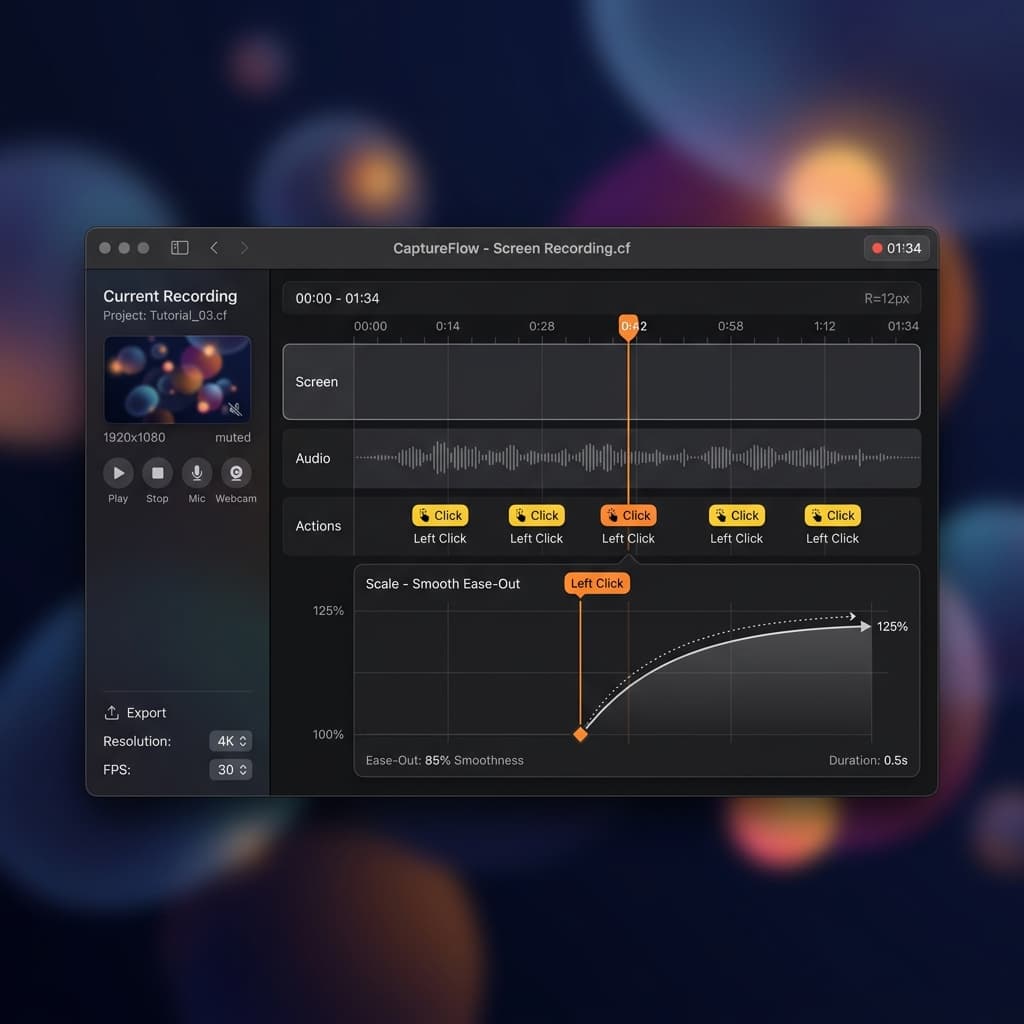
Screen Studio was the first macOS tool to make automatic click-based zooming mainstream, and it's still excellent at what it does. The model is simpler than Screenify's: every click becomes a zoom keyframe. No ROI detection, no velocity analysis — just clicks.
How it works:
- Record with Screen Studio's capture client.
- On stop, the app opens the editor with zoom-on-click already applied.
- Each click shows up as a keyframe on the timeline with a configurable zoom level, duration, and ease curve.
- Default curve is a snappy ease that feels slightly more "motion graphics" than Screenify's smoother default — whether that's a plus or a minus is taste.
Where it shines: discrete click-heavy tutorials. "Click here, then click here, then fill this field, then click submit." Every step gets its own zoom, every zoom lands cleanly.
Where it struggles: hover interactions, drag operations, and any segment where you're demonstrating something without clicking. You can add manual zoom keyframes, but at that point you're doing manual work Screen Studio was supposed to save you from. If your demo is 80% clicking, Screen Studio is a fair choice. If it's 50% drag-and-hover, the click-only model leaves gaps.
Pricing: $89 one-time license, macOS only. No free tier.
Method 3: Final Cut Pro / Premiere Pro — Manual Keyframes
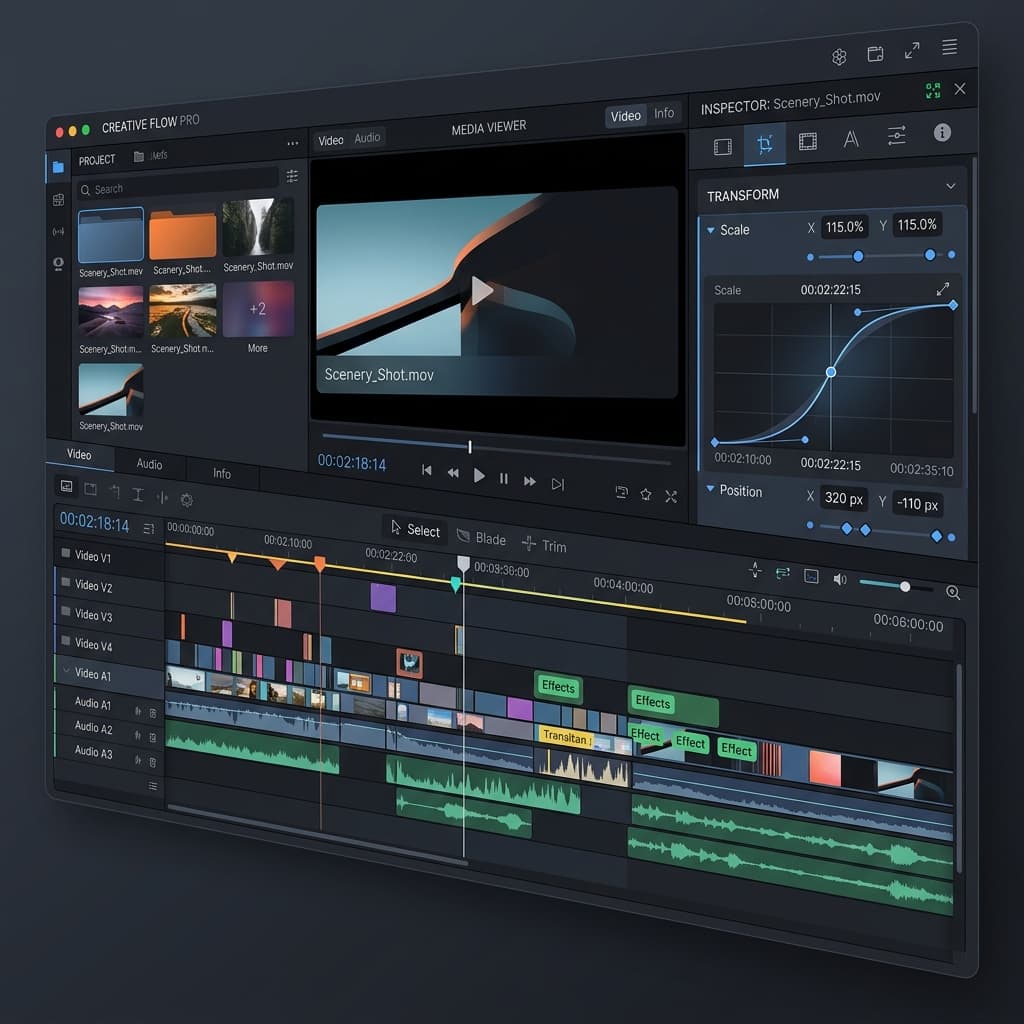
If you're already using Final Cut or Premiere for editing, you can fake auto-zoom by keyframing the scale and position of a raw screen recording. This is how people did it before dedicated tools existed, and it's still the most flexible approach — you have pixel-perfect control over every zoom.
It's also extremely tedious.
The manual keyframe workflow in Final Cut:
- Record your screen with QuickTime Player or any capture tool — you just need the raw video.
- Drop the clip into a Final Cut timeline.
- For each moment you want to zoom: position the playhead, open the Transform controls in the Inspector, and set a keyframe for Scale and Position.
- Move the playhead forward ~300ms, change the Scale to 200%, and adjust Position so the area of interest is centered in the frame.
- Add another keyframe at the end of the zoom-in to hold.
- Add a final keyframe where you want to zoom back out, scale back to 100%, position to 0,0.
- Right-click each keyframe and set the interpolation to Ease or Smooth to avoid linear robotic motion.
- Repeat for every click or region of interest in the video.
For a 3-minute tutorial with 15 clicks, this is roughly 60 keyframes to place, position, and time. Experienced editors can do it in ~20 minutes; newcomers take an hour or more. The result can be gorgeous if you're careful, but the time investment only makes sense if you need creative control a dedicated tool can't give you — say, custom zoom paths that don't track the cursor at all, or zooms that intentionally show the whole screen during a key moment.
Premiere Pro works the same way via the Effect Controls panel (Scale + Position keyframes), with the same tradeoffs. DaVinci Resolve too. The workflow is universal and universally tedious.
Verdict: use this method only if (a) you already own the NLE, (b) your video is short, and (c) you need zoom behavior that doesn't map to "follow the cursor." Otherwise, a dedicated tool will save you hours.
Method 4: Tella — Browser-Based Preset Zooms
Tella is a web-based screen recorder that applies zoom effects as presets rather than post-recording analysis. You pick a zoom preset (e.g., "zoom on clicks with 1.5x scale, 400ms ease-out") and Tella applies it across the whole clip.
How it works:
- Open Tella in your browser and start a new recording.
- Capture your screen (browser-permission gated — so capture quality is typically 1080p-ish, lower than native tools).
- After recording, pick a zoom preset from the effect panel. Tella applies it globally.
- You can override individual segments if a zoom lands wrong.
Strengths: no download, works on any OS (Windows, Linux, ChromeOS), integrates with Tella's hosting and sharing layer, good preset library for common tutorial styles.
Weaknesses: capture quality is capped by browser APIs — you won't get true Retina-native recording. Customization is less granular than Screenify or Screen Studio. Zoom presets are all-or-nothing: you can't tweak individual parameters without dropping into a manual keyframe view that's less capable than a desktop editor.
Best fit: non-Mac users, or Mac users who need cross-platform hosting and don't mind a quality tradeoff.
Try Screenify Studio — free, unlimited recordings
Auto-zoom, AI captions, dynamic backgrounds, and Metal-accelerated export.
When NOT to Use Auto-Zoom
Auto-zoom is the default answer for software tutorials, but there are cases where it actively hurts your video. Turn it off when:
You're recording full-screen video playback. If the thing on your screen is already a video (say, you're demoing a video editor, reviewing a film, or showing a playback UI), auto-zoom will crop the playback and confuse viewers. The viewer's brain is already parsing moving imagery; a second layer of motion on top is visual soup.
You're recording a dashboard with multiple regions of attention. Analytics dashboards, trading terminals, monitoring UIs — the whole point is seeing everything at once. Zooming into one panel hides the others and breaks the mental model. Full-frame, stay zoomed out.
You're recording a presentation where the whole slide matters. Slide decks are designed to be read as a whole. Auto-zoom centered on a cursor turns a slide into a peephole view. If you must zoom, do it manually on specific callouts, not automatically.
You're recording horizontally-scrolling content. Timelines, Kanban boards, and horizontal galleries already involve camera-like motion. Adding auto-zoom creates double motion that feels nauseating.
Motion sickness is a concern. If your audience is likely to watch on a large screen or for long durations, aggressive zoom transitions can trigger vestibular discomfort. Use a smoother ease curve (ease-in-out over 500ms+ rather than a snap 200ms ease-out), and limit zoom level to 1.5x instead of 2x or 3x. Screenify lets you tune both parameters; Screen Studio does too.
Your audience is on desktop and the UI is already large. Zoom exists to solve the small-viewport problem. If you know your audience is watching on 27" monitors and your source UI has large text, auto-zoom is solving a problem you don't have.
Troubleshooting
Zoom lands on the wrong area. This usually means the click detection anchored on a click that wasn't the "real" action — maybe a click in a scrollbar or a dismiss click. In Screenify, drag the segment's anchor on the timeline to re-center. In Screen Studio, delete the offending keyframe. In Final Cut, edit the Position keyframe values directly.
Zoomed regions look pixelated. Auto-zoom is essentially digital cropping — it magnifies whatever pixels exist in that region. If you record at 1080p and zoom to 2x, you're effectively viewing the zoomed area at 540p. Solution: record at the highest native resolution your display supports (Retina 2x for Macs), and prefer lossless or high-bitrate capture. If you're exporting for 1080p delivery, source at 1440p or 4K and let the zoom region downsample to 1080p cleanly.
Zoom transitions feel jarring or snappy. Your ease curve is too aggressive. Switch from ease-out to ease-in-out and increase duration from ~200ms to 350-500ms. The difference between a jarring zoom and a cinematic one is often just 200ms and a different curve.
Too many zooms — it feels like a pinball machine. Sensitivity is too high. In Screenify, lower the sensitivity slider to skip low-confidence click events. In Screen Studio, manually delete keyframes on rapid-succession clicks and keep only the meaningful ones. Rule of thumb: if you're zooming more than once every 3-4 seconds, viewers can't keep up.
Zoom segments don't hold long enough to read. The default hold time is tuned for "glance at the result and move on." If your tutorial shows text-heavy UIs (settings panels, forms, error messages), increase hold time to 1.5-2 seconds per segment so viewers can actually read. Screenify and Screen Studio both expose this as a per-segment setting.
FAQ
Can I add auto-zoom to a recording I already made in QuickTime?
Yes. Import the QuickTime file into Screenify or Screen Studio as an existing clip — both tools can process external recordings. The catch: click detection only works on recordings made by the tool, because it captures click events alongside video. On imported files, you'll be doing manual keyframe placement instead. If you're planning to use auto-zoom, record with the target tool from the start.
What zoom level should I use?
2x is the default for a reason — it roughly matches the size jump from "comfortable desktop viewing" to "comfortable phone viewing." 3x starts to feel claustrophobic and usually reveals pixelation unless your source is 4K. 1.5x is subtler and good for UIs that are already fairly readable. Start with 2x and adjust down if it feels aggressive.
How long should each zoom segment last?
For click actions with immediate visual feedback (a button turns blue, a modal opens), 800ms-1.2s is enough. For text-heavy changes (a form fills in, an error appears), 1.5-2s. Never shorter than 600ms — below that, the zoom reads as a glitch rather than a deliberate framing.
Does auto-zoom work on multi-monitor setups?
It depends on how you capture. If you're recording a single display, auto-zoom works normally. If you're recording all displays as one canvas, zoom segments can jump across screens in ways that confuse viewers. Best practice: capture one display at a time, or use a region capture so auto-zoom has a single coherent viewport to work with. Our guide on how to screen record on Mac covers display selection.
Can I disable auto-zoom for part of a recording?
Yes, in every tool except QuickTime (which has no zoom to begin with). In Screenify, select a segment and toggle its zoom off — the video plays through at full frame during that range. Useful for the video-playback and dashboard cases mentioned earlier.
What's the difference between auto-zoom and "follow cursor"?
Auto-zoom magnifies; follow-cursor only pans. A follow-cursor effect keeps the pointer roughly centered in the frame without changing zoom level. Auto-zoom actually scales up. Some tools (Screenify included) let you combine them: zoom in on clicks, and during the zoomed segments, pan to follow cursor movement. The combination feels the most cinematic when tuned well.
Will auto-zoom make my exported file larger?
Marginally. The zoom effect is applied during render, so the output file is the same resolution and codec as without zoom — the per-frame content just changes. What can increase size is if you export at higher resolution to compensate for zoom pixelation. Going from 1080p to 1440p export will roughly double the file size.
Is there a free option?
Screenify Studio has a free tier that includes Smart Auto-Zoom. Tella has a free tier with some zoom presets (with a watermark and recording length limits on the free plan). Screen Studio is paid-only ($89 one-time). Final Cut requires a $299 purchase, Premiere a subscription. If you want auto-zoom without spending anything, Screenify is the straightforward answer on Mac.
Wrapping Up
Auto-zoom is one of those features that sounds like polish but actually functions as accessibility — it's the difference between a video that works for mobile viewers and one that doesn't. The specific tool matters less than picking one that matches your workflow: Screenify if you want the recording to self-analyze and generate zooms automatically, Screen Studio if you're click-heavy and want a polished click-driven workflow, Final Cut if you need total creative control, Tella if you need cross-platform and browser-based.
If you haven't tried ROI-based auto-zoom yet, it's worth 5 minutes with a real recording to see how much editing time it saves. Download Screenify Studio, record a short walkthrough of whatever app you happen to be using right now, and look at the generated zoom timeline before you touch anything. That's usually the moment people stop hand-keyframing zooms forever.
Try Screenify Studio
Record your screen with auto-zoom, AI captions, dynamic backgrounds, and Metal-accelerated export. Free plan, unlimited recordings.
Download Free


