Using macOS Screenshot Toolbar for Recording
Master the ⌘+Shift+5 Screenshot toolbar — every option, hidden feature, and limitation explained with workarounds.

The macOS Screenshot toolbar is the only screen recorder most Mac users will ever open — and most of them use about 20% of what it can do. Behind those six small icons and one Options menu lives a surprisingly capable recording tool with behaviors that Apple never documented in any user guide.
This is the complete reference. Every icon, every option, every hidden keyboard trick, every Terminal command, and every limitation — with workarounds for the gaps.
Quick Comparison
| Feature | Screenshot Toolbar | Screenify Studio | OBS Studio | QuickTime Player |
|---|---|---|---|---|
| Price | Free (built-in) | Free / Pro $9.99/mo | Free (open-source) | Free (built-in) |
| System Audio | No | Yes (automatic) | Yes (macOS 13+ or plugin) | No |
| Webcam Overlay | No | Yes | Yes | No |
| Region Recording | Yes | Yes | Crop filter only | Yes |
| Post-recording Editing | Trim only | Auto-zoom, captions, backgrounds | None | Trim only |
| Annotation During Recording | No | No | No | No |
| Auto-zoom on Cursor | No | Yes | No | No |
| Output Format | .mov (HEVC or H.264) | .mp4 / .mov / .gif | .mkv / .mp4 | .mov |
| Timer Delay | 5s or 10s | Custom | Custom | None |
| Difficulty | Easy | Easy | Moderate | Easy |
The toolbar covers simple recordings well. Once you need system audio, webcam, or any post-processing beyond a basic trim, you'll need a dedicated tool.
Anatomy of the Screenshot Toolbar
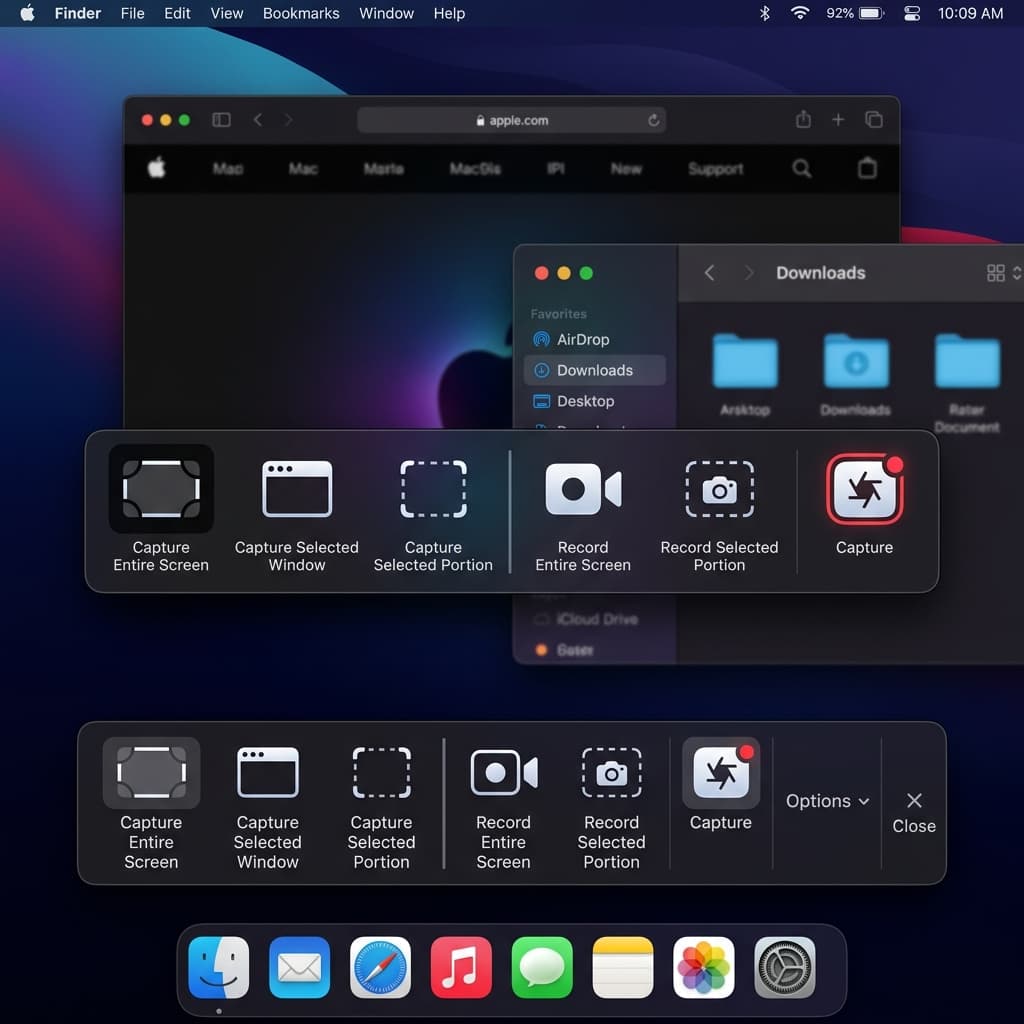
Press ⌘ + Shift + 5. A floating toolbar appears near the bottom of your screen with six icons and an Options button. Here's what each icon does, left to right:
The Six Toolbar Icons
- Capture Entire Screen (solid rectangle) — takes a still screenshot of your full display. Not a recording.
- Capture Selected Window (rectangle with a raised title bar) — takes a screenshot of a single window, including its drop shadow. Hover over a window and click to capture it.
- Capture Selected Portion (dotted rectangle, smaller) — takes a screenshot of a custom rectangular region you drag on screen.
- Record Entire Screen (solid rectangle with a circle in the corner) — records video of your full display.
- Record Selected Portion (dotted rectangle with a circle in the corner) — records video of a custom rectangular region.
- Capture / Record button — the rightmost button changes its label based on which mode you selected. In screenshot mode it says "Capture"; in recording mode it says "Record."
The first three icons are screenshot modes. The fourth and fifth are recording modes. There's no "Record Selected Window" button — that mode doesn't exist natively (more on this limitation later).
Accessing the Toolbar
Three ways to open it:
- ⌘ + Shift + 5 — the standard shortcut, available on macOS Mojave 10.14 and later
- Launchpad → Other → Screenshot — the app lives in the Utilities folder, but Launchpad groups it under "Other" by default
- Applications → Utilities → Screenshot.app — you can also open it from Finder directly
The toolbar floats above all windows and stays visible until you press Esc or click away from it.
The Options Menu — Every Setting Explained

Click Options in the toolbar to reveal a dropdown with six configuration areas.
Save to
Controls where your recording file lands after you stop recording.
- Desktop — the default. Files appear directly on your desktop.
- Documents — saves to ~/Documents.
- Clipboard — copies the recording to your clipboard instead of saving a file. Useful for pasting directly into Slack, an email, or a presentation. Note: video clips on the clipboard can be large and may not paste correctly in all apps.
- Mail — opens a new Mail.app compose window with the recording attached.
- Messages — opens Messages.app with the recording ready to send.
- Preview — opens the recording in Preview.app immediately after recording stops.
- Other Location... — opens a Finder dialog where you can select any folder or create a new one.
Terminal override: You can permanently change the default save location without opening the toolbar:
defaults write com.apple.screencapture location ~/Recordings
killall SystemUIServer
This affects both screenshots and screen recordings. The killall SystemUIServer restarts the system UI process so the change takes effect immediately.
Timer
Adds a countdown before recording starts.
- None — recording starts immediately when you click Record or press Enter.
- 5 Seconds — a large countdown number appears on screen. Gives you time to switch apps, arrange windows, or hide the toolbar from the recording area.
- 10 Seconds — same behavior, longer delay.
The countdown overlay appears centered on the screen being recorded. If you're recording a selected portion, the countdown appears inside that region. You can still interact with your Mac during the countdown — switch apps, scroll, move windows — but the recording hasn't started yet.
There's no way to set a custom timer value (like 3 seconds or 15 seconds) through the toolbar. The only options are None, 5, and 10.
Microphone
Lists every audio input device connected to your Mac. You'll see options like:
- None — records video with no audio at all. The output file is silent.
- Built-in Microphone — the internal mic on your MacBook. Picks up room noise, keyboard sounds, and your voice.
- External USB microphone — if you have a Blue Yeti, Rode NT-USB, Elgato Wave, or similar, it appears by name.
- AirPods / AirPods Pro / AirPods Max — when connected, their microphone appears as a separate option.
- Audio interface inputs — Focusrite Scarlett, Universal Audio, or other audio interfaces show their input channels.
Critical limitation: This setting captures microphone input only. It does not capture system audio (the sound your Mac produces). If you're recording a tutorial that includes audio from a video playing in your browser, the built-in toolbar will not capture that audio. You'll get your voice narration but silence where the video audio should be.
For system audio capture, see our guide on how to record internal audio on Mac.
Show Mouse Clicks
When enabled, every mouse click during recording produces a visible dark circle animation around the cursor at the point of click. The circle appears as a semi-transparent gray ring that briefly expands and fades.
This is useful for tutorial recordings where viewers need to track where you're clicking. Without it, cursor movements can be hard to follow, especially on large displays.
The click indicator works for both left and right clicks. It does not distinguish between click types visually — both produce the same gray circle.
Show Floating Thumbnail
After you stop recording, a small preview thumbnail of the recording appears in the bottom-right corner of your screen for approximately 5 seconds. This thumbnail is interactive:
- Click it to open a preview window where you can trim the start and end of the clip using yellow drag handles, then click Done to save
- Drag it to a Finder window, an email compose window, Messages, or any app that accepts file drops — the recording transfers directly
- Swipe it right (toward the screen edge) to dismiss it immediately and save the file to your chosen location
- Do nothing — after 5 seconds it slides off-screen and saves automatically
The floating thumbnail workflow is one of the most useful features for quick iterations. Record a clip, realize you started too early, click the thumbnail, trim the first 3 seconds, and save — all without opening a separate editor.
If you disable this option, recordings save immediately to your chosen location with no preview step. You lose the ability to quick-trim but gain a faster workflow for batch recordings where you don't need to review each clip.
Remember Last Selection
When enabled (the default), the toolbar preserves the position and dimensions of your last recording region. The next time you press ⌘ + Shift + 5 and select "Record Selected Portion," the dotted rectangle appears in exactly the same place and size as your previous recording.
This is essential for recurring recordings of the same screen area — recording the same app window at the same position daily, or capturing a specific dashboard panel for a regular report.
When disabled, each new session starts with a default-sized rectangle centered on the screen.
Method 1: Full-Screen Recording
The simplest recording mode. Everything visible on your display gets captured.
- Press ⌘ + Shift + 5 to open the toolbar
- Click the Record Entire Screen icon (fourth from left — solid rectangle with a small circle)
- If you have multiple displays, click on the screen you want to record. A camera icon appears on the selected display.
- Optionally click Options to set microphone, timer, and save location
- Click Record or press Enter
- The toolbar disappears. A stop button (⏹) appears in the menu bar at the top-right of your screen.
- Perform whatever you need to record
- Click the stop button in the menu bar, or press ⌘ + Control + Esc
- Your recording saves to the location you chose in Options
Multi-display behavior
If you use multiple monitors, the toolbar only records one display at a time. After clicking "Record Entire Screen," each display shows a subtle highlight effect when you hover over it. Click the display you want. You cannot record multiple displays simultaneously with the built-in tool.
What gets captured
Full-screen recording captures everything: the menu bar, the Dock (if visible), notifications that appear during recording, and any overlays like Spotlight search or the screenshot toolbar itself (though the toolbar hides when recording starts). The mouse cursor is always visible.
Notifications during recording: Consider enabling Do Not Disturb (Focus mode) before recording. Open Control Center from the menu bar, click Focus, and select Do Not Disturb. This prevents notification banners from appearing in your recording — especially important if you're recording a tutorial and don't want a personal message popping up on screen.
Method 2: Region Recording
Records only a rectangular portion of your screen. Everything outside the rectangle is excluded from the output file.
- Press ⌘ + Shift + 5
- Click the Record Selected Portion icon (fifth from left — dotted rectangle with a circle)
- A dashed rectangle appears on screen. This is your recording region.
- Resize the rectangle by dragging any edge or corner
- Reposition the rectangle by dragging from the center area
- Click Record or press Enter
- Stop with the menu bar stop button or ⌘ + Control + Esc
Hidden manipulation tricks
These behaviors aren't documented anywhere in Apple's support pages:
- Drag the region after drawing it: Once the dashed rectangle is visible, click inside it (not on an edge) and drag to move the entire selection without changing its size. The cursor changes to a hand icon.
- Resize from a single edge: Drag just the top, bottom, left, or right edge to change only one dimension. This is easier than corner-dragging when you want to extend the height without changing the width.
- Hold Shift while resizing: This does not lock the aspect ratio (unlike many design apps). On the Screenshot toolbar, Shift has no modifier effect during region resizing.
- Space bar behavior: If you press Space while the "Record Selected Portion" rectangle is visible, macOS does not switch to window capture mode. The Space bar toggle only works in screenshot modes (Capture Selected Portion switches to window capture). In recording mode, Space has no effect.
- Precise positioning with arrow keys: After selecting a region, you cannot nudge it with arrow keys. The toolbar doesn't support keyboard-based region adjustment.
Getting exact dimensions
The toolbar doesn't display pixel dimensions of your selected region. If you need an exact size (e.g., 1920x1080 for YouTube), you have two options:
- Use a reference window: Resize a Finder or browser window to your target dimensions using a window management tool (Rectangle, Magnet, or Stage Manager), then visually align the recording region to match that window's edges.
- Record full screen and crop later: Record more than you need, then crop to exact dimensions in a video editor. This guarantees pixel-perfect output.
For precise region control with pixel dimensions displayed during selection, Screenify Studio shows the exact width and height in pixels as you drag.
Method 3: Window Recording — The Gap and the Workaround
The Screenshot toolbar has Capture Selected Window for screenshots but no Record Selected Window for video. This is a deliberate omission by Apple, not a bug.
The screenshot-only window mode
In screenshot mode (Capture Selected Window), pressing Space turns your cursor into a camera icon. Hover over any window and click to capture it — complete with the macOS drop shadow. The window doesn't need to be in the foreground; you can capture partially hidden windows.
This does not exist for recording. There's no way to tell the toolbar "record only this window and follow it if it moves."
Workaround: Region recording over a window
- Position the window you want to record so it doesn't overlap with others
- Open the Screenshot toolbar with ⌘ + Shift + 5
- Choose Record Selected Portion
- Carefully drag the recording region to match the window's edges
- Start recording
Problem: If you accidentally move the window during recording, the recording region stays fixed. Your window slides out of frame. This is a fundamental limitation of region-based recording versus true window capture.
When you need real window capture
If you record application demos or tutorials where the window might get repositioned, true window capture (where the recording follows the window) requires a dedicated app. Screenify Studio offers a Window capture mode that tracks the selected window regardless of position changes, and renders the window over a clean background — no desktop clutter, no accidental reveals of personal files on your desktop.
Keyboard-Only Workflow
You can operate the entire Screenshot toolbar without touching the mouse or trackpad.
Opening and navigating
- ⌘ + Shift + 5 — opens the toolbar
- Tab — moves focus between the toolbar buttons (the six mode icons, Options, and Record/Capture)
- Space or Enter — activates the focused button
- Arrow keys — once Options is open, navigate the menu items with Up/Down arrows
- Enter — selects the highlighted option
- Esc — closes the Options menu or the entire toolbar
Recording with keyboard only
- Press ⌘ + Shift + 5 to open the toolbar
- Press Tab until the Record Entire Screen icon is focused (you'll see a blue highlight ring)
- Press Enter to select that mode
- Press Tab to move focus to the Record button
- Press Enter to start recording
- When done, press ⌘ + Control + Esc to stop
For region recording via keyboard, the workflow is less practical — you still need the mouse to define the recording area. The keyboard can select the mode and start/stop, but drawing the rectangle requires pointer interaction.
Complete shortcut reference
| Shortcut | Action |
|---|---|
| ⌘ + Shift + 5 | Open Screenshot toolbar |
| Tab | Cycle focus between toolbar controls |
| Enter | Activate focused button / start recording |
| Esc | Close toolbar or cancel |
| ⌘ + Control + Esc | Stop recording |
| ⌘ + Shift + 3 | Capture full screen (bypasses toolbar) |
| ⌘ + Shift + 4 | Capture selected area (bypasses toolbar) |
| ⌘ + Shift + 4, then Space | Capture selected window (bypasses toolbar) |
Note: ⌘ + Shift + 3 and ⌘ + Shift + 4 are direct screenshot shortcuts that don't open the toolbar at all. They capture screenshots instantly.
Output Format and File Details
File naming convention
Recordings saved by the Screenshot toolbar follow this naming pattern:
Screen Recording YYYY-MM-DD at HH.MM.SS.movExample: Screen Recording 2026-04-10 at 14.32.08.mov
The timestamp uses 12-hour or 24-hour format based on your System Settings > General > Date & Time > 24-hour time toggle. The file always has a .mov extension regardless of the actual codec used.
Screenshots follow a similar pattern: Screenshot YYYY-MM-DD at HH.MM.SS.png
Video codec
The codec depends on your Mac's hardware:
- Apple Silicon (M1, M2, M3, M4) — records in HEVC (H.265) using the hardware encoder. This produces smaller files with high quality. A 5-minute full-screen recording at Retina resolution typically produces a 150-300 MB file.
- Intel Macs — records in H.264 using the hardware encoder. Files are larger compared to HEVC for the same visual quality. The same 5-minute recording might produce a 300-600 MB file.
Both codecs are wrapped in a QuickTime .mov container.
Frame rate
The toolbar records at your display's refresh rate — 60 fps for standard displays, or the ProMotion variable rate (up to 120 Hz) on MacBook Pro models with ProMotion. There's no option to set a custom frame rate. If your display runs at 60 Hz, the recording is 60 fps.
Resolution
Recordings capture at your display's native resolution. On a MacBook Pro 14" with a 3024x1964 display, the output file is 3024x1964 pixels. On an external 4K display (3840x2160), the output is 3840x2160.
For region recordings, the resolution matches the pixel dimensions of the selected area on screen.
There's no way to downscale the output through the toolbar. If you need a 1080p recording from a 4K display, you'll need to resize the output in a video editor afterward, or use a third-party recorder that supports resolution selection.
Terminal Commands for Power Users
macOS stores Screenshot toolbar preferences in the com.apple.screencapture domain. You can modify these from Terminal.
Change default save location
defaults write com.apple.screencapture location ~/Movies/Recordings
killall SystemUIServer
Change default file format (screenshots only)
defaults write com.apple.screencapture type jpg
# Options: png (default), jpg, tiff, gif, pdf, bmp
killall SystemUIServer
This changes the screenshot format but does not affect screen recordings — recordings are always .mov.
Disable the drop shadow on window screenshots
defaults write com.apple.screencapture disable-shadow -bool true
killall SystemUIServer
Remove the floating thumbnail
defaults write com.apple.screencapture show-thumbnail -bool false
killall SystemUIServer
Equivalent to unchecking "Show Floating Thumbnail" in Options, but persists across system updates.
Show mouse cursor in screenshots
defaults write com.apple.screencapture showsCursor -bool true
killall SystemUIServer
By default, the cursor is hidden in screenshots (but always visible in recordings).
Reset all screenshot preferences to defaults
defaults delete com.apple.screencapture
killall SystemUIServer
Check current settings
defaults read com.apple.screencaptureThis outputs all customized keys. If a key doesn't appear, the system default is in use.
Method 4: When You Need More — Screenify Studio
The Screenshot toolbar hits a hard ceiling once your recordings need any of these:
- System audio — the toolbar cannot capture what your Mac is playing. No workaround exists within the toolbar itself.
- Webcam overlay — no camera feed option. If you're recording a tutorial or demo where your face should appear in a corner bubble, the toolbar can't do it.
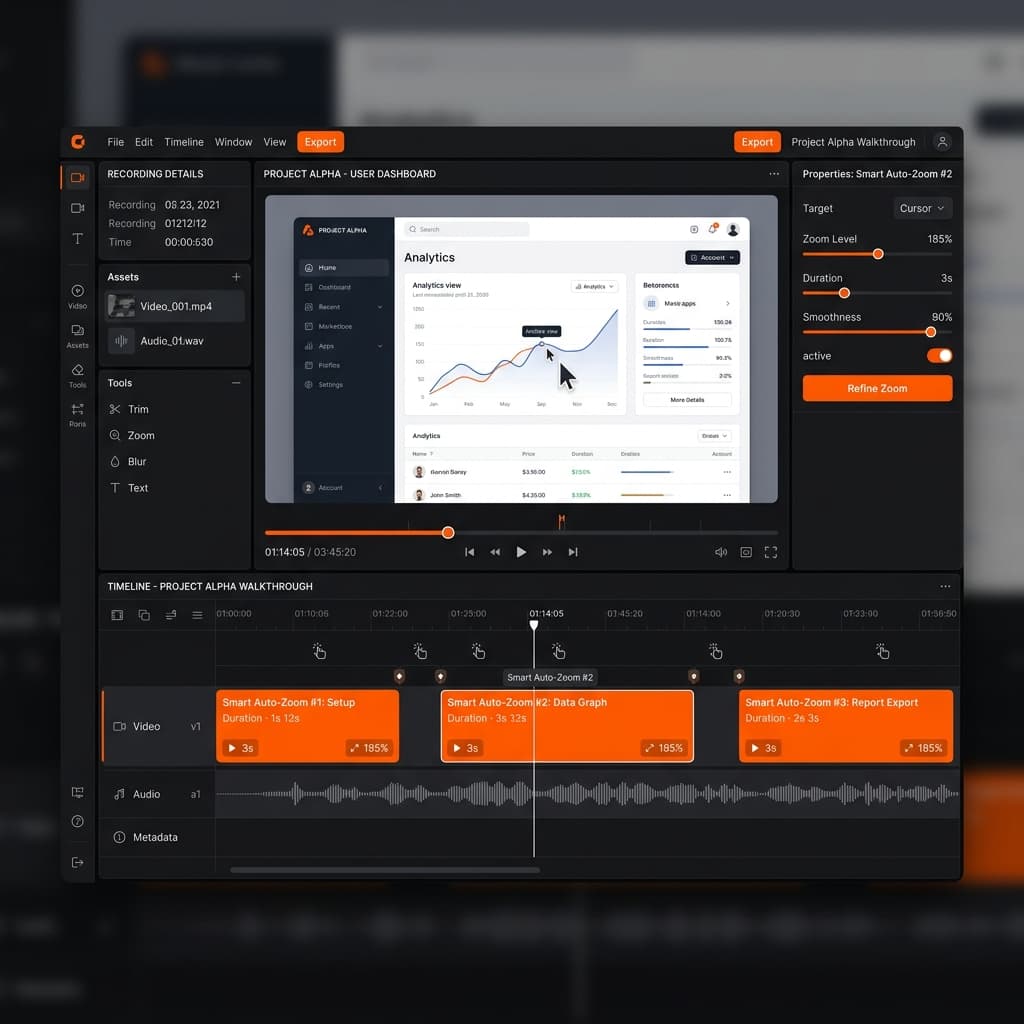
- Auto-zoom — on a Retina display, small UI elements and text are hard to read in a full-screen recording viewed at normal size. Screenify's auto-zoom tracks your cursor and smoothly magnifies the area around it during playback, making click targets clearly visible without manual zooming.
- Post-recording editing — beyond the 5-second floating thumbnail trim, there's no editing. No captions, no background replacement, no annotations.
- Shareable links — the toolbar saves a local file. To share it, you need to upload it somewhere manually.
Screenify Studio fills every gap listed above. System audio works out of the box with a one-click driver install. The webcam overlay is drag-and-positionable during recording. AI-generated captions and auto-zoom happen automatically in post-processing — no manual editing required. And every recording gets a shareable link on screenify.studio that you can send to anyone.
The free plan includes all recording features with no watermark and no time limit. If you've been using the Screenshot toolbar and find yourself wishing it could do "just one more thing," Screenify is the natural next step.
Try Screenify Studio — free, unlimited recordings
Auto-zoom, AI captions, dynamic backgrounds, and Metal-accelerated export.
Method 5: When You Need Free + Advanced — OBS Studio
OBS Studio is a free, open-source recorder with capabilities far beyond the Screenshot toolbar — at the cost of a steeper learning curve.
What OBS adds over the Screenshot toolbar
- System audio — on macOS Ventura 13 and later, OBS includes a native macOS Audio Capture source that captures system audio without third-party plugins. On older macOS versions, you'll need BlackHole or a similar virtual audio driver.
- Webcam overlay — add a Video Capture Device source and position it as a picture-in-picture layer.
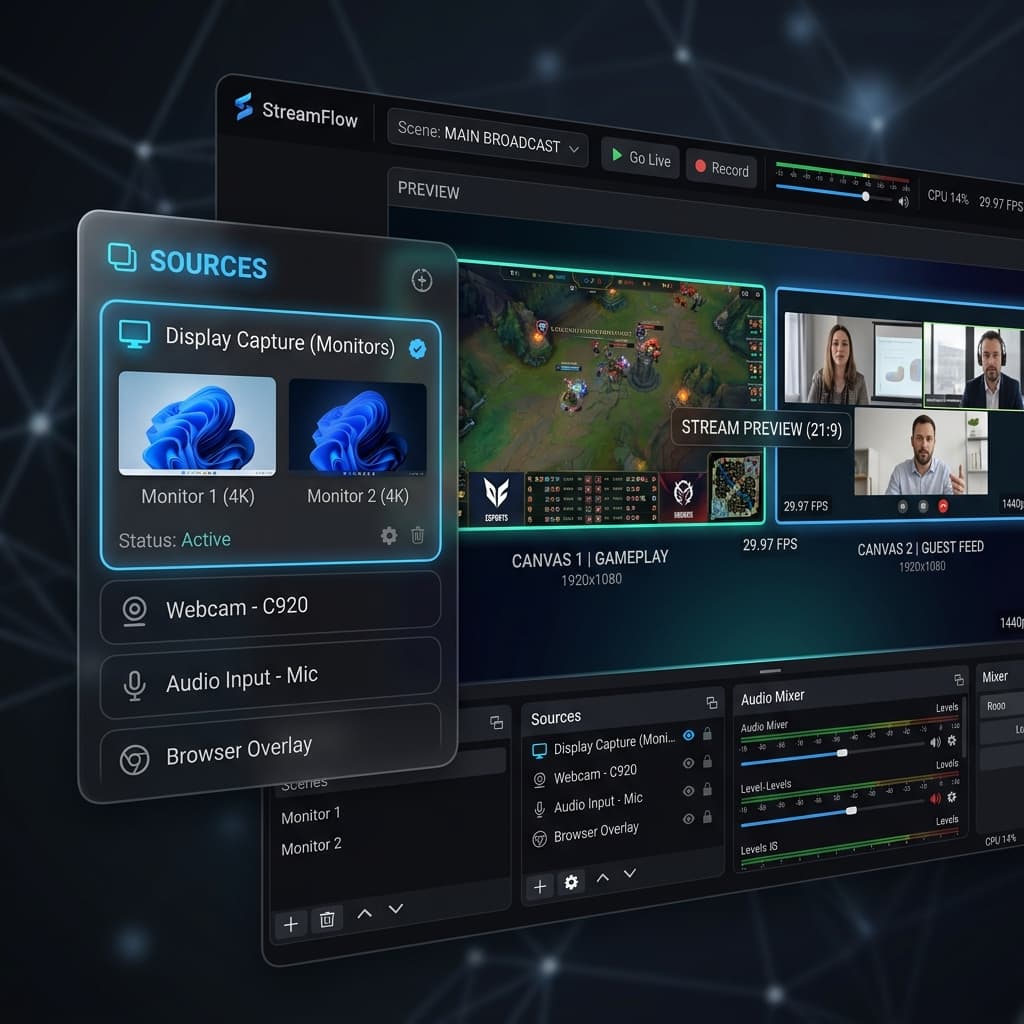
- Multiple sources — combine screen capture, webcam, images, text overlays, and audio into a single scene.
- Custom resolution and frame rate — set exactly 1920x1080 at 30 fps for YouTube, or 1080x1920 for vertical social content.
- Streaming — OBS can stream directly to Twitch, YouTube, or any RTMP endpoint while simultaneously recording locally.
What OBS doesn't do
- No auto-zoom — cursor movements play back at 1:1 scale, same as the built-in toolbar.
- No built-in editing — OBS is a recorder and streamer, not an editor. You'll need a separate tool (DaVinci Resolve, Final Cut Pro, or similar) for trimming, effects, and export.
- No one-click sharing — output is a local file. Sharing requires manual upload.
- Complex UI — the Scenes/Sources/Mixer paradigm takes time to learn. First-time users often spend 20-30 minutes configuring a basic screen recording setup.
OBS is the right choice if you need system audio capture with zero cost and don't mind the setup time. For a comparison of all Mac recording options, see our full guide on how to screen record on Mac.
Troubleshooting
"⌘ + Shift + 5 does nothing"
Cause: The keyboard shortcut may have been reassigned or disabled.
Fix: Open System Settings > Keyboard > Keyboard Shortcuts > Screenshots. Verify that "Screenshot and recording options" is checked and assigned to ⌘ + Shift + 5. If it's been changed, click "Restore Defaults" at the bottom of the pane.
If the shortcut is correct but still doesn't work, try opening Screenshot.app directly from Applications > Utilities > Screenshot.
Recording saves but the file is 0 bytes or won't play
Cause: This typically happens when your Mac runs out of disk space during recording, or when the recording destination is on a network drive that disconnected.
Fix: Check available disk space in System Settings > General > Storage. You need continuous free space for the entire duration of the recording — a 10-minute full-screen recording can use 500 MB to 1 GB. Switch your save location to a local drive with sufficient space.
No audio in the recording
Cause: You either selected "None" for microphone in Options, or you selected the wrong input device.
Fix: Open the toolbar, click Options, and verify the correct microphone is selected. Record a short test clip and play it back. If you're trying to capture system audio (sounds from your Mac), the Screenshot toolbar cannot do this — you need a third-party tool. See how to record internal audio on Mac for solutions.
The recording region keeps resetting position
Cause: "Remember Last Selection" may be disabled in Options.
Fix: Open the toolbar, click Options, and enable "Remember Last Selection." The toolbar will then preserve your region position and dimensions between sessions.
Recording is laggy or drops frames
Cause: High system load during recording. The Screenshot toolbar shares system resources with all other running apps. GPU-intensive applications (3D rendering, games, video playback) competing for encoder time can cause dropped frames.
Fix: Close unnecessary applications, especially those using significant GPU resources. If you're on a MacBook, connect to power — macOS throttles performance on battery to conserve energy, which can affect recording smoothness. Also verify you have at least 10% free disk space; low storage causes system-wide performance degradation.
Try Screenify Studio — free, unlimited recordings
Auto-zoom, AI captions, dynamic backgrounds, and Metal-accelerated export.
Frequently Asked Questions
Can the Screenshot toolbar record system audio?
No. The toolbar only captures microphone input. System audio — sounds from apps, browsers, video calls — is not supported. Apple has not added this feature through macOS Sequoia. To capture system audio, use Screenify Studio (automatic setup), OBS with macOS Audio Capture (macOS 13+), or BlackHole with a multi-output device.
What's the maximum recording length?
There's no hard time limit. The toolbar records until you stop it or your disk fills up. Practical limits depend on available storage: at HEVC quality on Apple Silicon, expect roughly 1-2 GB per 10 minutes of full-screen recording at Retina resolution. A Mac with 50 GB free can record for several hours.
Can I record two monitors at once?
Not with the Screenshot toolbar. It records one display per session. If you need both monitors in a single recording, use OBS Studio — create two Display Capture sources and combine them side by side on a single canvas.
Can I add a webcam overlay while recording?
No. The toolbar records the screen only, with no camera input. For webcam-in-corner recordings, use Screenify Studio (drag-and-positionable bubble cam) or OBS (Video Capture Device source).
Does recording slow down my Mac?
Minimally. The toolbar uses hardware-accelerated encoding through Apple's VideoToolbox framework, which offloads compression to the dedicated media engine on Apple Silicon chips (or the Intel Quick Sync encoder on Intel Macs). You'll notice little to no performance impact during normal use. Heavy GPU workloads — gaming, 3D rendering, large video exports — may see slight frame drops because the encoder shares the media engine with other tasks.
How do I record a specific window (not just a region)?
The toolbar doesn't support window-specific recording. Your options: carefully align the region selection over the window (fragile — breaks if the window moves), or use a third-party tool with dedicated window capture. See our detailed walkthrough on recording a specific area on Mac for step-by-step methods.
Can I annotate or draw on screen during recording?
No. The toolbar has no annotation layer. Some third-party tools like CleanShot X and Presentify offer screen annotation overlays that work alongside any recording tool — you run the annotation app, draw on your screen, and the recorder captures the annotations as part of the screen content.
Where do recordings go if I can't find them?
Check these locations in order:
- Desktop — the default save location
- The folder you selected in Options > Save to
- Run this Terminal command to find recent screen recordings:
find ~ -name "Screen Recording*" -mtime -1This searches your home directory for files matching the naming pattern modified within the last day.
If recordings are going to an unexpected location, open the toolbar, click Options, and check the Save to setting. You can also run defaults read com.apple.screencapture location in Terminal to see the configured save path.
The Bottom Line
The macOS Screenshot toolbar is a competent built-in recorder for simple screen captures — quick bug reports, short walkthroughs for a teammate, internal documentation where polish doesn't matter. Mastering its Options menu and hidden region manipulation tricks gets you 80% of what most people need without installing anything.
The remaining 20% — system audio, webcam overlays, auto-zoom, captions, shareable links — requires a dedicated tool. For a detailed comparison of every option available on Mac, start with our complete guide to screen recording on Mac.
Try Screenify Studio
Record your screen with auto-zoom, AI captions, dynamic backgrounds, and Metal-accelerated export. Free plan, unlimited recordings.
Download Free


