How to Screen Record with Webcam on Mac
Add a webcam overlay to your Mac screen recording — 4 methods from free built-in combos to one-click recorder apps.

A screen recording with a webcam overlay — sometimes called picture-in-picture — lets viewers see your face while watching your screen. It's the standard format for tutorials, product demos, course content, and async video updates. Seeing the presenter builds trust and keeps attention.
macOS doesn't have a single built-in tool that does this. But there are several approaches, from free workarounds to dedicated apps that handle everything in one click.
Quick Comparison
| Tool | Price | Webcam Overlay | Layout Options | Post-Recording Editing |
|---|---|---|---|---|
| QuickTime + Photo Booth | Free (built-in) | Separate window (hacky) | None | None |
| Screenify Studio | Free / Pro $9.99/mo | Built-in, 6+ layouts | Circle, rectangle, split, custom | Full editor |
| OBS Studio | Free (open-source) | Yes, fully customizable | Unlimited (scene-based) | None |
| mmhmm | Free / Pro $9.99/mo | Yes, presenter mode | Templates, slides integration | None |
Method 1: QuickTime + Photo Booth (Free Workaround)

macOS doesn't have a built-in recorder with webcam support. But you can fake it by opening Photo Booth alongside QuickTime's screen recorder. The webcam feed from Photo Booth will be captured as part of the screen recording.
Steps
- Open Photo Booth (find it in Applications, or press ⌘ + Space and type "Photo Booth"). Your webcam feed appears in a window.
- Click the Effects button and select Normal (no filter) unless you want a specific effect
- Resize the Photo Booth window by dragging its edges. Make it small — roughly 200x150 pixels — so it doesn't block too much screen content. Position it in the corner where you want the webcam overlay, typically the bottom-right or bottom-left.
- To keep Photo Booth from being covered by other windows, there's no built-in "always on top" feature. As a workaround, use a utility like Afloat or hold ⌘ while dragging Photo Booth's title bar to keep it visible. Alternatively, arrange your other windows so they don't overlap with the Photo Booth area.
- Press ⌘ + Shift + 5 to open the Screenshot toolbar
- Choose Record Entire Screen (this will capture everything visible on your display, including the Photo Booth window)
- Click Options and select your microphone if you want voice narration
- Click Record
- Do your screen walkthrough. The Photo Booth window appears in the recording as part of your screen content.
- Stop recording with the ⏹ button in the menu bar or press ⌘ + Control + Esc
Problems with this approach
- No circular crop — Photo Booth shows a rectangular window with the macOS title bar, chrome, and a gray background. It doesn't look like a polished webcam overlay.
- Photo Booth is mirror-flipped — the preview is horizontally mirrored. The final recording captures this mirrored view.
- Window management — if you click outside Photo Booth, another window might cover it. You have to keep it on top manually (there's no "always on top" in Photo Booth).
- No audio — the Screenshot toolbar can capture your mic but not system audio (see our guide on recording with audio).
This method works in a pinch but produces amateur-looking results. If you're making anything beyond a quick one-off clip, use a dedicated tool.
Method 2: Screenify Studio (Built-in Webcam Layouts)
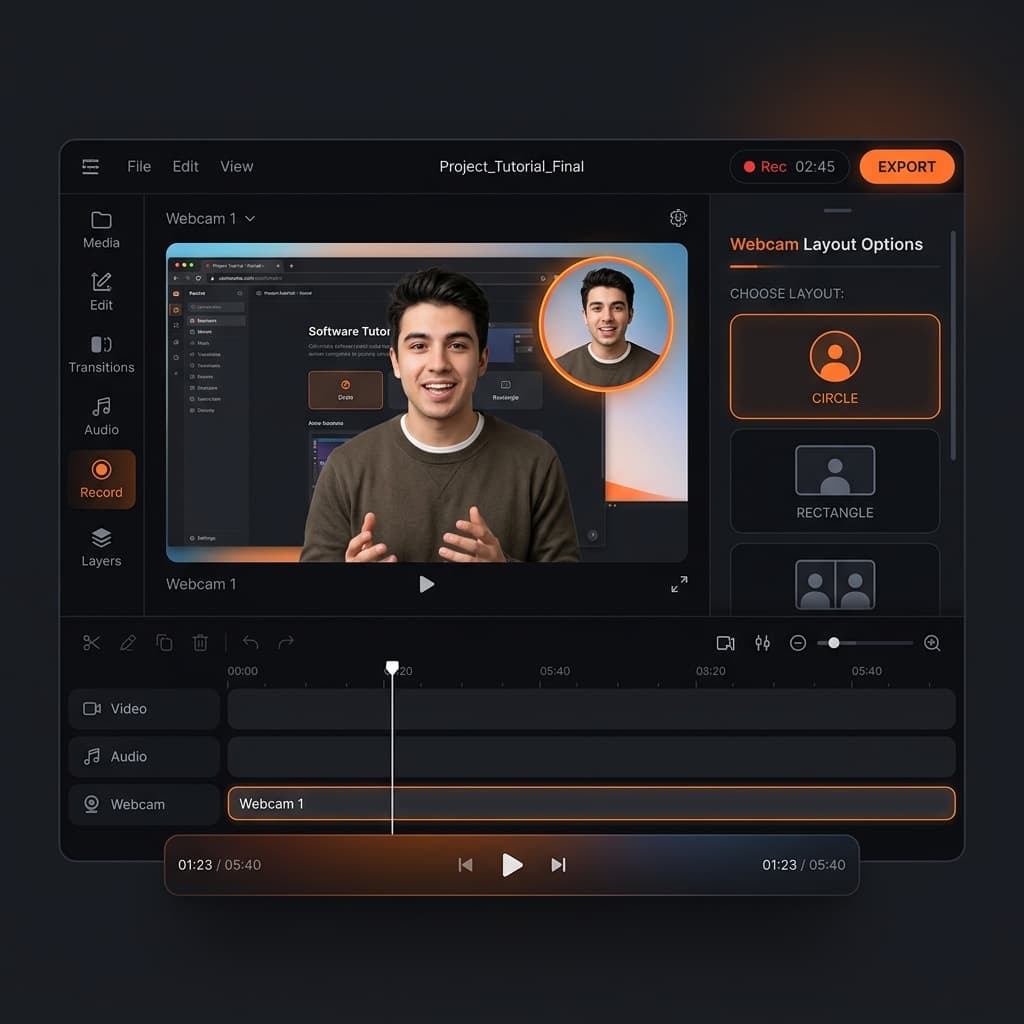
Screenify Studio integrates the webcam directly into the recording pipeline. Your camera feed is composited into the video — not as a separate window on screen, but as a styled overlay rendered during export. This means the webcam stays positioned consistently and doesn't interfere with your actual screen workspace.
Steps
- Download Screenify Studio and open it
- In the recording panel, click the Camera toggle to enable your webcam
- Choose a layout preset:
- Circle — small circular webcam in the corner (most popular for tutorials)
- Rectangle — rounded rectangle, slightly larger
- Split Left/Right — webcam takes up one side, screen recording takes the other
- Full Camera — camera feed fills the frame with screen recording as a smaller overlay
- Drag the webcam preview to reposition it — any corner or edge
- Resize by dragging the edges of the webcam preview
- Select your screen capture area and audio settings
- Press ⌃ + ⌘ + R to start recording
Adjustments in the editor
After recording, you can change the webcam layout without re-recording:
- Switch layout — change from circle to rectangle or split view after the fact
- Reposition and resize — move the webcam overlay to a different corner
- Background shape — add padding, border, or shadow around the webcam feed
- Dynamic camera — the camera smoothly transitions between layouts at keyframe points you set on the timeline
- Hide/show — toggle the webcam off for specific sections (useful when showing a full-screen demo, then bringing your face back for commentary)
Camera quality tips
- Lighting matters more than camera quality — sit facing a window or lamp. The built-in MacBook camera produces surprisingly good video with proper front lighting. Avoid backlighting (a bright window behind you) as it silhouettes your face.
- Eye contact — position the Screenify recording controls so you're looking near the camera lens (top center of your Mac display). Looking at a second monitor while talking is a common mistake that makes you appear disengaged.
- Background — Screenify doesn't blur your webcam background automatically, but a clean, uncluttered background behind you goes a long way. A plain wall, bookshelf, or neutral curtain works better than a messy desk or open room.
- Camera angle — the built-in Mac camera sits at the top of the display, which is roughly eye level on a laptop. If you use an external monitor, mount the webcam at or slightly above eye level. Cameras angled up from below create an unflattering perspective.
- Framing — position yourself so your head and upper shoulders are visible in the webcam preview. Too close and the overlay shows only your forehead; too far and your face becomes too small to read expressions.
Try Screenify Studio — free, unlimited recordings
Auto-zoom, AI captions, dynamic backgrounds, and Metal-accelerated export.
Method 3: OBS Studio (Fully Customizable)
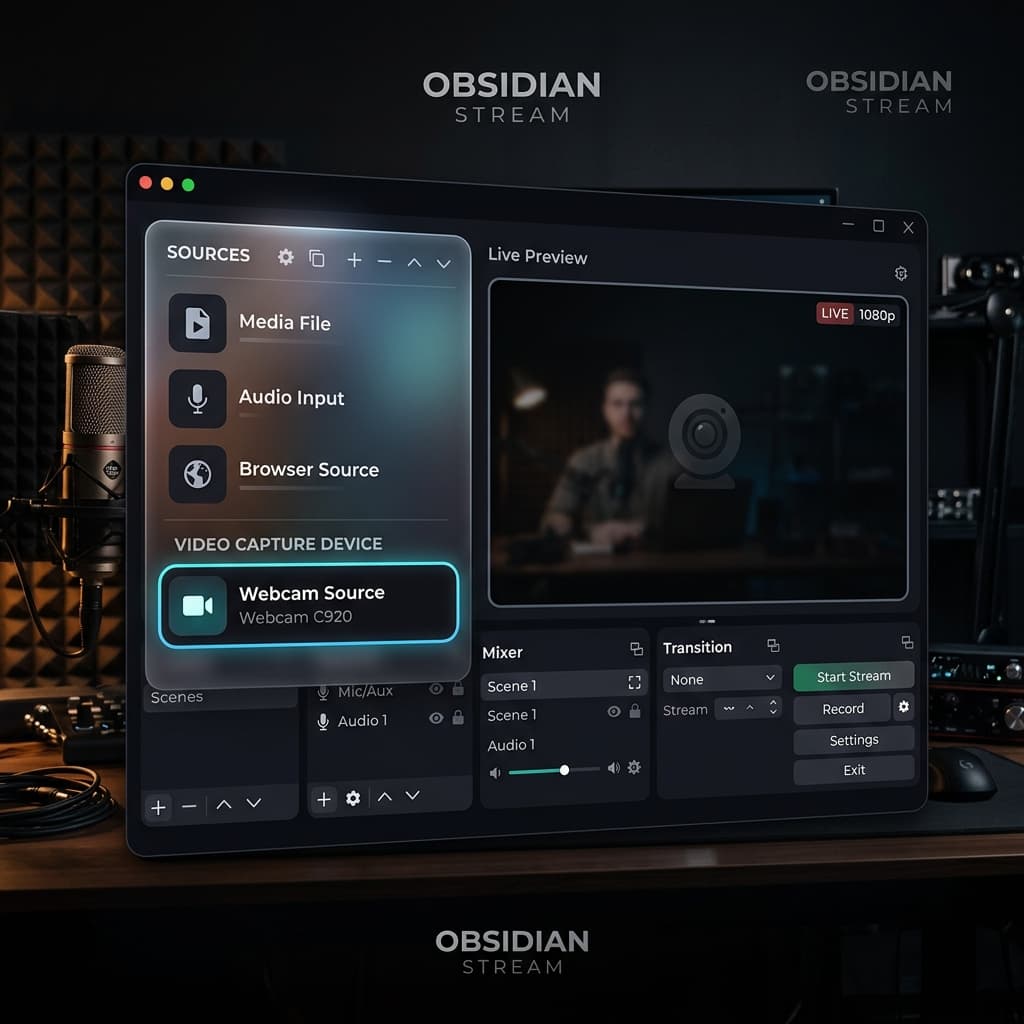
OBS gives you complete control over webcam positioning, sizing, and layering. You can create complex scenes with multiple webcam angles, overlays, and lower thirds. The trade-off is setup time and complexity.
Steps
- Download OBS Studio and open it
- In Sources, click + → macOS Screen Capture to add your screen
- Click + → Video Capture Device to add your webcam
- Select your camera from the Device dropdown (e.g., "FaceTime HD Camera")
- The webcam feed appears in the preview. Drag to reposition, drag corners to resize.
- Right-click the webcam source → Transform → Edit Transform for precise pixel-level positioning
- (Optional) To make the webcam circular:
- Right-click the webcam source → Filters
- Add an Image Mask/Blend filter
- Use a white circle PNG as the mask image
- Add audio sources (microphone, system audio) as needed
- Click Start Recording
Scene presets
OBS uses "Scenes" — saved layouts you can switch between during recording:
- Create a "Talking Head" scene with full-screen webcam for intros
- Create a "Screen + Camera" scene with small webcam in the corner
- Create a "Screen Only" scene for complex demos
- Switch scenes mid-recording using hotkeys
Limitations
- No post-recording layout changes — the webcam position is baked into the recording
- Setting up circular webcam with masks requires creating an image file and configuring filters
- No built-in editor — you export raw footage
- Scene switching during recording requires practice to avoid awkward transitions
Method 4: mmhmm (Presenter Mode)
mmhmm is designed specifically for presentations with a webcam. It works as a virtual camera that other apps (Zoom, Google Meet, recording apps) can use as a video source. It integrates your webcam with slide decks and screen content.
Steps
- Download mmhmm and open it
- Choose a room template — this sets the background and layout
- Add your content: slides, screen share, images, or websites
- Your webcam appears overlaid on the content with automatic background removal
- Use the built-in presenter controls to show/hide yourself, switch slides, or change layouts
- To record: use mmhmm's built-in recording or set mmhmm as a virtual camera in another recording app
When mmhmm works well
- Live presentations where you're walking through slides
- Video calls where you want to look more polished than a standard webcam
- Quick async updates for your team
When it doesn't
- Screen recording workflows — mmhmm is optimized for slides and presentation content, not for recording app workflows, code walkthroughs, or software demos
- Complex screen capture — you can share your screen through mmhmm, but the recording quality and control are limited compared to dedicated screen recorders
- Offline work — mmhmm requires an internet connection for some features
- No auto-zoom, no AI captions, no post-recording editing
Troubleshooting
Webcam shows black or is not detected
- Check System Settings → Privacy & Security → Camera — make sure your recording app has permission
- Close other apps that might be using the camera (Zoom, FaceTime, Photo Booth). Only one app can access the camera at a time on most Macs.
- If using an external webcam, try unplugging and reconnecting it
- On MacBook, close and reopen the lid to reset the built-in camera
Webcam feed is laggy or choppy
- Lower the webcam resolution in your recording app's settings. 720p is sufficient for a small overlay.
- Close other apps that consume CPU. Screen recording + webcam + encoding is resource-intensive.
- On Intel MacBooks, webcam lag during recording is common with high screen resolutions — try recording at a lower resolution or reducing frame rate to 30fps.
Webcam overlay covers important screen content
- Reposition the overlay to a corner where your app's UI has empty space
- Reduce the webcam size — for tutorials, a small circle is enough for presence without blocking content
- In Screenify Studio, you can hide the webcam for specific timeline segments where screen content needs full visibility
Poor webcam quality in recording
The built-in FaceTime camera on Macs (especially pre-M1 models) is 720p. To improve quality:
- Lighting — front-facing natural light or a ring light makes the biggest difference
- External webcam — a Logitech C920 or similar 1080p webcam is a significant upgrade
- iPhone as webcam — on macOS Ventura+, use Continuity Camera to use your iPhone's rear camera, which is dramatically better than any built-in Mac camera. To set this up: connect your iPhone to the same Wi-Fi and Apple account as your Mac, then select it as the camera source in your recording app.
Webcam overlay is too dark or too bright
- Too dark: increase ambient lighting or add a desk lamp facing you. Increase exposure in your recording app's camera settings if available.
- Too bright: avoid direct sunlight hitting your face or a bright light source directly in front of you. In OBS, right-click the webcam source → Filters → add a Color Correction filter and reduce brightness.
- The built-in Mac camera adjusts exposure automatically but can be fooled by bright backgrounds. Moving a bright window or monitor behind you out of the camera's view helps significantly.
Webcam and screen recording are out of sync
This happens occasionally with external USB webcams that don't match the recording frame rate:
- Set your recording app to 30fps instead of 60fps — webcams are more stable at 30fps
- In OBS, go to Settings → Video and set both Base and Output frame rates to 30
- Use USB 3.0 ports for external webcams — USB 2.0 can introduce latency with high-resolution video
- Screenify Studio synchronizes the webcam and screen capture at the engine level, so sync drift is rare
Best Practices for Webcam Recordings
Look at the camera when speaking, not at the screen. When you're narrating, glance at the camera lens (the small dot at the top of your MacBook or external display). This creates the impression of eye contact with the viewer. You can look at the screen when pointing out UI elements, then return your gaze to the camera during explanations.
Keep the webcam overlay small for software tutorials. A circle or small rectangle taking up no more than 10-15% of the frame provides face presence without blocking the content your viewers came to see. Reserve larger webcam sizes for intros, conclusions, or sections where your personality and reactions are the focus.
Disable webcam effects and filters for professional content. Photo Booth effects, Snap Camera filters, and virtual backgrounds with heavy processing look distracting in tutorials and demos. A clean, natural webcam feed builds more credibility.
Test the webcam position against your app's UI. Before recording, open the application you'll demonstrate and check that the webcam overlay doesn't cover critical buttons, menus, or panels. Move the overlay to the corner with the least important content — this varies per app.
Wear solid colors on camera. Busy patterns, stripes, and small checks cause moire artifacts on webcam video, especially at lower resolutions. Solid, muted colors look best in small webcam overlays.
Try Screenify Studio — free, unlimited recordings
Auto-zoom, AI captions, dynamic backgrounds, and Metal-accelerated export.
FAQ
Can I add a webcam to a screen recording on Mac for free?
Yes. The QuickTime + Photo Booth workaround is completely free but looks rough. Screenify Studio's free plan includes built-in webcam overlays with professional layouts and no watermark. OBS Studio is free and offers full webcam customization.
What's the best webcam layout for tutorials?
A small circle in the bottom-right or bottom-left corner is the most common layout for software tutorials. It provides face presence without blocking the screen content your viewers are watching. Use a larger webcam or split-screen layout only for sections where your face is more important than the screen (intros, summaries, emotional moments).
Can I change the webcam position after recording?
In Screenify Studio, yes — the webcam is recorded as a separate layer, so you can reposition, resize, or change layouts in the editor. In OBS and QuickTime, the webcam position is baked into the recording and cannot be changed afterward.
Should I use the built-in Mac camera or an external webcam?
For professional-looking content, an external 1080p webcam (like the Logitech C920 or C922) is a worthwhile upgrade. However, the built-in FaceTime camera on M1+ MacBooks is acceptable for small overlays, especially with good lighting. If you have an iPhone running iOS 16+, Continuity Camera lets you use your iPhone as a Mac webcam — this produces the best quality of any option.
How do I avoid the webcam covering important UI elements?
Position the webcam overlay in the corner of the screen with the least important content. In most apps, the bottom-right corner has the least critical UI. Screenify Studio lets you reposition the webcam per-section, so you can move it out of the way when specific UI elements need to be visible.
Can I record my webcam without the screen?
Yes. In OBS, create a scene with only a Video Capture Device source. In Screenify Studio, choose the Full Camera layout. mmhmm is designed for camera-first recording with optional screen sharing. QuickTime also has a standalone video recording mode (File → New Movie Recording).
Does adding a webcam affect recording performance?
Adding a webcam overlay increases CPU and GPU usage slightly. On Apple Silicon Macs (M1 and later), the impact is minimal — you won't notice a difference. On older Intel Macs, recording at high resolution with a webcam overlay may cause frame drops; reduce the screen recording resolution or webcam resolution to 720p.
Can I use multiple webcams in one recording?
OBS supports multiple Video Capture Device sources — you can add two or more webcams and position them anywhere on the canvas. This is useful for recording a face cam plus a top-down view of your hands on a keyboard or drawing tablet. Screenify Studio supports one camera feed per recording. mmhmm also supports only a single camera.
How do I use Continuity Camera (iPhone as webcam)?
On macOS Ventura or later, your iPhone can serve as a Mac webcam wirelessly. Requirements: both devices signed into the same Apple ID, on the same Wi-Fi network, and the iPhone running iOS 16+. Once connected, your iPhone appears as a camera option in any recording app's camera selection. Mount the iPhone at eye level using a MagSafe stand or a phone tripod for stable framing.
Related Guides
Try Screenify Studio
Record your screen with auto-zoom, AI captions, dynamic backgrounds, and Metal-accelerated export. Free plan, unlimited recordings.
Download Free


