How to Convert MOV to MP4 on Mac
4 proven methods to convert MOV files to MP4 on Mac — Finder, Screenify Studio, HandBrake, and Permute compared step-by-step.

Every screen recording on Mac saves as a .mov file by default. That works fine inside the Apple ecosystem — but the moment you upload to a website, share with a Windows user, or embed in a slide deck, you'll hit compatibility issues. MP4 (H.264) is the universal format that plays everywhere: browsers, Android devices, Slack previews, LMS platforms, social media uploaders, and email clients.
The good news: you don't need expensive software. macOS itself can handle the conversion, and several free tools do it faster with more control over quality and file size.
Quick Comparison
| Tool | Price | Batch Convert | Quality Control | Difficulty |
|---|---|---|---|---|
| Finder (Encode Selected Video) | Free (built-in) | No | Limited (2 presets) | Easy |
| Screenify Studio | Free / Pro $9.99/mo | Yes | Resolution + FPS + codec | Easy |
| HandBrake | Free (open-source) | Yes | Full (bitrate, encoder, filters) | Moderate |
| Permute | $14.99 one-time | Yes | Presets + custom | Easy |
Method 1: macOS Finder — Encode Selected Video Files
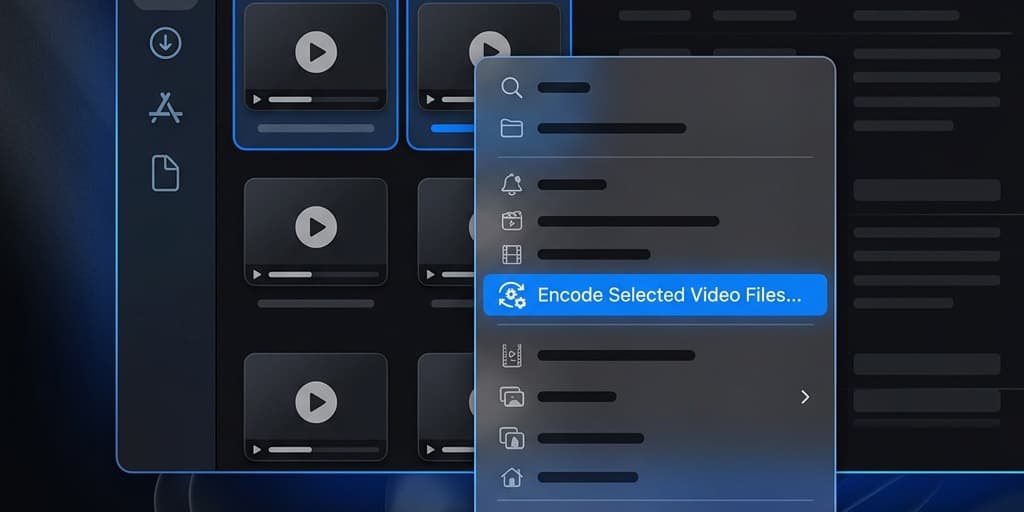
The fastest way to convert a single MOV to MP4 requires zero downloads. Apple built a video transcoder directly into Finder, though it's hidden behind a right-click menu that most people never discover.
Steps
- Open Finder and navigate to the folder containing your
.movfile - Right-click (or Control-click) the
.movfile - Hover over Encode Selected Video Files... in the context menu — it's typically near the bottom, below Quick Actions
- A dialog box appears with these options:
- Setting — choose from three presets:
- 480p — smallest file, suitable for email attachments or low-bandwidth sharing
- 720p — balanced quality, good for Slack messages or internal documentation
- 1080p — full HD, appears only when the source file is 1080p or higher
- Apple ProRes — lossless format for professional editing workflows (not MP4)
- Greater compatibility — check this box. It forces H.264 encoding in an
.m4vcontainer, which plays on virtually every device. Without it, macOS may use HEVC (H.265), which older Windows machines and some web players can't decode.
- Setting — choose from three presets:
- Click Continue
- Finder creates a new file in the same directory with an
.m4vextension. The original.movremains untouched.
Renaming .m4v to .mp4
The .m4v file Finder produces is technically an MP4 container — Apple just uses a different extension. If you need the .mp4 extension specifically (many upload forms check the extension):
- Right-click the
.m4vfile → Rename - Change the extension from
.m4vto.mp4 - macOS asks: Are you sure you want to change the extension? Click Use .mp4
The file plays identically. No re-encoding happens — you're just changing the label.
Limitations
- No batch processing — you must right-click each file individually. Converting 20 recordings means 20 manual clicks.
- No bitrate control — you can't target a specific file size. A 2-minute 1080p recording might produce 80 MB or 200 MB depending on scene complexity.
- No audio codec selection — Finder always uses AAC audio, which is fine for most cases but doesn't allow you to strip audio entirely or choose a different codec.
- No progress indicator — Finder shows a circular progress bar in the file icon, but no percentage or estimated time remaining.
This method is ideal when you have a single recording and just need a quick MP4 for uploading. For anything more — batch jobs, custom quality, or trimming — use one of the methods below.
Method 2: Screenify Studio
Screenify Studio handles the MOV-to-MP4 problem at the source. Instead of recording in MOV and converting later, you can export directly to MP4 (H.264) from the editor — or re-export any existing recording in the format you need.
Steps
- Open Screenify Studio and either start a new recording or open an existing one from your library
- After recording, the editor opens automatically. Make any edits — trim dead time at the start, apply auto-zoom to highlight mouse movements, or add a webcam overlay
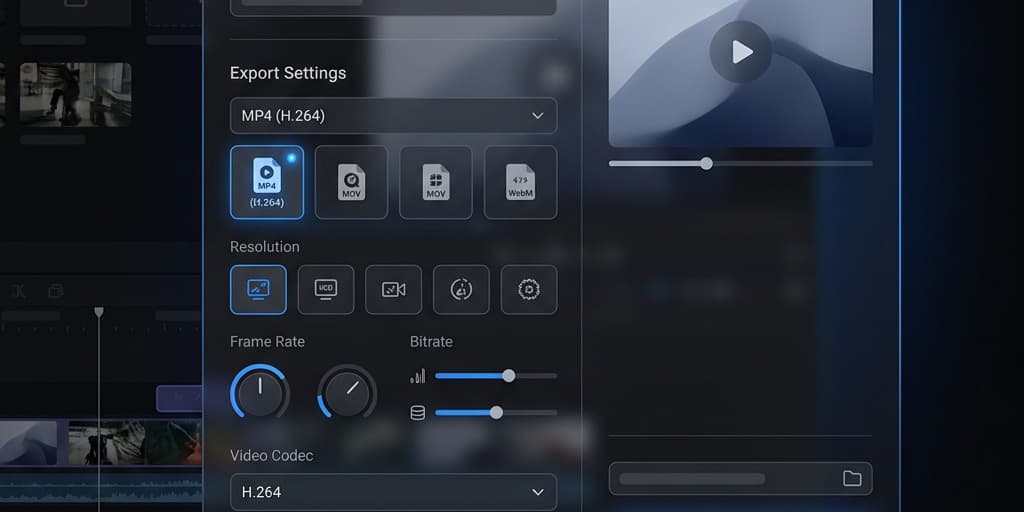
- Click the Export button in the top-right corner of the editor
- In the export panel, configure your output:
- Format — select MP4 (H.264) from the dropdown. Other options include MOV, WebM, and GIF
- Resolution — choose from 720p, 1080p, or 4K. Screenify preserves the original recording resolution by default
- Frame rate — 30 FPS for standard recordings, 60 FPS for smooth gameplay or animation captures
- Quality — drag the slider between file size and visual fidelity. The preview updates in real-time so you can judge the tradeoff before committing
- Click Export and choose your save location
- Screenify uses Apple's Metal-accelerated encoder, so a 5-minute 1080p recording typically finishes in under 30 seconds on M-series chips
Why export from Screenify instead of converting separately
- Skip the double-encode — recording in MOV then converting to MP4 means your video gets compressed twice, degrading quality each time. Exporting directly to MP4 means one compression pass.
- Metadata stays intact — Screenify embeds chapter markers, cursor highlights, and zoom keyframes into the export. A post-hoc conversion tool strips all of that.
- Batch export — select multiple recordings in the library, right-click, and choose Export All as MP4. Each file processes in parallel using all available CPU cores.
If you're recording screen content regularly and sharing it outside of macOS, exporting to MP4 from the start saves a conversion step every single time.
Try Screenify Studio — free, unlimited recordings
Auto-zoom, AI captions, dynamic backgrounds, and Metal-accelerated export.
Method 3: HandBrake (Free, Open-Source)
HandBrake is the go-to free video transcoder for macOS, Windows, and Linux. It gives you granular control over every encoding parameter — codec, bitrate, resolution, filters, audio tracks, and subtitles. If Finder's two presets feel limiting, HandBrake opens up the full toolbox.
Install HandBrake
- Go to handbrake.fr and click Download HandBrake
- Open the downloaded
.dmgfile and drag HandBrake into your Applications folder - On first launch, macOS may warn that HandBrake is from an unidentified developer. Go to System Settings → Privacy & Security and click Open Anyway
Convert a single MOV file
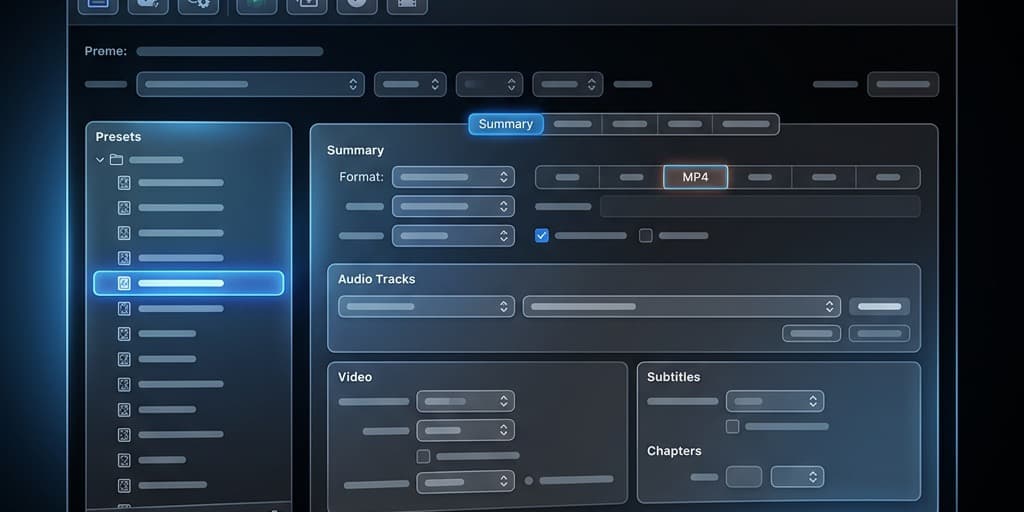
- Launch HandBrake
- Click Open Source (top-left) or drag your
.movfile directly onto the HandBrake window - HandBrake scans the file and displays its properties: duration, resolution, codecs, audio tracks
- Under the Summary tab, verify the Format is set to MP4
- Choose a preset from the right sidebar:
- General → Fast 1080p30 — good balance of speed and quality for screen recordings
- General → HQ 1080p30 Surround — higher quality, larger file, slower encode
- Web → Gmail Large 3 Minutes 720p30 — optimized for email-friendly file sizes
- Click the Video tab to fine-tune:
- Video Encoder — H.264 (x264) for maximum compatibility, or H.265 (x265) for 30-40% smaller files at the cost of encoding speed
- Quality — the RF (Rate Factor) slider. Lower RF = higher quality. RF 18-22 is the sweet spot for screen content. Text stays sharp at RF 20.
- Encoder Preset — ranges from Ultrafast to Veryslow. For screen recordings (lots of static content with occasional movement), "Medium" encodes efficiently without wasting time
- Click the Audio tab — HandBrake defaults to AAC passthrough, which preserves whatever audio your MOV contains. Leave this alone unless you want to strip audio entirely (click the red X on the audio track)
- Set your Save As path at the bottom of the window — type a filename and click Browse to choose the destination folder
- Click the green Start button in the toolbar
- HandBrake shows progress percentage and estimated time remaining in the bottom bar
Batch convert multiple MOV files
- Open HandBrake and click Open Source
- Select a folder containing your MOV files instead of a single file
- HandBrake lists all video files in the folder as separate titles
- Click Add to Queue (top toolbar) for each title, or use Queue → Add All to add every file
- Open the Queue window (toolbar icon or Window → Queue)
- Click Start Queue — HandBrake processes files sequentially, maintaining your preset settings for each
Optimal settings for screen recordings
Screen recordings differ from camera footage: they contain large areas of flat color, sharp text, and abrupt transitions. These settings reduce file size without visible quality loss:
- Video Encoder: H.264 (x264)
- RF: 20 (lower RF = larger file but crisper text)
- Encoder Preset: Medium
- Encoder Tune: None (the "Animation" tune can help for cartoon-style content but isn't necessary for UI recordings)
- Resolution: Same as source (don't downscale unless targeting a specific platform requirement)
A typical 10-minute 1080p screen recording converts from a 500 MB MOV to a 60-90 MB MP4 with these settings.
Method 4: Permute (Paid, $14.99)
Permute is a macOS-native media converter that prioritizes drag-and-drop simplicity over technical controls. If HandBrake feels overwhelming and you regularly convert batches of files, Permute's clean interface is worth the one-time purchase.
Steps
- Purchase and download Permute from the Mac App Store or the developer's website
- Launch Permute — the app opens as a compact window with a large drop zone
- Drag one or more
.movfiles onto the Permute window. Each file appears as a card with a thumbnail preview - In the bottom-left corner, click the format dropdown and select MP4 (H.264)
- To adjust quality settings before converting:
- Click the gear icon on any file card → Video Settings
- Choose a resolution preset or enter a custom width/height
- Set the bitrate or use the quality slider
- Click the Play button (▶) in the bottom-right to start converting all queued files simultaneously
- Permute uses hardware acceleration on Apple Silicon, so conversions run fast — expect roughly real-time speed (a 5-minute video converts in about 5 minutes or less)
- Converted files save to the same directory as the originals by default. Change this in Permute → Settings → Output Folder
Features worth noting
- Watch folders — Permute can monitor a folder and automatically convert any new MOV file dropped into it. Set this up in Settings → Watch Folders. Useful if you save all screen recordings to a specific directory.
- Presets for platforms — built-in presets for YouTube, Vimeo, Instagram, and Twitter. Each preset adjusts resolution, bitrate, and aspect ratio to match the platform's recommended specs.
- Preview before converting — click the thumbnail on any queued file to preview a few seconds of the converted output without processing the entire file.
Permute costs $14.99 but handles the conversion workflow more smoothly than HandBrake for non-technical users who just want a reliable MOV-to-MP4 pipeline.
Troubleshooting
Finder's "Encode Selected Video Files" option is missing
This happens when the selected file isn't recognized as a video by macOS. Causes:
- The file extension is wrong — rename it to
.movif it's actually a MOV file with a different extension - The file is corrupted or still being written (e.g., a recording that crashed mid-save)
- You're running macOS older than Mojave (10.14). The Encode option was added in Mojave.
Converted MP4 has no audio
Check the source MOV file first — play it in QuickTime Player and confirm audio is present. If the original has no audio track (common with macOS Screenshot Toolbar recordings that had no microphone selected), the MP4 won't have one either. In HandBrake, verify the Audio tab shows at least one track. If it shows "None Found," the source genuinely has no audio.
MP4 file is larger than the original MOV
This usually means the MOV was encoded with HEVC (H.265) — common on Apple Silicon Macs — and you're converting to H.264, which produces larger files at equivalent quality. Solutions:
- Accept the size increase (H.264 compatibility is often worth the tradeoff)
- Use H.265 output in HandBrake if your target platform supports it
- Lower the quality setting slightly — for screen content, the difference between RF 20 and RF 22 is barely visible but saves 20-30% file size
Conversion takes excessively long
HandBrake's x264 encoder runs on CPU only. If you're encoding a 4K recording on an older Intel Mac, expect 2-3x real-time (a 10-minute recording takes 20-30 minutes). Switch the encoder preset from "Slow" to "Fast" or "Veryfast" for quicker results with minimal quality impact on screen content. On Apple Silicon, consider using VideoToolbox (hardware encoder) in HandBrake's Video tab — it's significantly faster, though file sizes run slightly larger.
Converted video stutters or drops frames on playback
The MP4 might be encoded at a frame rate your player can't handle smoothly. Screen recordings captured at variable frame rate (VFR) — which macOS does by default — can confuse some players. In HandBrake, enable Constant Framerate under the Video tab and set it to 30 FPS. This re-times the video to a fixed interval, eliminating playback stuttering in Windows media players and web browsers.
FAQ
Q: Does converting MOV to MP4 reduce video quality?
Every re-encode introduces some quality loss because the video gets compressed again. However, the loss is negligible for screen recordings when using reasonable quality settings (RF 18-22 in HandBrake). If you want zero quality loss, use a tool that remuxes instead of re-encodes — FFmpeg can do this with ffmpeg -i input.mov -c copy output.mp4 when the MOV already contains H.264 video. This rewraps the same data in an MP4 container in seconds with no quality change.
Q: Is .m4v the same as .mp4?
Functionally, yes. Both use the MPEG-4 container format. Apple uses .m4v for files that may include DRM (FairPlay) or AC3 audio, but for screen recordings exported by Finder, the .m4v file is identical to an .mp4. Renaming the extension works without issues.
Q: Can I convert MOV to MP4 using Terminal on Mac?
Yes, using FFmpeg. Install it via Homebrew: brew install ffmpeg. Then run:
ffmpeg -i recording.mov -c:v libx264 -crf 20 -preset medium -c:a aac -b:a 128k output.mp4This encodes the video with H.264 at quality level 20 and AAC audio at 128 kbps. For a simple remux (no re-encoding): ffmpeg -i recording.mov -c copy output.mp4 — this only works if the MOV already contains H.264/AAC streams.
Q: What's the fastest way to convert MOV to MP4 on Apple Silicon?
Hardware-accelerated encoding through VideoToolbox. In HandBrake, select H.264 (VideoToolbox) as the video encoder. On M1/M2/M3/M4 chips, this runs 5-10x faster than software encoding. Screenify Studio also uses Metal acceleration for exports, finishing most conversions in seconds rather than minutes.
Q: Will converting MOV to MP4 reduce file size?
Usually, yes — sometimes dramatically. A 10-minute 1080p screen recording saved as MOV (Apple ProRes or HEVC) by QuickTime can be 500 MB to 2 GB. Converting to H.264 MP4 at RF 20 typically produces a 60-120 MB file. The reduction depends on content complexity: recordings with mostly static UI elements compress much better than recordings with rapid full-screen motion.
Q: Should I use H.264 or H.265 for MP4?
Use H.264 when sharing with others, uploading to web platforms, or embedding in presentations. It plays everywhere — every browser, every device, every OS. Use H.265 when file size matters more than compatibility (e.g., archiving recordings on your own drive). H.265 produces files 30-40% smaller than H.264 at the same visual quality but takes longer to encode and may not play on older devices.
Q: Can I batch-convert an entire folder of MOV files?
Finder handles one file at a time. For batch conversion, use HandBrake (free — add files to queue), Permute (paid — drag the entire folder), or Screenify Studio (select multiple recordings → Export All as MP4). FFmpeg users can write a one-liner: for f in *.mov; do ffmpeg -i "$f" -c:v libx264 -crf 20 "${f%.mov}.mp4"; done
Q: How do I convert MOV to MP4 without losing metadata?
Most converters strip custom metadata (chapter markers, GPS data, camera info). FFmpeg's -c copy remux preserves stream-level metadata. HandBrake preserves basic tags (title, date) but drops custom fields. If metadata preservation matters for your workflow, remuxing with FFmpeg is the safest approach.
Related reading
- How to Screen Record on Mac — covers the recording step in detail, including system audio capture and webcam overlays
- How to Record Screen in 4K on Mac — if your source recordings are 4K, this guide covers optimal export settings to maintain resolution while keeping files manageable
- How to Convert Video to GIF on Mac — when MP4 isn't the right format and you need a looping animation for docs, Slack, or GitHub PRs
Try Screenify Studio
Record your screen with auto-zoom, AI captions, dynamic backgrounds, and Metal-accelerated export. Free plan, unlimited recordings.
Download Free


