How to Screen Record on macOS Sequoia
Screen record on macOS Sequoia with 4 methods — Screenshot toolbar, Screenify Studio, OBS, and QuickTime. Step-by-step for each.

macOS Sequoia (15.x) changed how screen recording works under the hood. Apple tightened privacy controls, introduced monthly re-authorization prompts, and rebuilt the capture pipeline around ScreenCaptureKit. If your screen recording workflow broke after upgrading — or the permission dialogs suddenly started reappearing — Sequoia is why.
Here are four methods that work on Sequoia right now, with the specific settings paths and permission steps this version requires.
Quick Comparison
| Tool | Price | System Audio | Webcam | Editing | Sequoia-Specific Advantage |
|---|---|---|---|---|---|
| macOS Screenshot Toolbar | Free (built-in) | No | No | Trim only | Zero setup, no permissions needed for basic capture |
| Screenify Studio | Free / Pro $9.99/mo | Yes | Yes | Auto-zoom, captions, backgrounds | ScreenCaptureKit native — low CPU, passes monthly re-auth automatically |
| OBS Studio | Free (open-source) | Yes (macOS Audio Capture) | Yes | None (record only) | ScreenCaptureKit source available since OBS 30 |
| QuickTime Player | Free (built-in) | No | No | Trim only | Already authorized as system app |
Before You Start: Sequoia's New Privacy Permissions
Sequoia introduced a significant change to screen recording permissions that affects every third-party app. Understanding this upfront saves frustration later.
The Monthly Re-Authorization Prompt
Starting with macOS 15.0, Apple requires users to re-authorize screen recording access every 30 days for third-party apps. After 30 days, the next time an app attempts to capture your screen, macOS displays a modal dialog:
"[App Name] would like to record the contents of your screen. Allow for one month?"
You get two options: Allow for One Month or Deny. There is no "allow permanently" option for third-party apps. Built-in tools (Screenshot toolbar, QuickTime) are exempt.
How to Pre-Authorize Apps
Before recording, grant permissions so you don't hit a dialog mid-session:
- Open System Settings (not System Preferences — Sequoia uses the redesigned Settings app)
- Navigate to Privacy & Security → Screen & System Audio Recording
- You'll see a list of apps that have requested access. Toggle on the apps you plan to use.
- macOS may ask you to quit and reopen the app for the change to take effect
Note the path: in Sequoia, Apple renamed the section from "Screen Recording" to "Screen & System Audio Recording", combining screen and audio capture permissions into one toggle.
ScreenCaptureKit: What Changed Under the Hood
Sequoia's capture pipeline runs on ScreenCaptureKit (SCKit), Apple's framework introduced in macOS 12.3 but now the primary capture method. SCKit captures frames at the compositor level rather than through the WindowServer, which means:
- 30-40% lower CPU usage compared to the legacy CGDisplayStream API
- Native HDR support on XDR and Liquid Retina displays
- Per-window and per-app audio capture without virtual audio devices
- Hardware-accelerated encoding through VideoToolbox integration
Apps built on SCKit (Screenify Studio, OBS 30+) benefit automatically. Older apps still using CGDisplayStream will work but consume more resources.
Method 1: macOS Screenshot Toolbar (Built-in)
The Screenshot toolbar works identically to previous macOS versions with one key Sequoia addition: it now respects Focus modes, suppressing notification banners during recording if you have a Focus active.
Steps
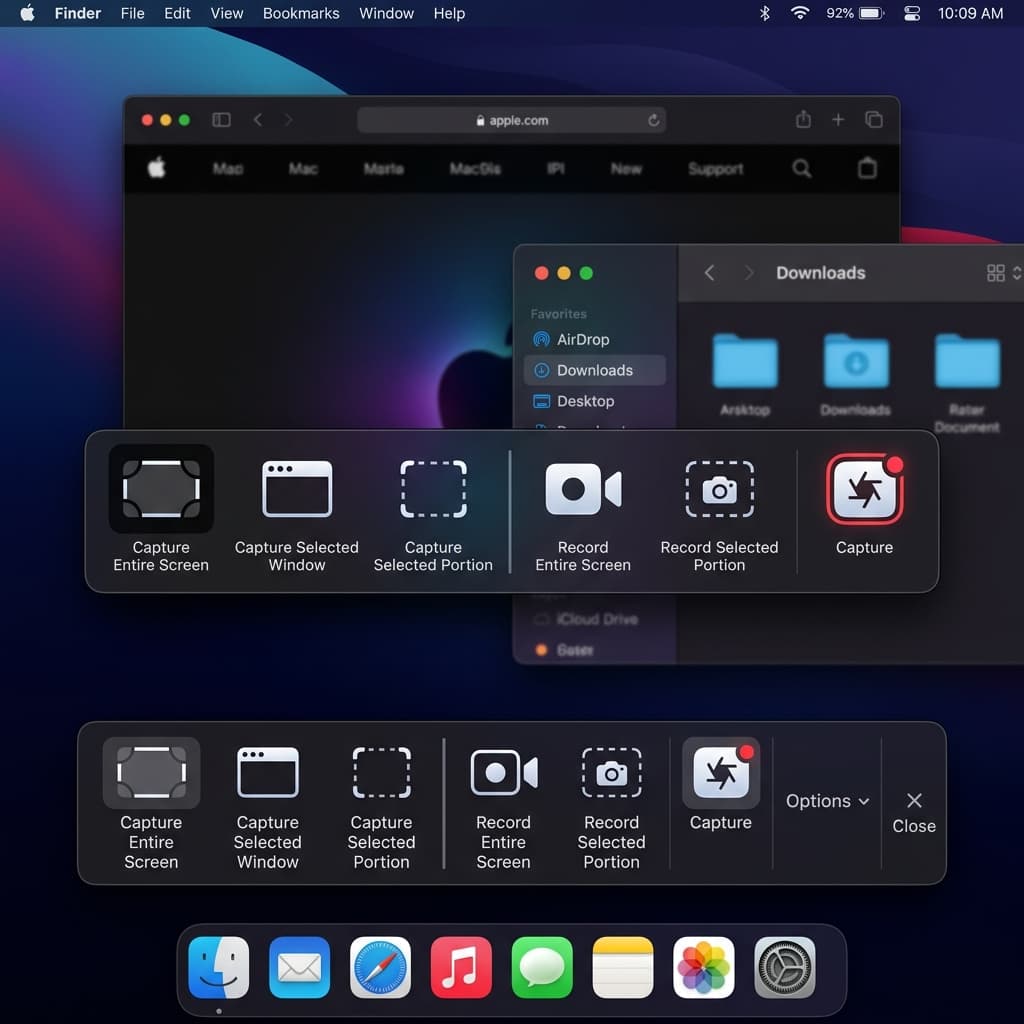
- Press ⌘ + Shift + 5 to open the Screenshot toolbar at the bottom of your screen
- Select a recording mode:
- Record Entire Screen — the solid rectangle icon (fourth button from left)
- Record Selected Portion — the dotted rectangle icon (fifth button from left)
- Click Options to configure recording settings:
- Save to — Desktop is the default. In Sequoia, iCloud Drive locations sync immediately after recording finishes, which wasn't reliable in Sonoma.
- Timer — 5 or 10 second countdown. The countdown overlay now respects your display's Dynamic Island area on newer MacBook Pro models.
- Microphone — lists all available input devices. In Sequoia, Bluetooth microphones (AirPods Pro, Beats) appear here even if they're not the current system input.
- Show Mouse Clicks — renders a dark circle at each click position during playback
- Show Floating Thumbnail — a 5-second preview appears in the bottom-right corner after recording stops. Click to trim; swipe right to dismiss.
- Click Record or press Return
- Stop recording: click the Stop button (⏹) in the menu bar, or press ⌘ + Control + Esc
Sequoia-Specific Behavior
- No re-authorization required — the Screenshot toolbar is a system-level tool and bypasses the monthly permission prompt entirely
- HEVC output on Apple Silicon — recordings use H.265 compression by default, producing smaller files than H.264. On Intel Macs, output remains H.264.
- iPhone Mirroring integration — if you have an iPhone connected via iPhone Mirroring (new in Sequoia), the Screenshot toolbar can record the mirrored iPhone window just like any other app window. Select "Record Selected Portion" and drag over the iPhone Mirroring window. This is the fastest way to capture your iPhone screen without AirPlay or a cable.
Limitations
- No system audio capture — microphone input only
- No webcam overlay
- No post-recording editing beyond basic trim
- No annotation tools during recording
- Cursor movements stay at 1:1 scale — small UI elements are hard to follow in playback
For a deeper look at all the built-in methods, see How to Screen Record on Mac (2026 Guide).
Method 2: Screenify Studio
Screenify Studio uses ScreenCaptureKit natively, which means it gets the low-CPU capture, per-app audio isolation, and hardware-accelerated encoding that Sequoia's pipeline provides. It also handles the monthly re-authorization prompt automatically — the app detects when permission has expired and re-requests it at launch rather than mid-recording.
Steps
- Download Screenify Studio — the free plan includes unlimited recordings with no watermark
- On first launch, Sequoia displays the "Screen & System Audio Recording" permission dialog. Click Allow for One Month. The app also requests Accessibility access if you enable cursor effects — grant this at System Settings → Privacy & Security → Accessibility.
- In the recording panel, configure your capture:
- Capture Mode — Full Screen, Window, or Custom Region. Window mode on Sequoia uses SCKit's
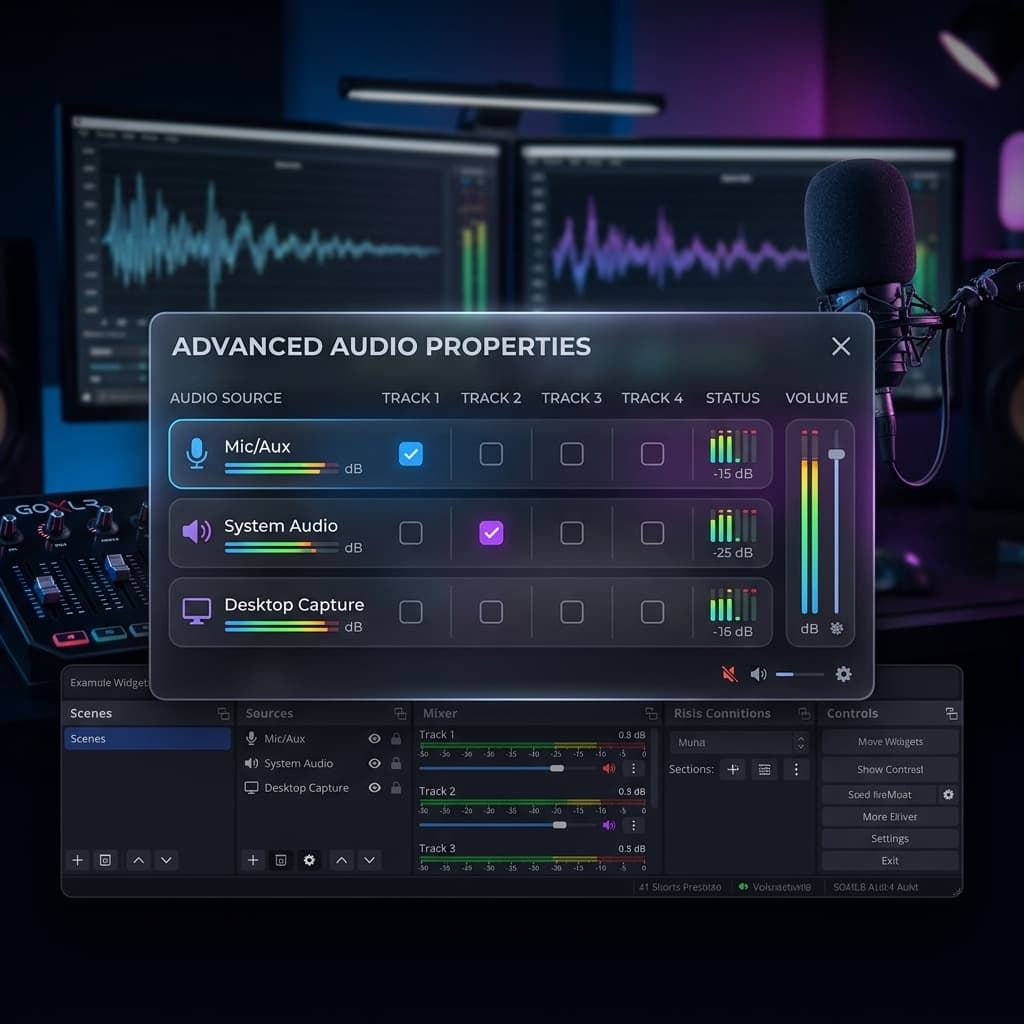
SCContentFilterto capture a single window without the desktop background bleeding through at rounded corners. - System Audio — toggle on. Screenify's audio driver captures internal audio as a separate track. On Sequoia, the driver coexists with SCKit's native audio capture without conflict.
- Microphone — toggle on for narration. A balance slider appears between System Audio and Microphone so you can set relative levels before recording.
- Webcam — toggle on to add a camera overlay. Sequoia's Continuity Camera support means your iPhone camera appears as an option here alongside your Mac's built-in camera and any external webcams.
- Capture Mode — Full Screen, Window, or Custom Region. Window mode on Sequoia uses SCKit's
- Press ⌃ + ⌘ + R to start recording
- Press ⌃ + ⌘ + R again to stop
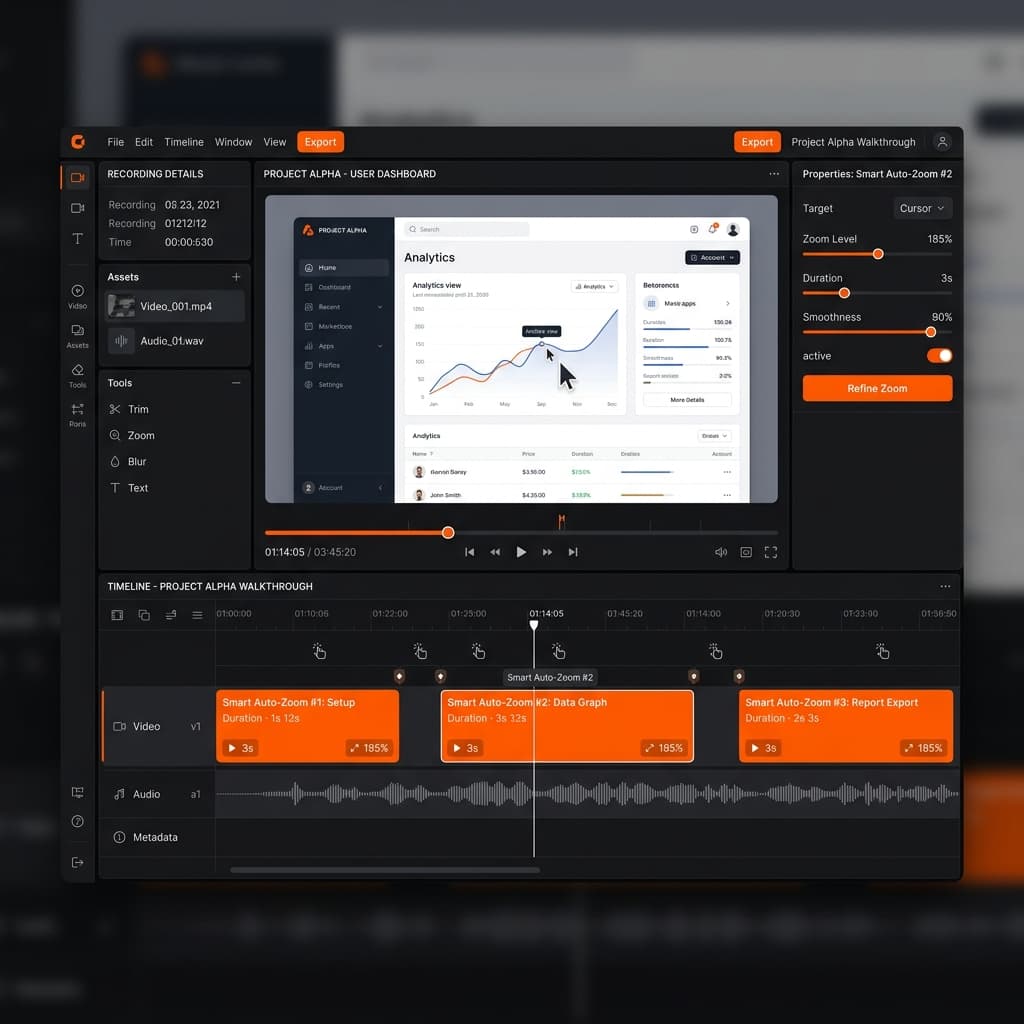
- The recording opens in the editor where you can apply:
- Auto-Zoom — the AI tracks your cursor and automatically zooms into areas of activity, making small UI interactions visible without manual keyframing
- Captions — generated from your audio tracks, positioned and styled to your preference
- Background — replace the desktop wallpaper with a solid color, gradient, or custom image so your recording looks polished regardless of your actual desktop clutter
Sequoia-Specific Features
iPhone Mirroring Recording — When iPhone Mirroring is active, Screenify detects the mirrored window and offers it as a capture target in Window mode. Unlike the Screenshot toolbar, Screenify applies its full post-processing (auto-zoom, backgrounds, captions) to the iPhone recording. Record an iOS app demo on your Mac with production-quality output.
Automatic Permission Renewal — Screenify checks its screen recording authorization status at launch. If the 30-day window has expired, it prompts you immediately rather than failing when you hit Record. No interrupted recordings.
Metal-Accelerated Export — Sequoia's VideoToolbox improvements mean exports complete 2-3x faster on M-series chips compared to Sonoma. A 10-minute 4K recording typically exports in under 90 seconds on an M3 MacBook Pro.
If you also need to capture system audio, the setup guide covers the details: How to Record Internal Audio on Mac.
Try Screenify Studio — free, unlimited recordings
Auto-zoom, AI captions, dynamic backgrounds, and Metal-accelerated export.
Method 3: OBS Studio
OBS Studio added native ScreenCaptureKit and macOS Audio Capture sources in version 30, making it a capable free option on Sequoia. The setup is more involved than Screenify or the built-in toolbar, but OBS offers granular control over encoding, bitrate, and multi-source scene composition.
Steps
- Download OBS Studio from obsproject.com — version 30.0 or later required for SCKit support
- On first launch, Sequoia's permission dialog appears. Click Allow for One Month for screen recording access. OBS also needs Microphone access if you plan to capture voice — grant it at System Settings → Privacy & Security → Microphone.
- Create a new Scene (bottom-left Scenes panel, click +)
- Add a macOS Screen Capture source (this is the SCKit-based source):
- Click + in the Sources panel → macOS Screen Capture
- Choose capture type: Display, Window, or Application
- Application mode is new in OBS 30 and unique to SCKit — it captures all windows of a single app, including dialog boxes and pop-overs, without picking up other apps
- Select your target display, window, or application from the dropdown
- Check Show Cursor if you want the mouse pointer visible
- Add audio:
- For system audio: click + in Sources → macOS Audio Capture. This uses SCKit's native audio tap — no BlackHole or virtual audio device needed. Select the application whose audio you want, or choose "Desktop Audio" for all system sound.
- For microphone: click + in Sources → Audio Input Capture → select your mic
- Configure output: go to Settings → Output → Recording:
- Recording Format: MKV (recommended for crash safety; remux to MP4 after recording via File → Remux Recordings)
- Encoder: Apple VT H265 Hardware Encoder (leverages Sequoia's VideoToolbox — lower CPU than software encoding)
- Recording Quality: "High Quality, Medium File Size" for most use cases
- Click Start Recording (bottom-right) or press the hotkey you've configured
- Click Stop Recording when finished
Sequoia-Specific Behavior
- macOS Audio Capture eliminates the need for BlackHole or Loopback on Sequoia. It taps directly into the SCKit audio pipeline.
- OBS is subject to the monthly re-authorization prompt. If you open OBS and your capture source shows a black screen, go to System Settings → Privacy & Security → Screen & System Audio Recording and re-toggle OBS.
- The Apple VT H265 Hardware Encoder option only appears if you're running macOS 13+ on Apple Silicon. On Intel Macs running Sequoia, use "Apple VT H264 Hardware Encoder" instead.
Limitations
- No built-in editing — OBS records raw footage only
- Complex UI compared to dedicated screen recording apps
- No auto-zoom, captions, or cursor effects
- Scene setup takes time if you need webcam overlays, lower thirds, or branding elements
Method 4: QuickTime Player
QuickTime Player remains a reliable option for simple recordings. As a first-party Apple app, it skips the monthly re-authorization entirely and integrates tightly with Sequoia's media pipeline.
Steps
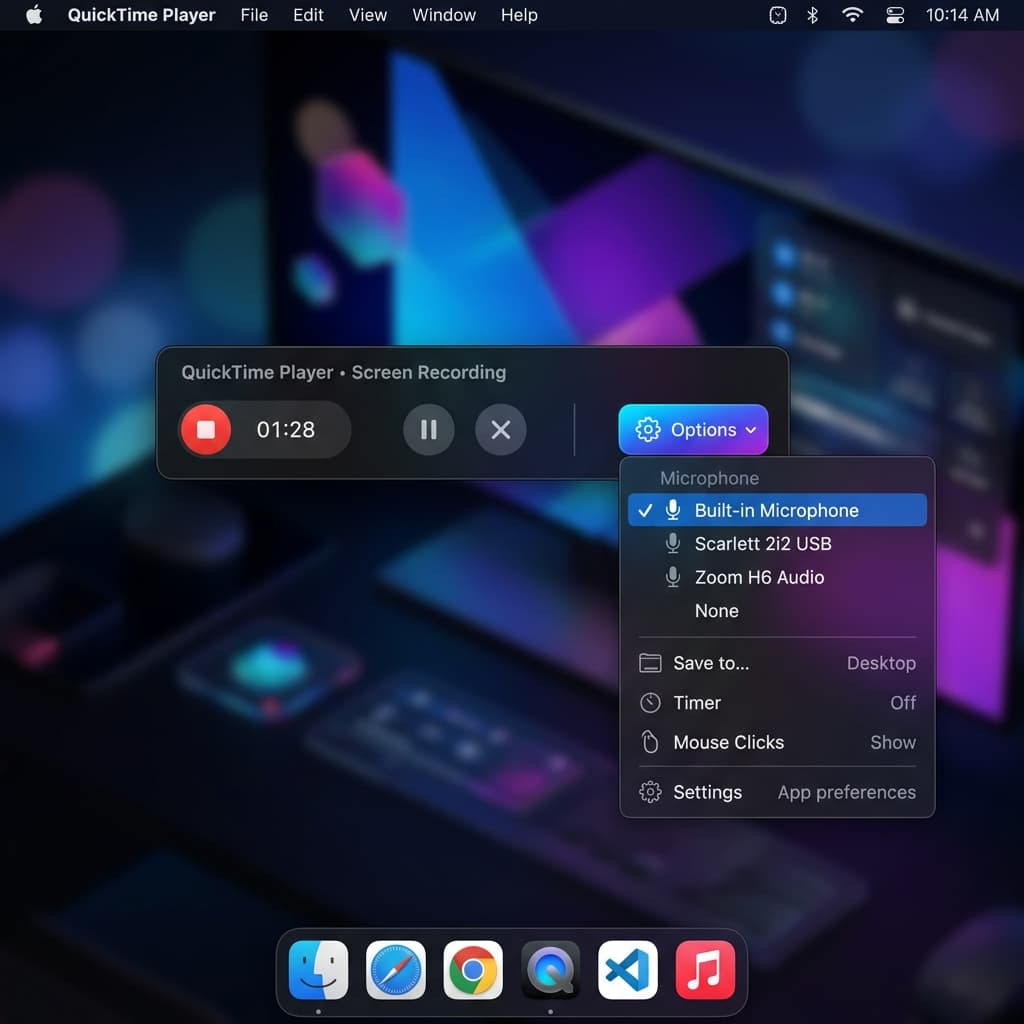
- Open QuickTime Player (Applications folder or Spotlight search)
- Go to File → New Screen Recording (or press ⌃ + ⌘ + N)
- Sequoia opens the same Screenshot toolbar as Method 1, but launched from QuickTime's context. The behavior is identical:
- Select recording area (full screen or selected portion)
- Click Options for microphone selection, timer, and save location
- Click Record or press Return
- Stop recording via the menu bar Stop button or ⌘ + Control + Esc
- QuickTime opens the recording immediately. Use Edit → Trim (⌘ + T) to cut the start and end.
- Export via File → Export As — Sequoia offers 4K, 1080p, 720p, and 480p presets. The 4K preset uses HEVC on Apple Silicon Macs.
QuickTime + iPhone Mirroring
QuickTime has a lesser-known trick on Sequoia: File → New Movie Recording, then select your iPhone from the camera dropdown. This creates a direct USB or wireless video feed from your iPhone — higher quality than iPhone Mirroring's window capture, and with audio passthrough.
Requirements:
- iPhone and Mac on the same Apple Account
- iPhone running iOS 18 or later
- USB-C or Lightning cable connected (wireless works but introduces latency)
Limitations
- Same constraints as the Screenshot toolbar: no system audio, no webcam overlay, no editing beyond trim
- QuickTime's export presets are fixed — you can't customize bitrate or codec settings
- No cursor highlighting or zoom effects
For adding a webcam to your recordings, see How to Screen Record with Webcam on Mac.
Recording Your iPhone Screen via iPhone Mirroring
iPhone Mirroring is the standout Sequoia feature for screen recording. It mirrors your iPhone display into a resizable Mac window — and any screen recording tool can capture that window.
Setup
- Make sure your iPhone and Mac are signed into the same Apple Account
- On your Mac, open iPhone Mirroring (search Spotlight or find it in Applications)
- Your iPhone locks and its screen appears on your Mac. You can interact with iOS apps using your Mac's keyboard and trackpad.
- Resize the iPhone Mirroring window to your preferred recording resolution — drag the corner to scale up for higher-resolution captures
Recording the Mirrored Screen
Use any of the four methods above to capture the iPhone Mirroring window:
- Screenshot toolbar: press ⌘ + Shift + 5, choose "Record Selected Portion", drag over the iPhone window
- Screenify Studio: select Window mode, pick the iPhone Mirroring window. Download Screenify Studio to get auto-zoom and backgrounds applied to your iOS recordings.
- OBS: add a macOS Screen Capture source in Window mode targeting the iPhone Mirroring window
- QuickTime: use New Movie Recording with iPhone as the camera source for a direct feed, or New Screen Recording to capture the mirrored window
Limitations
- iPhone Mirroring requires both devices on the same Wi-Fi network
- Notifications are suppressed on the iPhone while mirroring is active
- Audio from the iPhone routes through your Mac's speakers — capture it as system audio using Screenify or OBS
- Some DRM-protected content (Netflix, Apple TV+) shows a black screen in the mirrored window
Troubleshooting
1. "Screen Recording permission denied" After Sequoia Update
After upgrading to Sequoia, previously granted screen recording permissions reset. Every third-party recording app needs re-authorization.
Fix: Open System Settings → Privacy & Security → Screen & System Audio Recording. Find your app in the list. If the toggle is off, turn it on. If the app isn't listed, open the app and attempt a recording — the permission dialog will appear. If it still doesn't work, remove the app from the list (click the minus button), then re-add it.
2. Monthly Permission Prompt Appears Mid-Recording
If your 30-day authorization expires while you have an active recording session, Sequoia won't interrupt the in-progress recording. The prompt appears the next time the app tries to initiate a new capture. However, if you stop and restart recording after expiration, you'll get the prompt.
Fix: There's no way to disable the monthly prompt — it's an OS-level security measure. Set a monthly calendar reminder to open your recording app and re-authorize proactively. Screenify Studio handles this automatically at launch.
3. Black Screen in OBS macOS Screen Capture Source
This happens when OBS's screen recording permission has expired or was denied.
Fix: Go to System Settings → Privacy & Security → Screen & System Audio Recording. Toggle OBS off, wait 3 seconds, toggle it back on. Quit and reopen OBS. If the source still shows black, delete the macOS Screen Capture source and re-add it.
4. No System Audio in QuickTime or Screenshot Toolbar
macOS does not allow its built-in recording tools to capture system audio. This is by design — Apple restricts it to prevent unauthorized audio capture.
Fix: Use a third-party tool. Screenify Studio captures system audio natively with its built-in driver. OBS uses the macOS Audio Capture source on Sequoia 15.0+. For a full walkthrough, see How to Record Internal Audio on Mac.
5. iPhone Mirroring Window Shows "iPhone in Use" Instead of the Screen
This occurs when someone is actively using the iPhone (screen unlocked and awake).
Fix: Lock the iPhone by pressing the side button. iPhone Mirroring only activates when the iPhone's screen is off. Once locked, the Mac's iPhone Mirroring window should display the iPhone home screen within a few seconds. If it still doesn't connect, make sure both devices are on the same Wi-Fi network and signed into the same Apple Account.
Try Screenify Studio — free, unlimited recordings
Auto-zoom, AI captions, dynamic backgrounds, and Metal-accelerated export.
FAQ
Does macOS Sequoia record screen with audio by default?
No. The built-in Screenshot toolbar and QuickTime capture microphone audio only — not system audio. To record what's playing through your Mac's speakers (app sounds, browser audio, video call output), you need a third-party tool like Screenify Studio or OBS with macOS Audio Capture enabled. See the internal audio guide for detailed setup.
How do I stop the monthly screen recording permission popup?
You can't disable it. Apple introduced the 30-day re-authorization in Sequoia as a privacy measure. Every third-party app that accesses your screen must be re-approved monthly. The only workaround is using built-in tools (Screenshot toolbar, QuickTime) which are exempt, or using an app like Screenify Studio that detects expired permissions at launch and prompts you before you start recording.
Can I record a specific app window on Sequoia without capturing the desktop?
Yes. ScreenCaptureKit supports per-window capture natively on Sequoia. In Screenify Studio, select Window mode and click the target window. In OBS 30+, add a macOS Screen Capture source and set the type to Window or Application. The captured output includes only the app content — no desktop wallpaper, no overlapping windows. For more on area-specific recording, see How to Record a Specific Area on Mac.
Is ScreenCaptureKit better than the old CGDisplayStream API?
For most use cases, yes. SCKit runs at the compositor level with hardware acceleration, resulting in 30-40% lower CPU usage during capture. It also supports per-app audio tapping without virtual audio devices, HDR content capture, and individual window isolation with clean edges. Apps built on SCKit (Screenify Studio, OBS 30+) benefit from these improvements automatically. Apps still using CGDisplayStream will work on Sequoia but won't get the performance gains.
How do I record my iPhone screen using my Mac on Sequoia?
Two methods. iPhone Mirroring: open the iPhone Mirroring app on your Mac, lock your iPhone, then use any screen recording tool to capture the mirrored window. QuickTime direct feed: open QuickTime → File → New Movie Recording, select your iPhone from the camera dropdown (requires USB connection or same Wi-Fi network). The QuickTime method gives higher quality but requires a wired connection for best results.
Does Screenify Studio work on macOS Sequoia without issues?
Yes. Screenify Studio is built on ScreenCaptureKit and uses Metal for rendering and export. It handles Sequoia's monthly re-authorization automatically — the app checks permission status at launch and prompts you immediately if renewal is needed, so you never get interrupted mid-recording. The audio driver is compatible with Sequoia's updated audio stack and coexists with SCKit's native audio capture. Download the latest version to make sure you're on the Sequoia-compatible build.
Can I use Continuity Camera for the webcam overlay when recording on Sequoia?
Yes. Sequoia's Continuity Camera feature lets you use your iPhone as a wireless webcam. Any app that accesses the camera — including Screenify Studio and OBS — will show your iPhone as an available camera source. In Screenify, toggle Webcam on and select your iPhone from the camera dropdown. In OBS, add a Video Capture Device source and choose the iPhone. Continuity Camera supports Center Stage (auto-framing), Portrait mode (background blur), and Studio Light (face illumination) directly from the iPhone's camera hardware.
What's the best recording format for Sequoia?
On Apple Silicon Macs, HEVC (H.265) is the default and most efficient option. Sequoia's VideoToolbox encodes HEVC in hardware, producing files roughly 40% smaller than H.264 at the same quality. The Screenshot toolbar and QuickTime export as .mov with HEVC automatically. Screenify Studio exports as .mp4 with HEVC. OBS can use the Apple VT H265 Hardware Encoder for the same efficiency. If you need maximum compatibility (e.g., sharing with Windows users on older systems), H.264 .mp4 remains the safe choice.
Wrap Up
Sequoia's screen recording changes come down to three things: tighter permissions (monthly re-auth), better performance (ScreenCaptureKit everywhere), and new capture possibilities (iPhone Mirroring). The built-in tools handle quick captures without permission hassles. Screenify Studio and OBS take advantage of the ScreenCaptureKit pipeline for lower CPU usage and system audio capture.
Pick the tool that matches your needs — and if you want auto-zoom, captions, and one-click system audio without configuring virtual devices, give Screenify Studio a try.
Try Screenify Studio
Record your screen with auto-zoom, AI captions, dynamic backgrounds, and Metal-accelerated export. Free plan, unlimited recordings.
Download Free


