How to Screen Record on macOS Sonoma
Record your screen on macOS Sonoma using the Screenshot toolbar, Screenify Studio, OBS, and QuickTime — each method explained.

macOS Sonoma (14.x) changed how desktop recording works in ways most guides haven't caught up to. Desktop Widgets now live directly on the wallpaper and can appear inside your recordings. Presenter Overlay adds a built-in webcam composite that interacts with third-party recorders. Game Mode throttles background processes, which affects encoding performance. And Reactions — the hand-gesture effects Apple introduced for video calls — can fire mid-recording if you're not careful.
This guide covers four recording methods with Sonoma-specific setup, gotchas, and workarounds.
Quick Comparison
| Tool | Price | System Audio | Webcam Overlay | Sonoma Presenter Overlay | Editing | Difficulty |
|---|---|---|---|---|---|---|
| macOS Screenshot Toolbar | Free (built-in) | No | No | No (FaceTime/Zoom only) | Trim only | Easy |
| Screenify Studio | Free / Pro $9.99/mo | Yes | Yes (independent of Presenter Overlay) | Not needed — own overlay | Easy | |
| OBS Studio | Free (open-source) | Yes (via plugin) | Yes | Can capture Presenter Overlay window | Moderate | Moderate |
| QuickTime Player | Free (built-in) | No | No | No | Trim only | Easy |
Method 1: macOS Screenshot Toolbar (Built-in, Sonoma Edition)
The Screenshot toolbar is still the fastest way to record on Sonoma, but Apple changed several underlying behaviors in 14.x that affect what ends up in your recording.
Sonoma-Specific Setup
Before recording, configure two Sonoma settings that directly affect capture output:
-
Desktop Widgets visibility — In Sonoma, widgets sit on the desktop wallpaper. During a full-screen recording, they appear in the capture unless you cover them with app windows. To control this:
- Open System Settings > Desktop & Dock
- Scroll to the Desktop & Stage Manager section
- Set Show Widgets to On Desktop (they'll appear in recordings), In Stage Manager (only visible in Stage Manager), or toggle Click wallpaper to reveal desktop to Only in Stage Manager so clicking the wallpaper doesn't flash widgets mid-recording
- If you want a clean desktop capture, drag your recording window to cover the widget area or switch to Record Selected Portion mode
-
Reactions gestures — Sonoma detects hand gestures (thumbs up, hearts, fireworks, etc.) through the webcam and overlays animated effects on screen. These effects render in the system compositor, meaning they can appear in screen recordings if your camera is active:
- Open System Settings > General > Video Effects (or click the green video icon in the menu bar during a FaceTime/Zoom call)
- Toggle Reactions off before recording to prevent accidental heart or thumbs-up animations from appearing in your capture
Steps
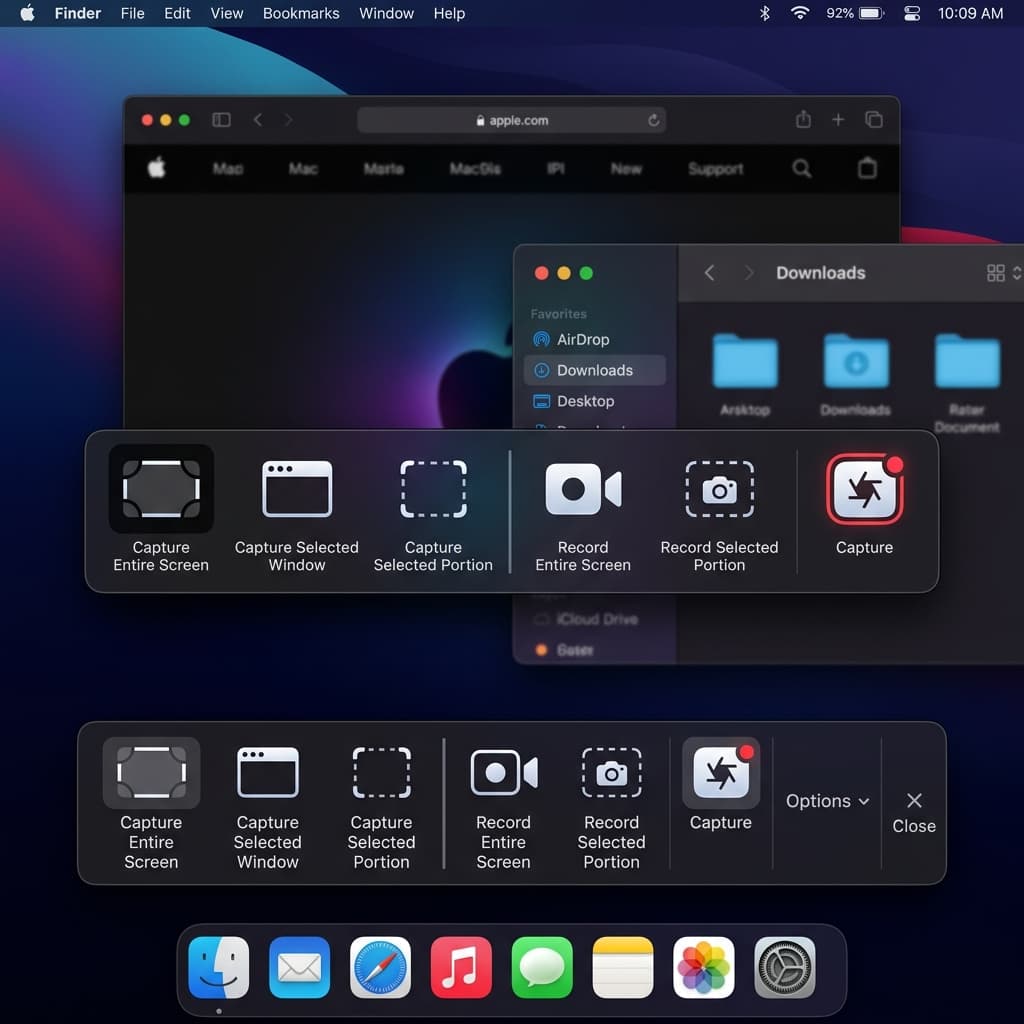
- Press ⌘ + Shift + 5 to open the Screenshot toolbar
- Sonoma displays the same five-button layout: three screenshot modes on the left, two recording modes on the right — Record Entire Screen and Record Selected Portion
- Click Options to configure:
- Save to — choose Desktop, Documents, or a custom folder. Sonoma remembers your last choice across sessions.
- Timer — 5 or 10 second countdown. The timer overlay renders on screen and will appear in any concurrent screen recording from a third-party app.
- Microphone — lists all input devices. On Sonoma, if you have an iPhone nearby with Continuity Camera enabled, it may appear as "iPhone Microphone" in this list. Select it only if you intentionally want to use the iPhone mic.
- Show Mouse Clicks — adds a dark circle pulse on each click during playback
- Select your recording mode. If you choose Record Entire Screen on a multi-monitor setup, Sonoma highlights each display and asks you to click the one you want — it no longer defaults to the primary display.
- Click Record or press Return
- Stop with ⌘ + Control + Esc or click the ⏹ icon in the menu bar
Desktop Widgets During Recording
When recording the full screen, Sonoma desktop widgets (Weather, Clock, Calendar, Reminders, etc.) are part of the wallpaper layer. They will be captured. Three options:
- Hide them: Switch Show Widgets to off in System Settings > Desktop & Dock before recording
- Cover them: Maximize your app window so it covers the widget area
- Use Selected Portion: Draw your recording region to exclude the widget strip
Output Format on Sonoma
Sonoma saves recordings as .mov files using HEVC (H.265) on Apple Silicon Macs and H.264 on Intel Macs. File sizes are typically 5-12 MB per minute of 1080p content. The codec selection is automatic — there is no setting to change it in the Screenshot toolbar.
Limitations
- No system audio capture — microphone input only
- No webcam overlay — Presenter Overlay only works in supported video conferencing apps, not the Screenshot toolbar
- No annotation or editing beyond basic trim
- No way to pause and resume — you must stop and start a new recording
- Desktop widgets appear in full-screen captures unless manually hidden
Method 2: Screenify Studio
Screenify Studio handles system audio capture and webcam overlays independently of Sonoma's Presenter Overlay, which means you get consistent results regardless of which Sonoma video effects are active.
Sonoma-Specific Advantages
- Ignores Reactions effects — Screenify captures the screen buffer before the Reactions compositor layer, so accidental hand-gesture animations won't appear in your recording even if Reactions is enabled
- Own webcam overlay — Instead of relying on Presenter Overlay (which only works in FaceTime, Zoom, and a few other apps), Screenify renders its own camera bubble that works in any recording context
- Web app recording — Sonoma lets you add websites to the Dock as standalone web apps (Safari > File > Add to Dock). Screenify's Window capture mode treats these web apps as individual windows, so you can record just the web app without capturing the rest of your desktop
- Game Mode aware — When Game Mode activates (Sonoma enables it automatically for full-screen games), Screenify adjusts its encoding thread priority to avoid frame drops
Steps
- Download Screenify Studio — free plan includes system audio, webcam overlay, and unlimited recording length
- Open the app. Grant screen recording permission when prompted: Sonoma shows this dialog at System Settings > Privacy & Security > Screen Recording. You must toggle Screenify Studio on and restart the app.
- Choose your capture mode:
- Full Screen — captures everything including desktop widgets
- Window — records a single application window. On Sonoma, this includes web apps added to the Dock.
- Custom Region — drag to select any area
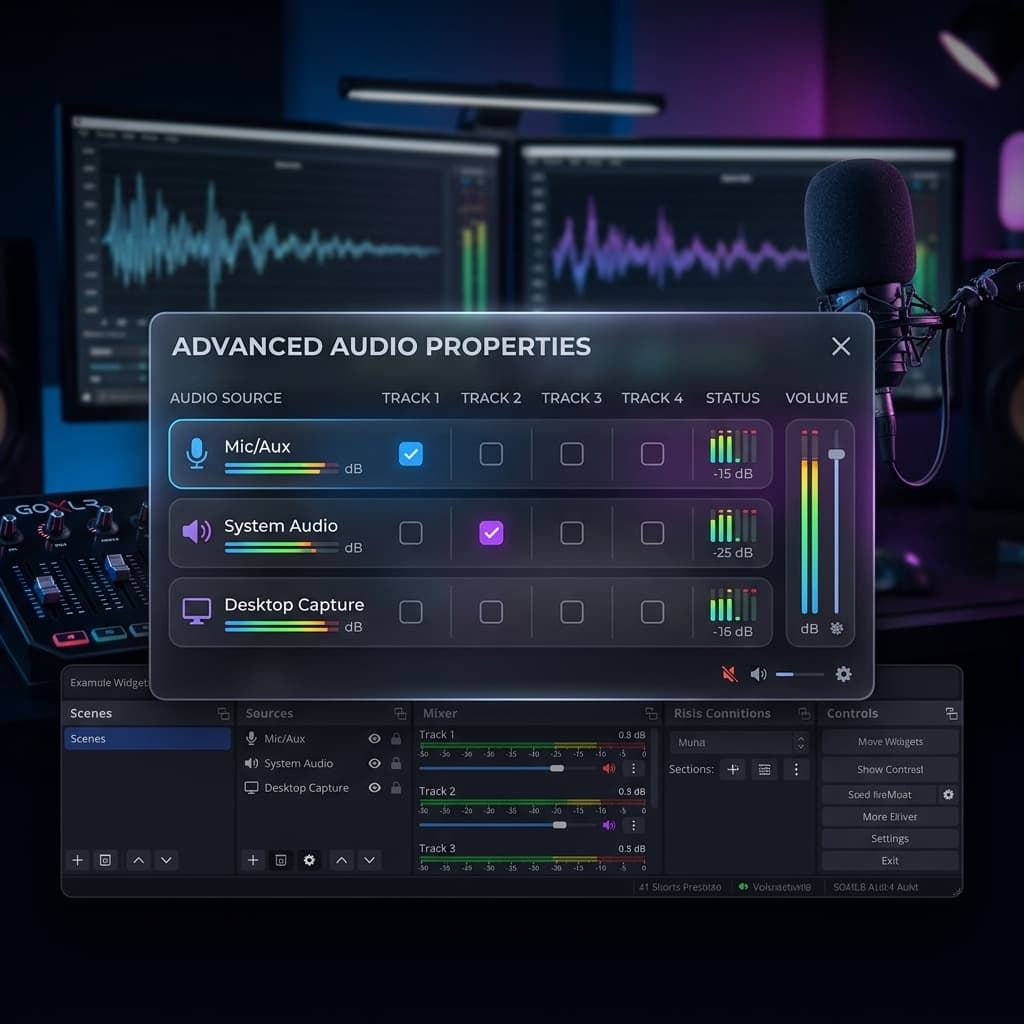
- Configure audio:
- Toggle System Audio on to capture all Mac audio output
- Toggle Microphone on and select your input device
- Use the balance slider to set relative levels between system and mic audio
- Enable the webcam overlay if you want a camera bubble — choose shape (circle, rounded rectangle), size, and position. This overlay is independent of Sonoma's Presenter Overlay, so both won't conflict.
- Press ⌃ + ⌘ + R to start recording
- Stop with the same shortcut
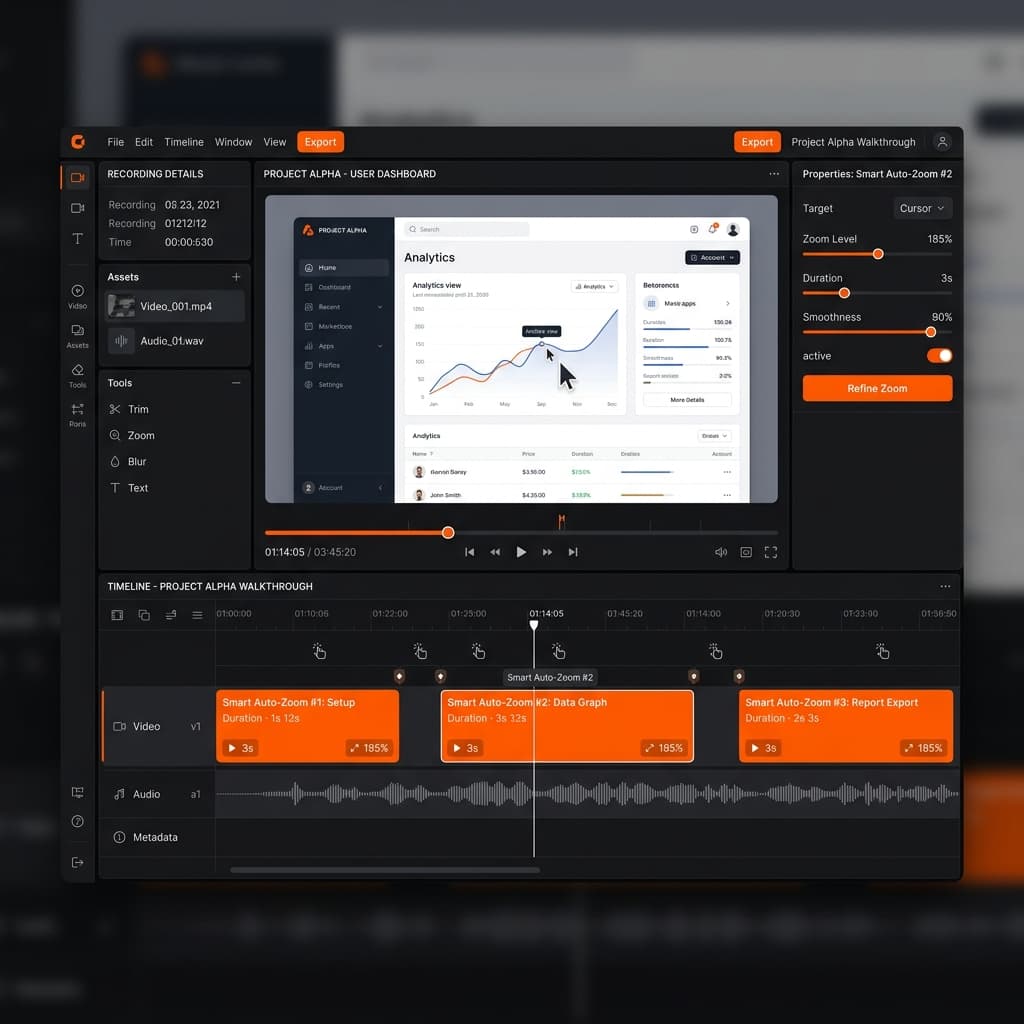
- The editor opens automatically — trim, apply auto-zoom to cursor movements, add captions, or adjust the background style
Recording Sonoma Web Apps
Sonoma's "Add to Dock" web apps behave as separate processes. To record one:
- Open the web app from your Dock
- In Screenify, select Window capture mode
- The web app appears in the window list with its own icon and name (e.g., "Figma" or "Google Docs")
- Click to select it and start recording — only that web app window is captured
This is cleaner than recording a browser tab because there's no address bar, bookmark toolbar, or other browser chrome in the output.
Permission Setup on Sonoma
Sonoma is stricter about screen recording permissions than earlier macOS versions. If Screenify doesn't appear in the Screen Recording permission list:
- Open System Settings > Privacy & Security > Screen Recording
- Click the + button and navigate to Screenify Studio in Applications
- Toggle it on
- Quit and reopen Screenify Studio — the permission only takes effect after a restart
If you want polished recordings with system audio and webcam without fighting Sonoma's permission dialogs repeatedly, Screenify Studio handles the setup once and stays out of your way.
Try Screenify Studio — free, unlimited recordings
Auto-zoom, AI captions, dynamic backgrounds, and Metal-accelerated export.
Method 3: OBS Studio
OBS is free, open-source, and endlessly configurable. On Sonoma, it requires extra setup for system audio and has specific interactions with Presenter Overlay and Game Mode.
Sonoma-Specific Setup
Screen Recording Permission:
- Open System Settings > Privacy & Security > Screen Recording
- Add OBS to the list and toggle it on
- Restart OBS — Sonoma requires a full app restart after granting this permission
System Audio via BlackHole:
OBS cannot capture macOS system audio natively. You need a virtual audio device:
- Download BlackHole (2ch version is sufficient)
- Install the package — Sonoma may show a "System Extension Blocked" dialog. Go to System Settings > Privacy & Security, scroll to the bottom, and click Allow next to the BlackHole extension notice.
- Open Audio MIDI Setup (in Applications > Utilities)
- Click + in the bottom-left > Create Multi-Output Device
- Check both BlackHole 2ch and your regular output (e.g., "MacBook Pro Speakers" or your headphones)
- Set this Multi-Output Device as your system output in System Settings > Sound > Output
- In OBS, add an Audio Input Capture source and select BlackHole 2ch
Presenter Overlay Interaction:
Sonoma's Presenter Overlay creates a virtual camera composition that composites your webcam feed with your screen. OBS can capture this:
- Start a Presenter Overlay session (e.g., from FaceTime or the green video menu bar icon)
- In OBS, add a macOS Screen Capture source
- Set the mode to Window Capture and select the Presenter Overlay window from the dropdown
- This gives you Apple's webcam-on-screen composite as an OBS source — useful if you prefer Apple's overlay style but want OBS's recording capabilities
Steps
- Install OBS Studio from obsproject.com
- Create a new Scene
- Add a macOS Screen Capture source:
- Display Capture — records an entire monitor, including desktop widgets
- Window Capture — records a single window
- Application Capture — records all windows of an application (new in recent OBS builds on macOS)
- Add audio sources:
- Audio Input Capture > select your microphone
- Audio Input Capture > select BlackHole 2ch (for system audio, if configured)
- Set output format in Settings > Output:
- Recording Format: MKV or MP4
- Encoder: Apple VT H265 Hardware Encoder (leverages Apple Silicon's hardware encoder on Sonoma)
- Rate Control: VBR, quality 60-70 for balanced file size
- Click Start Recording
- Click Stop Recording when done
Game Mode Considerations
Sonoma's Game Mode activates automatically when a full-screen game launches. It prioritizes the game process and deprioritizes background tasks — including OBS encoding. Symptoms:
- Dropped frames in OBS recording
- Audio desync in longer recordings
- Higher CPU usage as OBS competes for resources
Workarounds:
- Run the game in windowed/borderless mode to prevent Game Mode from activating
- In OBS Settings > Advanced, set Process Priority to Above Normal
- Use hardware encoding (Apple VT H265) instead of software encoding to reduce CPU load
- Lower your recording resolution to 1080p if your display is higher
Limitations
- No built-in editing — OBS is a recorder, not an editor
- System audio requires BlackHole setup (15+ minutes on first install)
- Sonoma's Game Mode can cause frame drops without manual tuning
- No auto-zoom, captions, or post-processing features
- Steeper learning curve than other options on this list
Method 4: QuickTime Player
QuickTime Player is the other built-in recorder on Sonoma. It predates the Screenshot toolbar and offers slightly different controls, though with similar limitations.
Sonoma-Specific Behavior
QuickTime on Sonoma uses the same screen capture framework as the Screenshot toolbar, so most Sonoma-specific behaviors carry over:
- Desktop widgets appear in full-screen recordings
- Reactions effects can render in the capture if your camera is active
- Continuity Camera iPhone sources appear in the microphone list
- Web apps added to the Dock appear as separate windows in window-selection mode
Steps
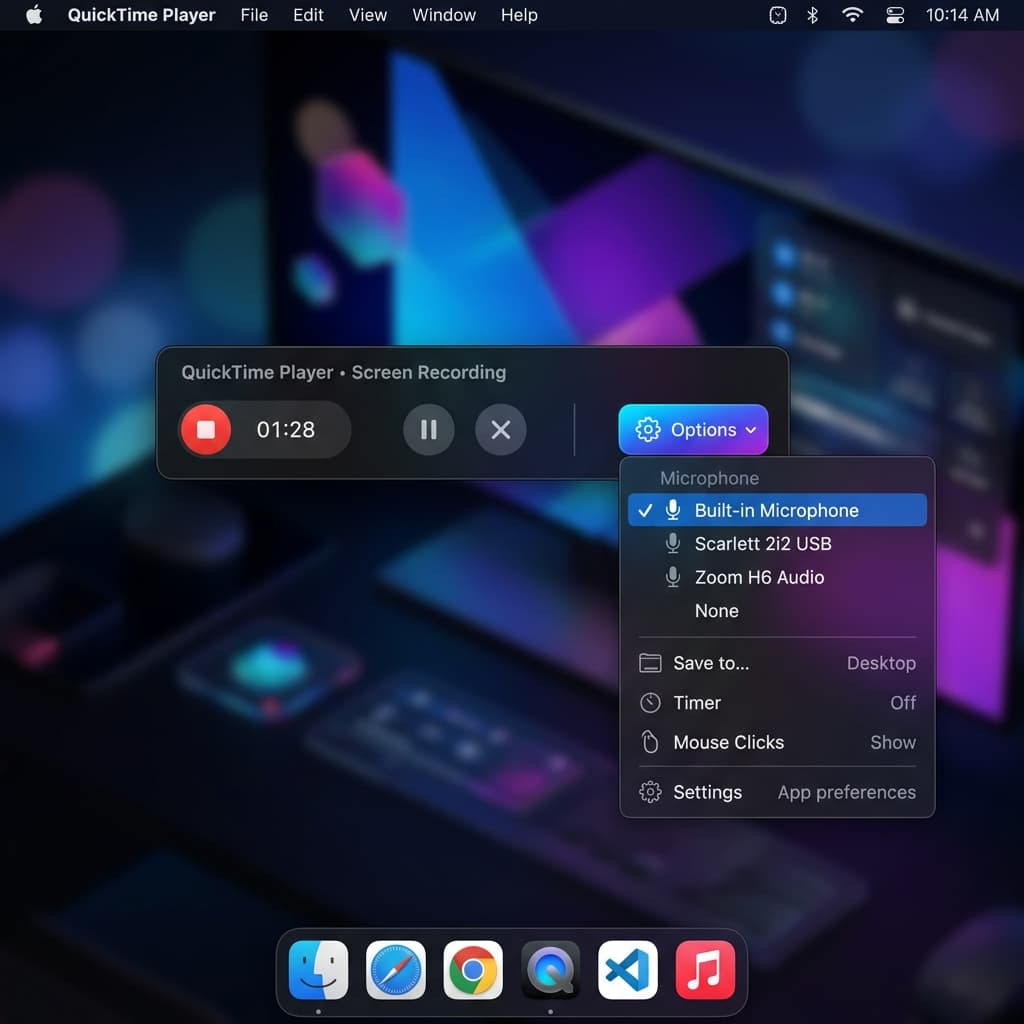
- Open QuickTime Player from Applications
- Go to File > New Screen Recording (or press ⌃ + ⌘ + N)
- Sonoma redirects this to the Screenshot toolbar (⌘ + Shift + 5) — the standalone QuickTime recording window was removed in macOS Catalina. QuickTime now acts as a launcher for the same system recorder.
- Configure options (same as Method 1): save location, microphone, mouse clicks
- Click Record
- Stop via the menu bar stop button or ⌘ + Control + Esc
- QuickTime opens the recording automatically for playback
- Use Edit > Trim (⌘ + T) to cut the start and end of the clip
When QuickTime Makes Sense
QuickTime is useful in one specific Sonoma scenario: recording an iPhone or iPad screen via USB. Connect your device, open QuickTime, go to File > New Movie Recording, click the dropdown arrow next to the record button, and select your iPhone/iPad as the camera and microphone source. This captures the device screen at native resolution through the Lightning/USB-C connection — no wireless lag, no AirPlay compression.
For Mac screen recording specifically, QuickTime offers nothing beyond what the Screenshot toolbar provides. They share the same engine.
Limitations
- Identical to Screenshot toolbar limitations: no system audio, no webcam overlay, no editing
- The only advantage over ⌘ + Shift + 5 is the iPhone/iPad capture feature
- No Presenter Overlay support — QuickTime doesn't participate in the Sonoma video effects pipeline
Troubleshooting Sonoma-Specific Issues
1. "Screen Recording permission keeps resetting after macOS updates"
Sonoma has a known behavior where minor updates (14.1 to 14.2, etc.) reset screen recording permissions for third-party apps. After updating:
- Open System Settings > Privacy & Security > Screen Recording
- Check that your recording app is still toggled on
- If it's toggled on but the app shows a black screen, toggle it off, then back on, then restart the app
This affects OBS, Screenify Studio, and every third-party recorder equally. Apple has not changed this behavior as of Sonoma 14.5.
2. "Reactions effects appearing in my recording"
If animated hearts, thumbs-up bursts, or fireworks overlay your recording, Sonoma's Reactions feature is detecting your hand gestures through the webcam:
- Click the green video icon in the menu bar (visible when any camera is active)
- Toggle Reactions off
- Alternatively, go to System Settings > General > Video Effects and disable Reactions there
- If you're using Screenify Studio, its capture pipeline bypasses the Reactions compositor — switch to Screenify to avoid this issue entirely
3. "Desktop widgets visible in my recording"
Full-screen recordings capture the desktop wallpaper layer, which includes widgets in Sonoma:
- Before recording, go to System Settings > Desktop & Dock
- Under Desktop & Stage Manager, turn Show Widgets off, or set Click wallpaper to reveal desktop to Only in Stage Manager
- Alternatively, use window capture or selected-region capture to exclude the widget area
4. "Recording stutters during gaming (Game Mode)"
Sonoma's Game Mode reduces priority for background processes. If your recording software drops frames:
- Run the game in windowed mode to prevent Game Mode activation
- Use hardware-accelerated encoding (Apple VT H265 in OBS, or Screenify Studio which uses Metal encoding by default)
- Close other resource-heavy apps during recording
- Check Activity Monitor — if the game is consuming >80% GPU, lower its graphics settings by one notch
5. "Continuity Camera iPhone keeps appearing as a video source"
Sonoma aggressively promotes Continuity Camera. If your iPhone keeps showing as a camera option and accidentally gets selected:
- On your iPhone, go to Settings > General > AirPlay & Continuity
- Toggle Continuity Camera off
- Or simply move the iPhone away from your Mac — Continuity Camera requires proximity and the same Wi-Fi network
Try Screenify Studio — free, unlimited recordings
Auto-zoom, AI captions, dynamic backgrounds, and Metal-accelerated export.
FAQ
Does macOS Sonoma have a built-in screen recorder?
Yes. Press ⌘ + Shift + 5 to open the Screenshot toolbar, which includes screen recording. It can record the full screen or a selected region with microphone audio. It cannot capture system audio or add a webcam overlay. This toolbar has been available since macOS Mojave, but Sonoma adds complications like desktop widget visibility and Reactions gesture effects that can appear in recordings.
Can I use Presenter Overlay for screen recordings on Sonoma?
Presenter Overlay only works in video conferencing apps that support it — FaceTime, Zoom, Webex, and a few others. It does not work with the Screenshot toolbar, QuickTime, or most third-party screen recorders. If you want a webcam overlay in your screen recording, use a dedicated tool like Screenify Studio or OBS with a video capture source. OBS can also capture the Presenter Overlay window itself as a workaround.
How do I record system audio on macOS Sonoma?
The built-in recorder and QuickTime cannot capture system audio — this is an Apple limitation, not a Sonoma bug. Your options: use Screenify Studio (captures system audio natively with no additional setup), or install BlackHole as a virtual audio device and route it through OBS. For a detailed walkthrough, see How to Record Internal Audio on Mac.
Do desktop widgets appear in screen recordings on Sonoma?
Yes, if you're recording the full screen. Widgets are rendered on the wallpaper layer and the system recorder captures that layer. To exclude them, either turn off widgets in System Settings > Desktop & Dock, use window capture mode, or draw a selected region that avoids the widget area. This behavior is specific to Sonoma and later — earlier macOS versions didn't have desktop widgets.
Does Game Mode affect screen recording quality?
Game Mode can degrade recording quality by deprioritizing background processes including your screen recorder's encoding threads. Symptoms include dropped frames, audio desync, and choppy playback. To avoid this, run games in windowed mode (which prevents Game Mode activation), use hardware encoding, or use a recorder like Screenify Studio that adjusts its thread priority when Game Mode is active.
Can I record Sonoma web apps (websites added to Dock)?
Yes. Web apps created through Safari's File > Add to Dock appear as standalone windows. Any screen recorder with window capture mode — Screenshot toolbar, Screenify Studio, OBS — can record just that web app window. The advantage over recording a browser tab: no address bar, no bookmarks bar, no browser chrome. The result looks like a native app recording. For a general overview of Mac recording methods, see How to Screen Record on Mac.
How do I stop Reactions animations from appearing during recordings?
Open System Settings > General > Video Effects and toggle Reactions off. You can also click the green video icon in the menu bar when any camera is active and disable Reactions from there. Note that Reactions requires an active camera — if you're not using a webcam during recording, Reactions won't trigger.
Is macOS Sonoma better for screen recording than Ventura?
Sonoma doesn't add new screen recording features to the built-in tools. The Screenshot toolbar works identically to Ventura. The differences are environmental: desktop widgets can clutter full-screen recordings, Presenter Overlay adds a webcam composite (but only in conferencing apps), Game Mode can impact recording performance, and Reactions can inject unwanted animations. These are manageable with the right settings, but Sonoma introduces more things to configure before hitting record than Ventura did. For audio-specific recording challenges across macOS versions, see How to Screen Record on Mac with Audio.
Which Method Should You Use?
Quick bug report or screen share — Screenshot toolbar (⌘ + Shift + 5). Zero setup, already on your Mac.
Tutorial, demo, or course content — Screenify Studio. System audio capture, webcam overlay, auto-zoom, and captions without fighting Sonoma's permission quirks or installing virtual audio drivers.
Live streaming or multi-source production — OBS Studio. Maximum flexibility, but expect 15-30 minutes of initial Sonoma configuration for audio routing and permissions.
Recording an iPhone/iPad screen — QuickTime Player via USB. The only built-in option that handles iOS device capture at native resolution.
Try Screenify Studio
Record your screen with auto-zoom, AI captions, dynamic backgrounds, and Metal-accelerated export. Free plan, unlimited recordings.
Download Free


