How to Record a Specific Area on Mac
Record just part of your Mac screen — a single panel, half the display, or a custom region — using 4 different tools.

Recording your full screen captures everything — the dock, the menu bar, notifications, that Slack message you didn't want in the video. When you only need to show one app, one panel, or a specific region of your display, recording a selected area produces a cleaner, more focused result with a smaller file size.
Every recording tool on Mac supports area selection, but the control and flexibility vary significantly.
Quick Comparison
| Tool | Price | Area Selection | Resize After Recording | Window Snap | Aspect Ratio Lock |
|---|---|---|---|---|---|
| macOS Screenshot Toolbar | Free (built-in) | Drag region | No | No | No |
| Screenify Studio | Free / Pro $9.99/mo | Drag region + window mode | Yes (crop in editor) | Yes | Yes |
| OBS Studio | Free (open-source) | Window or crop filter | No | Window capture only | Manual |
| CleanShot X | $29 one-time | Drag region | No | No | No |
Method 1: macOS Screenshot Toolbar (Built-in)
The built-in Screenshot toolbar lets you drag a custom rectangle on your screen and record only that area.
Steps
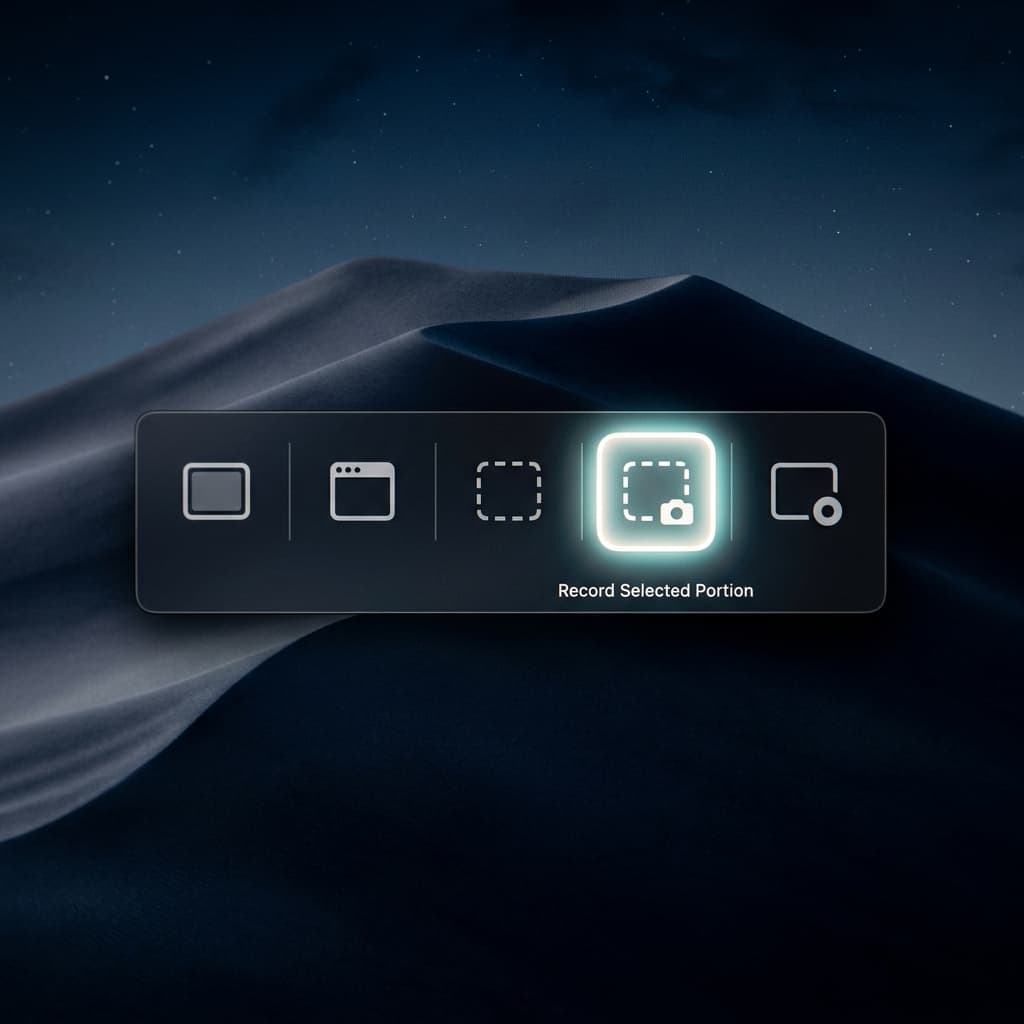
- Press ⌘ + Shift + 5 to open the Screenshot toolbar
- Click the Record Selected Portion button (the icon with a dotted rectangle)
- A dashed rectangle appears on your screen. Drag the edges or corners to resize it. Drag the center to reposition it.
- Position the rectangle over the area you want to record — for example, just a browser window, a code editor panel, or half of your display
- Click Options to set microphone and save location
- Click Record or press Enter
- Stop recording with the ⏹ button in the menu bar or ⌘ + Control + Esc
Tips for precise positioning
- Resize from corners for diagonal adjustments. Resize from edges for single-axis changes (width only or height only).
- The toolbar remembers the last region you selected. Next time you open it, the rectangle starts in the same position and size. This is useful for recurring recordings of the same area.
- There's no pixel-precise input — you can't type exact coordinates or dimensions. Drag and eyeball it.
- To align the selection with a window border, drag slowly and watch the edge of the selection rectangle approach the window edge. macOS doesn't provide snapping guides, so visual alignment is your only option.
- If you need to record the exact dimensions of a window, consider using the Record Entire Screen option and cropping to the window area later in a video editor. This avoids misalignment.
Limitations
- No aspect ratio lock — the rectangle is freeform. If you need a specific ratio like 16:9 for YouTube, you have to align it manually.
- No window snapping — the rectangle doesn't snap to application window boundaries. You have to match it by eye.
- Region is final — you can't crop or reframe after recording. If you dragged slightly wrong, you need to re-record.
- No system audio — same limitation as full-screen recording.
Method 2: Screenify Studio (Region + Window Mode)
Screenify Studio offers both a free-form drag region and a dedicated window capture mode. Window capture records a single application window with clean edges and an optional styled background — the window floats over a gradient or image instead of showing whatever was behind it.
Custom Region
- Download Screenify Studio and open it
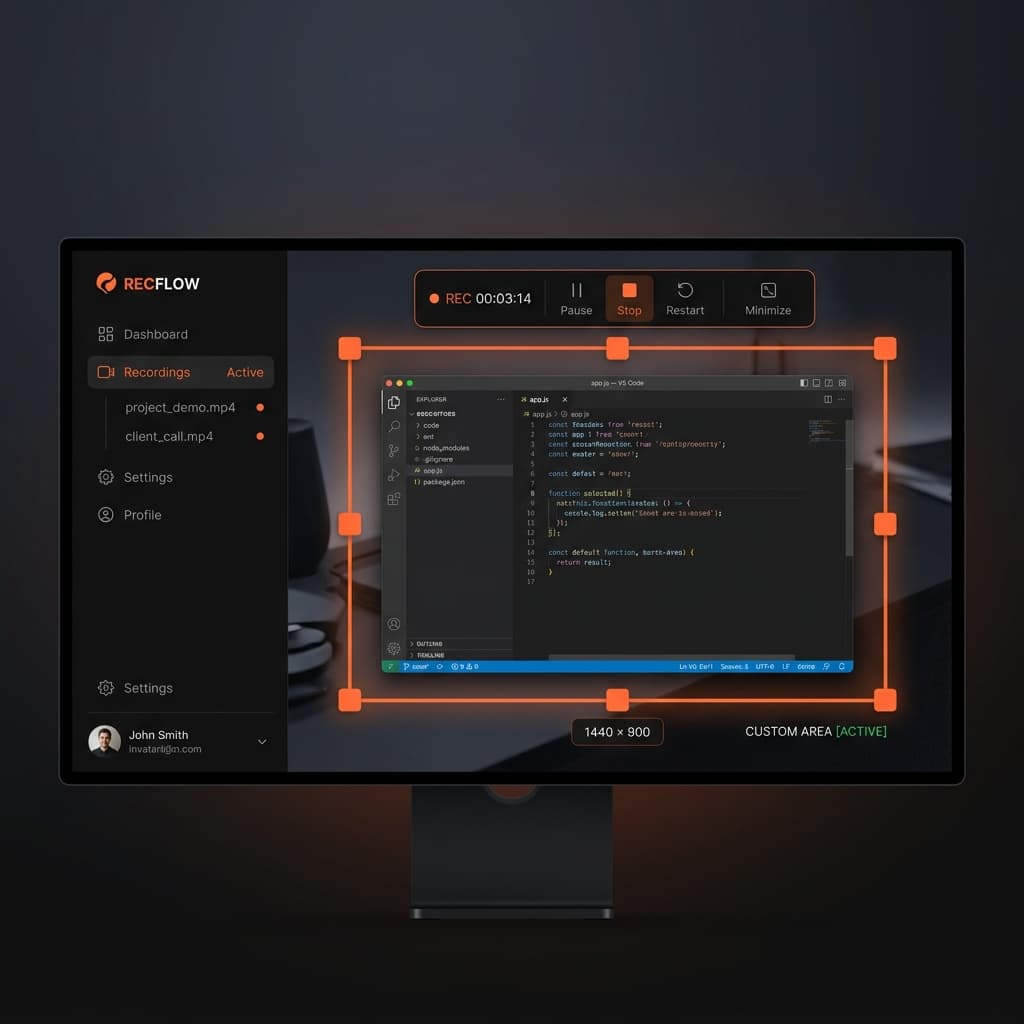
- In the capture mode selector, choose Custom Area
- Drag to draw a rectangle on your screen
- Hold Shift while dragging to lock the aspect ratio to 16:9 — useful for YouTube and social media
- Fine-tune by dragging edges or corners
- The dimensions display in pixels at the bottom of the selection overlay
- Press ⌃ + ⌘ + R to start recording
Window Capture
- Choose Window mode instead of Custom Area
- Click on the window you want to record — it highlights with a blue border
- Screenify captures only that window. When the window moves or resizes, the recording follows it.
- In the editor, the window appears over a dynamic background — you choose from gradients, solid colors, or images. This eliminates the desktop clutter that would normally appear behind the window.
Why window capture matters
Recording a specific window (not just a region) has a meaningful difference: the recording is of the window content itself, not the pixels at a fixed screen location. If you accidentally move the window mid-recording, the capture follows. With region recording (Method 1), moving the window partially out of the rectangle means part of your content disappears.
Post-recording adjustments
In the editor, you can:
- Crop the recording to a different aspect ratio (16:9, 9:16 for TikTok, 1:1 for Instagram, 4:3 for presentations)
- Zoom in on a section of the recording using Smart Auto-Zoom or manual zoom keyframes
- Pad the recording with background space — useful when you want to add branding or captions around the recorded area
Try Screenify Studio — free, unlimited recordings
Auto-zoom, AI captions, dynamic backgrounds, and Metal-accelerated export.
Method 3: OBS Studio (Window Capture + Crop)
OBS supports window-level capture and also lets you manually crop any source using the crop filter, giving you precise control over exactly what pixels are recorded.
Window Capture
- Download OBS Studio and open it
- In Sources, click + → macOS Screen Capture
- In the source properties, change the Method from "Display Capture" to "Window Capture"
- Select the specific window from the dropdown
- OBS captures only that window, regardless of what's behind it
Crop Filter (for precise regions)
If you need a specific portion of a window or display:
- Add a macOS Screen Capture source (display capture)
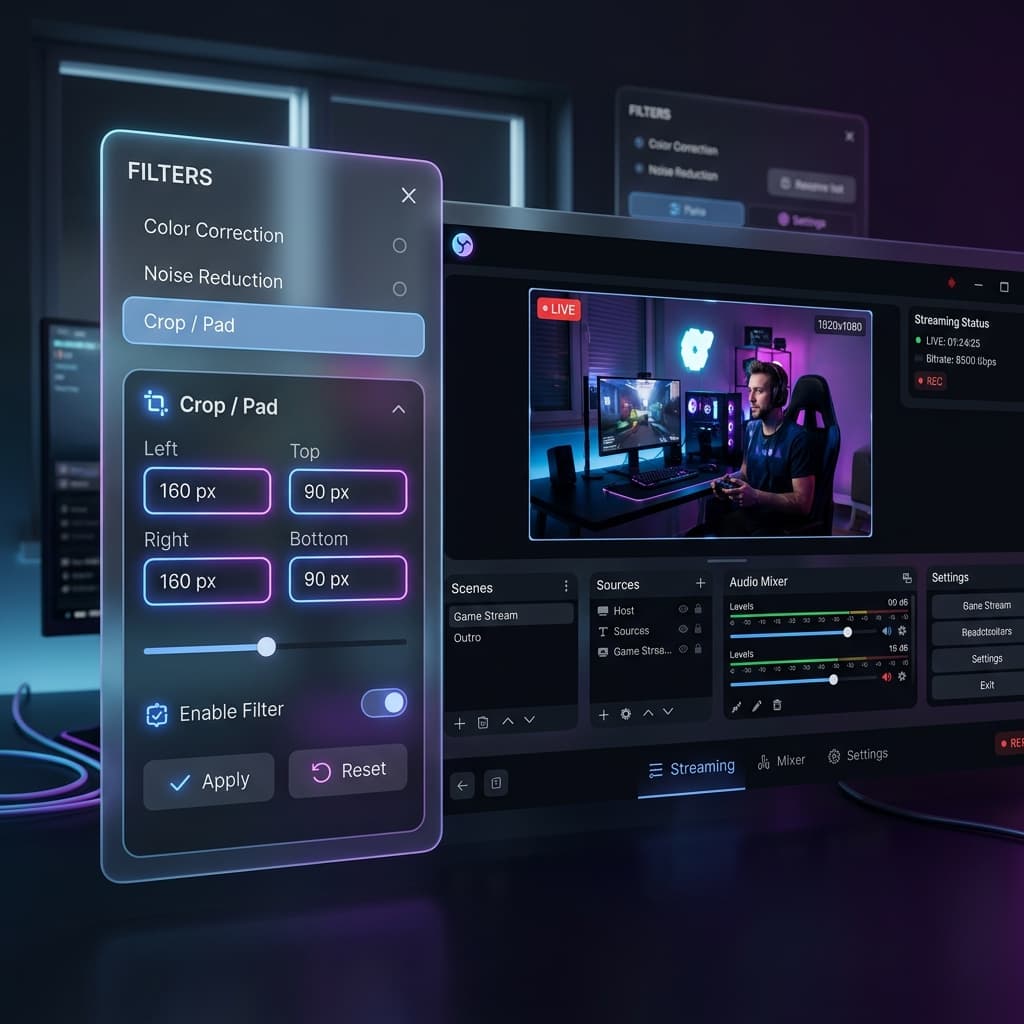
- Right-click the source → Filters
- Under Effect Filters, click + → Crop/Pad
- Enter pixel values for Left, Top, Right, Bottom to crop the captured area precisely
- The preview updates in real time
Setting output resolution
By default, OBS matches the canvas size to your display resolution. If you've cropped to a smaller area, the output will have black bars. To fix this:
- Go to Settings → Video
- Set Base (Canvas) Resolution to match your cropped area dimensions
- Set Output (Scaled) Resolution to your desired export size
Limitations
- Pixel-level crop setup is powerful but time-consuming
- No dynamic window following — if using crop on display capture, the region is fixed
- Canvas resolution changes affect all scenes
- No post-recording adjustment
Method 4: CleanShot X (Quick Region Recording)
CleanShot X is primarily a screenshot tool, but it includes a region screen recording feature. It's fast to invoke and the selection overlay has useful visual aids.
Steps
- Download CleanShot X ($29 one-time) and install it
- After installation, CleanShot adds an icon to your menu bar. Click it to access recording options, or use the keyboard shortcut.
- Open the recording overlay using the keyboard shortcut (default: ⌘ + Shift + 9 for recording). You can customize this shortcut in CleanShot X → Preferences → Shortcuts.
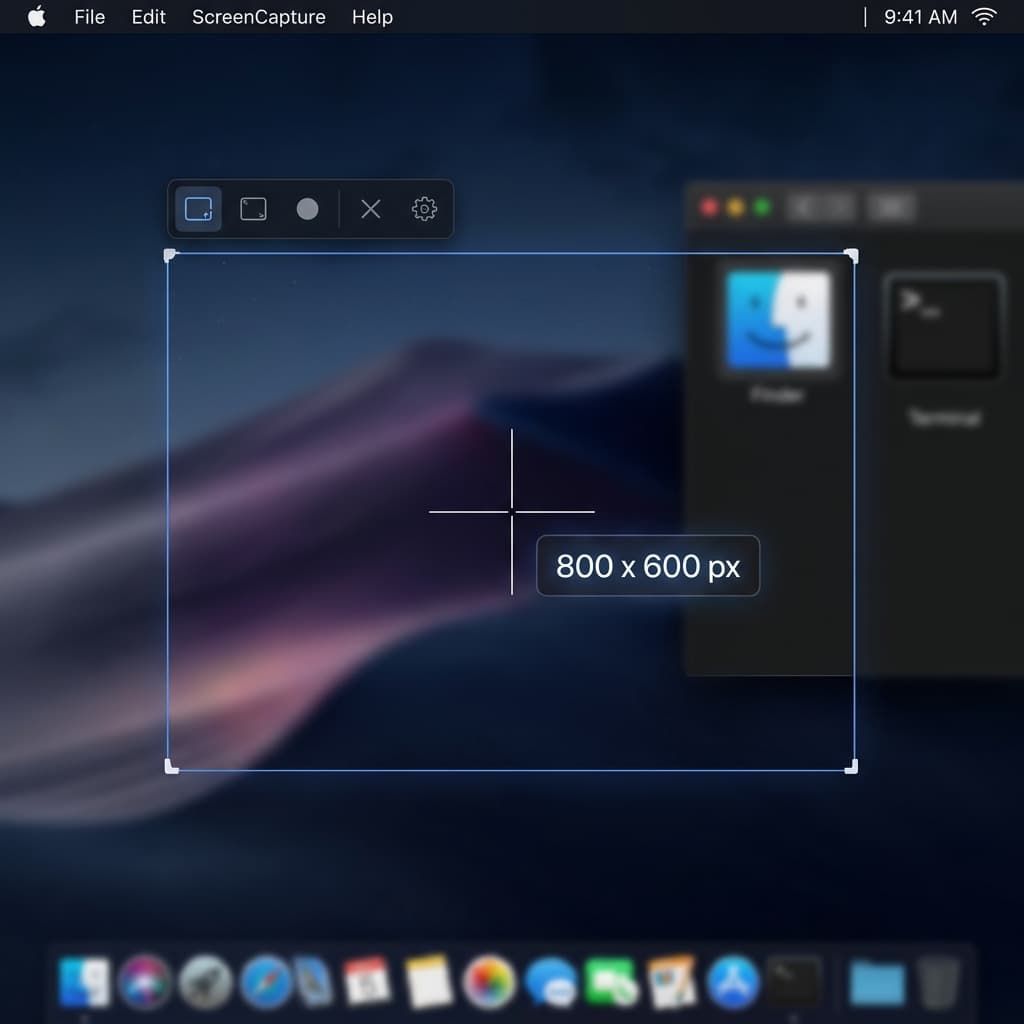
- Drag to select your recording region. CleanShot shows a crosshair with pixel coordinates and dimensions in pixels as you drag — helpful for precise alignment to specific sizes.
- Before clicking Record, you can adjust the selected area by dragging its edges or corners, similar to the macOS Screenshot toolbar.
- Click Record to start capturing
- Stop recording from the CleanShot menu bar icon → Stop Recording, or use the assigned keyboard shortcut
- After stopping, the recording appears as a floating thumbnail that you can save, copy, annotate, or upload to CleanShot Cloud
What CleanShot does well
- The selection overlay displays precise dimensions and coordinates while dragging
- Recordings can be quickly annotated with CleanShot's screenshot markup tools
- Integrates with CleanShot Cloud for quick sharing via link
Limitations
- No window-aware capture — it's a fixed region, like the built-in tool
- No post-recording editor — basic trimming only, no zoom, no backgrounds
- No system audio — mic only
- No webcam overlay
- Designed primarily as a screenshot tool; screen recording is a secondary feature
Choosing the Right Aspect Ratio
When recording a specific area, matching the right aspect ratio for your distribution platform saves time in post:
| Platform | Aspect Ratio | Typical Resolution |
|---|---|---|
| YouTube | 16:9 | 1920 × 1080 or 2560 × 1440 |
| TikTok / Reels / Shorts | 9:16 | 1080 × 1920 |
| Instagram Feed | 1:1 | 1080 × 1080 |
| Instagram Feed (portrait) | 4:5 | 1080 × 1350 |
| Twitter / X | 16:9 | 1280 × 720 |
| Presentations (keynote) | 16:9 or 4:3 | 1920 × 1080 or 1024 × 768 |
| Slack / Notion embed | Any | 1280 × 720 recommended |
Screenify Studio's aspect ratio lock (Shift + drag) and post-recording crop make it easy to produce content for multiple platforms from a single recording.
Troubleshooting
Selected area captures the wrong part of the screen
On macOS with multiple displays, the Screenshot toolbar may default to the wrong monitor. Make sure you:
- Move your mouse to the display you want to record before pressing ⌘ + Shift + 5
- The toolbar appears on the display where your cursor is located
- Drag the selection rectangle on that display
Recording has a border or extra pixels around the selected area
This happens when your selection doesn't align with clean pixel boundaries, especially on Retina displays where the logical resolution differs from the physical resolution:
- On Retina displays, 1 logical pixel = 2 physical pixels. A selection that looks 500px wide is actually 1000px in the output file.
- If you see fuzzy edges, try aligning your selection to window borders or use window capture mode
File size is still large despite recording a small area
The recording resolution scales with your Retina display. A small-looking rectangle on a 5K iMac can still produce a 2560×1440 or higher resolution recording. To reduce file size:
- Use HEVC (H.265) encoding
- Lower the frame rate to 30fps
- In OBS, set the Output Resolution to your desired resolution, not the capture resolution
Window capture misses parts of the window
If a window extends beyond the edge of your screen, the portions off-screen aren't captured. Make sure the window you're recording fits entirely within your display bounds. Also, some apps have floating panels or popovers that are technically separate windows — they won't be captured in window mode.
Selection rectangle moved between recordings
If your selection area appears to shift between recording sessions, check whether you've changed display arrangement or resolution since your last recording. Plugging in an external monitor, adjusting scaled resolution in System Settings → Displays, or switching between clamshell and open-lid mode can change the coordinate space. Re-draw the selection after any display configuration change.
Region recording has black bars on playback
Black bars appear when the recording aspect ratio doesn't match the player or platform you're uploading to. A 4:3 recording played in a 16:9 YouTube player will have black bars on the sides. To avoid this, set your region selection to the aspect ratio your target platform expects before recording, or use Screenify Studio's post-recording crop to reframe.
Mouse cursor disappears in the recording
Some macOS apps hide the cursor when you type (text editors, Terminal). The cursor reappears when you move the mouse. If the cursor is invisible throughout the entire recording, check that your recording tool doesn't have a "hide cursor" option enabled. In OBS, the macOS Screen Capture source has a "Show Cursor" checkbox in its properties — make sure it's checked.
Tips for Better Region Recordings
Decide on your output dimensions before recording. If the recording will end up on YouTube (16:9), set your region to 1920x1080 or 2560x1440 logical pixels from the start. Matching the target dimensions avoids cropping, letterboxing, or distortion in post. Screenify Studio displays pixel dimensions on the selection overlay; for the macOS Screenshot toolbar, you'll need to estimate.
Resize the app window to fit your recording area, not the other way around. Move and resize the application you're demonstrating so it fills your selected region cleanly. This prevents dead space around the app and ensures every pixel of your recording shows useful content.
Hide the Dock and menu bar for cleaner captures. Go to System Settings → Desktop & Dock and enable "Automatically hide and show the Dock" and "Automatically hide and show the menu bar." This gives you the maximum usable screen area and prevents the Dock from sliding into view mid-recording.
Use window capture over region capture when possible. Window capture tracks the window content — if the window scrolls, resizes, or redraws, the recording captures it all cleanly. Region capture records fixed screen coordinates, so anything that moves outside your selected rectangle is lost. Screenify Studio and OBS both offer window-level capture.
Avoid recording areas that cross monitor boundaries. If you have multiple displays, make sure your selection rectangle stays entirely within one screen. Cross-monitor selections can produce unpredictable results or capture the gap between displays as black space.
Record a few extra seconds at the start and end. It's easy to trim excess footage from a recording, but impossible to add content you didn't capture. Start recording 3-5 seconds before your first action and let the recording run a few seconds after your last action.
Try Screenify Studio — free, unlimited recordings
Auto-zoom, AI captions, dynamic backgrounds, and Metal-accelerated export.
FAQ
Can I record just one app window on Mac?
Yes. The macOS Screenshot toolbar lets you click a specific window to record it (under "Record Selected Portion," hover over a window and click). Screenify Studio has a dedicated Window capture mode. OBS supports window-level capture via macOS Screen Capture source properties.
How do I record a specific area with system audio?
The macOS built-in recorder can't capture system audio regardless of the recording mode. Use Screenify Studio (toggle System Audio on) or OBS with macOS Audio Capture. Both support region/window recording with full audio capture.
Can I resize the recording area while recording?
No, with any tool. The recording area is set before you start. If you need to reframe, stop the recording, adjust, and start again. Screenify Studio's post-recording crop is the closest alternative — you can't change what was captured, but you can trim the frame in the editor.
What resolution should I record at for YouTube?
Record at native resolution (the full pixel resolution of your selected area) and let YouTube handle downscaling. For most Macs, this means your region capture will naturally be 2x Retina resolution. YouTube accepts up to 4K (3840×2160). Recording at 1920×1080 logical pixels on a Retina display actually produces a 3840×2160 output.
Does recording a smaller area improve performance?
Yes, noticeably. Recording a 500×400 region uses significantly less CPU and GPU than recording a full 2560×1600 Retina display. If your Mac is struggling with frame drops during recording, reducing the capture area is one of the most effective optimizations.
Can I record the same area every time without re-selecting it?
The macOS Screenshot toolbar remembers your last selection. Screenify Studio and OBS both save your capture settings between sessions. For OBS, the window/display source persists in your scene. For a truly repeatable region, note the pixel coordinates and use OBS's crop filter with exact values.
How do I record a specific area on an external monitor?
Move your cursor to the external monitor before pressing ⌘ + Shift + 5. The Screenshot toolbar opens on whichever display your cursor is on. In Screenify Studio, the capture area selector shows all connected displays — click on the one you want, then draw your region. In OBS, change the macOS Screen Capture source's display property to the external monitor.
Can I record a vertical (portrait) region for TikTok or Reels?
Yes. Drag your selection region taller than it is wide — for example, 1080x1920 pixels. The macOS Screenshot toolbar doesn't lock aspect ratios, so you'll need to eyeball the 9:16 proportion. Screenify Studio's Shift+drag locks to common ratios and supports 9:16 explicitly. After recording, verify the output dimensions by right-clicking the file → Get Info and checking the video dimensions.
Related Guides
Try Screenify Studio
Record your screen with auto-zoom, AI captions, dynamic backgrounds, and Metal-accelerated export. Free plan, unlimited recordings.
Download Free


