How to Screen Record on MacBook Pro
Screen record on MacBook Pro — leverage ProMotion, the media engine, and XDR display. 4 methods with Pro-specific tips.

Your MacBook Pro has hardware that most screen recorders barely touch — a ProMotion display running at up to 120Hz, a dedicated media engine for H.264/H.265/ProRes encoding, a three-microphone array with directional beamforming, and a Liquid Retina XDR panel capable of HDR output. Standard recording guides treat it like any other Mac. This one doesn't.
Here are four methods for screen recording on MacBook Pro, with specific guidance on how to get the most out of the Pro hardware you paid for.
Quick Comparison
| Tool | Price | Max FPS | ProRes | System Audio | HDR Capture | Hardware Encode |
|---|---|---|---|---|---|---|
| macOS Screenshot Toolbar | Free (built-in) | 60fps | No | No | No | Yes (HEVC) |
| Screenify Studio | Free / Pro $9.99/mo | 120fps | Coming soon | Yes | No (SDR export) | Yes (Metal) |
| OBS Studio | Free (open-source) | 120fps | No | Yes (macOS 13+) | No | Yes (Apple VT) |
| Screen Studio | $89 one-time | 60fps | No | Yes | No | Partial |
Method 1: macOS Screenshot Toolbar (Built-in)
The Screenshot toolbar ships with every Mac running macOS Mojave or later. It works, but it ignores most MacBook Pro-specific hardware.
Steps
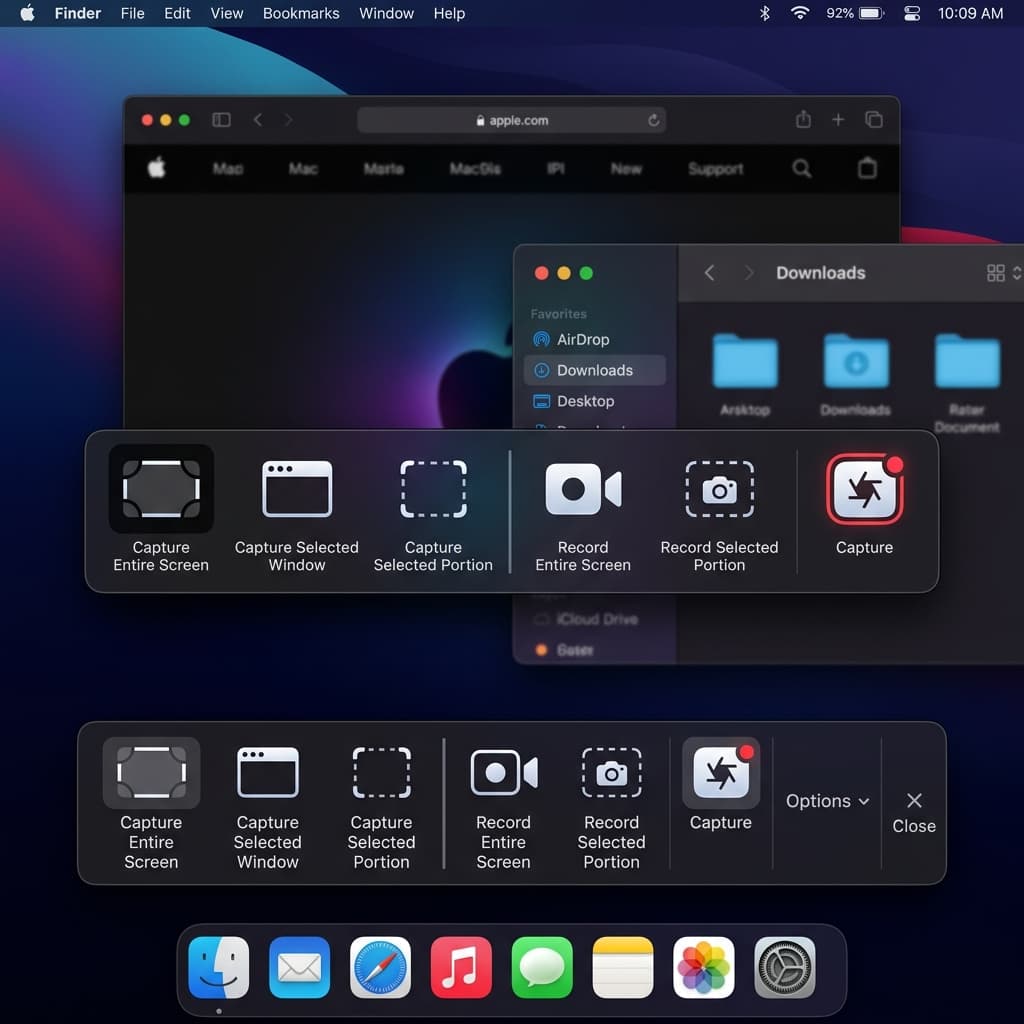
- Press ⌘ + Shift + 5 to open the Screenshot toolbar at the bottom of your screen
- Choose a recording mode:
- Record Entire Screen — captures the full Liquid Retina XDR panel at its native resolution (3024 × 1964 on 16-inch, 3024 × 1964 on 14-inch M3 Pro/Max models)
- Record Selected Portion — drag to select a custom region. Use this to exclude the notch area if you want a clean rectangle without the camera cutout at top center.
- Click Options to configure:
- Save to — choose Desktop, Documents, or a custom folder. For large recordings, save to the internal SSD rather than an SD card — the internal drive sustains 7.4 GB/s on M3 Max, while most SD cards top out at 300 MB/s.
- Timer — set a 5 or 10 second countdown
- Microphone — select from the built-in three-mic array, an external USB mic, or AirPods. The MacBook Pro's built-in mics have a higher signal-to-noise ratio than the MacBook Air's, with directional beamforming that isolates your voice from keyboard noise and fan hum.
- Show Mouse Clicks — displays a dark circle on each click during playback
- Click Record or press Enter
- Stop recording with the ⏹ button in the menu bar or ⌘ + Control + Esc
ProMotion and the Screenshot Toolbar
The built-in recorder captures at a fixed 60fps regardless of your ProMotion display's current refresh rate. macOS dynamically adjusts ProMotion between 24Hz and 120Hz based on content, but the Screenshot toolbar doesn't expose a frame rate setting. Your recording will look smooth at 60fps, but you won't capture the full 120Hz fluidity that your eyes see on screen.
The Notch in Recordings
When you record the entire screen, the notch area (the black camera cutout at top center) appears in your recording as a black intrusion into the menu bar. The recording captures the full display rectangle including the notch region. Most video players render this area as black. If you're recording a tutorial or demo, use Record Selected Portion and drag the selection to start below the menu bar — this eliminates the notch entirely from your output.
Limitations
- No system audio — cannot capture app sounds, video calls, or music playback
- No webcam overlay — no option to add your camera feed
- No ProRes output — saves as MOV with HEVC compression
- 60fps cap — doesn't leverage ProMotion's 120Hz capability
- No HDR — output is always SDR, even when recording HDR content on the XDR display
The Screenshot toolbar is adequate for quick bug reports or sharing a brief clip. For recordings that actually exploit your MacBook Pro's hardware, keep reading.
Method 2: Screenify Studio
Screenify Studio records your screen and handles post-processing automatically — system audio capture, webcam overlays, auto-zoom, and AI captions. On a MacBook Pro, it takes advantage of the Apple Silicon media engine for hardware-accelerated encoding and Metal GPU for export rendering.
Steps
- Download Screenify Studio — the free plan includes system audio, webcam, and AI features with no watermark
- Open the app. The recording controls appear in your menu bar.
- Choose your capture mode:
- Full Screen — captures your entire display at native resolution. On the 16-inch MacBook Pro, that's 3024 × 1964 pixels.
- Window — records a single application window, automatically cropping out the rest of the desktop. This sidesteps the notch entirely since individual windows don't extend into the notch region.
- Custom Area — drag to select any rectangle. Use this for recording a specific workflow area or to frame a 16:9 region that avoids the notch.
- Configure audio:
- System Audio — captures everything your Mac is playing. Uses a lightweight virtual audio driver installed on first launch.
- Microphone — select your input. The MacBook Pro's three-mic array appears as "MacBook Pro Microphone" and benefits from beamforming that rejects off-axis noise. If you're in a noisy environment, the built-in mics outperform most budget USB mics.
- (Optional) Enable Webcam — the 1080p FaceTime HD camera on MacBook Pro models delivers better low-light performance than the MacBook Air's camera, producing a cleaner webcam bubble with less grain.
- Set frame rate — Screenify supports up to 120fps on ProMotion displays. Select 120fps in the recording settings if you're demonstrating smooth scrolling, animation timelines, or game UI where the extra frames matter. For standard tutorials and demos, 60fps keeps file sizes in check.
- Press ⌃ + ⌘ + R or click Record
- Stop with the same shortcut or click Stop in the menu bar
- The editor opens with your recording
Why the Media Engine Matters
M3 Pro and M3 Max MacBook Pros include dedicated encode/decode blocks for H.264, H.265, and ProRes. When Screenify encodes your recording, it offloads compression to this hardware — your CPU and GPU stay free for the apps you're actually recording. The result: no frame drops during capture, even when recording a 3D viewport in Blender or a complex timeline in Final Cut Pro.
During export, Screenify's Metal pipeline uses the GPU for rendering effects (auto-zoom keyframes, backgrounds, cursor highlights) and hands off the final encode to the media engine. A 10-minute recording with auto-zoom exports in roughly 20 seconds on an M3 Pro.
Handling the Notch
In Window mode, the notch is irrelevant — individual app windows don't overlap it. In Full Screen mode, Screenify captures the full panel including the notch. During editing, you can add a Dynamic Background that effectively reframes your recording within a larger canvas, pushing the notch area off-screen. Alternatively, crop to 16:9 in the export settings — the notch sits above the 16:9 safe area on both 14-inch and 16-inch models.
External Display Recording
If you've connected a Studio Display, Pro Display XDR, or a third-party monitor via Thunderbolt or HDMI, Screenify lets you choose which display to record in the capture mode dropdown. Each connected display appears by name. For dual-monitor workflows — code on the external, browser on the built-in — record just the display that matters rather than stitching both together.
The MacBook Pro's HDMI 2.1 port supports up to 8K at 60Hz or 4K at 240Hz for external displays, and Screenify can capture these at their native resolution. If you're recording a 4K external monitor, expect file sizes roughly 4x larger than recording the built-in Retina display at scaled resolution.
Post-Recording Features
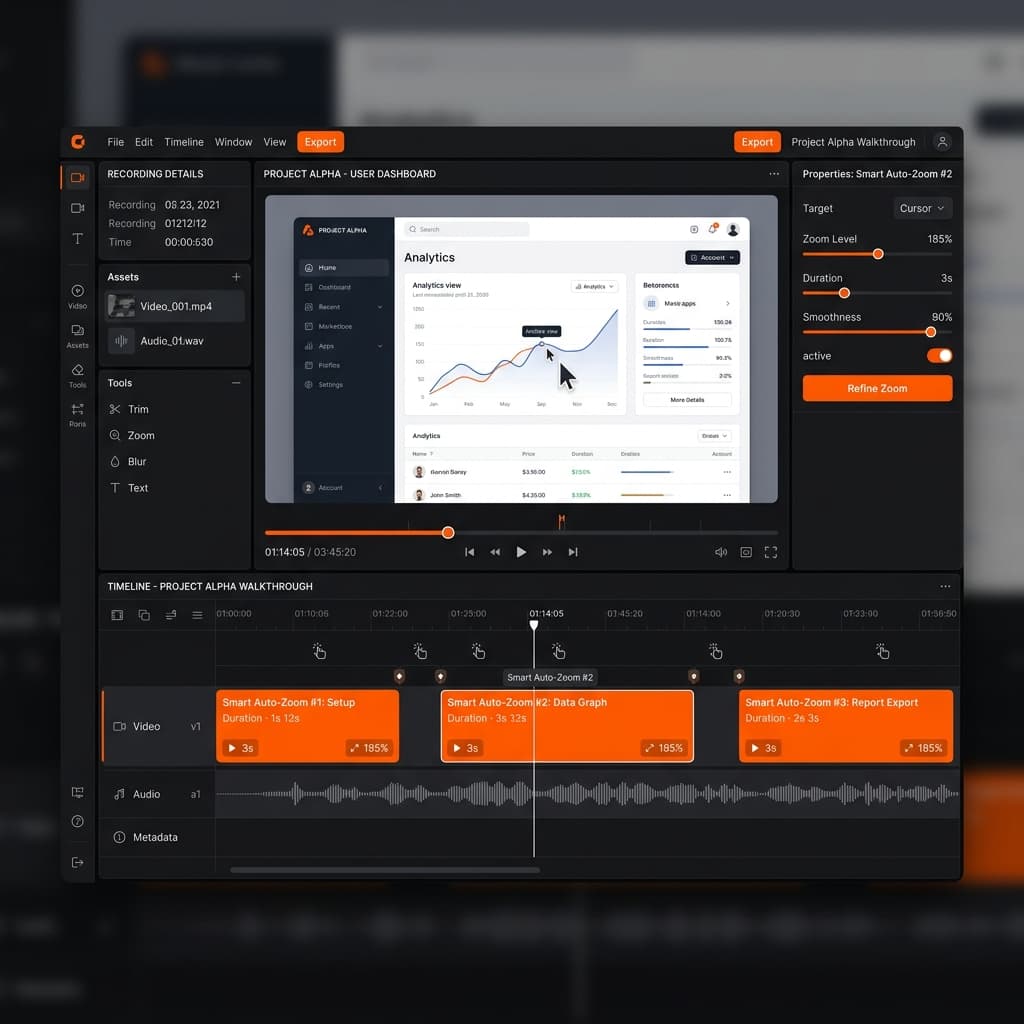
- Smart Auto-Zoom — analyzes cursor movement and creates zoom keyframes. On a Retina display recording, zoom-ins stay sharp because there are enough source pixels to crop without visible quality loss.
- AI Captions — transcribes your narration on-device. The M3 Pro/Max Neural Engine processes transcription faster than playback speed, so captions generate almost instantly.
- Dynamic Backgrounds — replace your desktop wallpaper with gradients, images, or animations behind the recorded window.
- Cursor Highlight — adds a glow or spotlight around your cursor.
Export
Metal GPU acceleration renders effects and the media engine handles final encoding. Output formats include MP4 (H.264), MOV (HEVC), and GIF. For MacBook Pro users who also work in Final Cut Pro or DaVinci Resolve, HEVC export preserves the most quality at the smallest file size — and these editors decode HEVC using the same media engine, so import is instant.
Try Screenify Studio — free, unlimited recordings
Auto-zoom, AI captions, dynamic backgrounds, and Metal-accelerated export.
Method 3: OBS Studio (Free, Open-Source)
OBS gives you granular control over encoding, frame rate, and multi-source layouts. It's free and cross-platform, with strong Apple Silicon support since version 28.
Steps
- Download OBS from obsproject.com — use the Apple Silicon (arm64) build for native M3 Pro/Max performance
- Run the Auto-Configuration Wizard — select "Optimize just for recording"
- In Settings → Video:
- Base (Canvas) Resolution — set to your MacBook Pro's native resolution (3024 × 1964 for 14-inch and 16-inch M3 models) or a scaled value like 1920 × 1200 for smaller files
- Output (Scaled) Resolution — match the base resolution for 1:1 quality, or downscale to 1920 × 1080 for standard HD
- FPS — set to 120 to leverage ProMotion. OBS reads the display's actual refresh rate and can capture at the full 120fps if your system can sustain it. For most recording scenarios, 60fps is sufficient.
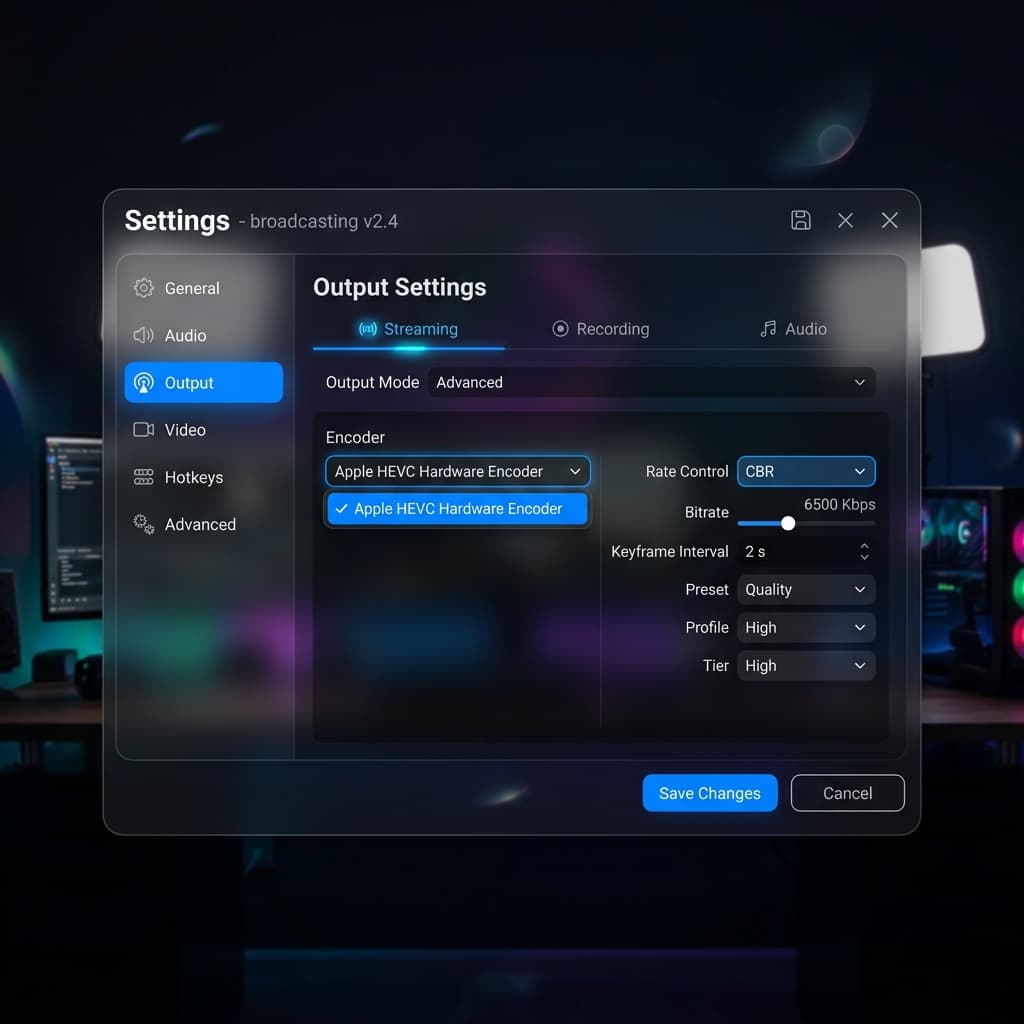
- In Settings → Output → Recording:
- Encoder — select Apple VT H265 Hardware Encoder to use the M3's dedicated media engine. This offloads encoding from the CPU entirely. If you need broader compatibility, choose Apple VT H264 Hardware Encoder instead.
- Recording Format — change from MKV to MOV or MP4 for better macOS compatibility
- Recording Quality — "High Quality, Medium File Size" is a good default. "Indistinguishable Quality" produces larger files but preserves every detail of your Retina display.
- In the Sources panel, click + and add:
- macOS Screen Capture — pick your MacBook Pro's built-in display or an external monitor. Each display appears by name.
- Audio Output Capture — captures system audio (requires macOS 13 Ventura or later for native support)
- Audio Input Capture — select the MacBook Pro's three-mic array or an external mic
- Video Capture Device — your webcam, if needed
- Click Start Recording
- Stop with Stop Recording or the configured hotkey
ProMotion at 120fps in OBS
OBS can record at 120fps on a ProMotion display, but there are trade-offs. At 120fps with native Retina resolution (3024 × 1964), you're pushing roughly 12 million pixels per frame, 120 times per second. The M3 Pro's media engine handles encoding, but your SSD needs to sustain the write throughput. The MacBook Pro's internal SSD (up to 7.4 GB/s sequential write) handles this easily. An external USB drive or SD card will bottleneck and cause dropped frames.
Monitor the Dropped Frames counter in OBS's status bar during recording. If it climbs above zero, lower the resolution or switch to 60fps.
The Notch in OBS
OBS captures the full display rectangle, notch included. The notch region appears as a black cutout in your recording. To remove it:
- Use macOS Screen Capture in Window mode instead of Display mode — this captures individual windows without the notch
- Or add a Crop/Pad filter to the source and crop the top ~74 pixels (the menu bar height on notched MacBook Pros) to eliminate the notch region entirely
Limitations
- No post-processing — OBS records raw footage. No auto-zoom, no captions, no background effects. You'll edit in a separate app.
- No ProRes — OBS doesn't support ProRes encoding on macOS. If you need ProRes output, you'll need to transcode after recording.
- Complex UI — the interface targets streamers. Scenes, sources, transitions, and filters are powerful but overwhelming for simple screen recording.
- No HDR pipeline — OBS records in SDR even if your XDR display is showing HDR content.
OBS makes sense if you need precise control over encoding settings, want 120fps capture without paying for software, or are already familiar with the interface from streaming.
Method 4: Screen Studio
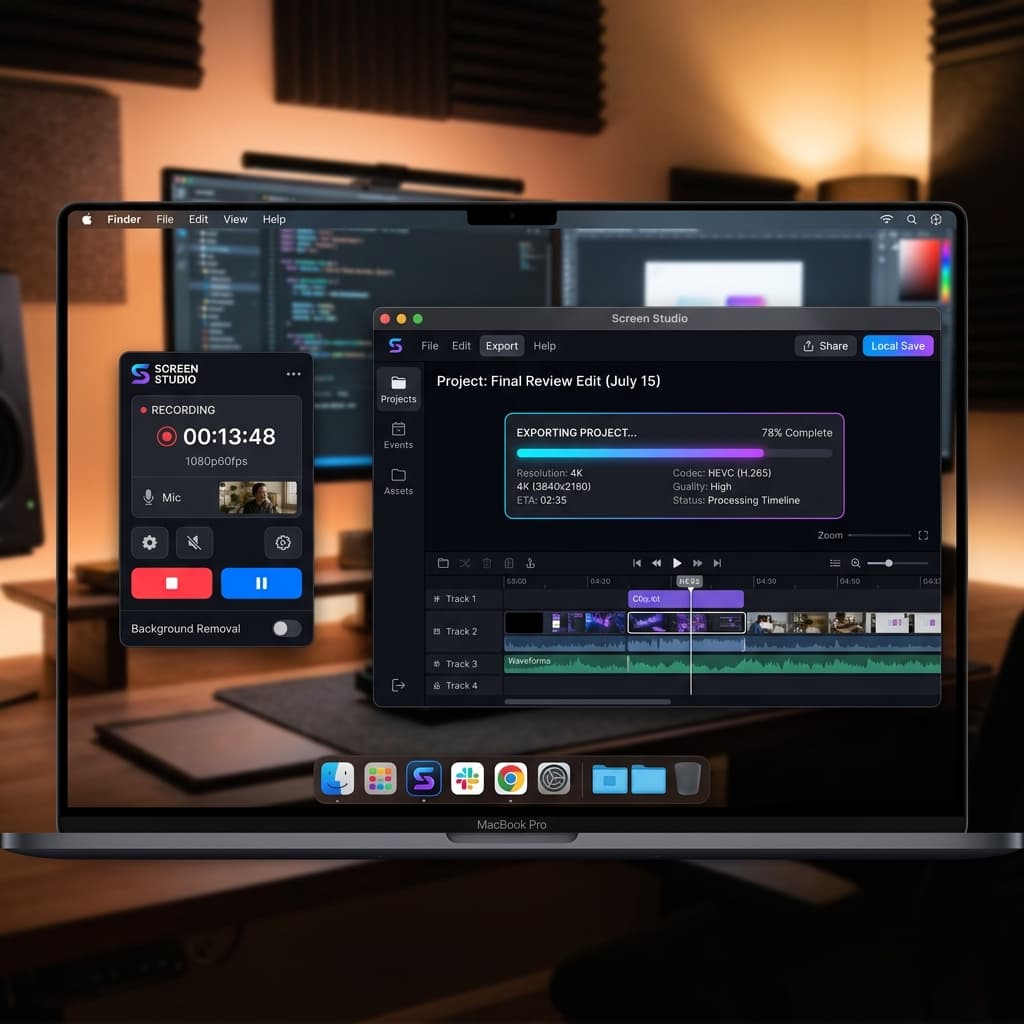
Screen Studio is a paid Mac app ($89 one-time) that applies cinematic motion effects to screen recordings automatically — zoom, smooth follow, and styled backgrounds.
Steps
- Purchase and download Screen Studio from screenstudio.lemonsqueezy.com
- Grant Screen Recording and Accessibility permissions in System Settings → Privacy & Security
- Select your recording area — full screen, window, or custom region
- Enable system audio and microphone toggles in the recording panel
- Click Record. A 3-second countdown runs before capture begins.
- After stopping, the editor opens with auto-zoom applied based on cursor movement
- Adjust the zoom intensity slider — lower values create subtle camera movement, higher values produce aggressive close-ups on every click
- Add a background (gradient, image, or solid color) and choose an aspect ratio preset
- Export as MP4 or GIF
MacBook Pro Considerations
Screen Studio captures at up to 60fps — it doesn't take advantage of ProMotion's 120Hz refresh rate. On a Retina display, the recording resolution is high enough for sharp zoom-ins, but export rendering relies primarily on CPU rather than fully leveraging the M3's media engine. Long recordings (10+ minutes) with heavy zoom effects can take several minutes to export.
Screen Studio captures the notch in full-screen recordings, same as other tools. Using window capture mode avoids it.
How It Compares
- Pricing — $89 one-time is fair for frequent use, but there's no free tier to test with a real project
- No captions — subtitle generation isn't built in; you'd need a separate tool
- No sharing platform — exports are local files only, no upload-and-share workflow
- No 120fps — capped at 60fps, leaving ProMotion performance on the table
- No ProRes — exports in H.264 only
MacBook Pro-Specific Tips
Leverage the Three-Mic Array
The MacBook Pro's three-microphone array uses beamforming to focus on your voice and reject ambient noise. For narrated recordings:
- Position yourself directly in front of the laptop, within arm's reach. The beamforming is optimized for this distance and angle.
- Avoid recording with the lid at extreme angles — the mics are located near the top of the keyboard deck, and extreme lid positions can shift the beamforming pattern.
- The built-in mics have a higher signal-to-noise ratio than the MacBook Air's dual-mic setup, producing cleaner voiceover without needing post-processing noise reduction.
Use the SD Card Slot for Offloading
The MacBook Pro's SDXC card slot supports UHS-II speeds (up to 312 MB/s). After a recording session, pop in an SD card and copy your files to free up internal storage. This is faster than uploading to cloud storage for large ProRes or high-bitrate recordings. SD cards aren't fast enough for recording directly to (you'll drop frames at high resolutions), but they're ideal for archival offloading.
Thermal Advantage Over MacBook Air
The MacBook Pro has an active cooling system with fans, unlike the fanless MacBook Air. During sustained recordings (30+ minutes), the Air may throttle CPU and GPU performance to manage heat, causing dropped frames or encoder stalls. The Pro maintains consistent clock speeds throughout. If you regularly record long sessions — lectures, webinars, multi-hour workflows — the Pro's thermals keep your frame rate steady.
HDMI for External Source Recording
The MacBook Pro's HDMI 2.1 port isn't just for output. If you connect an external device (a camera, gaming console, or another computer) via an HDMI capture card plugged into a Thunderbolt port, you can use OBS to record that input as a video source alongside your screen. The dedicated media engine decodes the incoming HDMI stream while simultaneously encoding your recording, without impacting performance.
Recording HDR Content
Your Liquid Retina XDR display can show HDR content — high dynamic range video in apps like Final Cut Pro, HDR photos in Preview, or HDR streaming in Safari. However, none of the four tools above record in HDR. All screen recordings output SDR (standard dynamic range). HDR highlights that appear bright and vivid on your XDR display will be tone-mapped down to SDR in the recording, looking slightly flatter than what you saw live.
If preserving HDR fidelity matters (for example, you're demonstrating color grading in DaVinci Resolve), mention this limitation to your audience and consider using Apple's ScreenCaptureKit API directly via a custom script to capture HDR frames — though this requires development work and isn't practical for most users.
Troubleshooting
HDR Content Looks Washed Out in Recordings
You recorded your screen while viewing HDR content on the XDR display, but the recording looks dull and low-contrast on playback.
Why: Screen recording tools capture in SDR. The XDR display's 1600-nit peak brightness and P3 wide color gamut get tone-mapped to SDR's smaller dynamic range during capture. Bright highlights compress, and the overall image loses punch.
Fix: There's no settings change that makes SDR recordings match the XDR viewing experience. To minimize the gap:
- Turn off True Tone in System Settings → Displays before recording — True Tone adjusts white balance based on ambient light, which can shift colors in the recording compared to what you expect.
- If you're recording a color-critical workflow (video editing, photo grading), set your display profile to sRGB in System Settings → Displays → Color Profile before recording. This forces the display into SDR mode, so what you see matches what gets captured.
- Tell your audience the recording is SDR and that the actual output looks different on an HDR display.
Notch Artifacts in Full-Screen Recordings
Your full-screen recording has a black notch shape cutting into the top center of the frame, or the menu bar items appear split around a gap.
Why: The MacBook Pro display panel includes the notch physically. Full-screen capture grabs the entire panel rectangle, and the notch region renders as black or transparent depending on the player.
Fix:
- Best approach: Record in Window mode instead of Full Screen. Individual app windows never overlap the notch.
- In OBS: Add a Crop/Pad filter to your display source. Set Top to 74 pixels (the menu bar height) to crop the notch out entirely.
- In Screenify Studio: Use a Dynamic Background with padding — this reframes your recording on a larger canvas, and you can position it so the notch falls outside the visible area. Or export with a 16:9 crop, which naturally excludes the notch on both 14-inch and 16-inch models.
- Post-recording: Trim the top of the frame in any video editor. You'll lose the menu bar, but the notch disappears.
ProRes File Sizes Are Unmanageable
You exported in ProRes (via Final Cut or another tool that supports it) and the file is 50 GB for a 10-minute recording.
Why: ProRes is designed for editing, not distribution. ProRes 422 at 3024 × 1964 and 60fps generates roughly 5 GB per minute. ProRes 4444 (with alpha channel) doubles that.
Fix:
- Use ProRes only when you need to edit the recording in Final Cut Pro, DaVinci Resolve, or Motion and require maximum quality for re-encoding.
- For sharing and distribution, export as HEVC (H.265) instead. HEVC at the same resolution and frame rate produces files roughly 50-100x smaller than ProRes with visually imperceptible quality loss for screen content.
- If you need to archive the ProRes master, use the SD card slot to offload to high-capacity SDXC cards — a 512 GB UHS-II card transfers at up to 312 MB/s, moving 50 GB in under 3 minutes.
- Screenify Studio exports in HEVC by default using the M3's dedicated media engine, keeping file sizes practical without sacrificing sharpness.
Recording Drops Frames at 120fps
You set OBS or Screenify to 120fps to match ProMotion, but the recording shows stutters or the dropped frame counter rises.
Why: 120fps at native Retina resolution (3024 × 1964) means encoding approximately 12 million pixels 120 times per second. Even with the M3's hardware encoder, the bottleneck is often the storage write speed or the compositor's ability to deliver frames fast enough.
Fix:
- Record to the internal SSD, never to an external USB drive or SD card
- Close GPU-intensive apps during recording — games, 3D viewports, and heavy video playback compete for the same GPU resources the encoder uses
- Lower the recording resolution to 1920 × 1200 or 1080p while keeping 120fps. Screen content (text, UI elements) stays readable at 1080p, and you halve the data throughput.
- If you don't genuinely need 120fps, drop to 60fps. Most screen recordings — tutorials, demos, presentations — look identical at 60fps. Reserve 120fps for capturing smooth animations, scrolling comparisons, or game UI.
Fan Noise Picked Up During Long Recordings
Under sustained load, the MacBook Pro's fans spin up and the built-in mics capture the noise.
Why: The fans are physically close to the microphone array. While beamforming reduces fan noise, it can't eliminate it entirely during heavy sustained workloads.
Fix:
- Use an external USB microphone or a headset mic — physical distance from the fans is the most effective solution
- Record in a cooler environment to delay fan activation
- Reduce CPU/GPU load during recording: close background apps, disable Spotlight indexing temporarily, and avoid running builds or renders simultaneously
- In Screenify Studio, enable Noise Reduction in the editor after recording to filter out low-frequency fan hum from the mic track
Try Screenify Studio — free, unlimited recordings
Auto-zoom, AI captions, dynamic backgrounds, and Metal-accelerated export.
FAQ
Does ProMotion actually make screen recordings look better?
Only if you record at a frame rate above 60fps. ProMotion runs the display at up to 120Hz, meaning your eyes see 120 frames per second of on-screen motion. But if your recording tool captures at 60fps (which the built-in macOS recorder and Screen Studio do), the recording looks identical to one made on a 60Hz MacBook Air. To capture the ProMotion difference, use OBS or Screenify Studio set to 120fps — then viewers on high-refresh-rate displays will see the smoother motion. On standard 60Hz monitors, the extra frames get dropped during playback anyway.
How do I remove the notch from my screen recording?
Three options: (1) Record in Window mode instead of Full Screen — windows don't extend into the notch. (2) Record a Selected Portion and drag the selection below the menu bar. (3) Add a crop in post-production, trimming the top 74 pixels. In OBS, use a Crop/Pad filter on the display source. In Screenify Studio, use Dynamic Backgrounds to reframe the recording on a clean canvas. For more recording techniques, see our complete Mac screen recording guide.
Can I record in ProRes on MacBook Pro?
The M3 Pro and M3 Max media engines include dedicated ProRes encode/decode hardware. However, most screen recording apps don't expose ProRes as an output option. Final Cut Pro can record your screen via its companion app and output ProRes. Apple's ScreenCaptureKit API supports ProRes encoding programmatically. For practical screen recording, HEVC (H.265) is a better choice — it produces files 50-100x smaller than ProRes with no visible quality difference for screen content. The media engine accelerates HEVC encoding just as efficiently.
Should I record at Retina resolution or scale down?
It depends on the output. If your recording will be viewed full-screen on Retina displays, record at native resolution (3024 × 1964) to preserve sharpness. If you're sharing on social media, in Slack messages, or embedding in a webpage where the player is 1080p, recording at native resolution wastes storage and bandwidth — scale down to 1920 × 1080 or 1920 × 1200 in your recording tool's settings. Text and UI elements stay readable at 1080p, and file sizes drop by roughly 75%.
Is the MacBook Pro's built-in mic good enough for narration?
For most screen recordings, yes. The three-mic array with directional beamforming produces significantly better audio than the MacBook Air's dual-mic setup. It effectively rejects keyboard noise and moderate background sounds. The SNR (signal-to-noise ratio) is high enough for tutorials, demos, and internal team recordings. For professional voice-over work, podcast-quality narration, or recording in noisy environments, an external condenser mic (like the Elgato Wave:3 or Rode NT-USB Mini) still outperforms it. See our guide on recording with audio on Mac for detailed audio setup instructions.
How long can I record continuously on MacBook Pro?
The MacBook Pro's active cooling system maintains sustained performance without thermal throttling for as long as your storage lasts. On battery, expect 2-3 hours of continuous recording depending on screen brightness, recording resolution, and whether you're using the webcam. Plugged in, the only limit is SSD storage — a 1 TB drive fills up at roughly 1 GB per minute at native Retina resolution with HEVC encoding, or much faster with ProRes. The MacBook Air, by comparison, may throttle after 15-20 minutes of sustained recording due to its fanless design.
Can I record audio playing through my MacBook Pro speakers?
The built-in macOS Screenshot toolbar cannot capture system audio — it only records microphone input. To capture what's playing through your speakers (or headphones), you need a tool that installs a virtual audio driver. Screenify Studio does this automatically on first launch. OBS supports native system audio capture on macOS 13 Ventura and later. For a deep dive on capturing internal audio, see our guide to recording internal audio on Mac.
Does recording affect the XDR display's peak brightness?
No. Screen recording runs as a background process and doesn't influence display brightness or HDR tone mapping. Your XDR display continues to operate normally — up to 1000 nits sustained, 1600 nits peak for HDR content. The recording itself is captured in SDR, but the display's behavior during recording is unaffected. Your viewers just won't see the HDR highlights in the recorded file.
Which Method Should You Use?
Pick the macOS Screenshot Toolbar if you need a quick clip in under a minute, don't need audio, and don't care about the notch or ProMotion. It's already on your Mac.
Pick Screenify Studio if you want system audio, webcam, auto-zoom, and AI captions without manual setup — and you want to actually use the M3's media engine for fast, efficient exports. The free plan covers most recording needs.
Pick OBS if you need maximum control over encoding settings, want 120fps capture without paying for software, or are already comfortable with OBS from streaming. Be prepared to handle editing in a separate app.
Pick Screen Studio if you want automatic zoom effects and are willing to pay $89 upfront for a polished one-time-purchase tool. Just know you're leaving 120fps and hardware-accelerated export on the table.
Your MacBook Pro is the most capable recording machine Apple makes. Whichever tool you choose, make sure it's actually using the hardware — not just running the same 60fps SDR pipeline you'd get on a base model Air.
Try Screenify Studio
Record your screen with auto-zoom, AI captions, dynamic backgrounds, and Metal-accelerated export. Free plan, unlimited recordings.
Download Free


