How to Record a Webinar on Mac
Capture webinars on Mac — Zoom, GoToWebinar, Webex, and browser-based — with audio, slides, and Q&A intact.

Webinars are where a lot of real knowledge lives — product roadmaps, conference talks, training sessions, industry panels. The problem: you sit through 75 minutes of good material, close the tab, and within a week you've forgotten two thirds of it. Note-taking helps. A clean recording helps more, because you can scrub back to the exact slide where the speaker said something you half-understood.
Recording a webinar on Mac sounds straightforward until you actually try it. The host may or may not have enabled attendee recording. The audio might be routed through Zoom or through your browser. The slides might be in one window while the speaker's face is in another. And if you're on a 90-minute session, you need to think about disk space and whether the recording will survive a Wi-Fi hiccup.
This guide walks through four practical ways to capture a webinar on a Mac, when each one makes sense, and the webinar-specific gotchas — etiquette, disclosure, long-session planning — that don't come up when you're just recording your own screen.
Quick comparison
| Method | Cost | Captures System Audio | Best For | Difficulty |
|---|---|---|---|---|
| Platform's built-in recording (Zoom, Webex, GoToWebinar) | Free (host permission required) | Yes | Hosts and co-hosts | Easy |
| Screenify Studio | Free tier; paid upgrades | Yes (built-in) | Attendees who want clean playback and chapter markers | Easy |
| OBS Studio | Free | Yes (with BlackHole or similar) | Power users who want multi-source composition | Hard |
| QuickTime Player + BlackHole | Free | Yes (requires audio routing setup) | Minimal one-off captures | Medium |
A quick note before the methods: this guide assumes you have a legitimate reason to record — personal review, accessibility, accurate note-taking. Keep reading for the etiquette section before you hit record on someone else's content.
A note on permissions and etiquette
Webinars sit in an awkward legal and social space. In most jurisdictions, recording a session you've been invited to for your own personal reference (notes, accessibility, later review) is not a problem. Redistributing that recording — posting it on YouTube, sharing it with your team Slack, clipping it for a newsletter — generally requires permission from the host and often from any named attendees.
A few rules of thumb:
- Personal notes are usually fine. If you're the only person who will ever see the file, you're in the clear almost everywhere.
- Disclose when asked. Many webinars open with "this session is being recorded by the host." If yours doesn't, and the host asks attendees not to record, respect that.
- GDPR and CCPA apply to faces and voices. If the webinar has a live Q&A with attendees on camera, and you want to share your recording, you'll need consent from those attendees or you'll need to cut them out.
- Check the ToS. Platforms like ON24 and some enterprise Webex deployments explicitly prohibit third-party recording in their terms. Violating that won't land you in jail, but it can get your account banned.
- Ask. If the content is genuinely useful and you want to share it, sending a one-line email to the host asking for a copy usually works better than recording in secret. Hosts often have a cleaner recording than anything you could capture.
With that out of the way, here are the four methods.
Method 1: Use the webinar platform's built-in recording
Every major webinar platform has native recording. The catch is that this option is almost always gated to hosts, co-hosts, and panelists — not attendees. If you're running the webinar, this is the cleanest path. If you're watching someone else's, skip to Method 2.
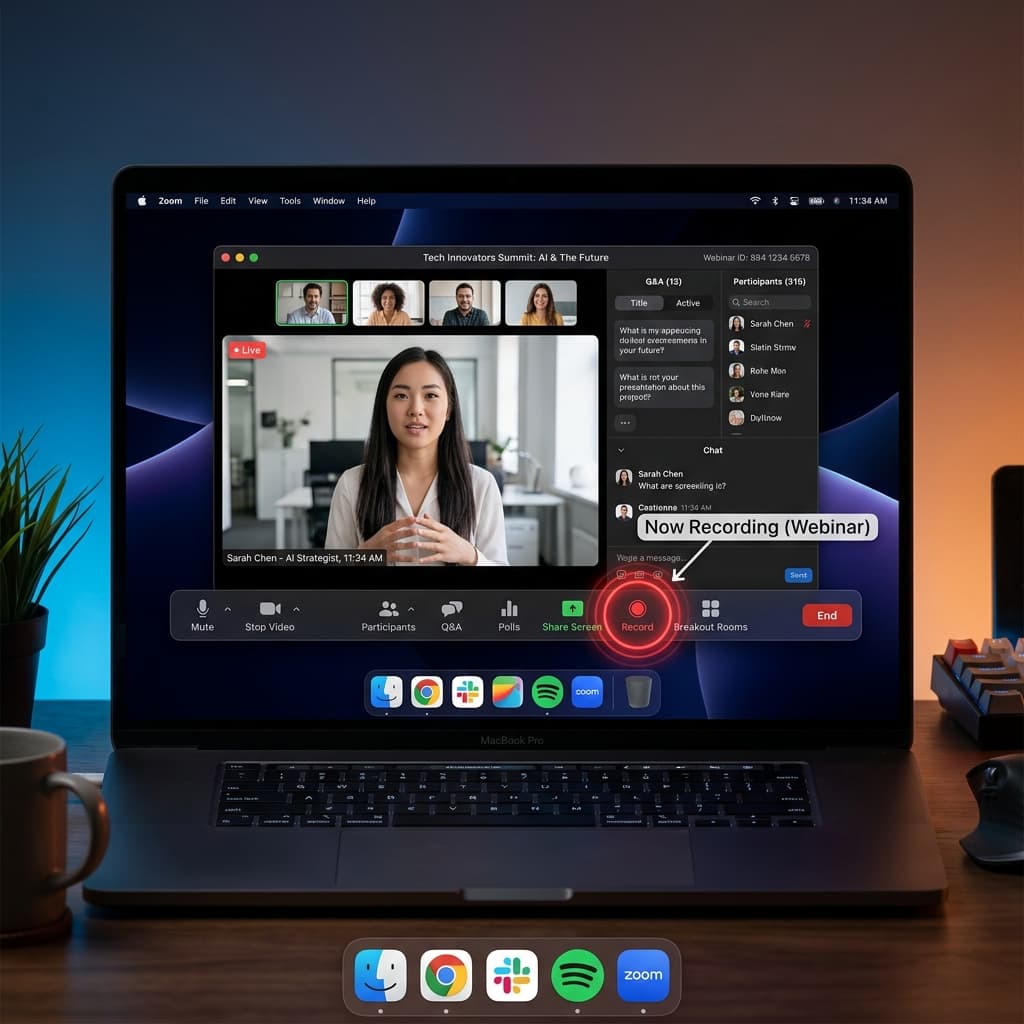
Zoom Webinars
Zoom distinguishes between Meetings and Webinars. For Webinars, only the host and co-hosts can start recording by default. The host can grant recording permission to specific panelists, but not to general attendees.
If you're the host:
- Start the webinar from the Zoom desktop app on your Mac.
- Once the session is live, click Record in the bottom toolbar.
- Choose Record to this Computer for a local MP4, or Record to the Cloud if you have a paid Zoom plan and want the file on Zoom's servers.
- Zoom will save the file to
~/Documents/Zoom/by default when the session ends. It processes the MP4 after the webinar closes — don't quit Zoom until you see "Converting" finish.
Zoom records the active speaker view by default. If you want to capture the slide share as a separate stream, enable Record a separate audio file for each participant and Record video during screen sharing in Zoom's recording settings before the webinar starts.
GoToWebinar
GoToWebinar records to the cloud automatically for paid organizers. As an attendee, you can't trigger a recording. Organizers can enable attendee recording under Event Settings > Recording, but it's off by default and rare in practice.
If you're organizing: recording starts automatically when you begin broadcasting. Files are available in your GoToWebinar dashboard under Past Events within a few hours.
Webex Webinars
Webex treats recording the same way — hosts and alternate hosts can record, attendees cannot. Click Recorder in the Webex menu bar and choose Record in cloud or Record on my computer. Local recordings land in ~/Documents/Webex/ as MP4 files with a separate audio track.
ON24
ON24 is an enterprise webinar platform, and its recording is entirely cloud-based. Neither hosts nor attendees get a local file during the session — recordings appear in the ON24 console 24-48 hours after the event. As an attendee, your only option is third-party capture (Methods 2-4).
When to use Method 1: You're the host or a co-host, and you want a pristine recording with separate audio tracks and slide streams. If you're an attendee, this method isn't available to you.
Method 2: Screenify Studio
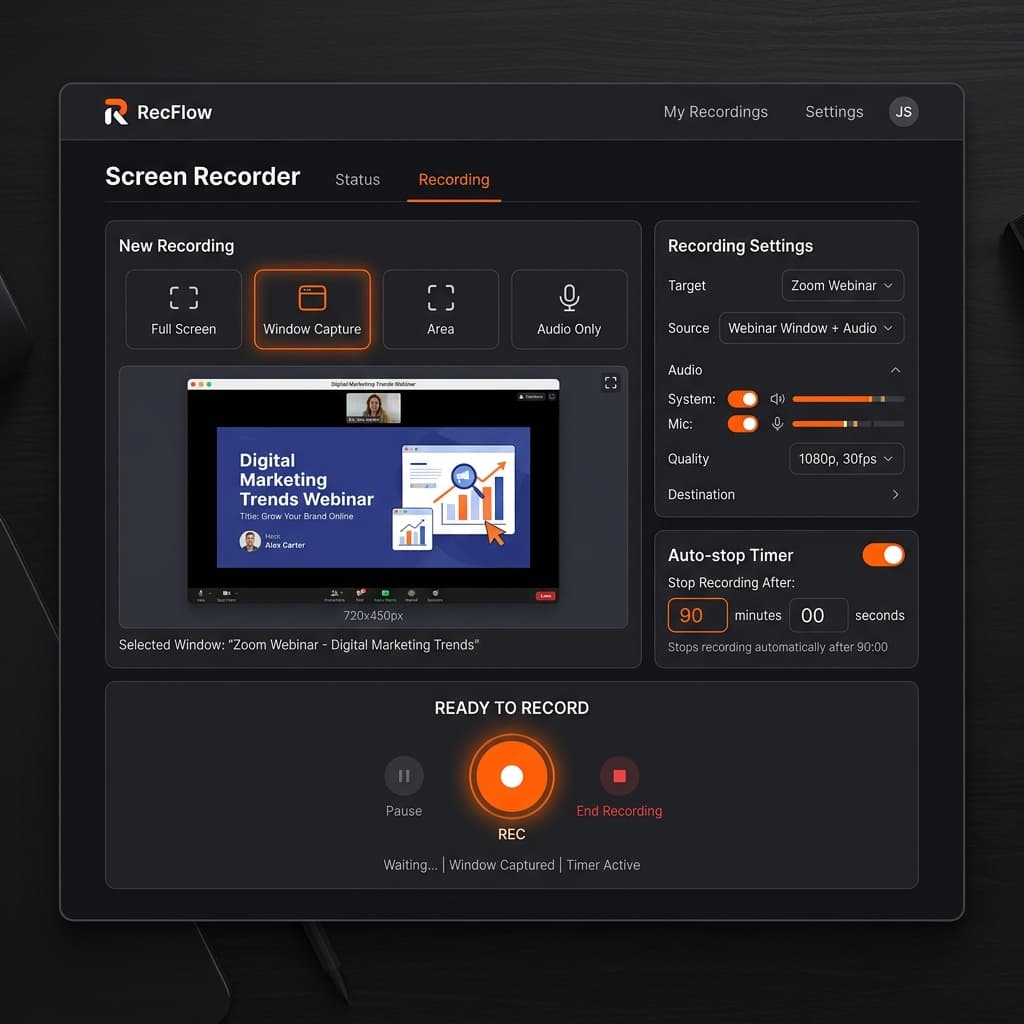
For attendees — which is most people reading this — third-party screen capture is the realistic option. Screenify Studio was built for this kind of session: long-form, slide-heavy, with variable presenter audio and important chat sidebars you may or may not want in the frame.
Download Screenify Studio and install it before the webinar starts. Let it request Screen Recording and Microphone permissions during first launch — you don't want a permissions dialog popping up mid-session.
Setup (do this 5 minutes before the webinar)
- Open Screenify and choose the capture target. For webinars, Window capture is almost always the right pick — it locks onto the specific Zoom, Webex, or browser window and ignores anything else happening on your desktop (Slack notifications, email previews, other tabs).
- Enable system audio so you capture the presenter's voice routed through the webinar app. Leave the microphone off unless you're planning to record your own voice commentary alongside.
- Set the frame rate to 30 fps. Webinars are mostly static slides with occasional cursor movement — 60 fps just doubles the file size for no visible benefit.
- Pick an output folder with room to spare. A 90-minute webinar at 1080p/30 fps is roughly 2-4 GB depending on how much movement is on screen.
During the webinar
Start recording when the host begins presenting (skip the 3-minute "we're waiting for people to join" countdown — your future self will thank you). Screenify runs in the menu bar so you can alt-tab back to the webinar window and forget about it.
A few tips for long sessions:
- Use the auto-stop timer. Screenify has a scheduled stop feature — set it for 90 or 120 minutes. If the webinar runs long or you get pulled away, the recording stops cleanly instead of bloating to 10 GB overnight.
- Mark chapters as you go. Tap the chapter marker shortcut when the speaker moves to a new section. These become scrub points in the editor later, which is a lifesaver on a 75-minute session.
- Don't minimize the target window. Window capture continues to record even when the window is hidden behind another, but if you minimize the webinar to the dock, Screenify will record a static frame until you restore it.
After the webinar
Screenify opens the recording in its built-in editor. For webinar footage, three quick passes go a long way:
- Trim the dead air. Cut the pre-roll, the post-roll, and any long "we'll give people another minute to join" pauses. A 75-minute webinar becomes 62 minutes of actual content.
- Normalize the audio. Presenters have wildly variable mic quality. The audio normalize feature levels out peaks and raises quiet sections so you're not constantly reaching for the volume knob during playback.
- Export as MP4 H.264. Screenify's Metal-accelerated encoder handles a 90-minute 1080p export in 2-3 minutes on Apple Silicon, which matters when you're trying to get notes to your team before the next meeting.
If you want to share the recording (with permission from the host), Screenify's sharing platform generates a link with a web player — your colleagues don't need to download a 3 GB file, they can scrub through it in a browser.
Screenify's audio routing is worth calling out because webinars are an audio-first medium and getting system audio wrong ruins the whole recording. For the detailed breakdown of how system audio capture works on Mac, see the guide on recording internal audio on Mac.
Try Screenify Studio free — the free tier handles webinar-length recordings without a watermark.
Try Screenify Studio — free, unlimited recordings
Auto-zoom, AI captions, dynamic backgrounds, and Metal-accelerated export.
Method 3: OBS Studio
OBS is the power-user option. It's free, open source, and designed for live streaming, which means it treats webinar capture as a trivial subset of what it can do. The tradeoff is setup complexity — you'll spend 20 minutes configuring it the first time.
Install and prepare
- Download OBS from obsproject.com. The Mac build is a universal binary and runs natively on Apple Silicon.
- On first launch, OBS prompts you to run the auto-configuration wizard. Choose Optimize for recording, I will not be streaming.
- Set the base canvas resolution to match your display (typically 1920x1080 or 2560x1440 on Retina Macs). Set the output resolution to 1920x1080 — recording the webinar at your full Retina resolution produces enormous files for no quality gain.
- Frame rate: 30 fps.
Capture the webinar
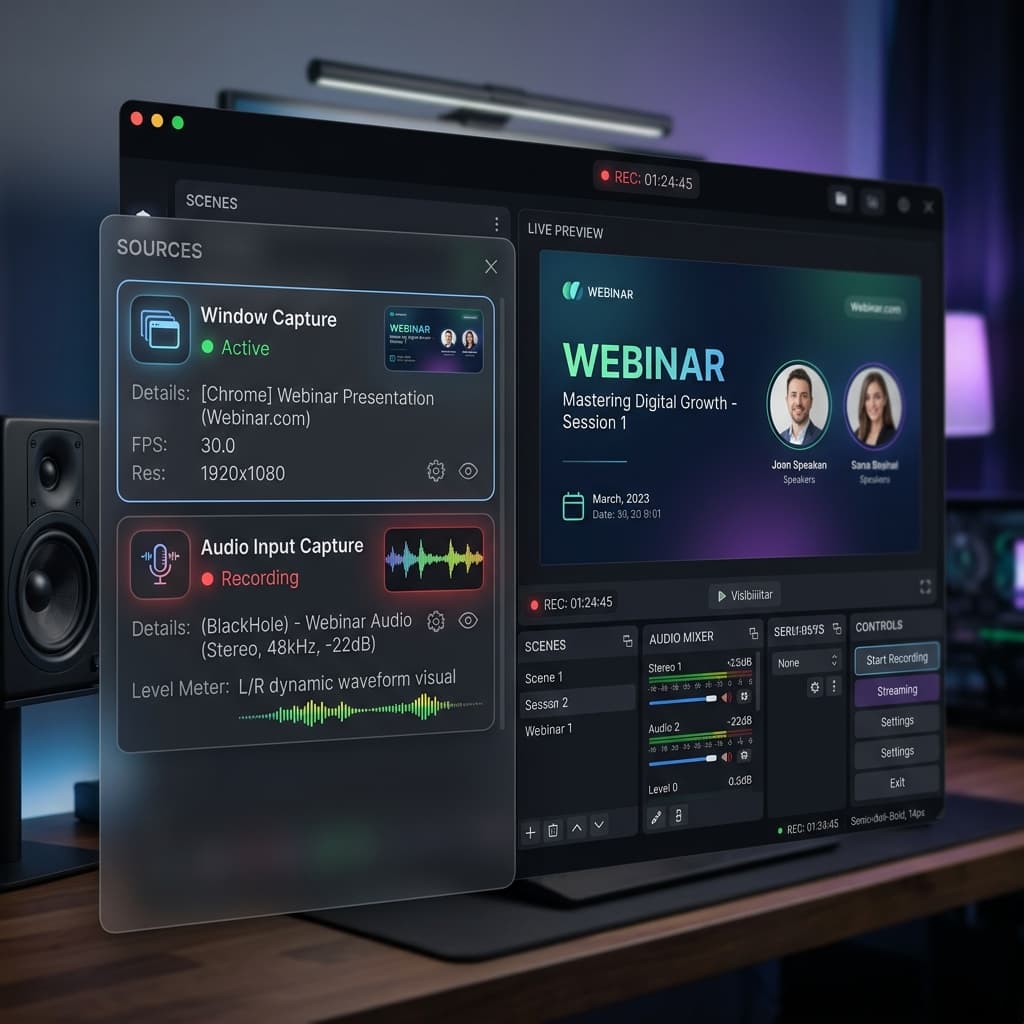
OBS works in scenes. Create a scene called "Webinar" and add two sources:
- Display Capture or Window Capture. Window capture is better — it follows the Zoom/browser window if you move it around. Add the source, pick the webinar window from the dropdown, and resize it to fill the canvas.
- Audio Input Capture for system audio. This is where OBS gets painful on Mac. macOS doesn't expose system audio to apps directly, so you need a virtual audio device.
System audio on OBS (the tedious part)
macOS 13 Ventura and later include a native Screen Capture Kit audio source in OBS 30+, which captures system audio without any third-party tools. If you're on OBS 30 or newer:
- Add a new source → macOS Screen Capture.
- Enable the Capture Audio checkbox.
- That's it.
If you're on an older OBS or older macOS, you need BlackHole:
- Install BlackHole 2ch from the ExistentialAudio GitHub releases.
- Open Audio MIDI Setup (in Applications → Utilities) and create a Multi-Output Device that routes to both your speakers/headphones and BlackHole 2ch.
- Set macOS system output to the Multi-Output Device.
- In OBS, add an Audio Input Capture source pointing to BlackHole 2ch.
The multi-output step is critical — without it, all webinar audio goes to BlackHole (invisible to you) and you can't hear the session while recording.
Settings for long webinars
Under Settings > Output > Recording:
- Recording Format: MP4 (or MKV if you're worried about crashes — MKV doesn't corrupt if the recording is interrupted, and you can remux to MP4 later).
- Encoder: Apple VT H264 Hardware Encoder on Apple Silicon. This offloads encoding to the media engine and keeps CPU usage low over long sessions.
- Rate Control: CBR at 6000-8000 kbps for 1080p. VBR is fine too, but CBR makes it easy to predict file size.
Hit Start Recording when the webinar begins. OBS writes the file continuously, so even if your Mac crashes mid-session you'll have everything up to the crash (especially with MKV).
When to use OBS: You want to record multiple sources at once (webinar window + your webcam reaction + a separate browser with notes), or you're already comfortable with OBS for other projects. For a quick attendee capture, it's overkill.
Method 4: QuickTime Player with system audio
QuickTime Player is pre-installed on every Mac and can record the screen. The catch: out of the box, QuickTime only records from the microphone input, not from system audio. For a silent webinar that would be useless. With a one-time BlackHole setup, you can route system audio into QuickTime and get a workable recording.
Install BlackHole
- Install BlackHole 2ch from ExistentialAudio (free, open source).
- Open Audio MIDI Setup and create a Multi-Output Device: check both your main output (MacBook Speakers, headphones, or AirPods) and BlackHole 2ch. This lets you hear the webinar and route its audio to BlackHole simultaneously.
- Set macOS system output (System Settings → Sound → Output) to the Multi-Output Device.
Record with QuickTime
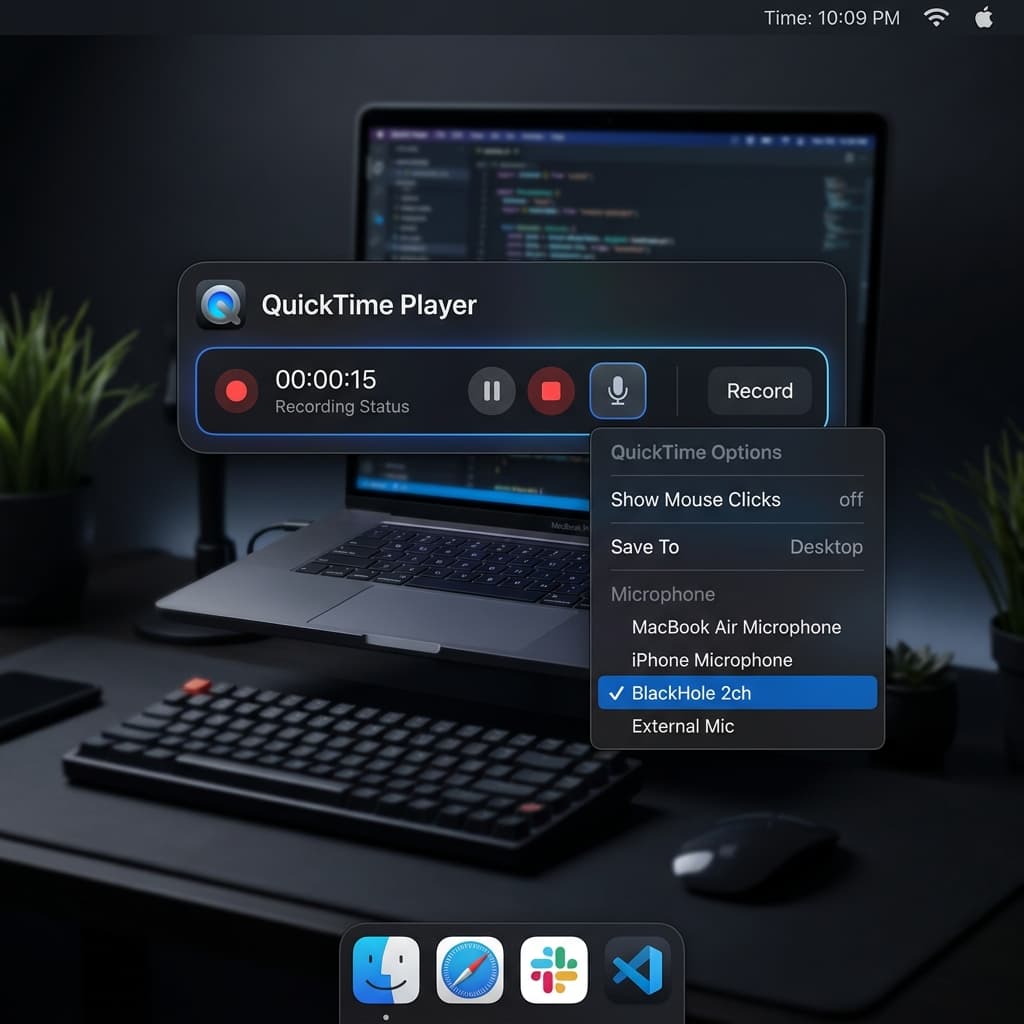
- Open QuickTime Player from Applications.
- File menu → New Screen Recording. This opens the macOS screen capture overlay.
- Click Options and set the microphone input to BlackHole 2ch. This tricks QuickTime into thinking BlackHole is a mic, but because BlackHole is receiving system audio, QuickTime records the webinar's audio track.
- Choose Record Entire Screen or Record Selected Portion. For a webinar, selected portion around the Zoom/browser window keeps file size down.
- Click Record.
- When the webinar ends, stop recording from the menu bar icon. QuickTime saves a .mov file to your Desktop by default.
The catches
- You lose voice levels if you want to record your own commentary alongside. QuickTime can only record one audio input at a time, so you'd have to pick between BlackHole (webinar audio) and your mic. There are workarounds using Audio MIDI's Aggregate Device feature, but at that point Method 2 or 3 is easier.
- No pause button. QuickTime records straight through. If you need to step away, you either let the disk fill up or stop the recording and start a new one (creating two files to stitch together later).
- No chapter markers, no auto-stop, no editing. QuickTime is bare metal — it saves a .mov file and that's it.
For more on QuickTime's audio limitations and how to work around them, the dedicated guide on screen recording on Mac with audio covers the BlackHole setup in more depth.
When to use QuickTime: You need to record a one-off webinar, you don't want to install anything beyond a free audio driver, and you're fine with doing any cleanup in a separate editor. For anything recurring, you'll save time with Method 2.
Troubleshooting
The recording has video but no sound
This is the most common webinar-recording problem on Mac, and it almost always traces back to system audio routing. macOS treats app audio and microphone audio as separate streams, and by default screen recording tools only get the mic.
Fix:
- In Screenify, check that the system audio toggle is on in the capture panel before starting the recording.
- In OBS, verify the macOS Screen Capture source has Capture Audio enabled, or that your BlackHole input is connected and receiving signal (you'll see the meter move).
- In QuickTime, confirm the Options menu shows BlackHole 2ch as the input and that macOS output is set to a Multi-Output Device that includes BlackHole.
If audio works for the first 30 seconds and then cuts out, your Multi-Output Device probably desynced — restart the recording and the webinar audio stream.
The Zoom window goes black in the recording
Zoom uses GPU-accelerated rendering for shared content, and some screen-capture tools struggle to pull frames from that layer. On Macs with macOS 13+, the Screen Capture Kit framework handles this natively and the issue is rare. On older systems:
- In Zoom: Preferences → Share Screen → uncheck Use hardware acceleration for sending video. This forces Zoom to render in software, which captures cleanly at a small CPU cost.
- In Screenify or OBS: use window capture on the Zoom window specifically rather than display capture.
My 90-minute recording is 15 GB
Frame rate and resolution are the usual culprits. A webinar is mostly static slides, so recording at 60 fps is pure waste. Check:
- Frame rate set to 30 fps (not 60).
- Output resolution set to 1080p, not your Retina native resolution (which might be 2560x1600 or higher).
- Encoder using H.264 hardware encoding, not raw or uncompressed.
A 90-minute webinar at 1080p/30 fps with H.264 should be 2-4 GB. If you're seeing 15 GB, something is off.
Wi-Fi dropped for 20 seconds — does my recording survive?
Yes and no. Your screen recording tool keeps writing frames to disk regardless of network state — if Zoom freezes because the webinar stream cut out, Screenify and OBS will dutifully record the frozen frame. Your recording survives, but the content during that 20 seconds is gone. There's no fix for this other than asking the host for the official recording after the session.
For long webinars, this is an argument for using MKV format in OBS or Screenify's crash-safe recording mode — if your Mac itself crashes (not just the network), the file up to that point is still readable.
The audio is quiet in some sections and loud in others
Presenter mics vary wildly. In Screenify's editor, apply audio normalize as a one-click fix — it levels peaks and raises quiet sections to a target LUFS. In other editors (DaVinci Resolve, Final Cut, even Audacity), apply a compressor with a 3:1 ratio and -18 dB threshold, then normalize the overall track to -16 LUFS.
Try Screenify Studio — free, unlimited recordings
Auto-zoom, AI captions, dynamic backgrounds, and Metal-accelerated export.
FAQ
Can attendees record a Zoom webinar without the host's permission?
Not through Zoom itself — the recording controls are gated to hosts, co-hosts, and panelists. You can record using third-party screen capture tools (Methods 2-4 above), which Zoom cannot prevent. Whether you should depends on the webinar's stated policy and what you plan to do with the recording. Personal note-taking is generally fine; redistribution requires permission.
Is it legal to record a webinar I've paid for?
In most jurisdictions, yes, for personal use — you paid for access to the content, and recording for your own review falls under fair use or personal copy exceptions. You do not get redistribution rights just because you paid for a ticket. Check the webinar's terms of service; some paid events explicitly prohibit recording even for personal use, and violating the terms can get your access revoked.
How much disk space do I need for a 90-minute webinar?
Plan for 4 GB at 1080p/30 fps with H.264 compression. If you're recording at 1440p or 4K, multiply accordingly — a 4K/60fps 90-minute recording can hit 25-30 GB, which is almost never what you want for a slide-heavy webinar. Drop to 1080p/30 fps unless the webinar has genuinely fine detail you need to preserve.
Can I record just the presenter's slides without the speaker's webcam?
Yes, if you use window capture and the slides are shared in a separate window. When the presenter shares their screen in Zoom, it shows up as a "Zoom Share" window. Use window capture on that specific window and you'll get the slides only, with no speaker video. The audio is still captured from the system audio stream regardless of which window you're recording.
Does Screenify work with browser-based webinars (Webex, GoToWebinar, ON24)?
Yes. Screenify captures anything that appears on your screen, so browser-based webinars work the same as native apps. Use window capture on the browser window (or tab) playing the webinar, enable system audio, and start recording. The one caveat: if the webinar player is in fullscreen mode, some tools fall back to display capture — confirm your setup with a 10-second test recording before the session starts.
What's the best way to capture the chat panel and Q&A?
If you want the chat in your recording, use display capture (not window capture) so both the main webinar window and the chat sidebar are in frame. You'll need to arrange the windows before the session starts. If you want chat as a separate artifact, most webinar platforms let you export chat transcripts after the session — Zoom saves chat.txt in the same folder as the recording, and Webex has a download option in the post-session dashboard.
My Mac is old — will recording a 90-minute webinar overheat it?
Probably not, if you use hardware encoding. Screenify, OBS (with VT H.264), and QuickTime all offload H.264 encoding to the Mac's media engine, which is power-efficient and barely touches the CPU. On an M1 or later, a 90-minute 1080p recording uses 5-10% CPU total. On Intel Macs, hardware encoding is still available but less efficient — expect 15-25% CPU and noticeable fan noise on long sessions.
Should I record the webinar or just rely on the host's official recording?
If the host is going to share the official recording afterward, wait for theirs — it'll be cleaner, have separate audio tracks, and usually include the slides as a downloadable deck. If the host doesn't offer a recording, or you need to review specific moments during the session (e.g., to fact-check a claim in live Q&A), capture your own. When in doubt, start your own recording and also ask the host for theirs — you'll have a fallback.
Wrapping up
The right method depends on your role in the webinar. Hosts should use the platform's built-in recording — it's the cleanest output and it's the tool the platform was designed for. Attendees who want clean slide capture, normalized audio, and chapter markers are best served by Screenify Studio. OBS handles power-user scenarios where you need multi-source composition, and QuickTime with BlackHole is the minimal-installation fallback.
For more on Mac screen recording basics that apply beyond webinars, the full how-to guide on screen recording on Mac covers the fundamentals and the permission quirks that trip people up on first-time recordings.
Whatever method you pick, do a 30-second test recording before the webinar starts. Check that system audio is captured, the right window is in frame, and the file is actually being written to disk. The worst moment to discover a misconfigured audio input is 80 minutes into a 90-minute session.
Try Screenify Studio
Record your screen with auto-zoom, AI captions, dynamic backgrounds, and Metal-accelerated export. Free plan, unlimited recordings.
Download Free


