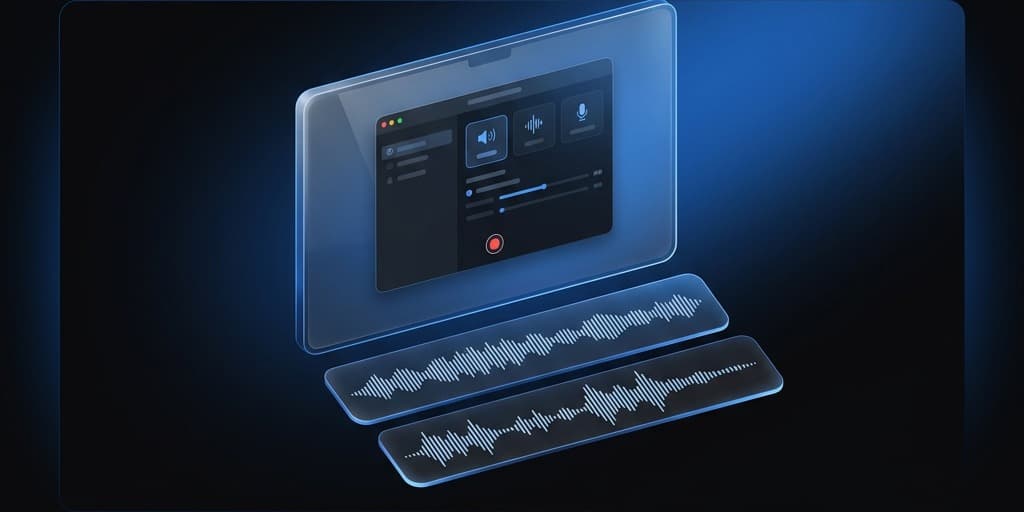
Record System Audio and Mic Together on Mac
Capture both system audio and microphone simultaneously on Mac — 4 setups with separate-track recording for clean editing.
Recording system audio and your microphone at the same time sounds like it should be a checkbox somewhere in macOS. It isn't. Apple blocks apps from capturing system output by default — a privacy decision that protects you from rogue screen recorders, but also blocks the legitimate case of narrating over an app demo, a game, or a Zoom call you need to review later.
The deeper problem: even once you route system audio through a virtual device, most setups hand you a single mixed track. Your voice and the app's audio are glued together forever. When you sit down to edit, you can't lower the background music without also lowering your narration. You can't mute a breath or a keyboard clack from the mic without punching a hole in the system audio. Every fix becomes a compromise.
The fix is separate tracks — system audio on one channel, mic on another, both perfectly in sync. This post walks through four ways to get there on macOS, from free hacks to a native one-click workflow, and explains which setups actually give you independent tracks and which quietly merge them.
Quick Comparison
| Method | Price | Separate Tracks | Setup Time | Best For |
|---|---|---|---|---|
| Screenify Studio | Free plan / $12mo | Yes (native) | 30 seconds | Tutorials, demos, voiceover edits |
| BlackHole + QuickTime | Free | No (mixed) | 15 minutes | Quick captures, no editing needed |
| OBS Studio | Free | Yes (MKV) | 20 minutes | Streamers, multi-source recordings |
| Loopback (Rogue Amoeba) | $118 | Yes (with host app) | 5 minutes | Podcasters, pro audio workflows |
Four paths, very different tradeoffs. The free route works but costs you editing flexibility. The paid routes buy back that flexibility in different ways.
Why macOS Makes This Hard
Before the methods, the why. On Windows, apps can ask the OS for a copy of whatever is playing through the speakers — the "Stereo Mix" device that's been around forever. macOS doesn't ship that. Apple's view is that any app silently copying your system audio is a privacy hole, so CoreAudio simply doesn't expose a loopback device to third parties.
The workaround is a virtual audio driver. You install a kernel extension (or, on Apple Silicon, a system extension) that shows up as both an output device and an input device. Set macOS output to the virtual device, point your recorder's input at the same device, and whatever plays through your speakers now also appears as a mic input to the recorder. BlackHole, Loopback, and similar tools all work this way.
The catch is what happens next. QuickTime, Screenshot toolbar, and most simple recorders only accept one audio input. So you have to mix your mic and the virtual device together before recording — usually via an Aggregate Device in Audio MIDI Setup. The resulting file has one audio track containing both sources, permanently blended. That's fine for throwaway clips. It's a nightmare for anything you plan to edit.
Apps that support multi-source recording (Screenify, OBS, ScreenFlow, Camtasia, Loopback's Loopback Audio + a host) can take the mic and the virtual device as two separate inputs and write them to independent tracks. That's the line that actually matters.
Method 1: Screenify Studio — Separate Tracks Natively
Screenify records your mic and system audio as two independent tracks without any virtual device plumbing. It installs a signed audio capture extension once on first launch, macOS prompts you to approve it in System Settings, and from then on system audio is just a toggle in the recording panel.
Steps:
- Download Screenify Studio and open the app. On first launch it asks for Screen Recording, Microphone, and System Audio permission — approve all three.
- Click the menu bar icon and pick your capture mode: full screen, window, or area.
- In the recording panel, enable System Audio and Microphone separately. Each has its own level meter so you can see both signals before hitting record.
- Set the mic input (built-in, AirPods, or USB interface) from the dropdown. Screenify auto-ducks nothing by default — you get clean, unprocessed signals on both tracks.
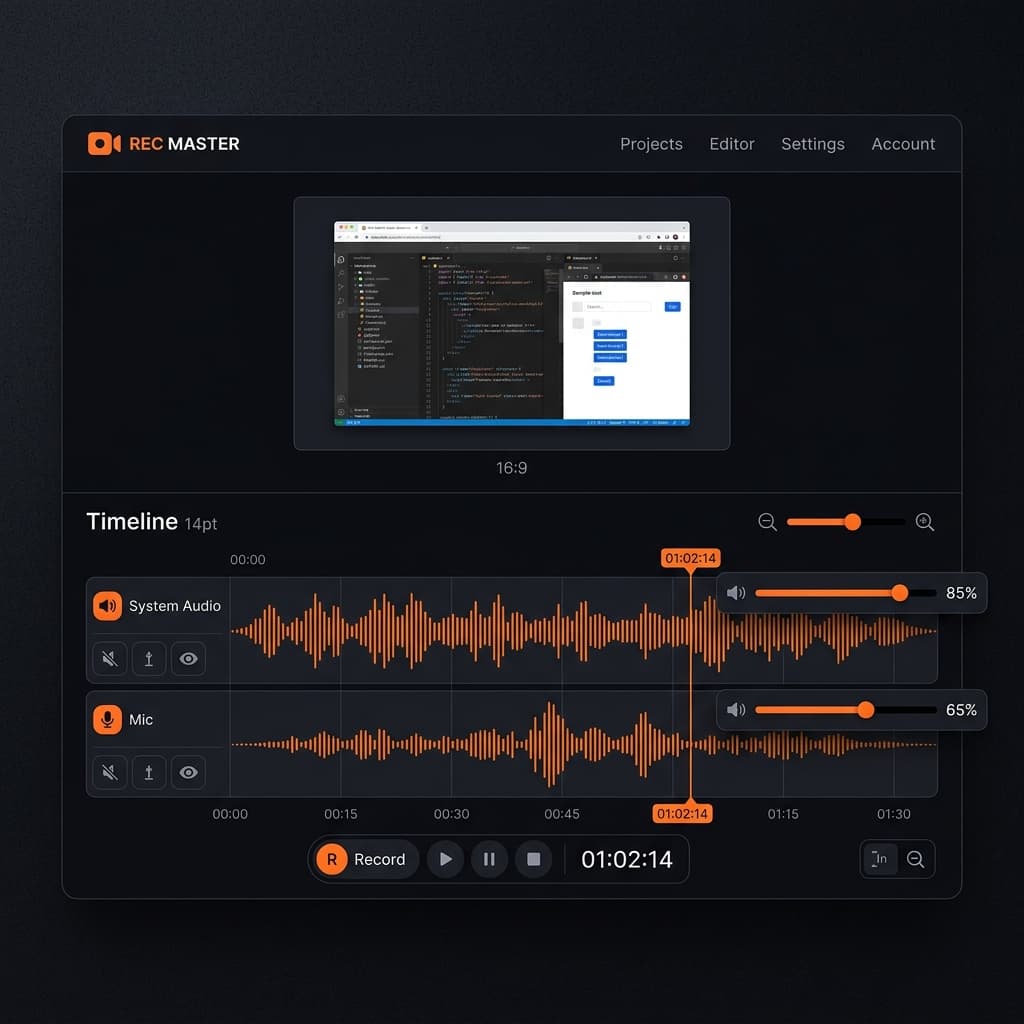
- Start recording. When you stop, the editor opens with Audio Track 1 (System) and Audio Track 2 (Mic) as separate rows on the timeline.
- In the editor, each track has independent gain, mute, solo, and trim controls. Drag the system audio down when you're talking, mute the mic during a silent demo section, or delete a cough from the mic without touching the app's audio.
- Export to MP4 (mixed for final delivery) or MOV with separate tracks preserved for further editing in Final Cut, Premiere, or DaVinci.
Why this matters for editing: the separate-track workflow is what lets you ship polished videos without a DAW. Standard ducking — quietly lowering background audio under your voice — takes one keyframe per section in Screenify instead of a ten-step sidechain compressor setup in Logic. Removing a keyboard clack is a single delete on the mic track, and the system audio underneath stays untouched.
Screenify also remembers the last input selection per profile, so if you switch between "tutorial mode" (mic + system) and "quiet demo mode" (system only), the toggles come back the way you left them. For a more complete walkthrough of the recording flow with audio, see our guide on screen recording Mac with audio.
The free plan includes separate-track recording up to 10 minutes per clip. Pro removes the limit and adds batch export.
Try Screenify Studio free — no virtual device install, no Audio MIDI Setup, no kernel extensions to manage.
Try Screenify Studio — free, unlimited recordings
Auto-zoom, AI captions, dynamic backgrounds, and Metal-accelerated export.
Method 2: BlackHole + Multi-Output Device + QuickTime
The classic free route. BlackHole is an open-source virtual audio driver from Existential Audio that replaces the discontinued Soundflower. It's well-maintained, signed, and works on Apple Silicon. The setup is finicky but costs nothing.
Important limitation up front: this method produces a single mixed audio track. QuickTime only accepts one audio input, so you have to combine mic and system audio into an Aggregate Device before recording. There is no way to get separate tracks out of QuickTime. If you need independent control in post, skip to Method 3 or Method 4.
Steps:
- Download BlackHole 2ch from existential.audio/blackhole. Run the installer and reboot if prompted.
- Open Audio MIDI Setup (Applications → Utilities, or Spotlight).
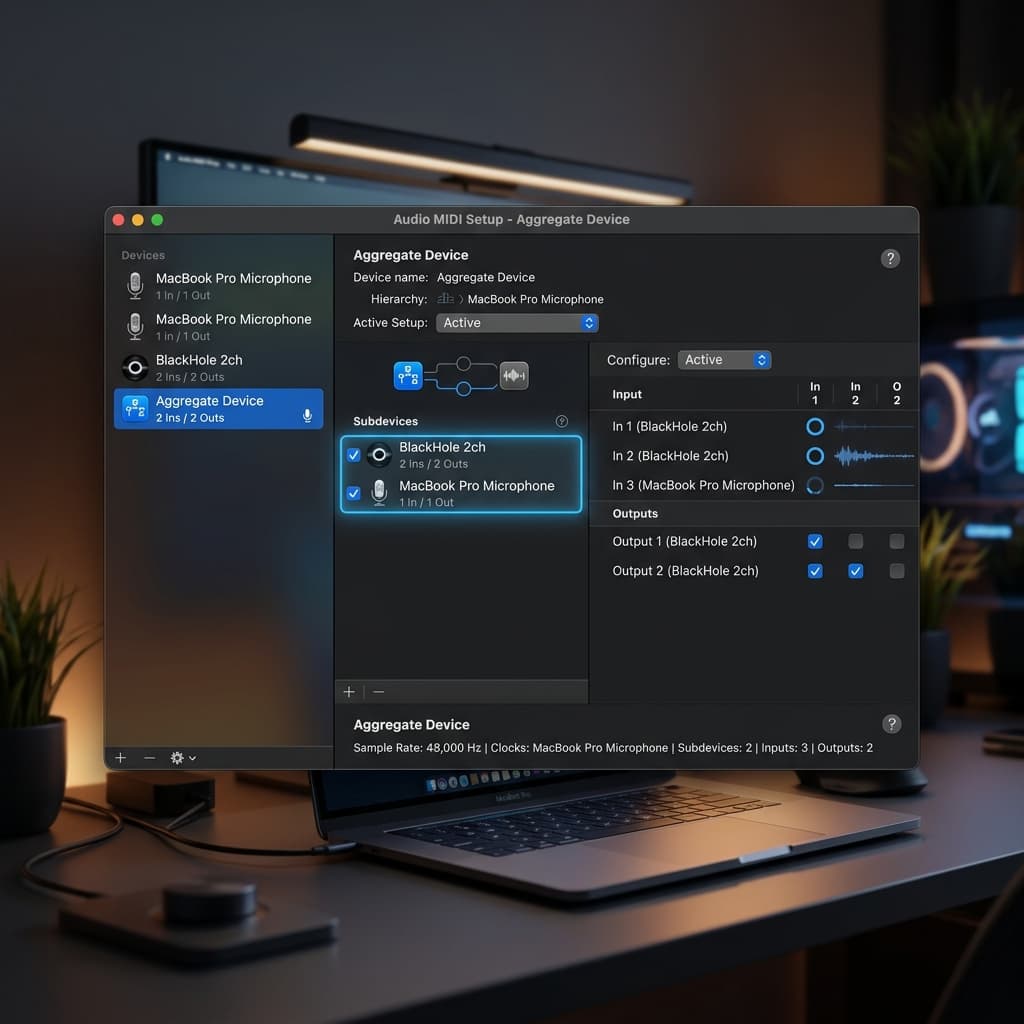
- Click the + at the bottom-left and choose Create Multi-Output Device. Check both Built-in Output (so you can still hear audio) and BlackHole 2ch. Rename it "Multi-Output" for clarity.
- Click + again and choose Create Aggregate Device. Check BlackHole 2ch and your microphone (Built-in Microphone, MacBook Pro Mic, or USB interface). Rename it "Mic + System".
- In System Settings → Sound, set Output to "Multi-Output" so system audio flows to both your speakers and BlackHole.
- Open QuickTime Player → File → New Screen Recording. In the toolbar that appears, click the chevron next to the Record button and pick Mic + System as the microphone. Start recording.
- When done, the resulting .mov has a single audio track with both sources permanently mixed.
Gotchas:
- The Multi-Output Device has no volume control. You adjust levels at the source app instead (iTunes volume, browser tab volume, etc.).
- Mic gain is fixed to whatever macOS has set for the physical input. Set it in System Settings → Sound → Input before you record.
- If the mic and system audio arrive at slightly different sample rates, you'll get clicks. In Audio MIDI Setup, force both BlackHole and your mic to the same rate (48000 Hz is safest).
- AirPods will not work reliably in an Aggregate Device due to their dynamic sample-rate switching. Use a wired mic or the built-in mic.
This approach is documented in more depth alongside other audio-routing techniques in our internal audio recording guide.
Method 3: OBS Studio — Separate Audio Sources
OBS is free, open-source, and the only free option on this list that writes your mic and system audio to genuinely separate tracks. The tradeoff is a dense interface and a one-time setup ritual.
OBS still needs BlackHole (or equivalent) to capture system audio, because macOS doesn't give any app direct loopback access. The difference is that OBS treats BlackHole and your mic as two distinct audio sources inside the app, and with track assignments you can route each to its own channel in the output file.
Steps:
- Install BlackHole 2ch (see Method 2, step 1) if you don't already have it.
- Create a Multi-Output Device in Audio MIDI Setup that includes Built-in Output + BlackHole 2ch. Set macOS output to it. Skip the Aggregate Device — OBS doesn't need it.
- Download OBS Studio from obsproject.com and launch it. Grant Screen Recording and Microphone permissions.
- In the Sources panel, click + → Display Capture (or Window Capture) and add your screen.
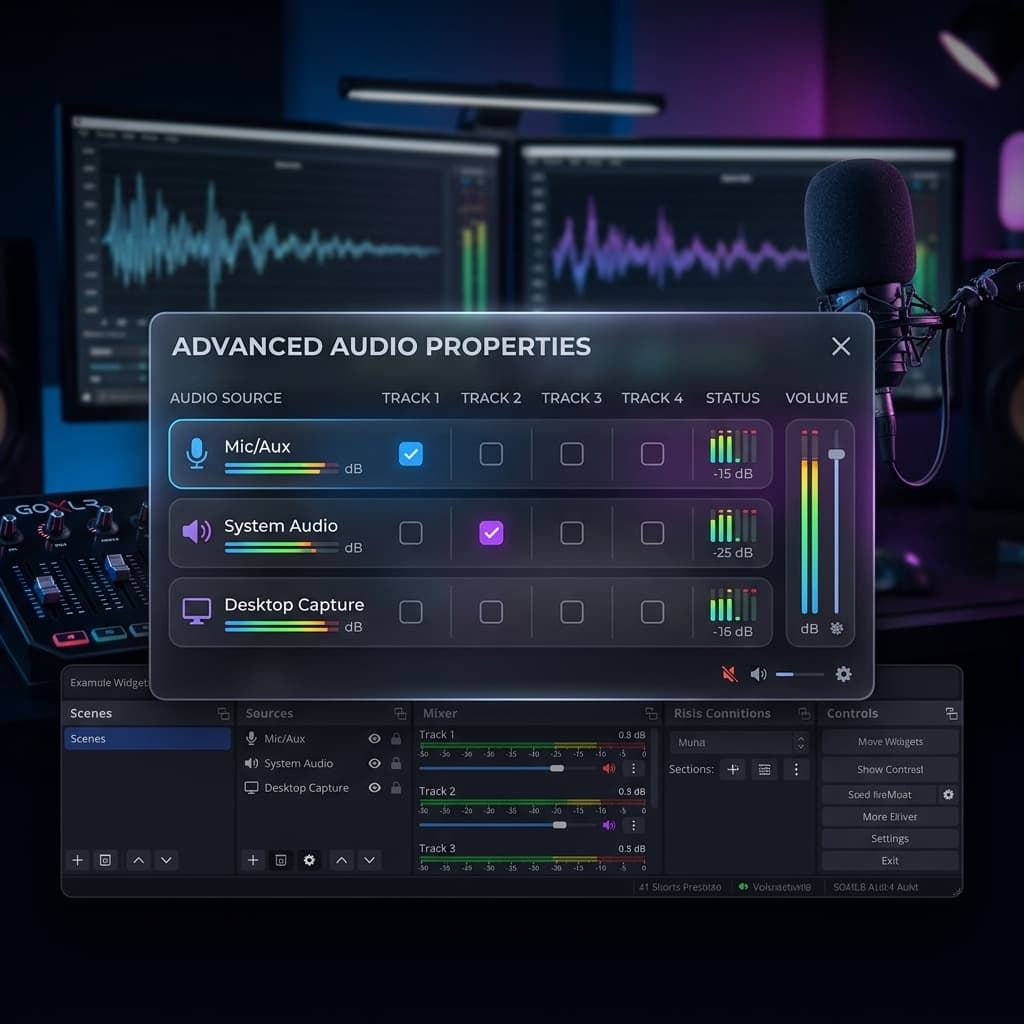
- In the Audio Mixer panel at the bottom, click the gear icon → Advanced Audio Properties. You should already see Mic/Aux. Add another source: click + in Sources → Audio Input Capture → select BlackHole 2ch. Name it "System Audio".
- Back in Advanced Audio Properties, assign tracks: set Mic/Aux to Track 1, set System Audio to Track 2. Uncheck Track 1 for System Audio and Track 2 for Mic so they don't bleed into each other's tracks.
- Go to Settings → Output. Switch Output Mode to Advanced. Under the Recording tab, set Recording Format to mkv (MP4 can corrupt on crash and has limited multi-track support). Under Audio Track, check Track 1 and Track 2.
- Click Start Recording. Speak and play audio to verify both meters are moving in the Audio Mixer.
- When done, the .mkv file contains two separate audio tracks. To edit in Final Cut or Premiere, remux to .mov with
ffmpeg -i input.mkv -c copy output.mov, which preserves both tracks without re-encoding.
OBS tradeoffs:
- The learning curve is real. Expect to spend an hour figuring out scenes, sources, and track assignments the first time.
- There's no built-in editor. OBS records; you edit somewhere else.
- CPU usage is higher than native tools because OBS is designed for live streaming.
- MKV files aren't natively editable in most Mac editors without the remux step.
For tutorial recording where editing quality matters more than setup speed, OBS is the strongest free option. For quick captures, it's overkill.
Download Screenify Studio if you'd rather skip the BlackHole + track-assignment setup and get separate tracks out of the box.
Method 4: Loopback by Rogue Amoeba
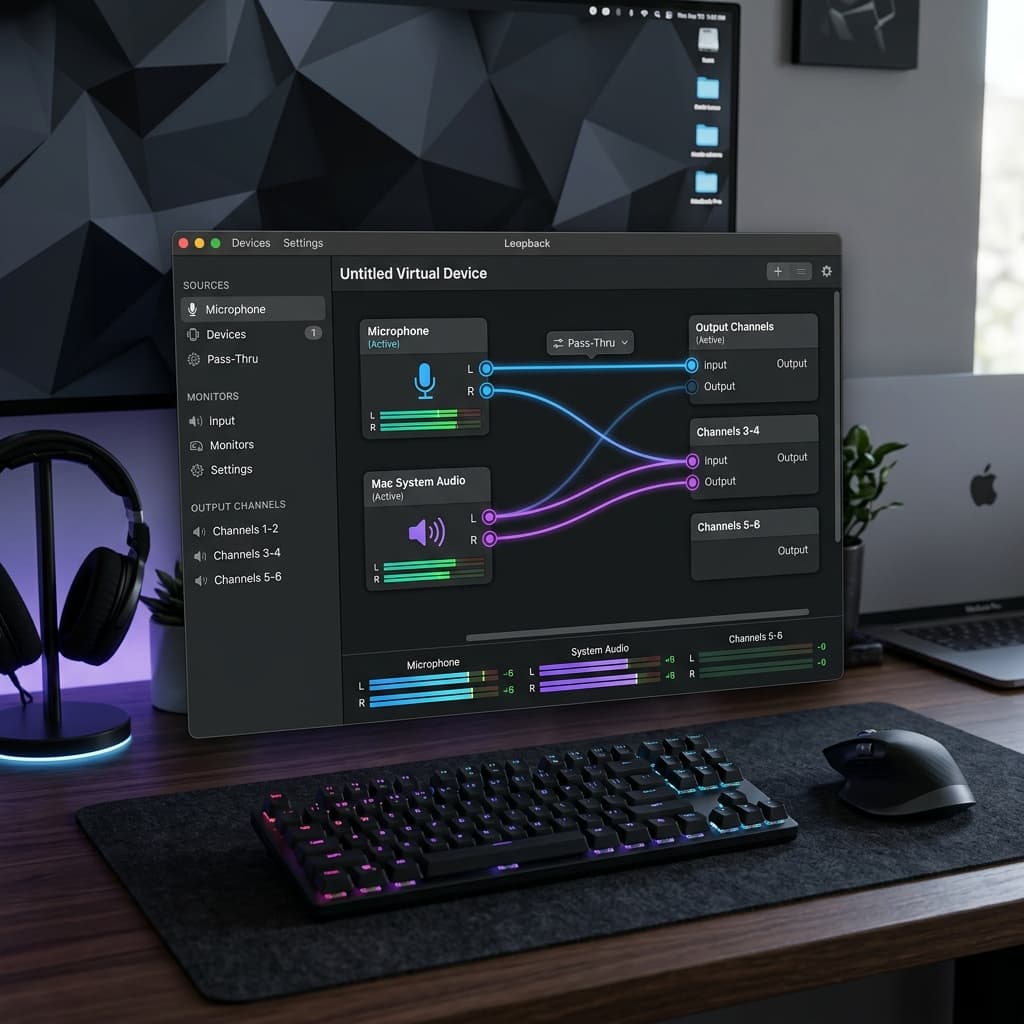
Loopback ($118, from Rogue Amoeba) is the professional answer. It's a visual audio routing app that lets you build virtual devices combining any number of inputs — mic, system audio, specific apps, hardware interfaces — with pass-through monitoring so you can hear yourself in real time without latency.
Loopback alone doesn't give you separate tracks. It creates virtual devices that feed into a recording app. The separate-tracks advantage comes from pairing it with a host that understands multi-channel inputs — Audio Hijack (also Rogue Amoeba, $64), Final Cut, Logic, or any pro DAW.
Steps (Loopback + Audio Hijack for recording):
- Install Loopback from rogueamoeba.com/loopback. Grant audio permissions.
- Open Loopback → New Virtual Device. Name it "Mic + System".
- Add sources: click + under Sources and add your microphone. Click + again and add a specific app (e.g., Chrome, Zoom, Logic) or System Audio for everything.
- In the channel grid on the right, assign the mic to channels 1-2 and the system audio source to channels 3-4. This is the separate-tracks trick — Loopback's virtual device becomes a 4-channel input where channels 1-2 carry the mic and channels 3-4 carry system audio.
- Enable Pass-Thru on the mic source so you hear yourself in the headphones without recording-app latency.
- Open Audio Hijack (or QuickTime for a mixed-down version). In Audio Hijack, create a session with an Input Device block pointing at "Mic + System", then a Recorder block. In the Recorder block, set the output to a multi-channel format (AIFF or WAV with 4 channels) or split to two stereo files.
- Record your screen separately with QuickTime or Screenify, and use Audio Hijack for audio. Sync in post using a clap or the waveform alignment tool in your editor.
Why pay $118+ for this:
- Pass-through monitoring is the killer feature. You hear your own voice with zero perceptible latency, which matters for long narration sessions where hearing yourself through headphones prevents the "cupped ear" voice modulation problem.
- Per-app routing. You can capture Zoom's audio only, excluding system notifications, Slack dings, and music from other apps. BlackHole can't do that.
- Multiple virtual devices. Create a "podcast" device, a "tutorial" device, and a "stream" device, each with different sources, and switch between them without rewiring.
- Stability. Rogue Amoeba's drivers have been rock-solid through every macOS update for 15+ years.
Tradeoffs: it's expensive, and it doesn't record video. You're paying for audio routing and then adding a screen recorder on top. For pro podcasters who also make video tutorials, the combination makes sense. For someone who just needs a clean tutorial twice a month, it's overkill.
For voiceover-heavy workflows, the techniques in our screen recording with narration guide complement whichever audio routing you choose.
Troubleshooting
Problem 1: System audio records but mic is silent (or vice versa).
With BlackHole + Aggregate Device, this usually means the Aggregate is picking up only one of the two inputs. Open Audio MIDI Setup, select the Aggregate Device, and verify both BlackHole 2ch and your mic have the Use checkbox ticked. Also confirm the clock source — set it to your mic, not BlackHole, or you'll get drift on long recordings.
In OBS, check the Audio Mixer meters while making noise. If only one meter moves, the silent source is probably routed to a track you didn't enable in Advanced Audio Properties. Revisit step 6 of Method 3.
Problem 2: Echo or double audio in the recording.
Happens when system audio is being captured twice — once through BlackHole and once through the mic picking up your speakers. Fix by wearing headphones so the mic can't hear the speakers, or by setting macOS output to BlackHole 2ch only (not a Multi-Output Device) during recording. The downside of the second approach is you won't hear anything during the recording unless you use pass-through monitoring (Loopback) or a software monitor.
Problem 3: Mic and system audio are out of sync after editing.
This is almost always a sample-rate mismatch. Force every device in the chain to 48000 Hz: the mic in Audio MIDI Setup, BlackHole, and the Aggregate/Multi-Output Device. If drift is still present after 5+ minutes of recording, the clock source in the Aggregate Device is wrong — set it to the most accurate device (usually your USB interface, not built-in).
Problem 4: Recording works but the mic sounds quiet or muffled.
Aggregate Devices don't apply macOS's automatic input gain. You have to bump mic gain manually: System Settings → Sound → Input → select the physical mic (not the Aggregate) → raise Input Volume. If you're using an external USB mic, adjust its hardware gain knob or the driver utility.
Problem 5: BlackHole doesn't appear in Audio MIDI Setup after install.
On Apple Silicon, BlackHole installs as a system extension and requires approval in System Settings → Privacy & Security → scroll to the bottom → Allow the Existential Audio extension, then reboot. If the Allow button isn't showing, reduced security mode may be blocking it — temporarily boot into Recovery and set Security Policy to "Reduced Security" for this Mac.
Try Screenify Studio — free, unlimited recordings
Auto-zoom, AI captions, dynamic backgrounds, and Metal-accelerated export.
FAQ
Can I record system audio and mic on Mac without any extra software?
Not with truly separate tracks. macOS's built-in Screenshot toolbar (Shift-Command-5) can capture video and mic, but not system audio — that's blocked at the OS level. You'll always need either a virtual audio driver (BlackHole, Loopback) or a recording app with a built-in system audio capture extension (Screenify, OBS with BlackHole, ScreenFlow).
Why does BlackHole give me only one audio track in QuickTime?
QuickTime accepts a single audio input, so when you route through an Aggregate Device the mic and system audio are mixed into one stream before QuickTime ever sees them. The mixing is destructive — you can't unmix afterward. To get separate tracks, use an app that supports multiple audio sources at recording time (Screenify, OBS, Audio Hijack).
Are separate tracks actually worth the extra setup?
For anything you plan to edit, yes. The most common editing task in tutorial videos is ducking — lowering the app's audio under your voice so the narration is clear. With a mixed track, ducking lowers your voice too, which defeats the point. With separate tracks, you adjust one independently of the other in seconds. Same for removing breath sounds, mouth clicks, or keyboard noise: on separate tracks you clean the mic without touching system audio.
Does recording separate tracks hurt video quality?
No. Audio and video are independent streams in the file container. Writing two audio tracks instead of one adds a few megabytes per minute (uncompressed PCM at 48 kHz is roughly 10 MB/min per stereo track) but doesn't affect video bitrate, frame rate, or encoding quality at all.
Will AirPods work for recording mic + system audio?
Poorly. AirPods switch sample rates dynamically between 16 kHz (when used as a mic) and 44.1 kHz (when used as output), which breaks Aggregate Devices and causes clicks or sync drift. Use wired headphones with a separate USB or built-in mic. If you must use AirPods, use them as headphones only and pick a different mic as the input.
Can I capture audio from a specific app instead of all system audio?
BlackHole can't. Loopback can — it has per-app source blocks that let you capture, say, only Zoom or only Chrome while excluding notifications and music from other apps. This is one of the strongest reasons to pay for Loopback if you record calls or app-specific content. Screenify captures all system audio by default; per-app audio filtering is on the roadmap.
What's the best format to record into if I want to edit in Final Cut?
ProRes or H.264 MOV with separate audio tracks preserved. Screenify exports MOV with multi-track audio intact. OBS records MKV which you'll need to remux to MOV first (ffmpeg -i in.mkv -c copy out.mov). Final Cut imports multi-track audio as a compound clip, and you can break it apart to edit each track independently.
Is it legal to record system audio on Mac?
Recording your own system audio for personal use is legal in all jurisdictions. Recording calls or meetings where other people are talking depends on your local laws — some states and countries require all-party consent (California, most of Europe), others require only one-party consent (most of the US). When in doubt, announce at the start of the call that you're recording.
Pick Your Path
The right method depends on one question: will you edit the recording?
- No editing, quick capture: BlackHole + QuickTime. Free, mixed track, done in 15 minutes of setup that you'll only do once.
- Regular tutorials, want to polish: Screenify Studio. Separate tracks natively, no virtual device plumbing, built-in editor. Download the free plan.
- Multi-source streaming and heavy customization: OBS with BlackHole. Free, separate tracks, steep learning curve, no built-in editor.
- Pro podcasting or per-app routing: Loopback + Audio Hijack. $180+ total, maximum flexibility, rock-solid drivers.
Separate tracks are the single biggest editing-quality upgrade you can make to a screen recording workflow. Whichever method you pick, make sure the one you choose actually delivers them — and test by looking at the timeline in your editor, not just the recording app's preview.
For related workflows, the screen recording Mac with audio guide covers the simpler one-track cases, and the internal audio recording guide goes deeper on the BlackHole side if you don't need mic capture at all.
Try Screenify Studio
Record your screen with auto-zoom, AI captions, dynamic backgrounds, and Metal-accelerated export. Free plan, unlimited recordings.
Download Free


