How to Record a Scrolling Screen on Mac
Capture scrolling content on Mac — full-page screenshots, scrolling video recordings, and stitching tools compared.

Some content doesn't fit on one screen. Long Slack threads, full web pages, multi-page documents, sprawling spreadsheets — if you need to capture something that requires scrolling, a standard screenshot or a static screen recording won't cut it.
There are two fundamentally different approaches: scrolling screenshots (stitching the entire page into one tall image) and scrolling video recordings (recording while you scroll, producing a video). Which one you need depends on what you're capturing and who's going to view it.
This guide covers both approaches across five methods — from free built-in tools to dedicated apps — so you can pick the right workflow for your situation.
Quick Comparison
| Method | Type | Price | Output | Best For |
|---|---|---|---|---|
| Screenify Studio (scroll + auto-zoom) | Video | Free / Pro $9.99/mo | .mp4 video | Scroll-through demos, presentations, tutorials |
| macOS Screenshot Toolbar + manual scroll | Video | Free (built-in) | .mov video | Quick scroll captures, no install needed |
| Safari Full-Page PDF Export | Image (PDF) | Free (built-in) | Full web page archival, documentation | |
| CleanShot X Scrolling Capture | Image (stitched) | $29 one-time | .png/.jpg | Long pages as a single image, bug reports |
| Firefox Full-Page Screenshot | Image | Free (built-in) | .png | Quick full-page captures in Firefox |
Rule of thumb: Use a scrolling screenshot when you need a static reference (documentation, bug reports, archiving). Use a scrolling video recording when you need to show movement, interaction, or context (demos, tutorials, walkthroughs).
Method 1: Screenify Studio — Scroll Recording with Auto-Zoom
Recording a screen while scrolling sounds simple — just hit record and scroll. But raw scroll recordings often look amateurish: the cursor darts around, the scrolling speed is inconsistent, and viewers lose track of what they should focus on.
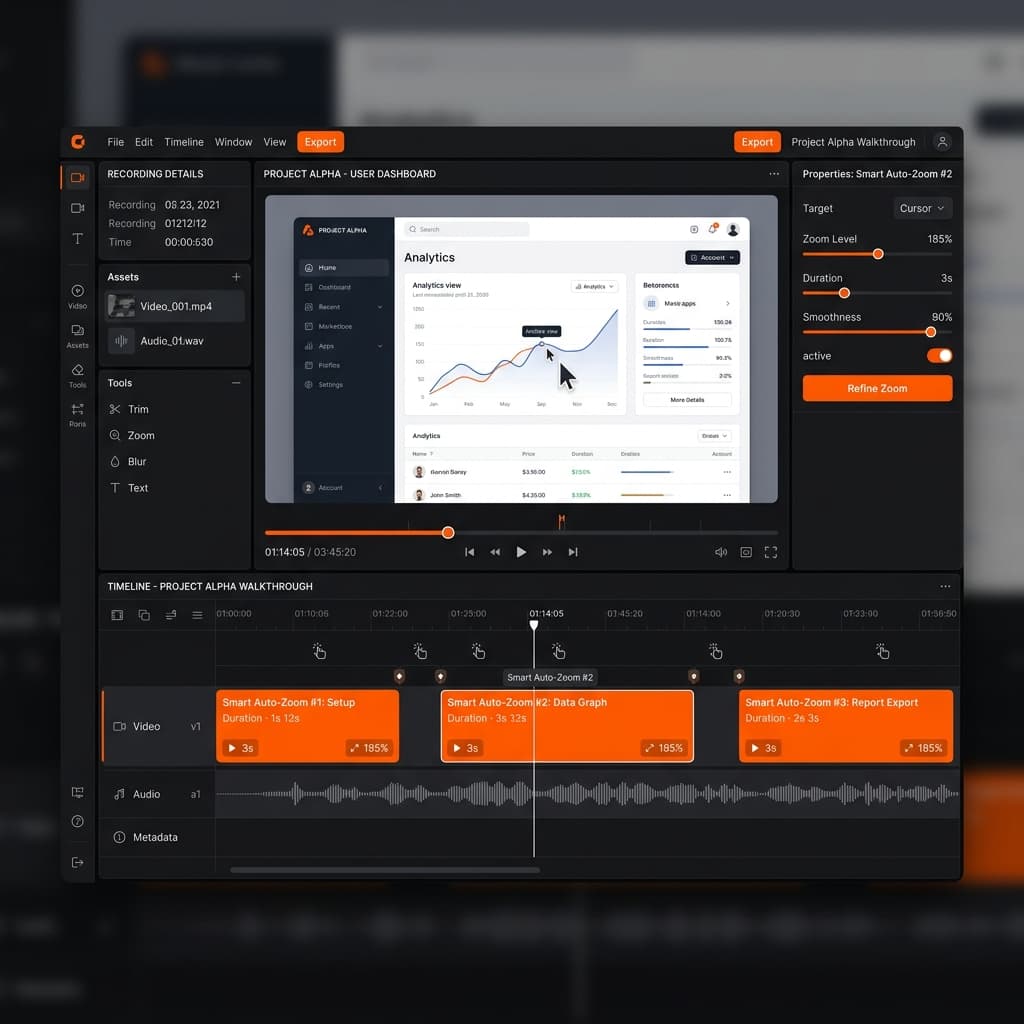
Screenify Studio solves this with auto-zoom and smooth cursor tracking. As you scroll through content, auto-zoom follows your cursor and keeps the active area magnified. The result is a scroll recording that looks like a polished product demo, not a screen grab.
Steps
- Download Screenify Studio and open it
- Choose your capture mode:
- Custom Area — drag a region over the content you want to scroll through (a browser window, a document panel, a spreadsheet)
- Window — select the specific app window
- Enable system audio if the page has media, or microphone if you're narrating
- Press ⌃ + ⌘ + R to start recording
- Scroll through the content at a steady, moderate pace (more on scroll speed below)
- Press ⌃ + ⌘ + R again to stop
- In the Screenify editor:
- Auto-zoom automatically tracks your cursor, zooming into the area you're scrolling through. Viewers see a smooth, focused pan instead of a tiny cursor moving across a full-screen capture.
- Trim dead time at the start and end
- Add a styled background if you recorded a window (the window floats over a gradient instead of showing desktop clutter)
- Export as MP4
Why auto-zoom matters for scroll recordings
Without auto-zoom, a scroll recording of a full web page at 1440p resolution means viewers are watching tiny text zip past. Auto-zoom dynamically magnifies the section you're interacting with, making text readable and UI elements visible — even when the viewer watches on a phone or in a small embed.
If you want to record a specific area instead of your full screen, combining region capture with auto-zoom produces the tightest possible framing.
Scroll speed tips for video recording
Scroll speed directly affects the quality of your recording:
- Too fast — frames blur together, text becomes unreadable, viewers can't follow
- Too slow — the video drags, viewers skip ahead or lose interest
- Ideal pace — scroll so that each section of content stays visible for 2-3 seconds. A viewer should be able to read a headline and scan the first line of a paragraph before it scrolls off
Trackpad users: Go to System Settings → Trackpad → Scroll & Zoom and set scrolling speed to the middle position. Two-finger scrolling on a trackpad produces smoother motion than a mouse scroll wheel, which moves in discrete "notched" steps.
Mouse users: In System Settings → Mouse, reduce scroll speed by one tick from your normal setting. The slower notch-by-notch scrolling gives your recording a more controlled feel.
Recording a long page and want audio too? See how to screen record with audio on Mac for setup instructions.
Try Screenify Studio — free, unlimited recordings
Auto-zoom, AI captions, dynamic backgrounds, and Metal-accelerated export.
Method 2: macOS Screenshot Toolbar + Manual Scroll
If you don't need auto-zoom or editing, the built-in macOS recorder works for basic scroll captures. You record a region (or full screen), scroll manually, and get a raw .mov file.
Steps
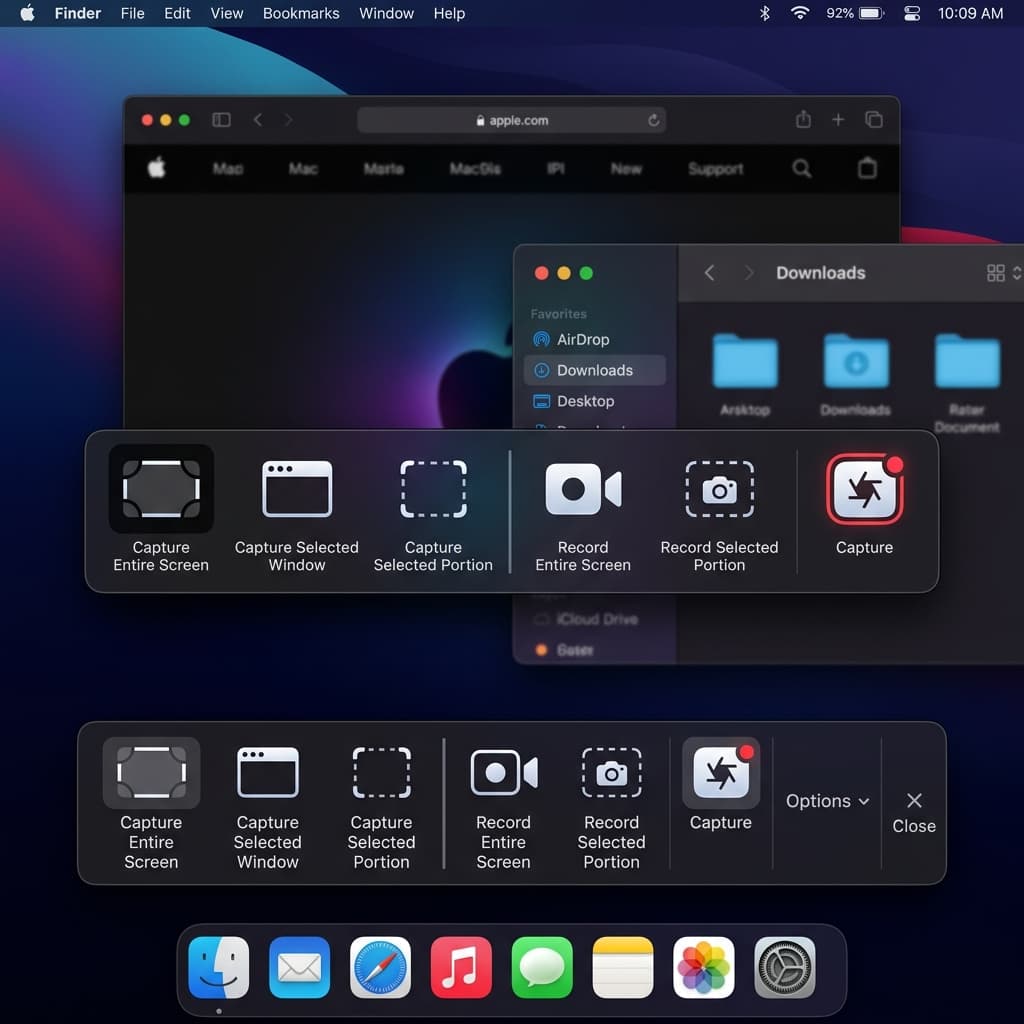
- Press ⌘ + Shift + 5 to open the Screenshot toolbar
- Click Record Selected Portion (dotted rectangle icon)
- Drag the selection rectangle over the scrollable area — a browser window, a document, a feed
- Click Options and enable Show Mouse Clicks (this helps viewers track your position while scrolling)
- Click Record or press Enter
- Scroll through the content at a steady pace
- Click the Stop button in the menu bar or press ⌘ + Control + Esc
Output
A .mov file saved to your chosen location. On Apple Silicon Macs, the file uses HEVC compression, which keeps sizes manageable.
Limitations
- No zoom or tracking — the recording is pixel-for-pixel what's on screen. If you recorded at full resolution, small text stays small.
- No editing — you can trim using the floating thumbnail preview (click it within 5 seconds of stopping), but there's no zoom, crop, or annotation.
- No system audio — only microphone input is available.
- Scroll wheel artifacts — if you're using a mouse with a physical scroll wheel, the discrete steps create a stuttery visual. Trackpad scrolling is noticeably smoother.
This method works for quick internal captures — showing a teammate a long error log, capturing a design comp for feedback, or documenting a UI state. For anything external-facing, the lack of zoom and editing shows.
Method 3: Safari Full-Page PDF Export
If you need a static image of an entire web page — not a video — Safari can export the full page as a PDF. This captures everything from the top of the page to the bottom, regardless of how long the page is.
Steps
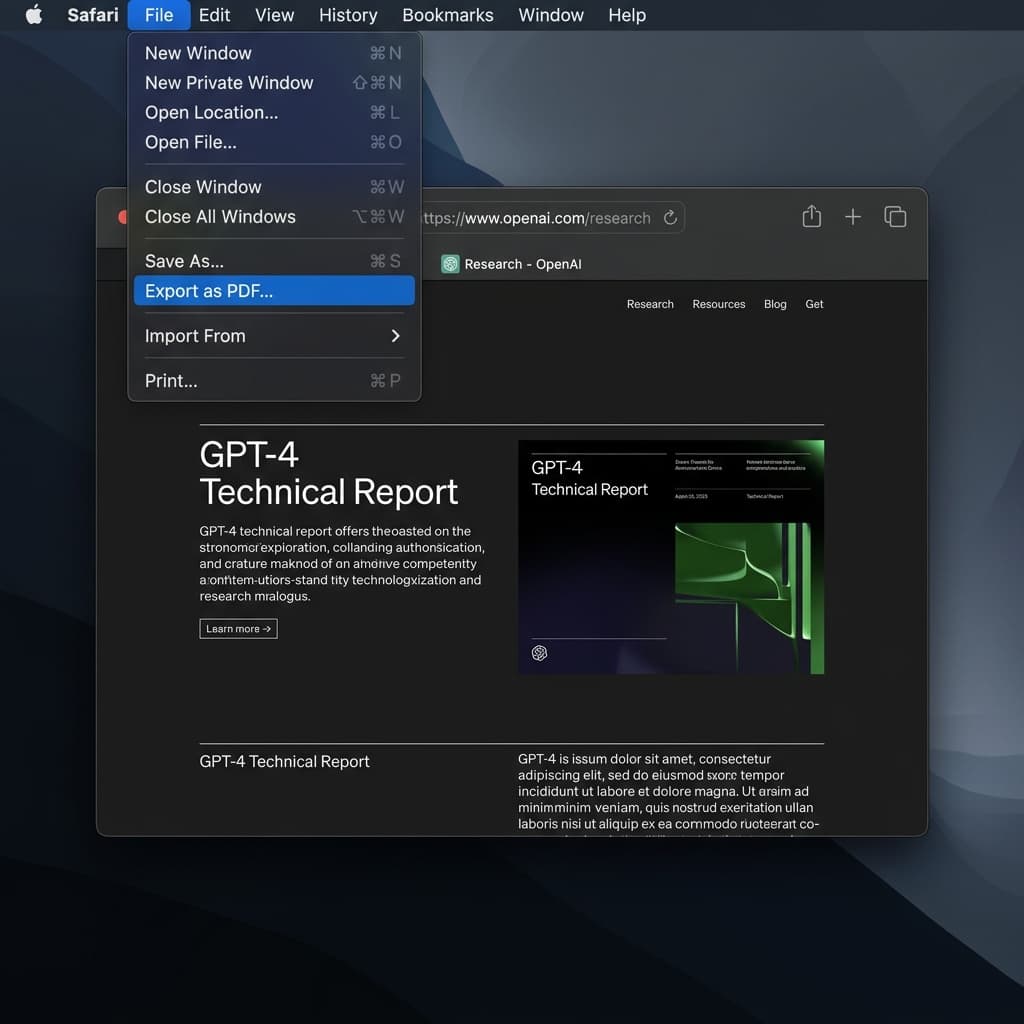
- Open the page in Safari
- Go to File → Export as PDF... in the menu bar
- Choose a save location and filename
- Click Save
Safari renders the entire page — including content below the fold — into a single PDF document. The output preserves text as selectable text (not a rasterized image), so you can search and copy from the PDF.
Alternative: Safari Reader + PDF
For article pages cluttered with ads, navigation, and sidebars:
- Click the Reader button in the address bar (or press ⌘ + Shift + R) to enter Reader mode
- Safari strips the page to just the article content
- Go to File → Export as PDF...
- The resulting PDF contains only the article text and inline images — clean and readable
Chrome: Full-Page Screenshot via DevTools
Chrome doesn't have a one-click export, but DevTools can capture a full-page screenshot:
- Open DevTools with ⌘ + Option + I
- Open the Command Palette with ⌘ + Shift + P
- Type
Capture full size screenshotand select it - Chrome saves a full-height
.pngof the entire page to your Downloads folder
This produces a single tall image, not a PDF. For very long pages, the image can be thousands of pixels tall.
Limitations
- Static content only — interactive elements, animations, hover states, and lazy-loaded images won't appear correctly
- No video — this is a snapshot, not a recording
- Lazy-loaded content — if the page loads images as you scroll, the PDF or screenshot only includes images that have already loaded. You may need to scroll to the bottom of the page first, wait for everything to load, then scroll back to the top and export.
- Print stylesheets — some sites have CSS
@media printrules that hide navigation, change layouts, or remove backgrounds. The PDF may look different from what you see on screen.
PDF export is ideal for documentation, archiving, and reference material. When you need to capture a terms-of-service page, a long knowledge base article, or a product spec for offline review, this is the fastest path.
Method 4: CleanShot X — Scrolling Capture
CleanShot X ($29, one-time purchase) has a dedicated Scrolling Capture feature that automatically scrolls a region and stitches the frames into a single tall image. Unlike the Safari PDF method, this works in any application — not just browsers.
Steps
- Open CleanShot X and select Scrolling Capture from the menu bar icon (or use the keyboard shortcut you've assigned)
- Draw a rectangle around the scrollable area — this can be a browser window, a Figma canvas, a code editor, a Notion document, or any scrollable content
- Click Start Capture
- CleanShot automatically scrolls the content downward and captures frames as it goes
- When it reaches the bottom (or you click Done to stop early), it stitches all frames into a single continuous image
- The screenshot opens in CleanShot's Overlay Editor where you can annotate, blur sensitive info, add arrows, or crop
Shottr: Free Alternative
Shottr is a free screenshot utility that also supports scrolling capture:
- Open Shottr and use Scrolling Screenshot from the menu bar
- Select the area to capture
- Shottr scrolls and stitches automatically
- The result opens in Shottr's annotation editor
Shottr's scrolling capture works well for most web pages and documents. It occasionally struggles with pages that have fixed headers or floating elements — the stitching can produce visible seam lines where the fixed element was removed.
When stitching fails
Scrolling capture tools rely on image matching to align consecutive frames. They can fail when:
- Fixed/sticky headers or footers — the header stays in place while content scrolls underneath, confusing the stitching algorithm
- Animated elements — carousels, auto-playing videos, or CSS animations change between frames
- Infinite scroll with layout shifts — pages that reflow content as new items load (like some social media feeds) produce misaligned stitches
- Horizontal scrolling — most scrolling capture tools only support vertical scrolling
For these edge cases, a video recording (Method 1 or 2) captures exactly what you see, animations and all.
Method 5: Firefox Full-Page Screenshot
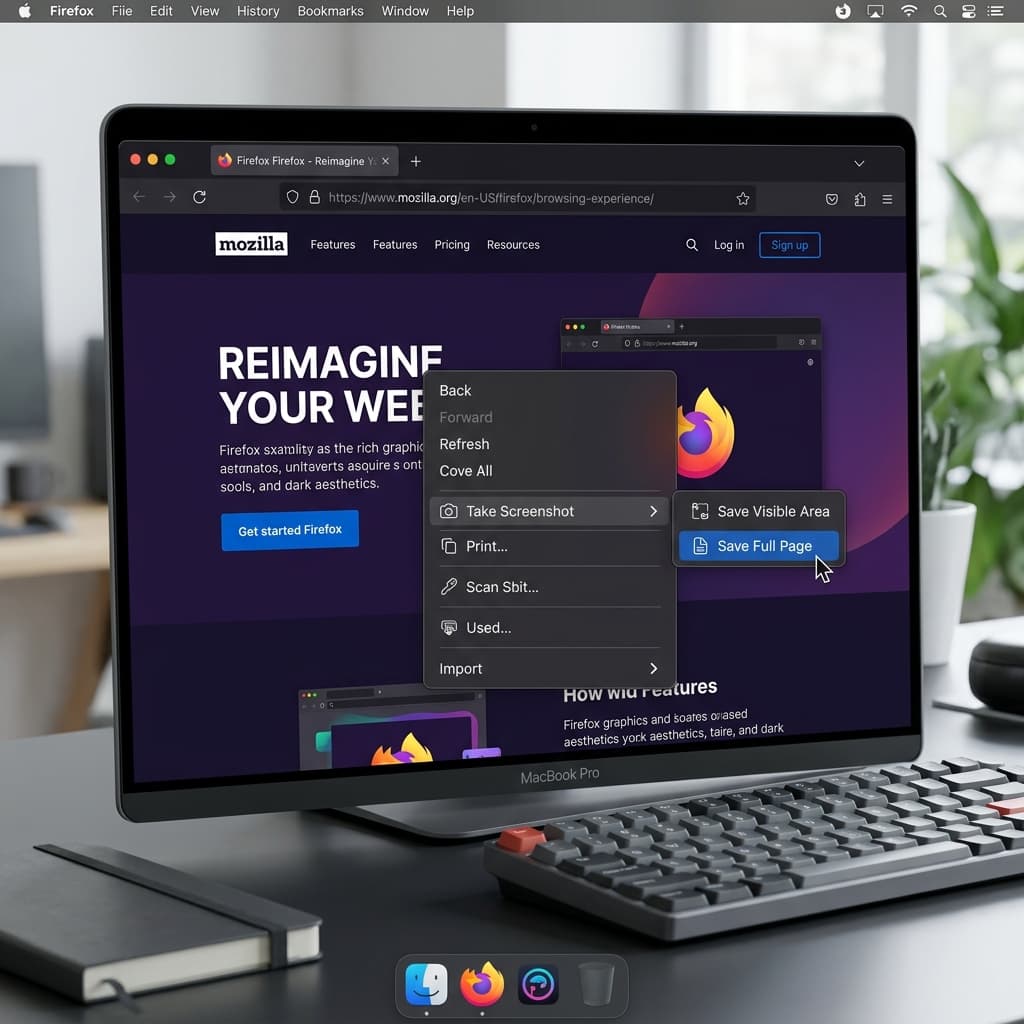
Firefox has a built-in full-page screenshot feature — no extensions or third-party tools required.
Steps
- Open the page in Firefox
- Right-click anywhere on the page
- Select Take Screenshot from the context menu
- In the screenshot toolbar that appears at the top, click Save Full Page
- Firefox captures the entire page — everything from the very top to the very bottom — as a single
.pngimage - Click Download to save it, or Copy to put it on your clipboard
Alternative trigger
You can also access the screenshot tool from Firefox's address bar:
- Click the three-dot menu (⋯) in the address bar
- Select Take a Screenshot
- Click Save Full Page
Keyboard shortcut
Press ⌘ + Shift + S to open the screenshot tool directly.
Limitations
- Firefox only — this doesn't work in Safari or Chrome (Chrome's equivalent is the DevTools method described in Method 3)
- Web pages only — this captures the rendered DOM, not a pixel-perfect copy of the screen. CSS-hidden content may be excluded, and some dynamic elements may render differently.
- No scrolling video — this is a screenshot, not a recording
- Large file sizes — a full-page screenshot of a long, image-heavy page can produce a
.pngthat's tens of megabytes. Consider converting to.webpor.jpgif file size matters.
Firefox's screenshot tool is the fastest way to capture a full web page as an image without installing anything. If you're already using Firefox, it takes three clicks.
Automating Scroll Speed with AppleScript
For scroll recordings (Methods 1 and 2), inconsistent scroll speed is the number one quality killer. You can automate scrolling at a constant speed using a simple AppleScript, then record the result.
AppleScript: Auto-scroll at constant speed
Open Script Editor (search for it in Spotlight), paste this script, and click Run:
-- Wait 3 seconds so you can switch to the target window
delay 3

-- Scroll down slowly for 30 seconds
-- Adjust 'steps' and 'delay' to control speed and duration
repeat 150 times
    tell application "System Events"
        key code 125 -- Down arrow key
    end tell
    delay 0.2
end repeat
This script waits 3 seconds (giving you time to click into the target window), then presses the Down arrow key 150 times with a 0.2-second delay between each press. The result is a slow, steady scroll.
Adjusting the speed
- Faster scrolling: Reduce the
delayvalue (e.g.,delay 0.1) or usekey code 121(Page Down) instead of the Down arrow for larger jumps - Slower scrolling: Increase the
delayvalue (e.g.,delay 0.4) - Longer page: Increase the
repeatcount - Smooth scrolling in browsers: Some browsers scroll smoothly with arrow keys; others jump. In Safari, the scroll is smooth. In Chrome, enable chrome://flags → Smooth Scrolling for better results.
Workflow
- Set up your screen recording (Screenify Studio, macOS Screenshot toolbar, or OBS)
- Run the AppleScript
- During the 3-second delay, click into the window you want to scroll
- The script scrolls automatically while your recorder captures it
- Stop recording when the script finishes
This produces a scroll recording with perfectly consistent speed — no jerky mouse movements, no pauses, no accidental fast scrolls. Combined with Screenify's auto-zoom, the result looks like a motion graphic rather than a screen capture.
Download Screenify Studio to pair auto-scroll scripts with auto-zoom for polished scroll-through videos.
Scrolling Screenshot vs. Scrolling Video: When to Use Which
| Scenario | Use | Why |
|---|---|---|
| Archiving a web page for legal/compliance | Screenshot (PDF) | Text stays selectable, file is small, timestampable |
| Documenting a bug in a long form | Screenshot (stitched image) | One image shows the entire context, easy to annotate |
| Walking a client through a dashboard | Video (scroll recording) | Motion shows the flow, narration adds context |
| Recording a tutorial of a long settings page | Video (with auto-zoom) | Zoom keeps text readable, cursor guides the viewer |
| Sharing a design comp in Slack | Screenshot (stitched image) | Static image previews inline, no playback needed |
| Presenting analytics data in a meeting | Video (scroll recording) | You can pause, highlight, and narrate specific sections |
| Saving a recipe or article for later | Screenshot (PDF or Firefox) | Quick, offline-readable, no playback required |
| Creating a product demo for your website | Video (with auto-zoom + background) | Professional appearance, embeddable, supports audio |
Troubleshooting
Scroll recording is blurry or stuttery
Cause: You're scrolling too fast for the frame rate. At 30 fps, fast scrolling produces motion blur on each frame because the content shifts significantly between captures.
Fix: Slow down your scroll speed. If you're using a mouse, switch to a trackpad for smoother motion. If you must scroll quickly, increase the recording frame rate to 60 fps in your recorder's settings. In Screenify Studio, set the frame rate in the capture mode settings before recording.
Scrolling capture stitch has visible seams
Cause: The page has a sticky header, floating chat widget, or animated element that moves independently of the scrolling content.
Fix: Before capturing, close or minimize floating elements. In browsers, you can use DevTools to temporarily hide a sticky header: right-click the header → Inspect → find the element → set position: static in the styles panel. Then run the scrolling capture. For CleanShot X, try capturing a narrower region that excludes the fixed element.
Safari PDF export is missing images
Cause: The page uses lazy loading — images only load when you scroll them into view.
Fix: Before exporting, scroll from the top of the page all the way to the bottom, slowly. Wait a few seconds at the bottom for any remaining assets to load. Then scroll back to the top and go to File → Export as PDF.... Alternatively, open DevTools (⌘ + Option + I), go to the Network tab, and disable throttling to speed up image loading.
Full-page screenshot in Chrome captures a blank area at the bottom
Cause: Chrome's DevTools screenshot calculates the page height from the DOM, which can include collapsed or hidden sections that take up vertical space but render as empty.
Fix: Try capturing in Firefox instead (Method 5), which handles edge cases differently. Or scroll to the bottom of the page first to trigger any lazy-loaded content, then run the DevTools capture.
AppleScript auto-scroll doesn't work in certain apps
Cause: Some applications don't respond to simulated key events from AppleScript, or they require accessibility permissions.
Fix: Go to System Settings → Privacy & Security → Accessibility and ensure Script Editor (or whatever app you're running the script from) is in the allowed list. If the app still doesn't respond to arrow keys, try using scroll events instead, or use the Shortcuts app to create an automation that sends scroll gestures.
Try Screenify Studio — free, unlimited recordings
Auto-zoom, AI captions, dynamic backgrounds, and Metal-accelerated export.
FAQ
Can I record a scrolling screen with audio on Mac?
Yes. Use Screenify Studio or OBS — both capture system audio and microphone while recording. The built-in macOS Screenshot toolbar only captures microphone audio, not system sound. For a detailed walkthrough, see how to screen record with audio on Mac.
What's the difference between a scrolling screenshot and a scrolling screen recording?
A scrolling screenshot produces a single tall image (or PDF) of the entire page. A scrolling screen recording produces a video of you scrolling through the content. Screenshots are better for static reference; videos are better for demonstrations, tutorials, and presentations where context and sequence matter.
How do I capture a full-page screenshot in Chrome without extensions?
Open DevTools with ⌘ + Option + I, then press ⌘ + Shift + P to open the Command Palette. Type Capture full size screenshot and select it. Chrome saves a full-height .png to your Downloads folder.
Does macOS have a built-in scrolling screenshot feature?
No. macOS can take screenshots of the visible screen or a selected area, but it has no native scrolling capture or page-stitching feature. You need a third-party tool like CleanShot X, Shottr, or a browser's built-in full-page capture (Firefox, Safari PDF export, Chrome DevTools).
How do I make my scroll recordings look professional?
Three things make the biggest difference: consistent scroll speed (use the AppleScript method or practice with a trackpad), auto-zoom to keep the relevant content magnified (Screenify Studio does this automatically), and a clean background with no desktop clutter (use window capture mode with a styled background). Avoid recording at full resolution with no zoom — viewers watching on small screens won't be able to read anything.
Can I scroll horizontally and capture it?
For video recordings, yes — just scroll horizontally while recording and the video captures whatever is on screen. For scrolling screenshots (CleanShot X, Shottr), horizontal scrolling capture is not supported by most tools. Your best option for horizontal content is to record a video, or manually stitch multiple screenshots together in an image editor.
What resolution should I use for scroll recordings?
Record at your display's native resolution. Screenify Studio's auto-zoom will handle magnifying specific areas during playback, so you don't need to zoom in during recording. If you're exporting for the web (embedded in a blog post or shared on Slack), 1080p output is the sweet spot between quality and file size.
How long can a scrolling capture be?
For video recordings, there's no practical limit — you can record for hours if your disk has space. For scrolling screenshots, the limit depends on the tool: CleanShot X can handle pages up to approximately 20,000 pixels tall. Firefox and Chrome full-page screenshots can produce images over 30,000 pixels tall, though very long captures may cause the browser to slow down or crash.
Summary
Capturing scrolling content on Mac comes down to two choices: a static image of the full content (screenshot/PDF) or a video of the scrolling action.
For static captures, Safari's PDF export, Firefox's full-page screenshot, Chrome's DevTools capture, and CleanShot X's scrolling stitcher each cover different situations. For video, recording your screen while scrolling — especially with Screenify Studio's auto-zoom and cursor tracking — produces scroll-through videos that stay readable and professional.
Pick the method that matches your output format, and use the scroll speed and automation tips to keep the result clean.
Try Screenify Studio
Record your screen with auto-zoom, AI captions, dynamic backgrounds, and Metal-accelerated export. Free plan, unlimited recordings.
Download Free


