How to Screen Record for TikTok & Reels (Vertical)
Record vertical 9:16 screen videos on Mac for TikTok, Reels, and Shorts — cropping strategies, mobile previews, and export presets.
Your Mac display is 16:9. TikTok wants 9:16. That single geometric mismatch is why most screen recordings posted to vertical platforms look like a tiny letterboxed window floating in a blurred background — and why creators who figure out the workflow tend to get disproportionate reach.
This guide walks through four ways to produce a clean 1080×1920 vertical screen recording on macOS, the pros and cons of recording narrow vs cropping wide, and the platform-specific details that decide whether your video gets finished or swiped.
Quick Comparison
| Tool | Price | Native 9:16? | Auto-Zoom | Captions | Difficulty |
|---|---|---|---|---|---|
| Screenify Studio | Free + Pro | Yes (export preset) | Yes | AI, built-in | Easy |
| iMovie (record + crop) | Free | No (crop post) | No | Manual | Medium |
| OBS Studio | Free | Yes (canvas resize) | No | No | Hard |
| CleanShot X + QuickTime | $29 + free | Partial | No | No | Medium |
Screenify is the only option in this list that exports a vertical timeline natively with auto-zoom and AI captions in a single pass. The others each work, but you're stitching 2-3 tools together to get there.
Vertical Video Specs You Need to Hit
Before picking a method, lock these numbers in:
TikTok
- Resolution: 1080×1920 (9:16)
- Frame rate: 30fps (60fps accepted for gameplay)
- Duration: 60s for standard, up to 3 minutes on most accounts, 10 minutes for eligible creators
- Format: MP4 (H.264)
- Max file size: 287.6 MB on iOS, 72 MB on Android, 4 GB web upload
Instagram Reels
- Resolution: 1080×1920 (9:16)
- Frame rate: 30fps
- Duration: up to 90 seconds for Reels, 15 minutes if uploaded as a regular video that Instagram auto-converts
- Format: MP4 (H.264)
- Max file size: 4 GB
YouTube Shorts
- Resolution: 1080×1920 (9:16)
- Frame rate: 30 or 60fps
- Duration: up to 60 seconds (3 minutes rolling out in some regions)
- Format: MP4 (H.264 or H.265)
- Max file size: 256 GB
All three platforms want the same basic deliverable: a 1080×1920 MP4 at 30fps. Hit that spec and you're safe everywhere.
Safe zones matter more than dimensions. TikTok's UI covers roughly the bottom 250 pixels (caption, username, sound, buttons) and the top 150-200 pixels (profile header, close button). If you put critical UI screenshots in those zones, they're hidden behind the platform chrome. Design for the middle 1470 pixels of vertical space.
The Vertical-on-Horizontal Problem: Two Strategies
There are exactly two ways to produce a 9:16 screen recording on a 16:9 display, and they have very different trade-offs.
Strategy A: Record narrow, export native. Drag a 9:16 selection box on your screen — something like 608×1080 or 1080×1920 if your display has the vertical pixels — and record only that region. What you shoot is what you ship. No cropping in post.
- Pros: Final output is 1:1 with your timeline. No wasted pixels. Easy to stay inside title-safe zones because you designed for them during recording. File sizes are small.
- Cons: You have to compose the app window into a narrow column before hitting record. Some UIs don't reflow to narrow widths. You can't change framing later.
Strategy B: Record full screen, crop later. Record your whole Mac display at 2560×1440 or higher, then crop down to 9:16 in post. You have maximum flexibility — you can pan, zoom, reframe, pick which part of the screen to keep.
- Pros: Fix framing mistakes after the fact. Add "Ken Burns" pans from one part of the screen to another. Reuse the same recording for both horizontal and vertical versions.
- Cons: You throw away 70%+ of your pixels. Small UI elements become unreadable after the crop unless you zoom in hard. File sizes are much larger during editing.
The rule of thumb: if you know exactly what you're showing, record narrow. If you're demoing something exploratory or want a horizontal version too, record wide and crop.
Method 1: Screenify Studio — 9:16 Export with Auto-Zoom
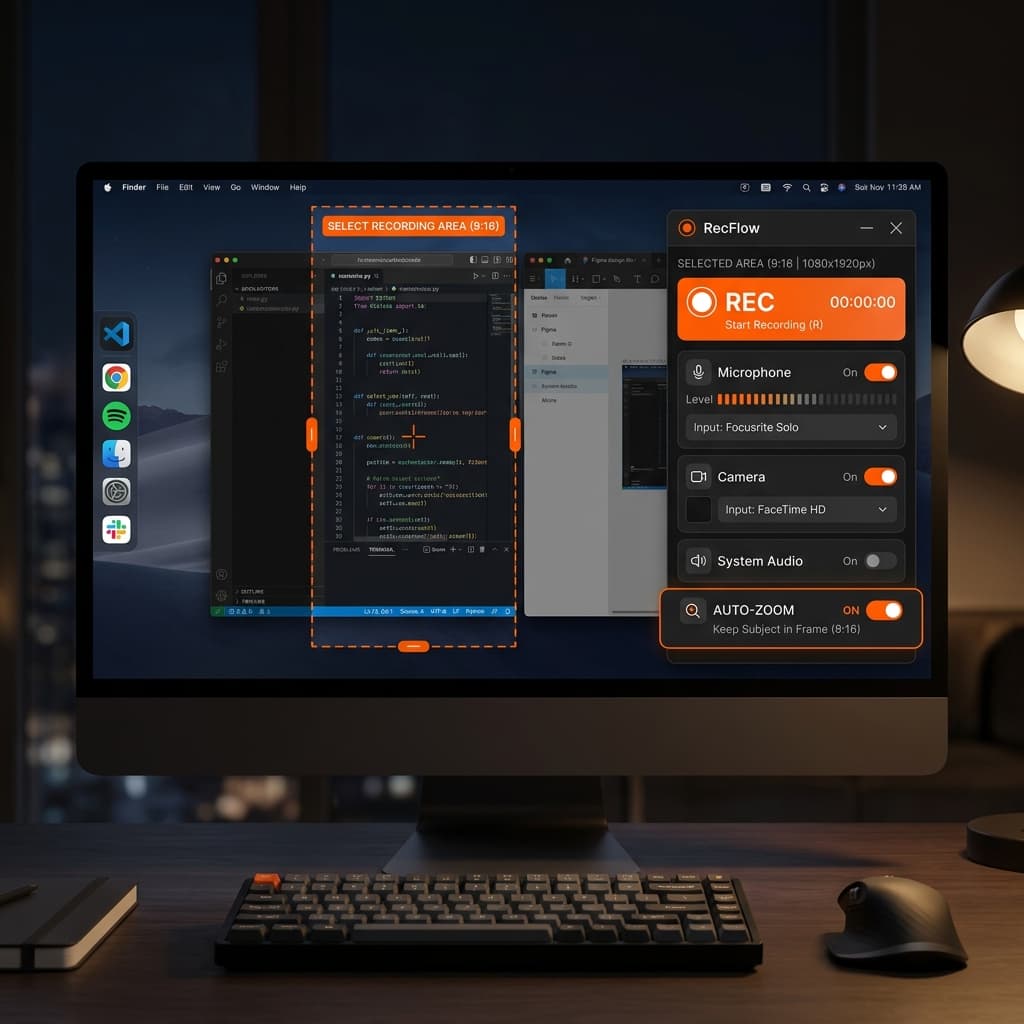
Screenify is the only option here built with vertical export as a first-class feature. Open a new recording, pick Area capture, and either drag a 9:16 region manually or use the 1080×1920 preset from the aspect ratio menu. The selection box snaps to a 9:16 rectangle you can position anywhere on your screen.
Record your demo normally. Screenify captures your screen plus cursor movements, clicks, and keystrokes as metadata — not baked into the pixels. That metadata is what makes auto-zoom possible in the editor.
When you're done, drop into the timeline. Switch the project aspect ratio to 9:16 (Vertical) if you recorded full-screen, and Screenify gives you a cropping frame you can reposition and keyframe over time. This is the "Ken Burns" part: you can have the frame start on one area of your app, slide to another, then zoom in on a button — all with smooth easing.
Auto-zoom is the reason this matters for vertical. When you crop a wide recording down to 1080 pixels wide, text that looked fine at 2560 pixels becomes tiny. Screenify's auto-zoom detects cursor movement, clicks, and text fields, then zooms in on the action so your viewer can actually read it. On a vertical timeline, this is the difference between a watchable demo and a squint-fest.
Turn on AI captions from the sidebar. Screenify transcribes your audio and drops word-level captions onto the timeline positioned inside the title-safe zone (roughly the middle third of the frame). You can restyle them — TikTok-style bold yellow, Reels-style centered white, whatever fits. Most vertical viewers watch muted, so captions aren't optional.
Export preset: choose TikTok / Reels / Shorts from the export dialog. That locks in 1080×1920, 30fps, H.264, and a file size that all three platforms accept without re-encoding.
Download Screenify Studio — vertical export, auto-zoom, and AI captions are all in the free tier.
Try Screenify Studio — free, unlimited recordings
Auto-zoom, AI captions, dynamic backgrounds, and Metal-accelerated export.
Method 2: Record with QuickTime, Crop in iMovie
The free, built-in route. Works, but requires patience.
Step 1: Record the source. Open the macOS screenshot toolbar and pick a selection-based screen recording. If you're going narrow, draw a tall rectangle approximating 9:16 — the toolbar doesn't snap to aspect ratios, so you'll eyeball it. If you're going wide, record the full display. Turn on microphone input if you're narrating.
Hit record, do your demo, hit stop. The file lands on your desktop as a .mov.
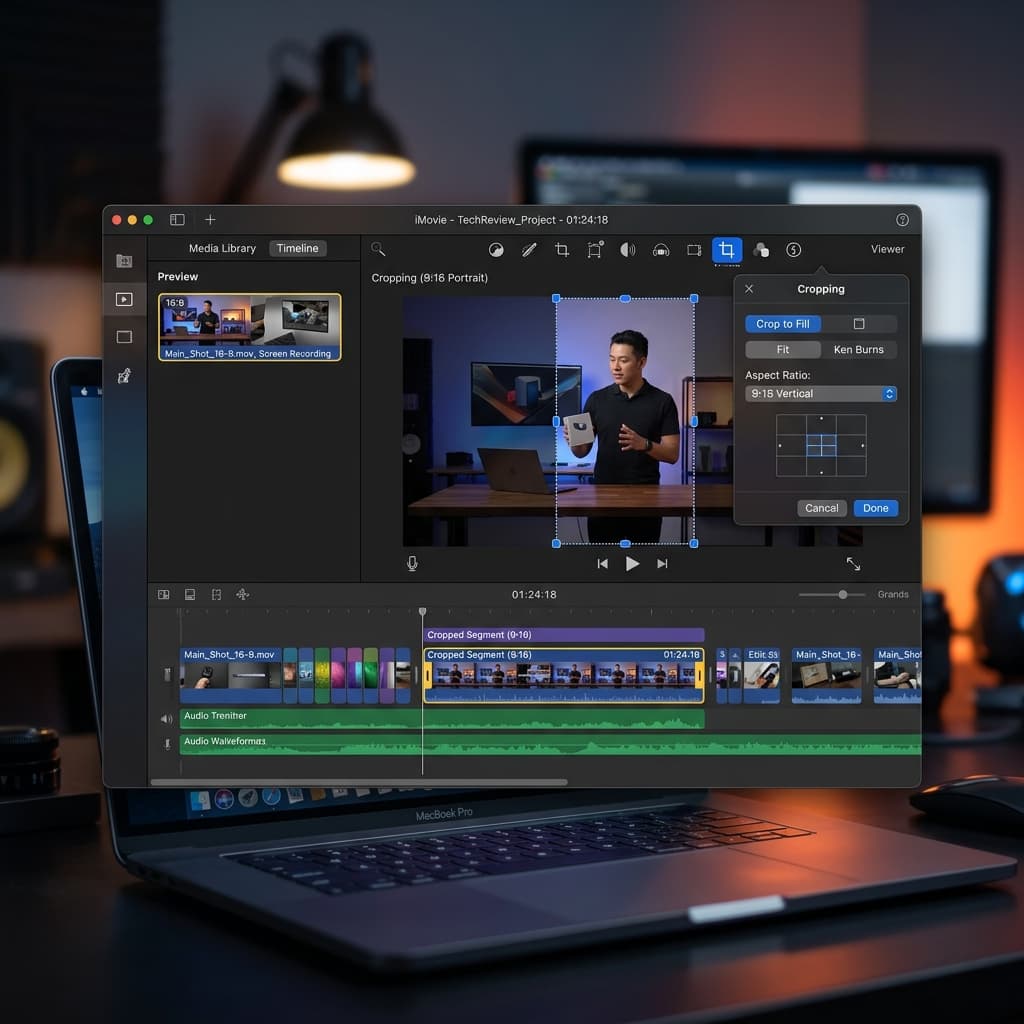
Step 2: Import into iMovie. Create a new project. iMovie doesn't expose a 9:16 aspect ratio in the standard UI — it defaults to 16:9 — so you need the workaround: create the project, drop your clip on the timeline, then use the Cropping tool in the viewer to crop the clip to a vertical portion of the frame.
Step 3: Crop to 9:16. Select your clip, click the Crop icon in the viewer, and drag the crop handles to a tall rectangle. iMovie doesn't show you exact pixel dimensions, so you're matching proportions by eye. Position the crop over the part of the screen you want visible. Apply.
Step 4: Export at the right size. iMovie's Share → File dialog defaults to 1080p, but because your project is still 16:9 internally, the export will be 1920×1080 with your cropped vertical content squeezed into the middle surrounded by black bars. This is the iMovie gotcha that trips everyone up.
The fix: export the 1920×1080 file, then bring it back into a tool that can crop out the black bars. You can use QuickTime Player → Edit → Trim for time, but QuickTime doesn't crop spatially. You need Photos app's video editor or a third-party tool to strip the sidebars.
Or — and this is honestly what most people do — give up on iMovie and use Method 1 or 3.
Verdict: Technically free, technically possible, but iMovie wasn't designed for vertical video and it shows. Fine for a one-off. Painful as a workflow.
Method 3: OBS Studio — Canvas Resize to 9:16
OBS is free, open source, and gives you complete control over canvas dimensions. That's exactly what you need for vertical.
Step 1: Install OBS. Grab it from obsproject.com. First launch runs an auto-configuration wizard — skip it or let it pick defaults, doesn't matter, you're going to override them.
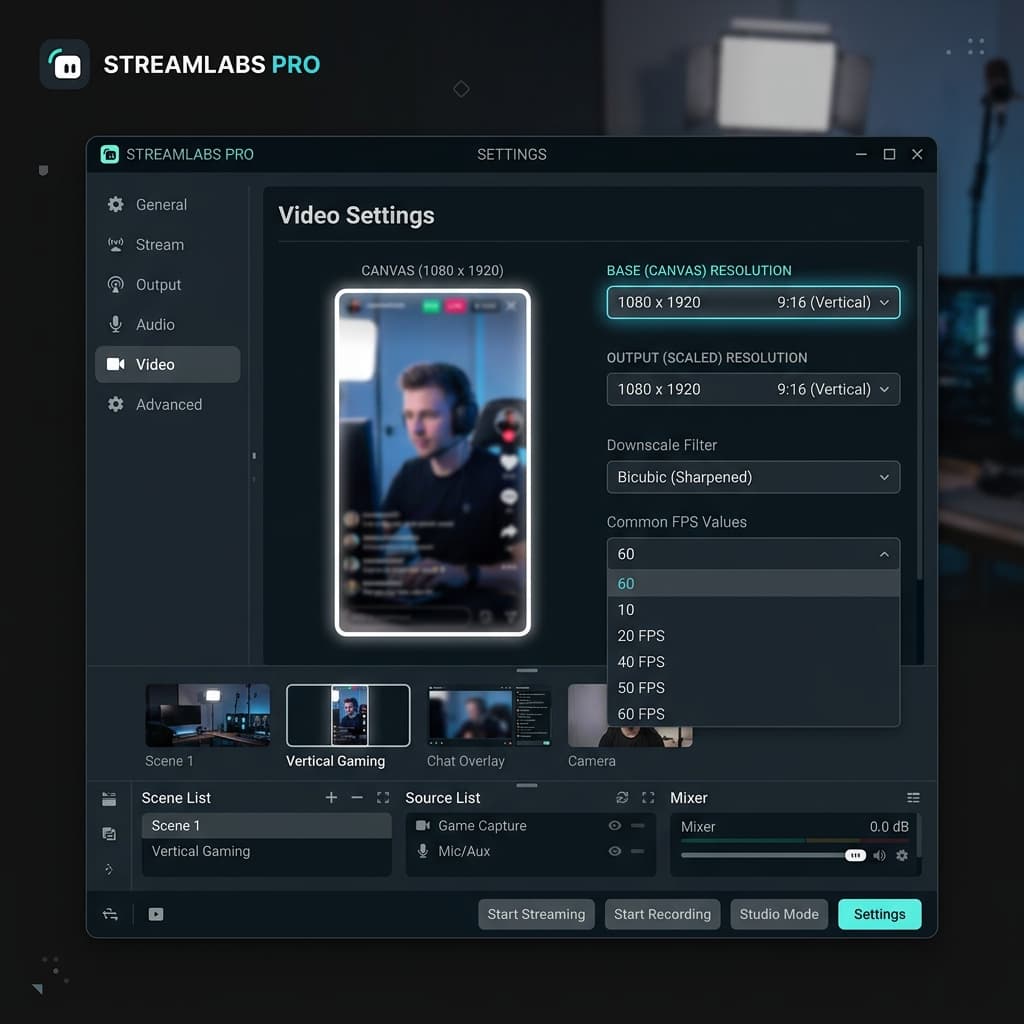
Step 2: Set the canvas to 1080×1920. Settings → Video. Change Base (Canvas) Resolution to 1080x1920 and Output (Scaled) Resolution to 1080x1920. Set Common FPS Values to 30. Click Apply. Your preview window switches from landscape to portrait.
Step 3: Add a Display Capture source. In the Sources panel, click the + button and pick Display Capture. Select your Mac display. OBS now shows your full 16:9 screen squeezed into a 9:16 canvas, which looks wrong — that's expected.
Step 4: Scale and position the source. Right-click the source → Transform → Edit Transform. You have two options:
- Crop mode: enter Crop values (Left, Right, Top, Bottom) to cut the source down to a 9:16 slice. For example, if your display is 2560×1440, crop left and right by about 920px each to get a 720-wide slice, then let OBS scale it to fill the 1080-wide canvas.
- Fit and move mode: scale the source larger than the canvas and drag the visible portion to whatever part of the screen you want to show.
This is where OBS is powerful — you can add multiple Display Capture sources with different crop settings, then switch between them like camera angles.
Step 5: Grant permissions. macOS will prompt for Screen Recording permission the first time you start a capture. System Settings → Privacy & Security → Screen Recording → enable OBS. Restart OBS.
Step 6: Start recording. Settings → Output → Recording. Set format to MP4, encoder to H.264 (hardware if available), and quality to High. Click Start Recording in the main window. Do your demo. Stop recording. The file lands in your configured output folder at exactly 1080×1920.
The catch: OBS has no auto-zoom. If the app you're showing has small UI elements, they stay small in the final video. You can zoom in manually by scaling the source and animating its position between scenes, but that's a lot of manual work. OBS also has no caption generation — you'll need to burn captions in separately using a tool like Descript or CapCut.
OBS is the right answer if you want pixel-perfect control and don't mind the setup time. It's not the right answer if you need to ship five vertical videos this week.
Need help deciding which region to record? Our guide on how to record a specific area on Mac walks through region selection across different tools.
Method 4: CleanShot X + Manual Crop in QuickTime
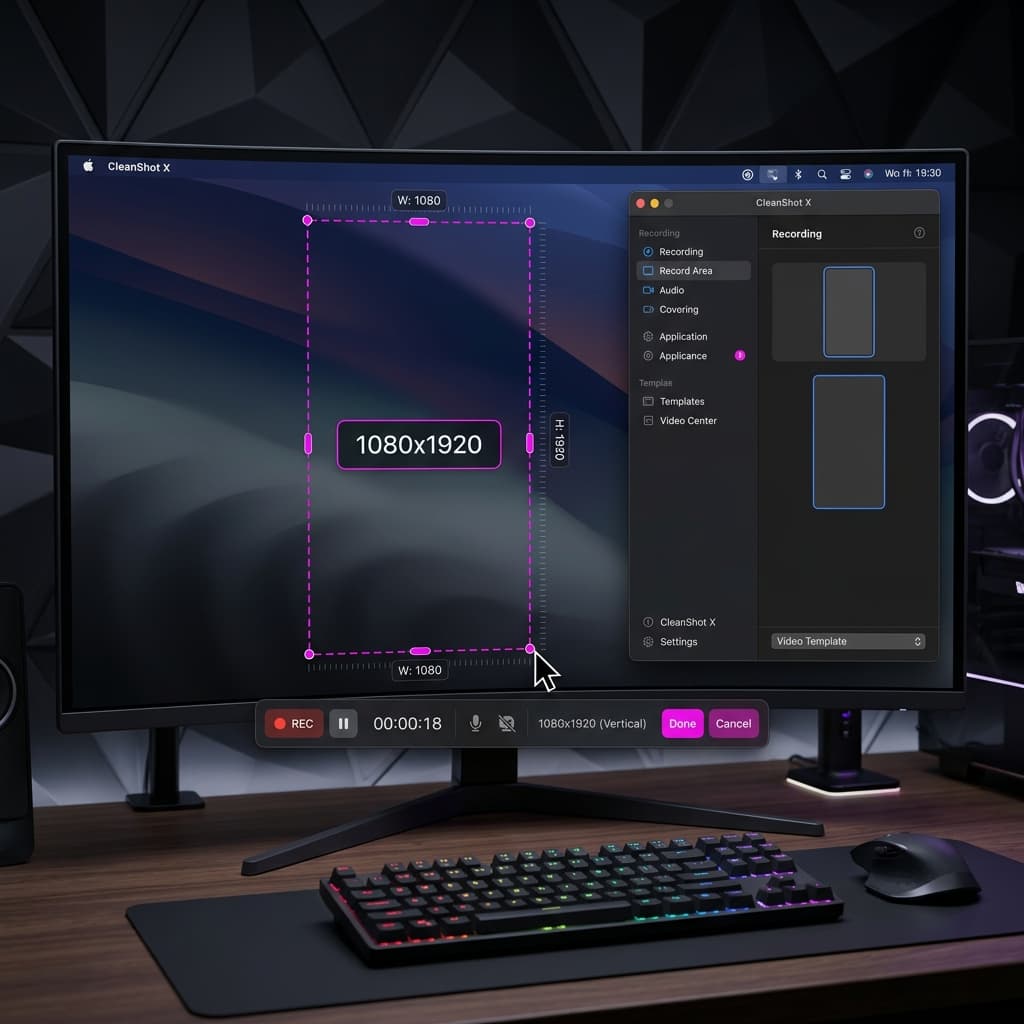
CleanShot X is a paid screenshot and recording tool ($29 one-time or subscription). It has a cleaner recording UX than QuickTime but doesn't export 9:16 natively — you still need a crop step.
Step 1: Record the region with CleanShot. Open CleanShot's screen recording, pick Record Area, and drag a selection. CleanShot shows live pixel dimensions as you drag, which is the feature that matters here: drag until the counter reads something like 608×1080 or whatever 9:16 ratio fits on your display. Start recording, do your demo, stop.
Step 2: Check the output dimensions. CleanShot saves to .mp4 by default. Open the file in QuickTime Player → Window → Show Movie Inspector. Confirm the frame size matches what you dragged.
Step 3: Crop if needed. If you recorded slightly off-ratio (say 610×1080 instead of 608×1080), you need to crop the extra pixels. QuickTime Player on macOS doesn't have spatial cropping built in — Edit → Trim only trims time. Workaround: open the file in Photos app, which does have a basic crop tool, or use the macOS Preview app's image crop on individual frames (not practical for video).
The realistic path: record at the exact dimensions during Step 1 using CleanShot's live pixel counter, avoid the crop step entirely. CleanShot's precise selection display makes this doable where QuickTime's selection doesn't.
Step 4: Verify the export. Drop the file into any player, confirm it plays at 1080×1920 or your target dimensions, and confirm the frame rate is 30fps.
CleanShot + QuickTime is a reasonable choice if you already own CleanShot and just need a quick vertical clip. It doesn't help with auto-zoom or captions, so for anything more than a single clip you're still layering more tools on top.
Try Screenify's free tier if you want all of this — region recording, auto-zoom, captions, and vertical export — in one app.
Strategy Deep Dive: Recording Narrow vs Cropping Wide
You'll decide this for every vertical video you make, so it's worth understanding the trade-offs in more detail.
When to record narrow (Strategy A):
- You know exactly which app and which panel you're demoing
- The app reflows to narrow widths (most modern websites, mobile-responsive apps, native macOS sidebars)
- You want the smallest possible working file
- You're comfortable composing the shot before you start
When to record wide and crop (Strategy B):
- You're demoing a desktop app that doesn't reflow (Photoshop, Final Cut, most pro tools)
- You want to produce both 16:9 and 9:16 versions from one take
- You want the option to pan across the screen in post ("Ken Burns" reveal)
- You're not sure exactly which part of the UI will matter until you see the recording
The Ken Burns pan trick is underused for vertical screen recordings. Instead of a static crop, keyframe the crop rectangle to move slowly across the wide recording. Start on the left half, end on the right half. Or start zoomed out on the full screen, then push in on a specific button. This adds motion to otherwise static screen footage, which helps with watch-time on TikTok's algorithm.
Auto-zoom does a version of this automatically by zooming in on cursor activity. On a cropped vertical timeline, auto-zoom is the difference between a demo where your viewer sees everything and a demo where they see a postage stamp in the middle of the frame.
Captions Are Not Optional
Stat that matters: somewhere between 75% and 85% of TikTok users watch with sound off, at least part of the time. Reels and Shorts are similar. If your recording has narration and no captions, most of your audience hears nothing.
What to use:
- Screenify AI captions: built-in, positioned inside the vertical safe zone, styled for vertical platforms. Word-level highlighting works out of the box.
- TikTok's in-app captions: upload your video, tap Captions in the editor, TikTok auto-generates. Decent accuracy, zero styling control, positioned wherever TikTok wants. Workable as a fallback.
- CapCut: free mobile/desktop editor with good auto-captions. Export then upload to TikTok.
- Descript: overkill for a single vertical, but good if you're also editing the audio.
Positioning matters. Don't put captions at the bottom of the frame — that's where TikTok's caption box and UI buttons live. Put them in the middle third, roughly pixel 700-1200 of a 1920-tall canvas. High-retention creators often put captions slightly above center so they're the first thing viewers read when they land on the video.
Audio Strategy: Plan for Music
Vertical platforms encourage music overlays. TikTok and Reels actively boost videos that use trending sounds. If you record a long narration track, you're competing with the music — viewers will either mute the music (rare) or mute you.
Three approaches that work:
- Record silent, add music + captions. Your screen demo runs with no dialogue. Captions carry the information. Music carries the vibe. Clean, platform-native, easy to remix.
- Record short dialogue beats. Narrate only the critical parts — hooks, transitions, key reveals. Leave space for music in between. Captions still required.
- Record full narration, duck the music. Keep your full voiceover and add music at low volume (20-30%). Works, but the video feels more like a YouTube clip than a TikTok. Fine for longer educational content.
The silent + captions + music approach is what most high-performing tech creators use on TikTok. It's also the easiest to produce — no voice recording, no re-takes for verbal stumbles, no audio cleanup.
Preview on Your Phone Before Publishing
This is the step everyone skips. You edit on a 27-inch monitor, the video looks great, you upload, and then on a 6-inch phone screen in the actual TikTok UI it turns out the text is unreadable and the key UI element is hidden behind the caption box.
Always preview on the target device. AirDrop the final export from your Mac to your iPhone, open it in the Photos app, and play it fullscreen. Better yet, upload it to TikTok as a draft (don't publish) and view it in the TikTok preview — that's the only way to see exactly where TikTok's UI will cover your content.
Things to check in mobile preview:
- Can you read all text without pinching to zoom?
- Are captions inside the safe zone and not behind UI elements?
- Does the hook work in the first second? (Preview with thumb over the sound icon.)
- Does the video still make sense muted?
If anything fails, go back to the editor and fix it. The five minutes of phone preview saves you from publishing a dud.
Troubleshooting
My recording looks stretched or squished. You recorded at one aspect ratio and exported at another without cropping. In Screenify, check the project aspect ratio matches your intended output. In OBS, confirm Base and Output resolutions are both 1080×1920. In iMovie, you probably hit the 16:9 project trap — the fix requires a post-export crop step.
Text in my demo is unreadable after cropping. You recorded wide and the UI elements became too small when cropped to 9:16. Either re-record narrow (Strategy A), enable auto-zoom (Screenify), or manually keyframe a zoom-in on the important parts. For future recordings, increase your Mac's display scaling (System Settings → Displays → Larger Text) before recording so UI elements are physically bigger.
TikTok is adding black bars to my video. Your video isn't exactly 1080×1920. TikTok will letterbox anything not precisely 9:16. Check the export dimensions in QuickTime's Movie Inspector. Re-export at the exact spec.
My captions are cut off by TikTok's UI. Captions were placed in the bottom or top safe zones. Move them to the middle third of the frame (pixel 700-1300 vertically) and re-export.
Cursor and clicks don't show up in the recording. QuickTime's screen recording has a cursor option that's off by default — check the settings menu before starting. OBS captures the cursor from the source by default but can be disabled per source. Screenify captures both cursor and click feedback automatically.
Try Screenify Studio — free, unlimited recordings
Auto-zoom, AI captions, dynamic backgrounds, and Metal-accelerated export.
FAQ
What's the exact export spec for TikTok, Reels, and Shorts?
1080×1920 resolution, 30fps (60fps also accepted for gameplay), H.264 MP4. Audio should be AAC at 128kbps or higher. All three platforms accept this spec without re-encoding, so you can upload the same file to all three.
Can I record at a higher resolution than 1080×1920?
Yes — 2160×3840 (4K vertical) is accepted by all three platforms. Whether it's worth the file size is another question. TikTok and Reels downsample aggressively, so the visible quality improvement on a phone screen is small. 1080p is the practical sweet spot.
How do I record a vertical region if my Mac's display is only 1440 pixels tall?
You can't record a full 1920-tall region on a 1440-tall display. Record at the display's native height (say 1080×1440 or 810×1440, which is 9:16), then scale up to 1080×1920 on export. The scale-up is lossless-ish at reasonable quality settings. Alternatively, lower your Mac's display scaling to get more effective vertical pixels.
Can I use the same recording for horizontal and vertical versions?
Yes, if you record wide. Record your full display at 1440p or 4K, then produce two exports from the same source: 1920×1080 for YouTube/web and 1080×1920 cropped for TikTok/Reels/Shorts. Screenify supports dual export from one project — swap the aspect ratio preset and re-export without re-editing.
Should I record at 30fps or 60fps?
30fps is standard and every platform accepts it. 60fps makes sense if you're recording gameplay, fast scrolling, or animation-heavy content. For typical app demos and screen recordings, 30fps is fine and cuts your file size in half.
How long should a TikTok screen recording be?
Based on current TikTok retention data, 15-30 seconds is the sweet spot for tech demos. Short enough that viewers watch to the end (completion rate boosts reach), long enough to communicate one clear idea. Longer videos (60s+) work if the hook is strong and there's a payoff at the end, but the drop-off rate is steeper.
Can I record my iPhone screen on my Mac and export vertical?
Yes — plug your iPhone into your Mac, open QuickTime Player → File → New Movie Recording, click the arrow next to the record button, and pick your iPhone as the camera source. You get a native 1170×2532 (or whatever your iPhone's resolution is) recording that's already vertical. No cropping needed. This is the easiest way to make vertical screen recordings of mobile apps.
Do I need a Pro plan to export vertical in Screenify?
No. Vertical export, auto-zoom, and AI captions are all in the free tier. The Pro plan adds longer exports, advanced effects, and commercial licensing.
Pick a Method and Ship One
Four methods, one goal: a 1080×1920 MP4 at 30fps that reads clearly on a phone screen. For a single quick clip, CleanShot + QuickTime works. For a serious workflow with auto-zoom and captions, Screenify. For total control with time to spare, OBS. For the free-but-painful path, iMovie.
If you're building a habit of posting screen demos to TikTok or Reels, the thing that matters most isn't which tool — it's whether you can go from idea to posted video in under 20 minutes. Every extra step (crop in one app, caption in another, export from a third) adds friction that eventually kills the habit.
Download Screenify Studio and try the vertical export preset on your next demo. If you're also producing horizontal content, our guide on how to screen record for YouTube covers the 16:9 side of the workflow. And if you're still getting your bearings with screen recording on macOS generally, start with our complete Mac screen recording guide.
Record narrow when you can. Crop wide when you must. Caption everything. Preview on your phone. Ship.
Try Screenify Studio
Record your screen with auto-zoom, AI captions, dynamic backgrounds, and Metal-accelerated export. Free plan, unlimited recordings.
Download Free


