How to Record Screen in 4K on Mac
Record true 4K screen video on Mac — resolution settings, codec choices, file size management, and hardware requirements.

Most Mac screens are not 4K. That sounds wrong — your MacBook has a "Retina" display with millions of pixels — but 4K refers to a specific resolution (3840x2160), and only a few Mac setups actually hit that number. Understanding this distinction is the first step to recording genuine 4K screen video.
This guide covers four recording methods, the codecs that matter at high resolution, file size expectations, and when 4K recording is worth the storage cost.
Quick Comparison
| Tool | Price | Max Recording Resolution | 4K Export | Codec Options | Difficulty |
|---|---|---|---|---|---|
| Screenify Studio | Free / Pro $9.99/mo | Native display resolution | Yes (upscale or native) | H.264, H.265, ProRes | Easy |
| OBS Studio | Free (open-source) | Custom (up to 4K+) | Yes (native) | H.264, H.265, ProRes, AV1 | Moderate |
| macOS Screenshot Toolbar | Free (built-in) | Display resolution only | No export control | HEVC only | Easy |
| Screen Studio | $89 one-time | Native display resolution | Yes | H.264, H.265, ProRes | Easy |
Mac Display Resolutions vs True 4K
Before configuring anything, know what your screen actually outputs in pixels. Every screen recorder captures at the display's native pixel resolution, not the "looks like" scaled resolution shown in System Settings.
Here is what each Mac actually records at:
| Mac Model | Native Resolution | Compared to 4K (3840x2160) |
|---|---|---|
| MacBook Air 13" (M1/M2/M3/M4) | 2560x1664 | Below 4K — 66% of 4K width |
| MacBook Air 15" | 2880x1864 | Below 4K — 75% of 4K width |
| MacBook Pro 14" | 3024x1964 | Close but not 4K — 79% of 4K width |
| MacBook Pro 16" | 3456x2234 | Exceeds 4K width by ~400px, but different aspect ratio |
| iMac 24" | 4480x2520 | Exceeds 4K in both dimensions (4.5K) |
| External 4K display | 3840x2160 | Exactly 4K UHD |
| Pro Display XDR | 6016x3384 | 6K — far exceeds 4K |
The Retina "Looks Like" Trap
Open System Settings > Displays on any Mac. You'll see options like "Looks like 1440x900" or "Looks like 1920x1080." These are scaled rendering resolutions — they control how large UI elements appear, not how many pixels the display uses.
A MacBook Pro 14" set to "Looks like 1512x982" still renders at 3024x1964 actual pixels. The OS draws everything at the higher resolution and downscales for display sharpness. Screen recorders capture at the actual pixel count, so your recording from a 14" MacBook Pro is 3024x1964 regardless of which "Looks like" setting you chose.
This means:
- A MacBook Air 13" cannot produce a true 4K recording from its built-in display. The panel physically has 2560x1664 pixels.
- A MacBook Pro 16" produces a recording wider than 4K (3456 vs 3840), but at a different aspect ratio (3456x2234 vs 3840x2160).
- An external 4K monitor is the simplest path to true 4K recording. Connect one, record that display, and you get exactly 3840x2160.
If you don't have a 4K external display, some tools can upscale your recording to 4K during export — more on that below.
Method 1: Screenify Studio
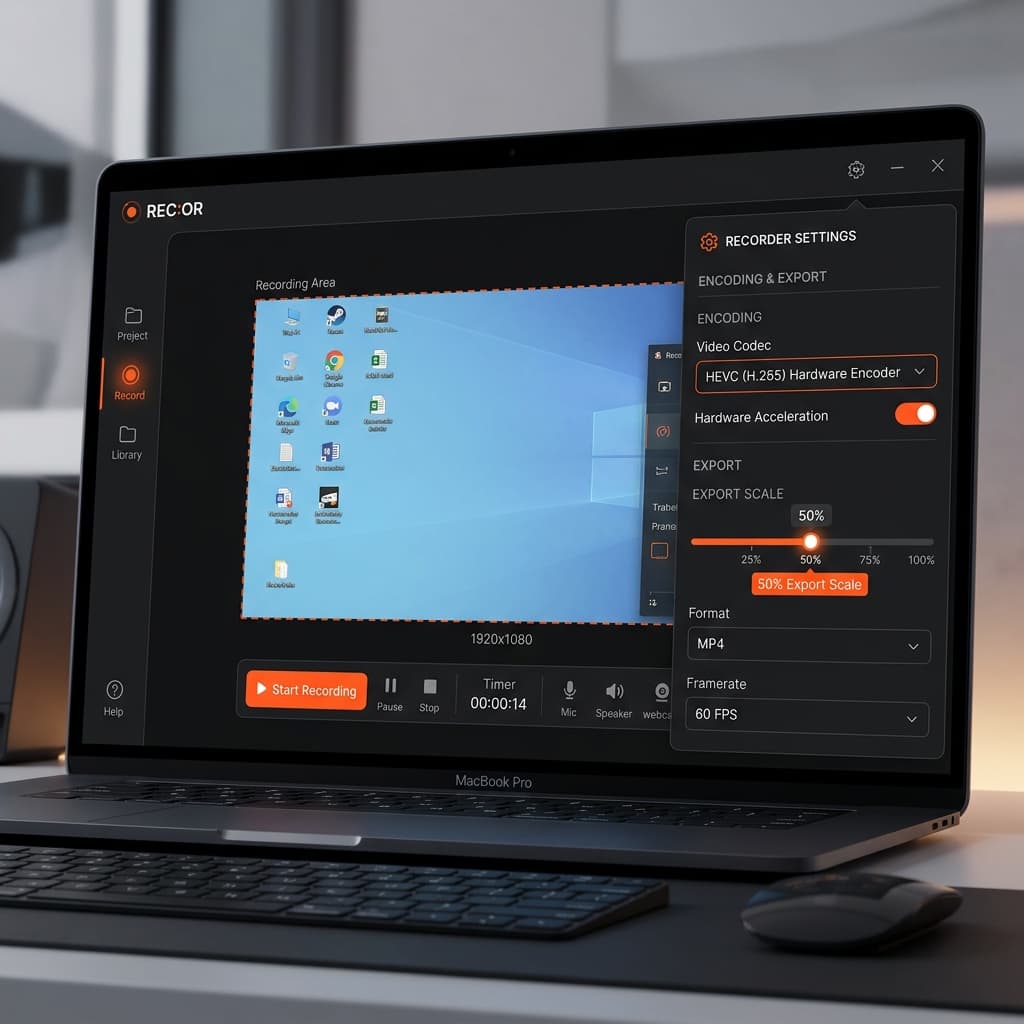
Screenify Studio records at your display's native pixel resolution and lets you choose the output resolution during export, including 4K (3840x2160). If your display is below 4K, the export engine upscales using a high-quality Lanczos algorithm — the result is sharper than a naive resize but not identical to native 4K capture.
Steps
- Download Screenify Studio and open the app
- Select your capture mode:
- Full Screen — captures the entire display at native resolution
- Window — captures a single app window
- Custom Region — drag to select an area (the recording resolution matches the pixel dimensions of your selection)
- If you have an external 4K display connected, select it as the recording target in the display picker. This gives you native 3840x2160 capture.
- Press ⌃ + ⌘ + R or click Record
- Perform your screen actions. Screenify runs the capture pipeline on a dedicated thread — CPU overhead is minimal on Apple Silicon.
- Stop recording with the same shortcut
- In the export dialog:
- Resolution — select 3840x2160 (4K) from the dropdown. If your source is lower resolution, the upscale happens here.
- Codec — choose H.265 (HEVC) for the best balance of quality and file size, or ProRes 422 if you plan to edit the footage in Final Cut Pro or DaVinci Resolve
- Frame rate — 30fps is standard for tutorials; 60fps if you're recording gameplay or animations
- Click Export. Hardware-accelerated encoding on Apple Silicon means a 10-minute 4K HEVC export finishes in roughly 2-3 minutes on an M1 or later.
Why use Screenify for 4K
- One-click resolution selection — no manual output settings or config files
- Automatic aspect ratio handling — if your source is 3024x1964 and you export at 3840x2160, Screenify adds minimal letterboxing or crops intelligently based on your preference
- AI auto-zoom — for tutorial content, auto-zoom tracks your cursor and zooms into relevant UI regions. Even if you record at 3024x1964, the zoomed output at 4K preserves sharpness because the zoom operates on the high-resolution source
- System audio + mic in the same recording, with separate tracks for post-editing
If you need system audio capture alongside 4K output, Screenify handles both without plugins. See the full audio setup in How to Screen Record on Mac with Audio.
Try Screenify Studio — free, unlimited recordings
Auto-zoom, AI captions, dynamic backgrounds, and Metal-accelerated export.
Method 2: OBS Studio
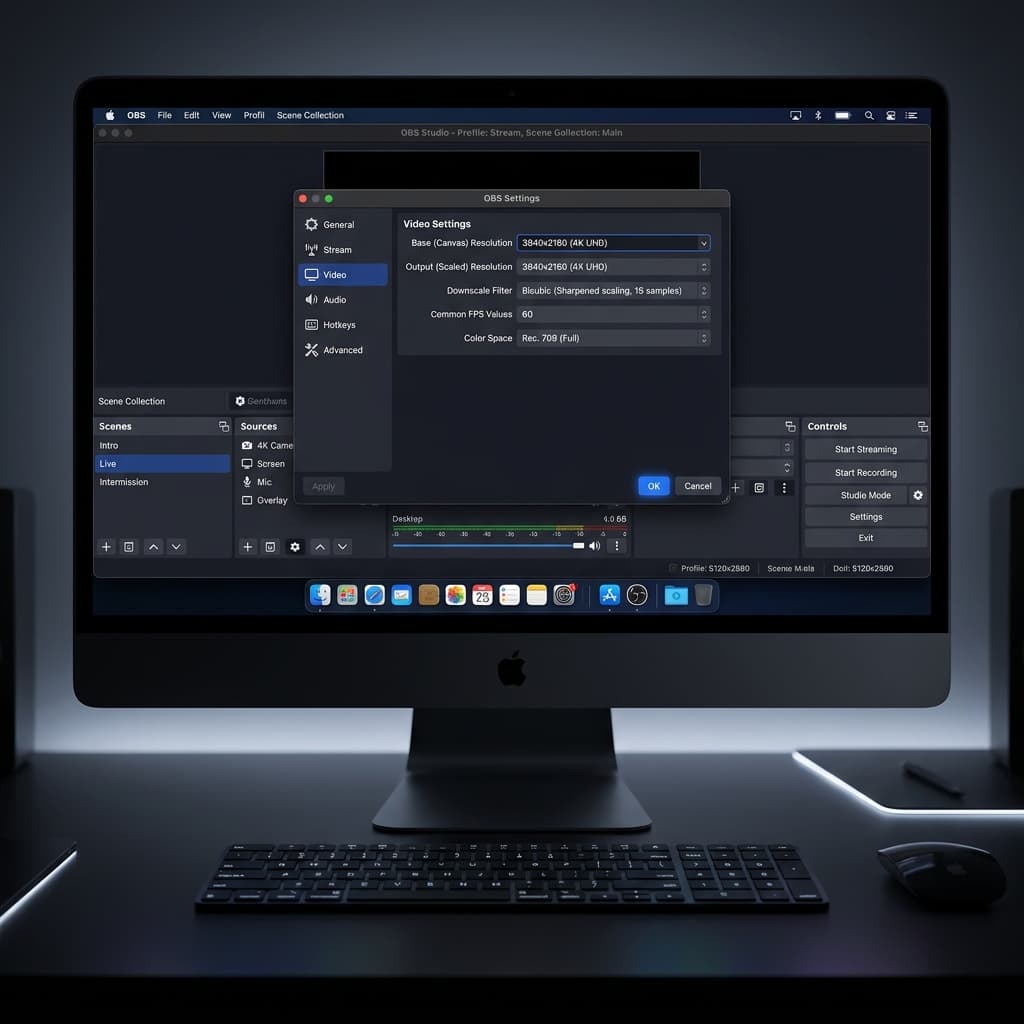
OBS gives you explicit control over recording resolution. You can set a custom output resolution of 3840x2160 even if your display is smaller — OBS will upscale the canvas. For native 4K, connect a 4K display and set both the base and output resolution to 3840x2160.
Steps
- Download OBS from obsproject.com and install it
- Open OBS and go to Settings > Video:
- Base (Canvas) Resolution — set this to your display's native resolution (e.g., 3024x1964 for MacBook Pro 14", or 3840x2160 for a 4K external monitor)
- Output (Scaled) Resolution — set to 3840x2160
- Downscale Filter — choose Lanczos (Sharpened scaling, 36 samples) if upscaling from a lower base resolution
- FPS — 30 or 60
- Go to Settings > Output, switch to Advanced mode:
- Recording tab
- Type — Standard
- Recording Format — MKV (recommended; you can remux to MP4 later via File > Remux Recordings) or MP4
- Encoder — choose Apple VT H265 Hardware Encoder for HEVC with hardware acceleration, or Apple VT H264 Hardware Encoder for maximum compatibility
- Rate Control — CRF
- CRF — 18-20 for high quality (lower = higher quality, larger files). For 4K, CRF 20 produces excellent results with manageable file sizes.
- Go to Settings > Output > Recording and set your recording path to a folder on your fastest drive (internal SSD preferred — 4K 60fps generates data at 50-100 MB/s depending on codec and complexity)
- Click OK to save settings
- In the main OBS window, add a Display Capture source:
- Right-click the Sources panel > Add > macOS Screen Capture
- Select your display from the dropdown
- If using a 4K external monitor, select that specific display
- Click Start Recording
- When finished, click Stop Recording
- If you recorded in MKV format, go to File > Remux Recordings to convert to MP4
OBS CRF Values for 4K — What the Numbers Mean
| CRF | Quality | File Size (4K 60fps, 10 min) | Use Case |
|---|---|---|---|
| 15 | Visually lossless | ~4-6 GB | Archival, editing source |
| 18 | Excellent | ~2-4 GB | High-quality final output |
| 20 | Very good | ~1.5-3 GB | Balanced quality/size |
| 23 | Good | ~800 MB-1.5 GB | YouTube upload (re-encoded anyway) |
| 28 | Acceptable | ~400-700 MB | Quick sharing, low storage |
CRF is logarithmic — each increment of 6 roughly halves the file size.
OBS Limitations for 4K on Mac
- No system audio without a plugin. You need BlackHole or Loopback to route system audio into OBS. See our audio recording guide for setup instructions.
- Performance overhead. OBS rendering a 4K canvas uses significant GPU resources. On M1 MacBook Air (8GB), expect occasional frame drops at 4K 60fps. M1 Pro/Max or later handles it smoothly.
- No post-processing. OBS records raw footage. Zoom effects, cursor highlights, and backgrounds require a separate editor.
Method 3: macOS Screenshot Toolbar
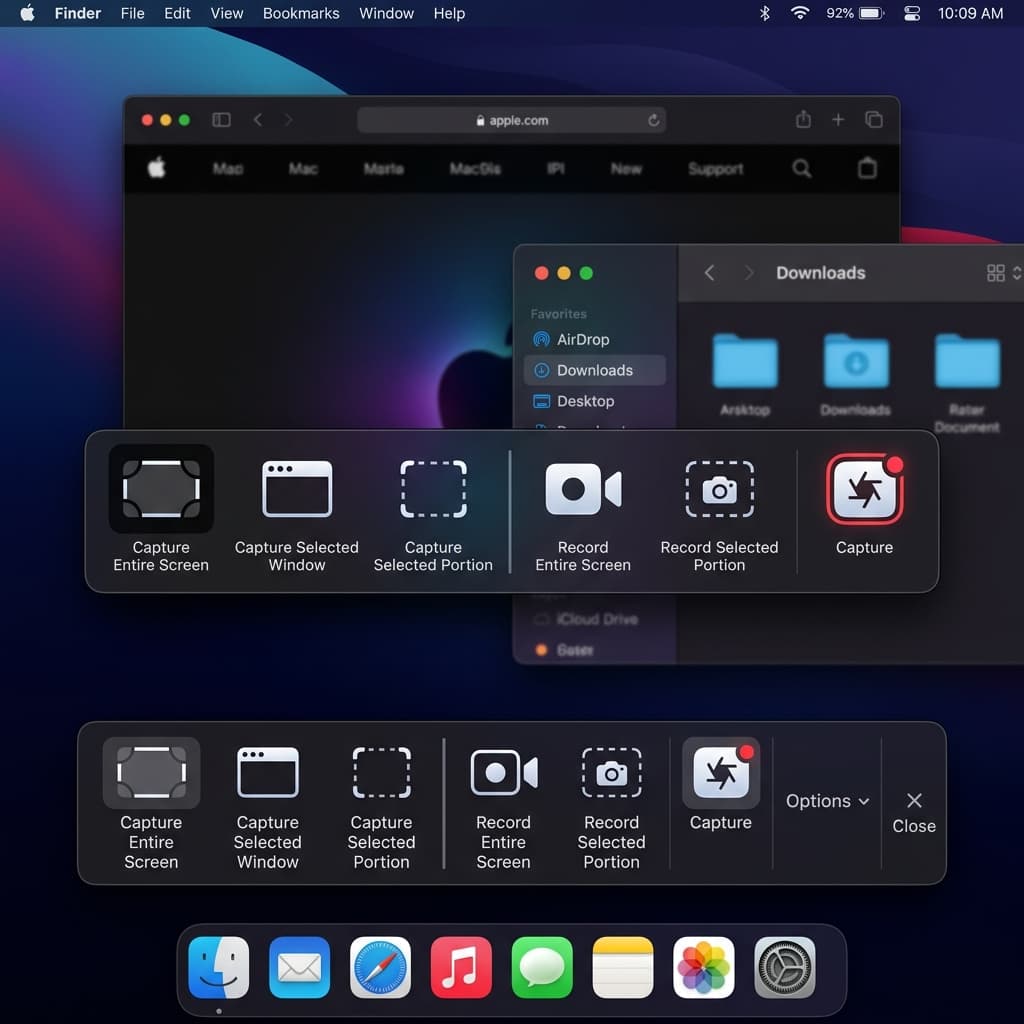
The built-in recorder captures at your display's native resolution with no options to change it. There is no resolution selector, no codec picker, and no export settings.
Steps
- Press ⌘ + Shift + 5 to open the Screenshot toolbar
- Select Record Entire Screen or Record Selected Portion
- Click Options to set the save location and microphone (if needed)
- Click Record or press Enter
- Stop with the ⏹ button in the menu bar or ⌘ + Control + Esc
What resolution do you actually get?
The recording matches your display's native pixel resolution:
- MacBook Air 13": 2560x1664 MOV file
- MacBook Pro 16": 3456x2234 MOV file
- External 4K display: 3840x2160 MOV file
If you connect a 4K external monitor and record that display, you get a true 4K recording. That is the only way to get 4K from the built-in tool.
Limitations
- No resolution selection — you get whatever your display outputs
- No codec choice — the system uses HEVC on Apple Silicon, H.264 on Intel Macs
- No frame rate control — defaults to 60fps
- No system audio capture
- No editing, zoom, or annotation
The built-in tool is covered in more detail in How to Screen Record on Mac.
Method 4: Screen Studio
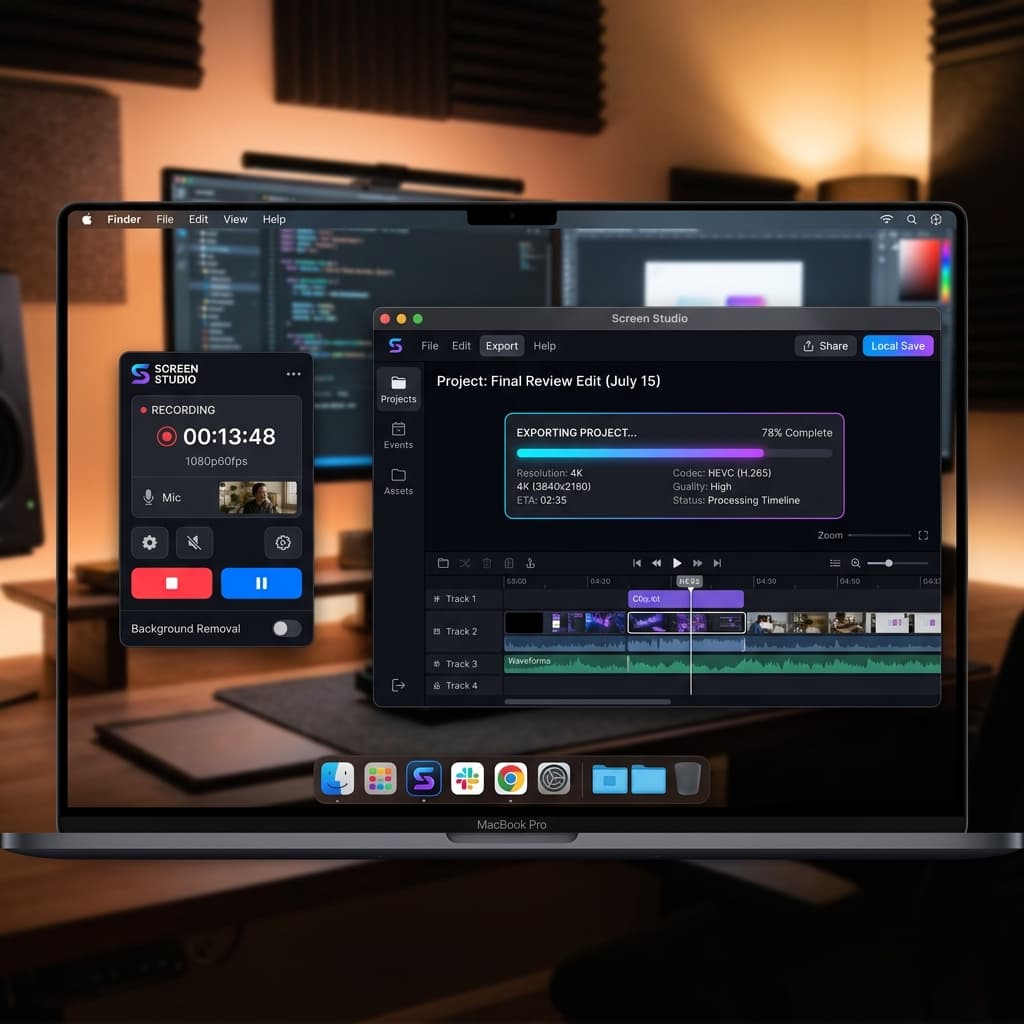
Screen Studio records at your display's native resolution and offers 4K as an export option. Its strength is automatic motion design — zoom effects, rounded corners, and gradient backgrounds applied during export.
Steps
- Purchase and download Screen Studio from screen.studio ($89 one-time)
- Open Screen Studio and grant screen recording permissions
- Select your recording area — full screen, window, or custom region
- Click Record to start
- Stop recording when finished
- In the export panel:
- Set resolution to 4K (3840x2160)
- Choose codec: H.264, HEVC, or ProRes
- Set frame rate and quality
- Click Export
Considerations
- $89 upfront cost with no free tier
- Excellent motion design but less control over codec parameters compared to OBS
- File sizes can be large due to the added zoom animations increasing visual complexity (more motion = more data for the codec to encode)
File Size and Codec Deep-Dive
At 4K resolution, codec choice determines whether your recording is 500 MB or 5 GB for the same content. Here is what to expect.
Codec Comparison at 4K 60fps
| Codec | File Size (10 min) | Encode Speed (Apple Silicon) | Compatibility | Best For |
|---|---|---|---|---|
| H.264 (AVC) | ~5 GB | Fast (hardware) | Universal — plays everywhere | Maximum compatibility |
| H.265 (HEVC) | ~2.5-3 GB | Fast (hardware) | Broad — all modern devices, some older Android/Windows may struggle | Balanced quality and size |
| ProRes 422 | ~20-30 GB | Very fast (hardware) | Apple ecosystem, pro editors | Editing pipeline (Final Cut, DaVinci) |
| ProRes 422 LT | ~12-18 GB | Very fast (hardware) | Apple ecosystem, pro editors | Editing with smaller files |
| AV1 | ~1.5-2 GB | Slow (software only on current Macs) | Growing — YouTube, modern browsers | Future-proof, smallest files |
File Size Calculator
Rough formula for estimating recording size:
File size (MB) = width x height x fps x duration(sec) x bits_per_pixel / (8 x 1024 x 1024)Where bits_per_pixel depends on the codec and CRF:
| Codec + CRF | Approximate bits/pixel |
|---|---|
| H.264, CRF 20 | 0.10-0.15 |
| H.265, CRF 20 | 0.05-0.08 |
| ProRes 422 | 0.80-1.20 |
| AV1, CRF 30 | 0.03-0.05 |
Example: 4K 60fps H.265 at CRF 20 for 10 minutes:
3840 x 2160 x 60 x 600 x 0.065 / (8 x 1024 x 1024) = ~2.4 GBScreen recordings of static content (code editors, documents) compress much better than recordings of video playback or animations. A 10-minute VS Code tutorial at 4K might be 1.2 GB in HEVC, while the same duration recording a video game would be 4+ GB.
Which Codec to Choose
- Uploading to YouTube or social media: H.265 or H.264. YouTube re-encodes everything to VP9/AV1 anyway, so uploading a ProRes master wastes upload time without quality benefit. Note: uploading at 4K gives you better 1080p quality on YouTube — their encoder allocates a higher bitrate to 4K source videos even at lower playback resolutions.
- Editing in Final Cut Pro or DaVinci Resolve: ProRes 422. Both editors handle ProRes natively with zero decode overhead. H.265 requires real-time transcoding during editing, which causes timeline lag at 4K.
- Sharing via link or email: H.265 for the smallest file that still looks sharp. Screenify Studio's share links handle playback in-browser, so codec compatibility is managed server-side.
- Long-term archival: AV1 if you can wait for the encode. On current Apple Silicon, AV1 encoding is software-only and roughly 5-10x slower than hardware H.265. Apple may add hardware AV1 encode in future chips.
Looking for a quick way to share your 4K recording without managing file uploads? Screenify Studio generates a share link directly from the export dialog — drag-free sharing at any resolution.
Hardware Requirements for 4K Recording
Recording at 4K is a sustained, high-throughput operation. Your Mac needs to capture 8.3 million pixels per frame, encode them in real time, and write the result to disk — all while running the app you are recording.
CPU and GPU
| Chip | 4K 30fps | 4K 60fps | Notes |
|---|---|---|---|
| Intel Mac (pre-2020) | Possible, with dropped frames | Not recommended | Software encoding only for HEVC; high CPU usage |
| M1 | Smooth | Smooth for most content | Hardware HEVC encode; may drop frames during complex 3D rendering |
| M1 Pro/Max | Smooth | Smooth | Extra encode/decode engines handle 4K easily |
| M2/M3/M4 | Smooth | Smooth | Improved media engines; M3 Pro+ has dedicated ProRes engine |
| M2/M3/M4 Pro/Max/Ultra | Smooth | Smooth, even ProRes | Multiple ProRes engines; can record and encode simultaneously |
RAM
- 8 GB — works for 4K recording of standard apps (browsers, editors, documents). Expect swap usage if you run memory-heavy apps alongside the recorder.
- 16 GB — comfortable for 4K recording in most scenarios. Recommended minimum for 4K 60fps.
- 32 GB+ — needed if you record 4K while running VMs, large Xcode projects, or multiple heavy apps simultaneously.
The recorder itself uses 200-500 MB of RAM. The concern is that 4K capture combined with the app being recorded and macOS overhead can push total memory past 8 GB quickly.
Storage Write Speed
4K HEVC at 60fps generates roughly 40-60 MB/s of data. 4K ProRes generates 200-400 MB/s.
- Internal SSD (all Apple Silicon Macs) — 2,000-7,000 MB/s read/write. No concerns.
- External SSD (USB-C/Thunderbolt) — 500-2,800 MB/s. Fine for all codecs.
- External HDD — 80-120 MB/s. Will cause frame drops with ProRes, and may struggle with HEVC at 60fps. Avoid for 4K recording.
- SD card — varies widely (30-300 MB/s). UHS-II cards are fast enough for HEVC; older cards are not.
Record to your internal SSD whenever possible. Move the files to external storage afterward.
Thermal Considerations
4K recording at 60fps sustains high GPU and media engine utilization. On MacBook Air (fanless), prolonged 4K recordings (30+ minutes) may trigger thermal throttling, reducing frame rate. MacBook Pro models with active cooling handle extended 4K sessions without throttling.
Troubleshooting
Recording drops frames or stutters at 4K
Cause: Insufficient hardware resources — usually GPU contention or slow storage.
Fix:
- Close unnecessary apps to free GPU and RAM
- Switch from ProRes to HEVC — ProRes generates 5-10x more data per second
- Reduce frame rate from 60fps to 30fps — halves the encoding workload
- Ensure you are recording to the internal SSD, not an external HDD
- On MacBook Air: use a laptop stand or cooling pad to delay thermal throttling
Recording resolution is lower than expected
Cause: You may be recording a scaled region, or your display's native resolution is lower than you assumed.
Fix:
- Check your actual native resolution: open Terminal and run
system_profiler SPDisplaysDataType | grep Resolution - This shows the true pixel dimensions. "Looks like 1920x1080" in System Settings does not mean the recording will be 1920x1080 — it will be the native resolution listed in Terminal.
- If you need exactly 3840x2160 and your display does not support it, connect an external 4K monitor or use OBS/Screenify Studio's 4K export upscale option.
Exported 4K file will not play on Windows
Cause: HEVC (H.265) playback requires the HEVC Video Extension on Windows 10/11, which Microsoft charges $0.99 for in the Microsoft Store. Many Windows machines do not have it installed.
Fix:
- Export as H.264 instead of HEVC for maximum compatibility
- Or, if sharing via link, use Screenify Studio's web player — it handles codec compatibility in the browser
OBS canvas is black or shows wrong display
Cause: macOS screen recording permissions not granted, or the wrong display is selected in the macOS Screen Capture source.
Fix:
- Go to System Settings > Privacy & Security > Screen Recording
- Ensure OBS is listed and enabled. If you just added it, restart OBS.
- In OBS, right-click the macOS Screen Capture source > Properties and select the correct display from the dropdown
File sizes are unexpectedly large
Cause: Recording at 4K with a low CRF value or using ProRes generates massive files.
Fix:
- For H.265: increase CRF from 18 to 22-23. Quality loss is minimal; file size drops by 40-50%.
- Switch from ProRes to HEVC unless you specifically need ProRes for an editing pipeline
- Record at 30fps instead of 60fps if the content does not involve fast motion
- Use Screenify Studio's Smart Export, which analyzes motion complexity and adjusts bitrate per-segment — static code editor frames get lower bitrate, fast scrolling gets higher bitrate
When 4K Recording Is (and Is Not) Worth It
4K matters when:
- Software with fine detail — design tools (Figma, Photoshop), CAD software, spreadsheets with small text. Viewers pausing to read UI text will see sharper results at 4K.
- YouTube uploads — YouTube's encoder gives 4K uploads a higher bitrate allocation even at 1080p playback. A video uploaded at 4K and watched at 1080p looks noticeably better than the same video uploaded at 1080p. This is the single biggest reason to record at 4K even if your audience watches on 1080p screens.
- Presentations on large displays — conference room TVs and projectors at 4K resolution will show 1080p content as blurry. Record at 4K if your content will be displayed on large screens.
- Cropping in post — if you plan to crop into a specific region of the screen during editing, 4K source footage gives you 4x the pixel budget of 1080p. You can crop to 50% and still have a 1080p output.
4K is overkill when:
- Quick bug reports — you are sharing a 30-second clip in Slack. 1080p is fine; the recipient will watch it in a small embed.
- Simple tutorials with no fine text — if your tutorial shows large UI elements and broad interactions, 1080p captures enough detail.
- Limited storage — a 4K HEVC recording uses roughly 3x the storage of 1080p HEVC for the same content. If you record frequently, the files add up.
- Slow upload speed — uploading a 3 GB 4K file on a slow connection is painful. Record at 1080p or use a more aggressive codec setting.
For recording a specific region of your screen instead of the full display — useful when you only need part of the screen at high resolution — see How to Record a Specific Area on Mac.
Try Screenify Studio — free, unlimited recordings
Auto-zoom, AI captions, dynamic backgrounds, and Metal-accelerated export.
FAQ
Does my MacBook record in 4K?
Only if you connect an external 4K display and record that screen. MacBook built-in displays range from 2560x1664 (Air 13") to 3456x2234 (Pro 16"). None are exactly 3840x2160. However, you can export/upscale to 4K using tools like Screenify Studio or OBS.
What is the difference between Retina resolution and 4K?
Retina is Apple's marketing term for high-DPI displays. A Retina MacBook Pro 14" has 3024x1964 pixels — high resolution, but not 4K (3840x2160). 4K UHD is a specific standard: 3840 pixels wide by 2160 pixels tall, at a 16:9 aspect ratio.
Can I upscale a 1080p recording to 4K?
Technically yes, but the result contains no additional detail — it is the same image stretched to more pixels. Upscaling from native Retina resolutions (2560x1664 or 3024x1964) produces better results because there is more source detail to work with. AI-based upscalers can add some sharpness, but they cannot invent detail that was not captured.
Does recording at 4K affect my Mac's performance?
Minimally on Apple Silicon. The M1 and later chips have dedicated hardware video encoders that handle 4K HEVC encoding without loading the main CPU cores. You might notice a 5-10% increase in CPU usage and a slight increase in memory consumption. On Intel Macs, the impact is more significant — expect 20-30% CPU usage for 4K H.264 encoding.
Which frame rate should I use for 4K screen recording?
30fps for tutorials, documentation, and presentations — screen content rarely changes fast enough to benefit from 60fps. Use 60fps for gameplay recording, animation previews, or UI interactions with fast scrolling and transitions. The file size difference is roughly 2x (60fps files are about twice as large as 30fps).
Should I record at 4K or upscale during export?
Record at the highest native resolution available (use an external 4K display if you have one). Native 4K capture preserves actual pixel detail. Upscaling during export is a good fallback when you do not have a 4K display — tools like Screenify Studio use high-quality scaling algorithms — but the result is mathematically interpolated rather than captured.
What is the best codec for 4K YouTube uploads?
H.265 (HEVC) at CRF 18-20. YouTube re-encodes all uploads to VP9 or AV1, so there is no benefit to uploading ProRes (which would be 10-20x larger). The goal is to give YouTube's encoder the highest quality source within a reasonable upload size. H.265 at CRF 18 does that well. H.264 also works but produces files roughly twice as large.
How much storage space do I need for 4K screen recording?
Plan for approximately 250-300 MB per minute at 4K 60fps with HEVC (H.265) at default quality settings. At 30fps, roughly 150-180 MB per minute. ProRes uses 2-3 GB per minute — only use ProRes if you have the storage budget and need it for professional editing. A 1 TB SSD gives you roughly 50-60 hours of 4K HEVC recording at 30fps.
Try Screenify Studio
Record your screen with auto-zoom, AI captions, dynamic backgrounds, and Metal-accelerated export. Free plan, unlimited recordings.
Download Free


