How to Speed Up or Slow Down a Video on Mac
Change video playback speed on Mac with iMovie, Screenify Studio, DaVinci Resolve, or FFmpeg — free methods with step-by-step instructions.

A two-minute screen recording of a software install does not need to show every loading spinner in real time. A 30-second clip of a UI animation looks far more impressive at half speed, where viewers can appreciate each transition. Adjusting video speed is one of the most common edits Mac users need — whether you are creating a time-lapse from a long recording, slowing down a fast demo, or trimming dead air from a tutorial.
Every method below works with standard video files (MP4, MOV, M4V) on macOS. Pick the one that matches your skill level and budget.
Quick Comparison
| Tool | Price | Key Feature | Difficulty |
|---|---|---|---|
| iMovie | Free (pre-installed) | Simple speed slider with instant preview | Beginner |
| Screenify Studio | Free plan available | Speed adjustment built into recording editor | Beginner |
| DaVinci Resolve | Free (full version) | Retime curves for variable speed within one clip | Intermediate |
| FFmpeg | Free (open source) | Command-line batch processing, no GUI needed | Advanced |
Method 1: iMovie (Free, Built-in)
iMovie handles basic speed changes with a two-click workflow. It supports constant speed (apply the same multiplier to the entire clip) and freeze frames, but does not offer variable speed ramps within a single clip.
Step 1: Open iMovie and Create a Project
Launch iMovie from Applications or Spotlight (Cmd + Space, type "iMovie"). Click Create New > Movie.
Step 2: Import Your Video
Click the Import Media button or drag your video file from Finder into the iMovie media browser. Once it appears, drag the clip down to the timeline.
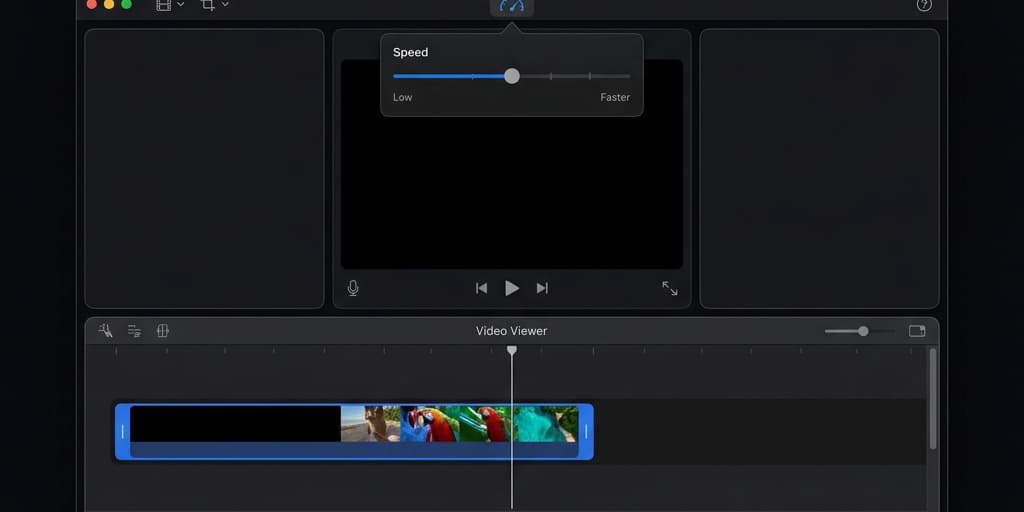
Step 3: Select the Clip and Open Speed Controls
Click the clip in the timeline to select it. Then click the Speed button in the toolbar above the viewer — it looks like a speedometer icon. A speed control bar appears above your clip in the timeline.
Step 4: Choose Speed Preset or Custom Value
In the speed dropdown, you will see options:
- Slow — 10%, 25%, or 50% of original speed
- Fast — 2x, 4x, 8x, or 20x original speed
- Custom — type any percentage you want
For a time-lapse of a long screen recording, try 8x or 20x. For slow-motion replay of a quick action, 25% or 50% works well.
Step 5: Preview and Fine-Tune
Press Space to play the clip. The viewer shows the adjusted speed in real time. If the audio sounds distorted at high speeds, check the Preserve Pitch checkbox in the speed controls — this keeps voices sounding natural even at 2x.
At very high speeds (8x and above), iMovie automatically mutes the audio. If you need audio at faster speeds, use Method 3 or 4 instead.
Step 6: Apply Speed to a Portion of the Clip (Optional)
If you only want to speed up one section — say, a loading screen in the middle of a tutorial — split the clip first. Move the playhead to the start of the boring section and press Cmd + B to split. Move to the end of that section and split again. Now select only the middle segment and apply the speed change. The rest of the video plays at normal speed.
Step 7: Export
Go to File > Share > File. Choose 1080p or 4K resolution, set Quality to High, and click Next. Name your file and save.
Important note on frame rate: When you slow down a clip in iMovie, it interpolates frames to fill the gap. If your original video was recorded at 30 fps, slowing to 50% gives you effectively 15 fps of unique frames — the rest are duplicated. For genuinely smooth slow motion, record at 60 fps or higher, then slow down in post.
Method 2: Screenify Studio
If you recorded your screen with Screenify Studio, you can adjust playback speed directly in the built-in editor without exporting and re-importing into a separate app. This keeps your workflow inside one tool — record, adjust speed, add annotations, and share.
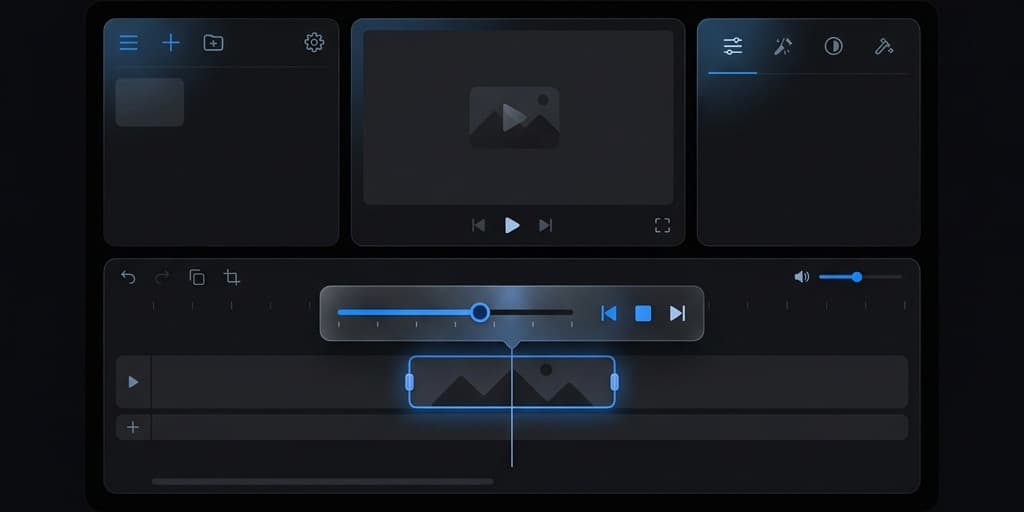
Step 1: Open Your Recording in the Editor
Click on any recording in your Screenify dashboard to open the editor. The timeline shows your full recording with audio tracks below.
Step 2: Select the Section to Adjust
Click and drag on the timeline to select the portion you want to speed up or slow down. To apply the change to the entire clip, select all (Cmd + A).
Step 3: Apply Speed Change
Open the Speed control in the editor toolbar. Drag the slider or type a specific value:
- 0.5x — half speed (slow motion)
- 1x — normal
- 2x — double speed
- 4x — quad speed (ideal for compressing install sequences or loading screens)
Screenify maintains audio pitch at 2x and below, so voiceovers remain intelligible when you speed up a slightly-too-slow tutorial.
Step 4: Preview and Export
Press Space to preview. The Metal-accelerated renderer on Apple Silicon shows the speed-adjusted preview in real time without dropped frames. When satisfied, click Export — choose MP4 or MOV, your target resolution, and hit Export.
This method is particularly useful for screen recording workflows where you have a 10-minute walkthrough but want to compress the repetitive parts (typing, waiting for builds, loading screens) into a tighter 3-minute video. Select each slow segment, apply 4x speed, and leave the important explanations at 1x.
Try Screenify Studio — free, unlimited recordings
Auto-zoom, AI captions, dynamic backgrounds, and Metal-accelerated export.
Method 3: DaVinci Resolve (Free, Professional-Grade)
DaVinci Resolve is a full professional editing and color grading suite — and the free version has no watermarks or major feature restrictions. Its standout speed feature is Retime Curves, which let you smoothly accelerate and decelerate within a single clip (speed ramping).
Step 1: Download and Install DaVinci Resolve
Download the free version from blackmagicdesign.com/products/davinciresolve. The installer is about 3 GB. Run it and follow the installation prompts. Launch Resolve after installation.
Step 2: Create a New Project and Import Media
On the Project Manager screen, click New Project, name it, and click Create. Switch to the Edit page (filmstrip icon at the bottom). In the Media Pool (top-left), right-click and select Import Media. Navigate to your video file and import it.
Step 3: Build the Timeline
Drag your clip from the Media Pool to the empty timeline area. Resolve automatically creates a timeline matching your clip's resolution and frame rate.
Step 4: Apply Constant Speed Change
Right-click the clip in the timeline and select Change Clip Speed. In the dialog:
- Enter a percentage: 200% for 2x speed, 50% for half speed
- Check Ripple Sequence if you want the timeline to close the gap when speeding up (or extend when slowing down)
- Click Change
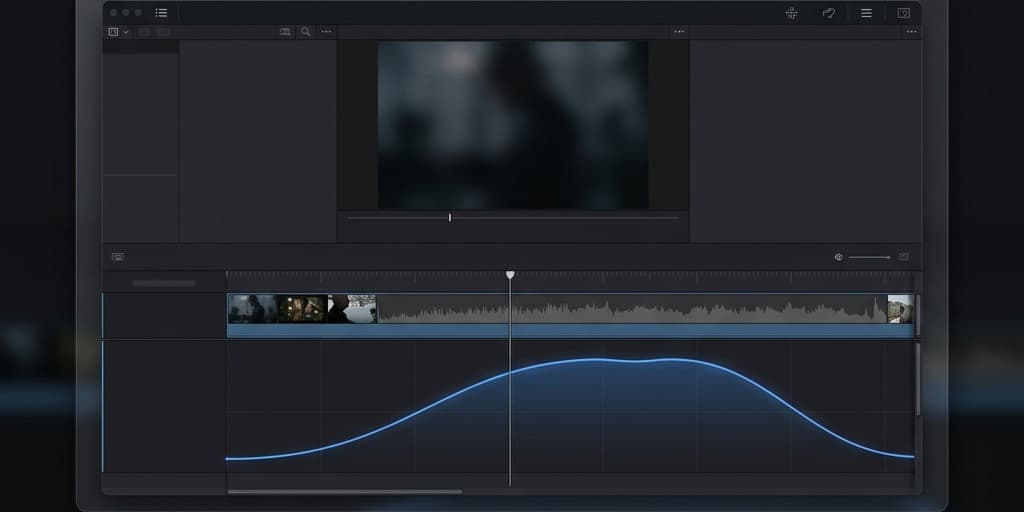
Step 5: Apply Variable Speed (Retime Curves)
For cinematic speed ramps — gradually slowing into a key moment, then ramping back to full speed:
- Right-click the clip and select Retime Controls. A speed bar appears above the clip.
- Move the playhead to where you want the speed change to begin. Click the small dropdown arrow on the speed bar and select Add Speed Point.
- Move the playhead to where you want the speed change to end and add another speed point.
- Click the percentage between the two speed points and change it (e.g., 25% for dramatic slow motion).
- For smooth transitions between speeds, right-click a speed point and select Retime Curve. In the curve editor below the timeline, drag the bezier handles to create a gradual ramp instead of an abrupt cut.
Step 6: Handle Audio
By default, Resolve pitch-corrects audio when changing speed. If you prefer the natural pitch shift (chipmunk effect at high speeds or deep voice at low speeds), right-click the clip, go to Clip Attributes > Audio, and uncheck Pitch Correction.
Step 7: Export
Switch to the Deliver page (rocket icon at the bottom). Choose a preset — YouTube (1080p) or Custom for specific settings. Click Add to Render Queue, then click Start Render.
Why choose Resolve over iMovie: Retime curves are the main advantage. If you need a smooth, cinematic slow-to-fast transition — common in product demos where you slow down at the key feature reveal — Resolve handles this elegantly. iMovie can only apply one constant speed per clip segment.
Method 4: FFmpeg (Free, Command Line)
FFmpeg is a command-line tool that processes video without a graphical interface. It is the fastest option for batch processing or scripting repetitive speed changes, and it produces no quality loss when used with the right settings.
Step 1: Install FFmpeg via Homebrew
Open Terminal (Cmd + Space, type "Terminal"). If you do not have Homebrew installed, install it first:
/bin/bash -c "$(curl -fsSL https://raw.githubusercontent.com/Homebrew/install/HEAD/install.sh)"Then install FFmpeg:
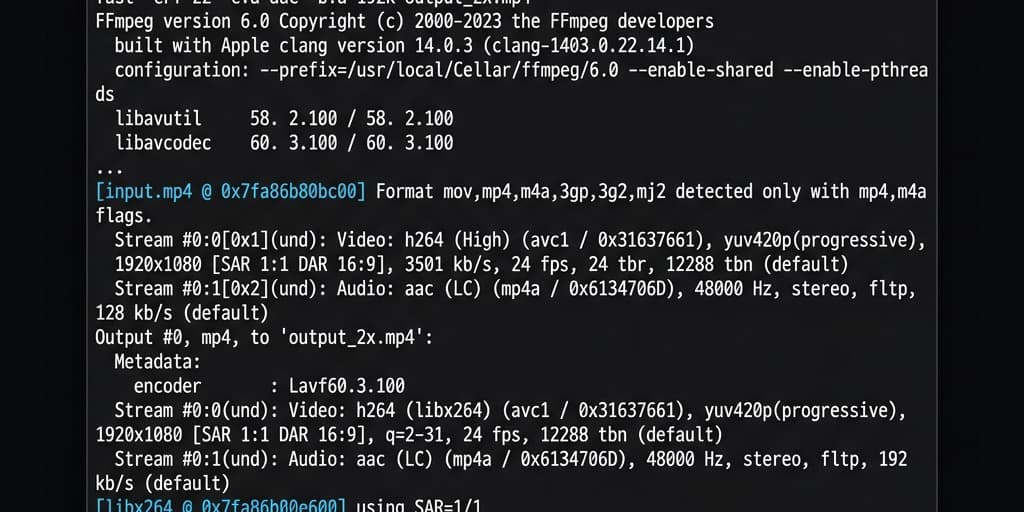
brew install ffmpegStep 2: Speed Up a Video (2x)
To double the playback speed of both video and audio:
ffmpeg -i input.mov -filter_complex "[0:v]setpts=0.5*PTS[v];[0:a]atempo=2.0[a]" -map "[v]" -map "[a]" output.mp4The setpts=0.5*PTS filter halves the presentation timestamp of each frame (making it play in half the time = 2x speed). The atempo=2.0 filter speeds up audio to match.
Step 3: Slow Down a Video (0.5x)
To play at half speed:
ffmpeg -i input.mov -filter_complex "[0:v]setpts=2.0*PTS[v];[0:a]atempo=0.5[a]" -map "[v]" -map "[a]" output.mp4setpts=2.0*PTS doubles each timestamp (half speed). atempo=0.5 slows the audio.
Step 4: Extreme Speed Changes (Beyond 2x)
The atempo filter only accepts values between 0.5 and 100.0 for a single instance. For 4x speed, chain two atempo filters:
ffmpeg -i input.mov -filter_complex "[0:v]setpts=0.25*PTS[v];[0:a]atempo=2.0,atempo=2.0[a]" -map "[v]" -map "[a]" output.mp4For speed changes without audio (common for time-lapses), drop the audio entirely:
ffmpeg -i input.mov -filter:v "setpts=0.05*PTS" -an output.mp4This creates a 20x time-lapse with no audio track.
Step 5: Batch Process Multiple Files
Create a simple shell script to speed up every .mov file in a folder:
for f in *.mov; do
  ffmpeg -i "$f" -filter_complex "[0:v]setpts=0.5*PTS[v];[0:a]atempo=2.0[a]" \
    -map "[v]" -map "[a]" "fast_${f%.mov}.mp4"
done
This outputs new files prefixed with fast_ in MP4 format.
When to use FFmpeg: Batch processing is the killer feature. If you have 20 screen recordings that all need to be sped up to 4x before uploading, a single shell command handles it in minutes. No clicking through menus, no project files, no GUI overhead.
Try Screenify Studio — free, unlimited recordings
Auto-zoom, AI captions, dynamic backgrounds, and Metal-accelerated export.
Troubleshooting
Slow-motion video looks choppy or stuttery
Your source video does not have enough frames. Slowing a 30 fps clip to 25% gives you only 7.5 unique frames per second — the rest are duplicated, causing visible stuttering. Solution: record at 60 fps (or 120 fps on newer Macs) if you plan to slow the footage down. In Screenify Studio, you can set the recording frame rate before capture. See our guide on screen recording on Mac for frame rate settings.
Audio pitch sounds wrong after speed change
In iMovie, check Preserve Pitch in the speed controls. In DaVinci Resolve, right-click the clip, go to Clip Attributes > Audio, and confirm pitch correction is enabled. In FFmpeg, the atempo filter preserves pitch by default — if you used asetrate instead, switch to atempo.
iMovie speed controls are grayed out
This happens when no clip is selected in the timeline. Click directly on the clip (it should highlight with a yellow border) before clicking the speed button. If the clip is part of a compound clip, double-click to enter it first, then select the individual clip inside.
Exported video has different duration than expected
When you speed up a clip, the total duration decreases proportionally. A 10-minute video at 2x becomes 5 minutes. If your exported file is not the expected length, check whether you accidentally applied the speed change to only a portion of the clip (especially common after splitting in iMovie). Select all segments and verify each one shows the correct speed in the toolbar.
Video plays at the wrong speed in some players but correct in others
This is a container metadata issue. Some players read the speed from the container headers rather than the actual frame timestamps. Re-encode with FFmpeg using -c:v libx264 to ensure frame timestamps are written correctly into the output container.
FFmpeg command produces a file with no video or no audio
Double-check your filter syntax. The most common error is a typo in the stream mapping. The -map "[v]" and -map "[a]" flags must exactly match the labels in your -filter_complex string. If your input file has no audio track (common with some screen recordings), remove the audio filter and -map "[a]" entirely to avoid the error.
FAQ
Q: What is the maximum speed you can apply in iMovie?
iMovie supports up to 20x speed. For anything faster, export from iMovie at 20x, then run the result through FFmpeg or DaVinci Resolve for an additional speed multiplier. Alternatively, use FFmpeg directly — it has no practical speed limit.
Q: Can I speed up just one section of a video and keep the rest normal?
Yes, in all four methods. In iMovie, split the clip with Cmd + B at the start and end of the section, then apply speed only to that segment. In DaVinci Resolve, use speed points in Retime Controls to isolate sections. In FFmpeg, use the -ss and -t flags to extract the section, speed it up, then concatenate the pieces.
Q: Does changing video speed affect quality?
Speeding up does not reduce quality — it simply drops frames from playback. Slowing down can reduce perceived quality because frames are duplicated (or interpolated). For the best slow-motion results, record at a high frame rate (60 fps or 120 fps) so that enough unique frames exist to fill the slowed-down timeline.
Q: How do I create a time-lapse from a long screen recording?
Apply a high speed multiplier. For a 1-hour recording compressed into 1 minute, you need 60x speed. In FFmpeg: ffmpeg -i input.mov -filter:v "setpts=PTS/60" -an output.mp4. In DaVinci Resolve, set clip speed to 6000%. iMovie maxes out at 20x, so you would need two passes or a different tool for extreme time-lapses.
Q: Will the audio still be usable after speeding up a video?
At 2x with pitch preservation, speech is still understandable — podcasts and audiobooks are commonly consumed at this speed. At 4x, speech becomes difficult to follow but music remains recognizable. Above 4x, audio is typically unusable and you should consider removing it (replace with background music or narrate a voiceover afterward). Our guide on adding music to video covers how to add a fresh audio track.
Q: How do I slow down a video to create a dramatic replay effect?
Record the original at 60 fps or higher. Import into DaVinci Resolve, apply 25% speed using Retime Controls, and add a speed ramp so the video gradually decelerates into the slow-motion section. This creates the cinematic "ramp" effect seen in product reveals and sports replays.
Q: Can I change video speed on Mac without any app installation?
Yes — iMovie is pre-installed on all Macs sold since 2011. Open it, import your video, use the speed controls, and export. No download, no account creation, no internet connection required.
Q: What frame rate should I record at if I plan to slow down the footage?
Record at 2x your target playback frame rate at minimum. If your final video will be 30 fps and you want 50% slow motion, record at 60 fps. For 25% slow motion (one-quarter speed), record at 120 fps. Most Macs support 60 fps screen recording natively — check out how to screen record with audio on Mac for setup details.
Related Guides
Working on more Mac video projects? These guides cover related workflows:
- How to Screen Record on Mac — capture your screen at the right resolution and frame rate
- How to Screen Record for TikTok — vertical screen recordings optimized for short-form video
- How to Add Music to a Video on Mac — replace audio after speed changes
Try Screenify Studio
Record your screen with auto-zoom, AI captions, dynamic backgrounds, and Metal-accelerated export. Free plan, unlimited recordings.
Download Free


