How to Reduce Video File Size on Mac
4 proven methods to compress video on Mac without destroying quality — QuickTime, Screenify, HandBrake, and Compressor compared.
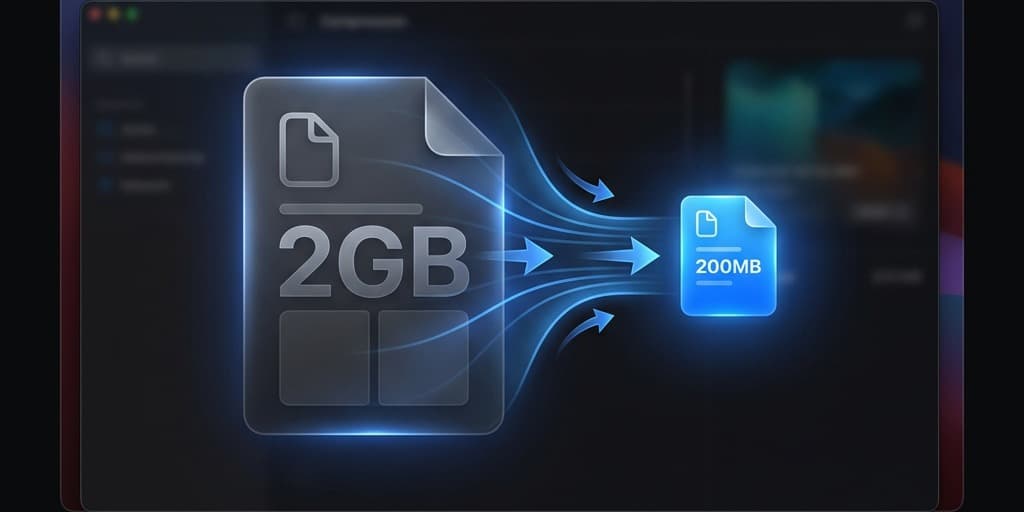
A 10-minute screen recording at Retina resolution can easily hit 2 GB. Email rejects it. Slack chokes on it. Google Drive upload crawls. You need the file smaller, but re-recording at lower quality wastes time you already spent.
macOS has multiple ways to shrink video files — from built-in tools that require zero downloads to dedicated encoders that squeeze every unnecessary byte. The right choice depends on how much compression you need and whether you can tolerate any quality loss.
Quick Comparison
| Tool | Price | Codec Support | Batch Processing | Difficulty |
|---|---|---|---|---|
| QuickTime Player | Free (built-in) | H.264 only | No | Easy |
| Screenify Studio | Free / Pro $9.99/mo | HEVC (H.265), H.264 | No | Easy |
| HandBrake | Free (open-source) | H.264, H.265, VP9, AV1 | Yes | Moderate |
| Apple Compressor | $49.99 one-time | H.264, H.265, ProRes | Yes | Moderate |
Method 1: QuickTime Player (Built-in)
QuickTime Player includes a basic export function that re-encodes your video at a lower resolution. No installation required — it ships with every Mac.
Steps
- Open Finder and right-click your video file
- Select Open With > QuickTime Player
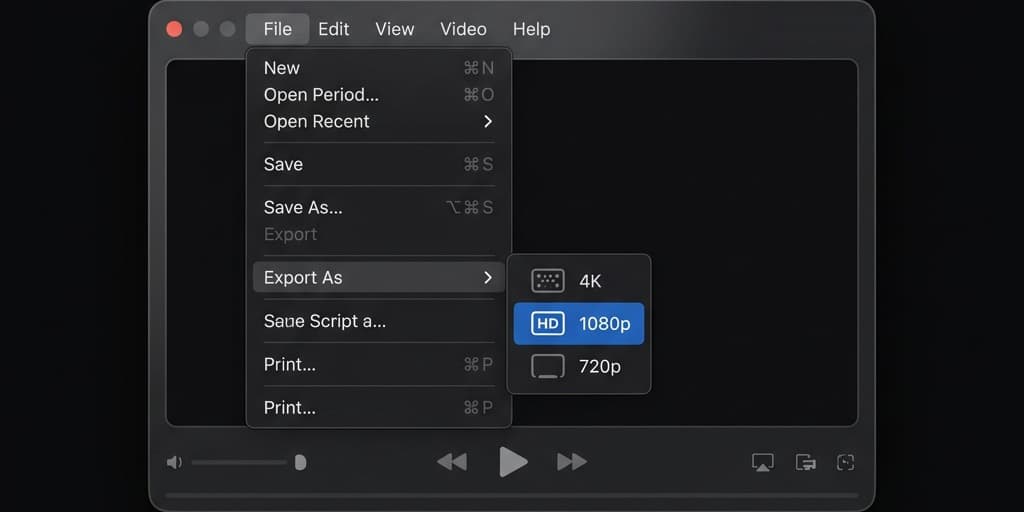
- Once the video loads, go to the menu bar and click File > Export As
- You'll see resolution options:
- 4K (2160p) — minimal reduction, best for archiving
- 1080p — good balance of quality and size for most screen recordings
- 720p — significant reduction, suitable for quick demos shared over chat
- 480p — smallest file, noticeable quality loss on detailed UI recordings
- Choose a resolution. A save dialog appears — pick your destination folder and file name
- Click Save. QuickTime re-encodes the video as an H.264
.movfile - Wait for the export to finish. A progress bar appears in the title bar. A 2 GB source file exported at 720p typically drops to 200-400 MB
What to expect
QuickTime's export is straightforward but limited. You cannot adjust bitrate, choose a codec, or keep the original resolution while increasing compression. The only lever is resolution — lower resolution means smaller file. For screen recordings where text readability matters, dropping below 1080p can make UI elements hard to read.
Checking file size before and after
Right-click the original file in Finder and select Get Info (or press ⌘ + I) to see the file size. Do the same with the exported file to verify the reduction. You can also see the video's codec and resolution under More Info in the Get Info window -- useful for understanding why a file is large in the first place.
When to use this
Quick one-off compressions where you need a smaller file in under a minute and don't care about fine-tuning the output. Works well for sharing a clip in Slack or attaching to a support ticket.
Method 2: Screenify Studio — HEVC Export
Screenify Studio records your screen and exports using HEVC (H.265), which produces files 30-50% smaller than H.264 at the same visual quality. If your original recording was made in Screenify, re-exporting with adjusted settings gives you the smallest file without a separate compression step.
Steps
- Open Screenify Studio and locate your recording in the library
- Click the recording to open the editor
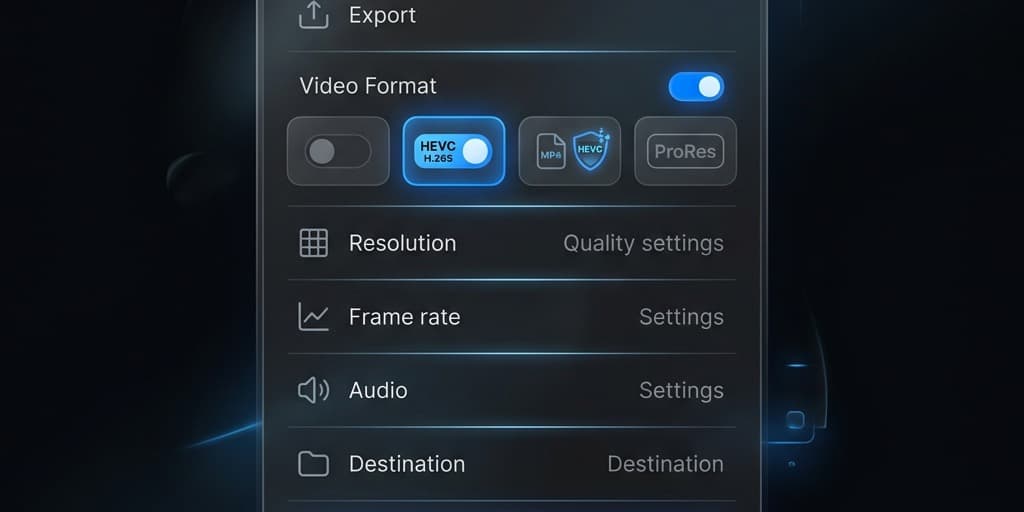
- In the export panel on the right side, check the current settings:
- Codec: select HEVC (H.265) — this is the single biggest factor for file size reduction
- Resolution: choose your target. Exporting a 4K recording at 1080p with HEVC can reduce file size by 70-80%
- Frame rate: if your recording is 60fps but the content is a static UI walkthrough, dropping to 30fps halves the temporal data
- Click Export
- Screenify uses Apple's Metal-accelerated encoder on Apple Silicon, so a 10-minute recording typically exports in under 60 seconds
Why HEVC matters for screen recordings
Screen recordings contain large areas of static pixels — toolbars, backgrounds, sidebars that don't change frame to frame. HEVC handles these static regions more efficiently than H.264 by using larger coding tree units (up to 64x64 pixels vs H.264's 16x16 macroblocks). For typical screen content, this means HEVC produces visibly identical output at roughly half the bitrate.
Compressing an existing video (not recorded in Screenify)
If you have a .mov or .mp4 from another source, you can import it into Screenify Studio and re-export with HEVC settings. Drag the file onto the Screenify window or use File > Import Video. The same export panel applies — select HEVC, set your resolution, and export.
Try Screenify Studio — free, unlimited recordings
Auto-zoom, AI captions, dynamic backgrounds, and Metal-accelerated export.
Method 3: HandBrake (Free, Open-Source)
HandBrake is the go-to free video encoder on macOS. It gives you full control over codec, bitrate, resolution, and dozens of encoding parameters. The trade-off is a steeper learning curve — but the presets handle 90% of use cases.
Installation
- Go to handbrake.fr
- Download the macOS version (universal binary for Intel and Apple Silicon)
- Open the
.dmg, drag HandBrake to your Applications folder - On first launch, macOS may show a Gatekeeper warning — click Open to proceed
Steps for basic compression
- Launch HandBrake
- It immediately prompts you to select a source. Drag your video file onto the window, or click Open Source and navigate to the file
- Under the Summary tab, verify the output format is MP4 (or MKV if you prefer)
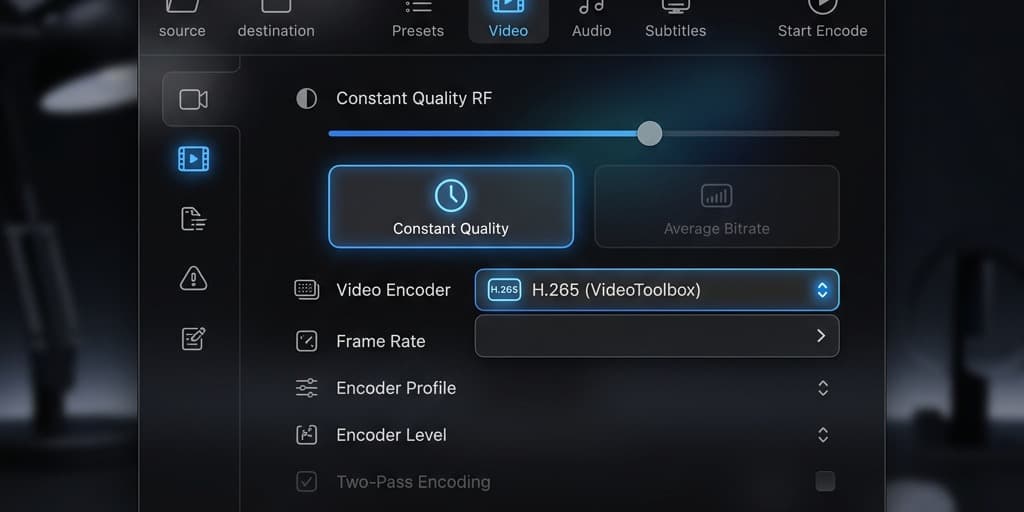
- Go to the Video tab. This is where compression happens:
- Video Encoder: select H.265 (VideoToolbox) to use hardware acceleration on Apple Silicon. Falls back to software encoding on Intel Macs — slower but same output
- Quality: the Constant Quality (RF) slider controls compression. Lower RF = higher quality, larger file. For screen recordings:
- RF 20-22 — visually lossless for screen content, good default
- RF 24-26 — noticeable softening on fine text, but 40-60% smaller than RF 20
- RF 28+ — aggressive compression, artifacts visible on detailed UI
- Framerate: set to Same as source unless you want to reduce fps
- Go to the Dimensions tab if you want to downscale resolution. Set Width to your target (e.g., 1920 for 1080p). Height auto-calculates to maintain aspect ratio
- Click Browse at the bottom to choose your output destination and file name
- Click the green Start button in the toolbar
- The encoding progress shows at the bottom. A 2 GB, 10-minute 4K file at RF 22 with H.265 typically compresses to 300-600 MB
Batch processing
HandBrake supports queuing multiple files. After setting up one file, click Add to Queue instead of Start. Then open another source, configure it, and add it to the queue. Click Start Queue to process all files sequentially.
Recommended presets for screen recordings
HandBrake ships with presets, but none are optimized for screen content. Create a custom preset:
- Set Video Encoder to H.265 (VideoToolbox)
- Quality RF to 22
- Framerate to 30fps (sufficient for most screen content)
- Under Dimensions, leave at source resolution
- Click Presets > Save New Preset, name it "Screen Recording Compression"
Understanding RF values for different content types
The RF (Rate Factor) scale is not linear -- each increment of 1 roughly doubles the compression ratio. Here is a practical reference for screen recordings:
- Tutorials with code or terminal output: RF 18-20. Small monospaced text needs high fidelity to remain readable after compression.
- Slide presentations and Keynote recordings: RF 22-24. Large text and simple graphics tolerate more compression without visible degradation.
- App demos with mixed content: RF 20-22. A balanced setting that preserves both text and UI animations.
- Gameplay or high-motion screen content: RF 18-20. Fast motion generates more complex inter-frame differences that need higher bitrates.
If you are unsure, start at RF 22 and encode a 30-second sample. Check text readability at 100% zoom. Adjust up or down by 2 and re-encode until you find the sweet spot for your content.
Method 4: Apple Compressor
Apple Compressor ($49.99 on the Mac App Store) is Apple's professional encoding tool. It integrates tightly with Final Cut Pro but works standalone for batch compression jobs.
Steps
- Open Compressor from your Applications folder
- Click Add File in the center area, or drag your video onto the batch area
- In the Settings panel on the left, browse to a compression preset:
- Apple Devices > Apple Devices HD (Best Quality) — H.264, good compatibility
- Apple Devices > Apple Devices HD (HEVC) — H.265, smaller files
- Or create a custom setting: click Add (+) at the bottom of the Settings panel, choose MPEG-4, then configure the Video tab with H.265 codec and your desired data rate
- Drag your chosen preset onto the file in the batch area
- Set the output location by clicking the Location dropdown below the file
- Click Start Batch in the bottom-right corner
- Compressor shows a progress bar. It uses hardware acceleration on Apple Silicon for H.264 and H.265 encoding
Custom bitrate targeting
Unlike HandBrake's quality-based encoding, Compressor lets you set an exact target bitrate. For screen recordings:
- 1080p screen content at 30fps: 2-4 Mbps H.265 produces clean results
- 4K screen content at 30fps: 6-10 Mbps H.265 balances quality and size
- 4K screen content at 60fps: 10-15 Mbps H.265
Setting a target bitrate gives you predictable file sizes — useful when you need to hit a specific upload limit.
Droplet workflow for repeated compression
Compressor lets you create Droplets -- standalone apps that apply a preset when you drag files onto them. To create one:
- Configure your compression setting (codec, bitrate, resolution)
- Go to File > Create Droplet
- Save the Droplet to your Desktop or Dock
- Next time you need to compress a file, drag it onto the Droplet icon. Compressor launches automatically and starts processing with your saved settings
This eliminates the manual setup for repeated compression tasks -- useful if you compress screen recordings regularly before sharing them.
When to use Compressor
Compressor makes sense if you already own it through Final Cut Pro, need exact bitrate control, or regularly process batches of videos with consistent settings. For occasional one-off compression, HandBrake does the same job for free.
Troubleshooting
Exported file is barely smaller than the original
The source video may already be heavily compressed. Re-encoding an H.264 file at the same resolution and similar quality won't shrink it much — the encoder can't find redundancy that the original encoder already removed. Your options: reduce resolution, switch to HEVC (if the source is H.264), or lower the quality setting.
Text looks blurry after compression
Screen recordings rely on sharp pixel edges for text readability. Aggressive compression (RF 26+ in HandBrake, or 720p export from QuickTime) smooths those edges. Stay at RF 20-22 for H.265 and keep resolution at 1080p or above if the recording contains small text.
HandBrake H.265 encoding is extremely slow
If you're on an Intel Mac without VideoToolbox H.265 support, HandBrake falls back to software encoding, which can be 5-10x slower. Check if H.265 (VideoToolbox) appears in the encoder dropdown. If it does, select it. If it doesn't, your hardware doesn't support hardware H.265 encoding — stick with H.264 (VideoToolbox) for hardware-accelerated encoding, which is faster at the cost of slightly larger files.
QuickTime export creates a larger file than the original
This happens when you export at the same or higher resolution as a file that was already efficiently compressed (e.g., an H.265 source). QuickTime exports as H.264, which at the same resolution may produce a larger file. Use HandBrake or Screenify with HEVC instead.
macOS says the compressed file "cannot be played"
Some older macOS versions and apps don't support HEVC playback. Ensure you're on macOS High Sierra (10.13) or later for native HEVC support. If you're sharing the file externally and aren't sure about the recipient's setup, export as H.264 for maximum compatibility.
Try Screenify Studio — free, unlimited recordings
Auto-zoom, AI captions, dynamic backgrounds, and Metal-accelerated export.
FAQ
Q: What's the best video codec for compressing screen recordings on Mac?
HEVC (H.265) produces the smallest files for screen content while preserving text sharpness. It's supported on all Macs from 2017 onward and plays natively in macOS. Use H.264 only if you need compatibility with older devices or web platforms that don't support HEVC.
Q: How much can I reduce a video file size without losing quality?
Switching from H.264 to HEVC at the same resolution typically cuts file size by 30-50% with no visible quality loss. Dropping resolution from 4K to 1080p removes another 50-70%. Combined, you can often reduce a 2 GB file to 200-400 MB while keeping the video sharp enough for screen content.
Q: Does reducing resolution affect text readability in screen recordings?
Yes. Screen recordings contain small UI text, icons, and interface elements that degrade faster than natural video when downscaled. Keep resolution at 1080p or higher if the recording includes code editors, spreadsheets, or any interface with small text. For presentations or large-text content, 720p is usually acceptable.
Q: Can I compress a video without re-encoding it?
Not in a way that significantly reduces file size. Lossless operations like remuxing (changing the container from .mov to .mp4) save minimal space. Meaningful compression requires re-encoding, which means the video is decoded and re-encoded with tighter compression settings. The good news: modern hardware encoders make this fast — a 10-minute clip re-encodes in under a minute on Apple Silicon.
Q: What's the difference between constant quality (CRF/RF) and constant bitrate?
Constant quality allocates more bits to complex frames and fewer to simple ones, maintaining consistent visual quality throughout. Constant bitrate forces the same data rate regardless of content complexity, which can waste bits on simple frames or starve complex ones. For screen recordings — which mix static UI with occasional fast scrolling — constant quality (RF 20-22 in HandBrake) usually produces better results at smaller file sizes.
Q: Why is my .mov file so much larger than .mp4?
The container format (.mov vs .mp4) itself barely affects file size. The difference comes from the codec and settings used during recording. macOS Screenshot toolbar records in H.264 inside a .mov container at a high bitrate. Re-encoding that file with H.265 inside an .mp4 container at a lower bitrate is what actually reduces the size — not the container change.
Q: How do I compress video for email attachment on Mac?
Most email providers cap attachments at 25 MB. For a short screen recording, export at 720p H.265 using HandBrake (RF 24) or Screenify Studio. For longer recordings, you'll likely need to share via a link instead — upload to Screenify Studio's sharing platform, Google Drive, or Dropbox and paste the link in your email.
Q: Is there a way to batch compress multiple videos at once on Mac?
HandBrake and Apple Compressor both support batch processing. In HandBrake, configure your settings, click Add to Queue, open the next file, and repeat. In Compressor, drag multiple files into the batch area and apply the same preset to all of them. QuickTime and Screenify handle one file at a time.
Related Guides
- How to Screen Record on Mac — capture your screen with the right settings from the start
- How to Record Screen in 4K on Mac — recording at 4K and compressing afterward vs recording at lower resolution
- How to Screen Record on Mac with Audio — capture system audio alongside your screen recording
Try Screenify Studio
Record your screen with auto-zoom, AI captions, dynamic backgrounds, and Metal-accelerated export. Free plan, unlimited recordings.
Download Free


