How to Add Music to a Video on Mac
Four proven methods to add background music to any video on Mac — using iMovie, Screenify Studio, GarageBand, and Final Cut Pro.

A screen recording without audio feels flat. A tutorial with dead silence loses viewers within seconds. Whether you captured a product walkthrough, a gaming clip, or a presentation recording, adding background music transforms the viewing experience — it sets the pacing, fills awkward gaps, and keeps your audience engaged from start to finish.
Mac users have several solid options for adding music to video, ranging from free built-in apps to professional editing suites. Below, you will find four methods with full step-by-step instructions, plus troubleshooting for the most common audio-sync and export issues.
Quick Comparison
| Tool | Price | Key Feature | Difficulty |
|---|---|---|---|
| iMovie | Free (pre-installed) | Built-in royalty-free soundtrack library | Beginner |
| Screenify Studio | Free plan available | Add music during or after recording | Beginner |
| GarageBand + iMovie | Free (pre-installed) | Full audio mixing before video import | Intermediate |
| Final Cut Pro | $299.99 one-time | Multi-track audio with keyframe volume control | Advanced |
Method 1: iMovie (Free, Built-in)
iMovie ships with every Mac and includes a library of royalty-free soundtracks that automatically adjust to your video length. This is the fastest path if you need background music and nothing else.
Step 1: Open iMovie and Create a New Project
Launch iMovie from your Applications folder or Spotlight (press Cmd + Space, type "iMovie", hit Return). Click Create New in the Projects view, then select Movie.
Step 2: Import Your Video
Click the Import Media button (downward arrow icon) in the media browser, or drag your video file directly from Finder into the iMovie media area. Once imported, drag the clip down to the timeline at the bottom of the screen.
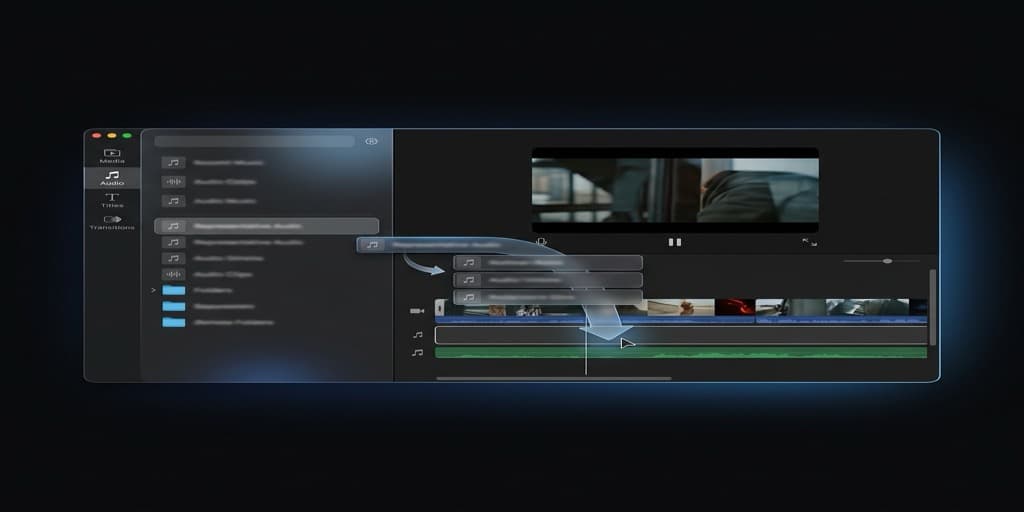
Step 3: Browse the Built-in Soundtrack Library
Click Audio in the top toolbar. In the sidebar, select Sound Effects to see Apple's bundled audio, or choose Music to browse your Apple Music / local iTunes library. Use the search bar to filter by mood — terms like "upbeat", "calm", or "cinematic" work well.
Step 4: Add Music to the Timeline
Drag your chosen audio track to the timeline, positioning it below the video track. iMovie displays it as a green bar. You can drag the edges to trim it, or reposition the entire clip by dragging it left or right along the timeline.
Step 5: Adjust Volume and Fade
Click the audio clip in the timeline to select it. A horizontal volume line appears — drag it up or down to set the level. For a smooth intro, hover near the beginning of the audio clip until you see a fade handle (small dot), then drag it to the right to create a fade-in. Repeat at the end for a fade-out.
Step 6: Export
Go to File > Share > File (or click the share icon in the top-right corner). Choose your resolution (1080p is standard for most uses), set Quality to High, and click Next. Name your file, pick a save location, and click Save.
Tip: If you are using a song from Apple Music, be aware that DRM-protected tracks cannot be added to iMovie. Use royalty-free music from the Sound Effects library or import an unprotected audio file (.mp3, .m4a, .wav).
Method 2: Screenify Studio
Screenify Studio lets you attach background music at the point of recording or add it afterward in the built-in editor — no separate app needed. This is especially useful when you are already recording your screen and want to ship a polished video without round-tripping through iMovie.
Step 1: Record or Import Your Video
Open Screenify Studio and either start a new screen recording or import an existing video file into your library via the dashboard.
Step 2: Open the Editor
Click on the recording thumbnail in your dashboard to open the editor. The timeline appears at the bottom with your video and any captured system/mic audio.
Step 3: Add a Music Track
Click the Audio tab in the editor sidebar. You can drag in an audio file from Finder, or choose from the curated royalty-free music library built into Screenify. The track appears on a separate audio lane below your recording.
Step 4: Trim and Adjust Volume
Drag the edges of the music clip to trim it to the desired length. Use the volume slider to balance the music against your voiceover or system audio. Screenify supports independent volume control per track, so your narration stays clear while the music fills the background.
Step 5: Export with Metal-Accelerated Rendering
Click Export. Screenify uses Metal hardware acceleration on Apple Silicon Macs, so even 4K exports finish quickly. Choose your format (MP4 or MOV), resolution, and frame rate, then hit Export.
Because Screenify handles recording, editing, and sharing in one app, you skip the export-import cycle that iMovie requires. Record your screen, drop in a music track, adjust levels, and share — all from one window.
Try Screenify Studio — free, unlimited recordings
Auto-zoom, AI captions, dynamic backgrounds, and Metal-accelerated export.
Method 3: GarageBand + iMovie (Free, Advanced Audio Control)
If you need more control over the audio — mixing multiple tracks, adjusting EQ, or layering sound effects — GarageBand gives you a full digital audio workstation for free. You prepare the audio mix in GarageBand, export it, and combine it with video in iMovie.
Step 1: Open GarageBand and Create an Empty Project
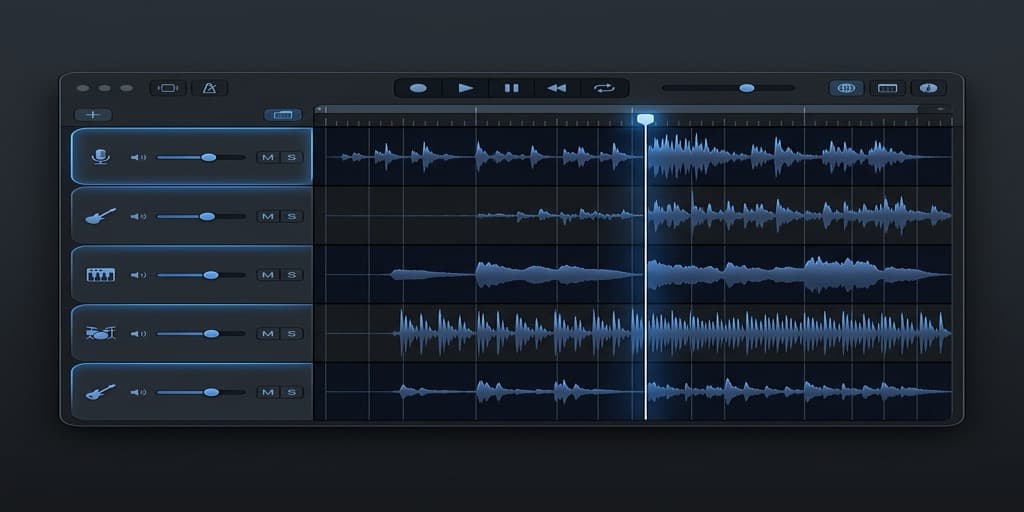
Launch GarageBand, select Empty Project, and choose Audio as the track type (microphone icon). Click Create.
Step 2: Import Your Music File
Drag your music file (.mp3, .wav, .m4a) from Finder directly onto the GarageBand timeline. It appears as an audio region on Track 1.
Step 3: Add Additional Audio Layers (Optional)
Click the + button in the track header area to add more tracks. You can layer a second music track for transitions, add sound effects, or import your voiceover recording. Each track has independent volume, pan, and EQ controls in the Smart Controls panel (View > Show Smart Controls or press B).
Step 4: Trim, Fade, and Mix
Use the playhead to navigate. Select an audio region and press T to split it at the playhead. To create fades, select the region, go to Mix > Fade Out (or use the automation lane: A key, then draw volume curves). Adjust track volumes so that background music sits around -12 to -18 dB below any narration.
Step 5: Export the Mixed Audio
Go to Share > Export Song to Disk. Choose AAC or AIFF format, set quality to Highest, and save the file.
Step 6: Combine in iMovie
Open iMovie, create a new Movie project, import your video, and drag it to the timeline. Then import the audio file you just exported from GarageBand and place it below the video track. Adjust timing if needed, then export via File > Share > File.
This two-app workflow takes longer than Method 1 or 2, but gives you professional-grade audio mixing without spending a dollar.
When GarageBand Makes Sense Over iMovie Alone
The GarageBand detour is worth it in three specific scenarios. First, when you need to loop a short music clip to cover a longer video — GarageBand's loop region (C key) repeats a section seamlessly, whereas iMovie requires you to manually duplicate and align clips. Second, when you want to layer ambient sound (rain, office noise, crowd chatter) under the music to create a richer audio bed. Third, when you are mixing audio for multiple videos in a series and want consistent levels across all of them — GarageBand's master track compressor and limiter ensure uniform loudness without re-adjusting every clip by hand.
Try Screenify Studio — free, unlimited recordings
Auto-zoom, AI captions, dynamic backgrounds, and Metal-accelerated export.
Method 4: Final Cut Pro ($299.99)
Final Cut Pro is Apple's professional video editor. If you already own it — or plan to do heavy video production — its audio tools are far more capable than iMovie's.
Step 1: Create a New Project
Open Final Cut Pro. Go to File > New > Project (or press Cmd + N). Name your project, set the resolution and frame rate to match your video, and click OK.
Step 2: Import Video and Audio
Press Cmd + I to open the Import window. Navigate to your video file and your music file, select both, and click Import Selected. They appear in the browser panel.
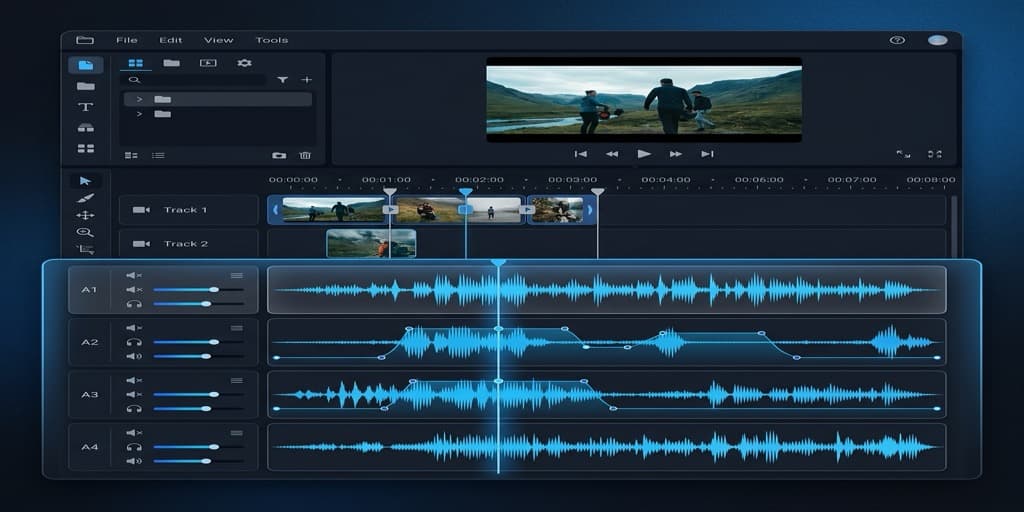
Step 3: Build the Timeline
Drag your video to the timeline first. Then drag the music file below it — Final Cut Pro places it on a connected audio storyline. You can have unlimited audio tracks stacked vertically.
Step 4: Fine-Tune with Keyframe Volume Control
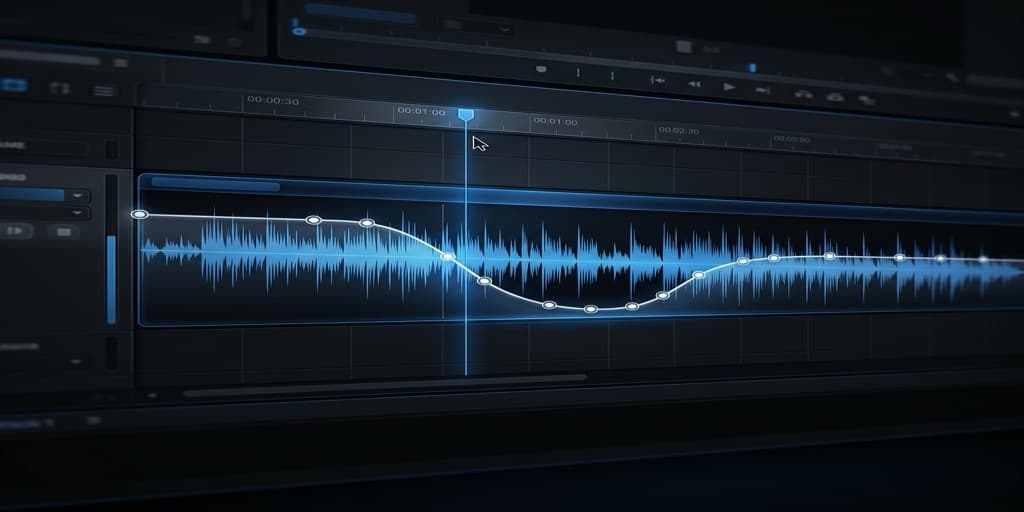
Select the audio clip in the timeline. Press Ctrl + V to toggle volume keyframes. Click on the horizontal volume line at different points to create keyframe nodes, then drag each node up or down. This lets you duck the music under speech segments and bring it back up during visual-only sections.
Step 5: Use the Built-in Audio Enhancements
With the audio clip selected, open the Audio Inspector (top-right panel). Use the Loudness slider to normalize levels, apply the Background Noise Removal to clean up any hiss, or add an EQ effect from the Effects browser to shape the music tone (e.g., rolling off bass so it does not compete with a voiceover).
Step 6: Export
Go to File > Share > Master File (or press Cmd + E). Set format to Computer (H.264) for web, or Apple ProRes for maximum quality. Click Next, name the file, and export.
Tip: Final Cut Pro supports Dolby Atmos spatial audio. If you are producing content for Apple TV or Apple Music, you can mix in immersive surround directly in the timeline.
Troubleshooting
Music and video are out of sync after export
This usually happens when the music file has a different sample rate than the project. Before importing audio, verify the sample rate in Finder: right-click the audio file, select Get Info, and check the sample rate under More Info. Set your project to match (48 kHz is standard for video). In iMovie, this is handled automatically, but Final Cut Pro and GarageBand let you configure it in project settings.
Audio clips in iMovie only show as grayed-out and cannot be dragged
The file is likely DRM-protected (common with Apple Music streaming tracks). You need a DRM-free file. Use royalty-free music libraries like Pixabay Music, Free Music Archive, or the built-in iMovie Sound Effects library.
Exported video has no audio at all
Check that the audio track is not muted. In iMovie, click the audio clip and make sure the volume line is not dragged all the way down. In Final Cut Pro, check the track visibility (the speaker icon in the timeline index). Also verify your export settings include audio — in Final Cut Pro's share dialog, ensure the Audio checkbox is ticked.
iMovie shows "Protected Content" error when importing audio
Some audio files downloaded from streaming services carry DRM encryption that iMovie cannot decode. Convert the file to an unprotected format first, or source your music from royalty-free libraries that distribute DRM-free downloads.
Music is too loud and drowns out voiceover
A common mixing mistake. As a rule of thumb, background music should be 12-18 dB below your voice track. In iMovie, click the music clip and drag the volume line down to around 15-20%. In Final Cut Pro, use keyframe ducking: lower the music volume during speech, raise it during pauses.
Exported file size is unexpectedly large
If you exported from GarageBand as AIFF (uncompressed) and imported that into iMovie, the final export will be larger. Re-export the audio from GarageBand as AAC (compressed) instead, or use H.264 compression in your final video export settings.
FAQ
Q: Can I add music to a video on Mac without downloading any software?
Yes. iMovie comes pre-installed on every Mac and includes a royalty-free soundtrack library. Open iMovie, import your video, browse the Audio tab for built-in sound effects and jingles, drag one to the timeline, and export.
Q: Where can I find royalty-free music for my videos?
Several free libraries exist: Pixabay Music, Free Music Archive, YouTube Audio Library (free with attribution), and Uppbeat (free tier). For built-in options, iMovie's Sound Effects library and GarageBand's Apple Loops are both royalty-free and pre-installed on your Mac.
Q: How do I lower background music volume during voiceover sections?
This technique is called "audio ducking." In iMovie, you can manually lower the volume line on the music clip. In Final Cut Pro, use volume keyframes (Ctrl + V) to draw precise volume curves — lower the music where speech occurs, raise it during pauses. In Screenify Studio, adjust individual track volumes in the editor.
Q: Can I add music to a screen recording?
Absolutely. Screen recordings are standard video files (MOV or MP4). Import them into any of the four tools above and add music the same way. If you use Screenify Studio, you can add music directly in the built-in editor without exporting first. See our guide on how to screen record on Mac for recording tips.
Q: Will adding music increase my video file size significantly?
A compressed audio track (AAC/MP3) adds very little — typically 1-3 MB per minute of music at 256 kbps. The video stream still dominates the file size. If your final export is unexpectedly large, check your video codec settings (H.264 at High quality is a good balance).
Q: How do I sync music to specific moments in my video?
In iMovie, split the music clip at the playhead (Cmd + B) to break it into segments you can reposition independently. In Final Cut Pro, use markers (M key) to tag beat points in your music and snap video cuts to those markers. GarageBand's grid view also lets you align audio edits to a beat grid.
Q: Can I use Apple Music songs in my videos?
Apple Music tracks are DRM-protected and cannot be imported into iMovie or Final Cut Pro. You need to own the track outright (purchased from iTunes Store as DRM-free AAC) or use royalty-free alternatives. Using copyrighted music in published videos also risks DMCA takedowns on YouTube and social platforms.
Q: How do I add multiple music tracks with different volumes to one video?
iMovie supports only one background audio track at a time (plus the video's own audio). To layer multiple music tracks — for example, an intro jingle that crossfades into a longer background loop — use GarageBand to pre-mix the audio (Method 3) or use Final Cut Pro, which supports unlimited connected audio storylines. In Final Cut Pro, each storyline has independent volume controls, making it straightforward to crossfade between tracks using keyframe automation.
Q: What audio format should I use when adding music to video?
For best compatibility, use AAC (.m4a) or WAV (.wav). AAC offers good quality at small file sizes and is natively supported across all Mac apps. WAV is uncompressed and preferred when you need maximum audio fidelity during editing. Avoid MP3 if possible — it is supported but introduces slight quality loss compared to AAC at the same bitrate.
Related Guides
Looking for more Mac video workflows? Check out these guides:
- How to Screen Record on Mac — capture your screen with system audio and microphone
- How to Screen Record on Mac with Audio — solve the common "no audio in recording" problem
- How to Screen Record for YouTube — optimize resolution, frame rate, and export settings for YouTube uploads
Try Screenify Studio
Record your screen with auto-zoom, AI captions, dynamic backgrounds, and Metal-accelerated export. Free plan, unlimited recordings.
Download Free


