How to Crop a Video on Mac
Step-by-step guide to crop videos on Mac using iMovie, Screenify Studio, DaVinci Resolve, and FFmpeg. Free methods included.

Cropping removes unwanted areas around the edges of a video frame — a cluttered desktop, a notification bar, or empty space that distracts from the actual content. Unlike trimming (which shortens duration), cropping changes the visible area of every frame throughout the entire clip. Maybe you recorded your full 27-inch display but only need the browser window. Or you captured a 16:9 screen recording that needs to become a 9:16 vertical clip for TikTok. macOS does not have a single obvious "crop video" button, but several free tools handle it well.
Here are four approaches from simplest to most powerful.
| Tool | Price | Key Feature | Difficulty |
|---|---|---|---|
| iMovie | Free (App Store) | Crop to Fill with visual preview | Beginner |
| Screenify Studio | Free plan available | Auto-zoom crops to cursor region automatically | Beginner |
| DaVinci Resolve | Free edition available | Pixel-precise crop with Inspector controls | Intermediate |
| FFmpeg | Free (open-source) | Scriptable crop filter, no GUI required | Advanced |
Method 1: iMovie (Free, Built-In)
iMovie is the most accessible option for users who prefer a visual interface. It ships free from the Mac App Store and offers a Crop to Fill tool that works without any command-line knowledge. If your goal is to crop a 16:9 video to a tighter 16:9 frame (removing edges while keeping the same aspect ratio), iMovie handles it cleanly.
Steps
-
Open iMovie and create a new project. From the Projects tab, click Create New > Movie. Give the project a name or leave the default.
-
Import your video. Click the Import Media button (down-arrow icon at the top of the media browser) or press Cmd + I. Select your file and click Import Selected. iMovie copies the file into its library — the original remains unchanged in Finder.
-
Drag the clip to the timeline at the bottom of the screen. The full duration appears as a filmstrip bar.
-
Select the clip in the timeline so it is highlighted with a yellow border.
-
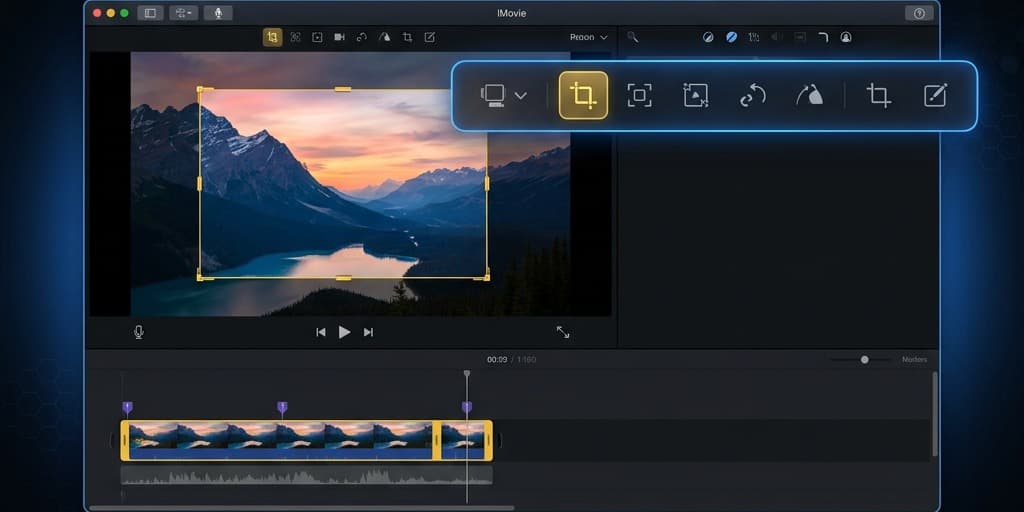
Open the crop controls. In the viewer toolbar (above the preview window), click the Cropping button — it looks like two overlapping right angles forming a square. If you do not see it, make sure you have a clip selected in the timeline. Three options appear in a bar above the viewer: Fit, Crop to Fill, and Ken Burns.
-
Choose Crop to Fill. A white rectangle appears over the preview. This rectangle defines the visible area in the final output. Everything outside the rectangle gets removed.
-
Resize and position the rectangle. Drag the corners to make it smaller (cropping more of the frame) or drag the center to reposition it. iMovie maintains the project's aspect ratio (16:9 by default), so the rectangle always stays at 16:9 proportions. You cannot drag it into a square or vertical shape.
-
Apply the crop. Click the blue checkmark button in the viewer toolbar (or press Enter) to confirm the crop.
-
Preview the entire clip. Press Space to play the timeline from the beginning. Verify the crop looks correct throughout the clip, not just on the first frame — especially if there is camera movement or on-screen elements that shift position during the video.
-
Export. Click Share (box with upward arrow icon, top-right corner) > Export File. Choose your resolution and quality. Click Next, name the file, and click Save. iMovie exports in
.mp4(H.264) by default.
Cropping to 9:16 (vertical) or 1:1 (square) in iMovie
iMovie locks all projects to 16:9 widescreen. There is no aspect ratio selector in project settings. This is the biggest limitation for creators who need vertical or square crops.
Workaround for vertical video: Rotate the clip 90 degrees clockwise in the Crop/Rotation panel, apply your crop (which is now effectively a vertical crop relative to the original footage), export, then rotate the exported file back using QuickTime (Edit > Rotate Left) or FFmpeg. This is clunky and adds an extra re-encode step, which is why other tools on this list handle custom aspect ratios better.
Workaround for square video: Similar rotation trick, or export at 16:9 and then crop to 1:1 using FFmpeg as a final step.
Limitations
- Locked to 16:9 project aspect ratio — no native support for 9:16, 1:1, 4:3, or custom ratios.
- No pixel-precise numeric input — you are dragging a rectangle by eye with no coordinate readout.
- Ken Burns mode adds slow pan/zoom motion, which is not a static crop. Make sure you select Crop to Fill, not Ken Burns, unless you intentionally want the slow zoom effect.
- iMovie is about 2.7 GB to download if it is not already on your Mac.
Method 2: Screenify Studio
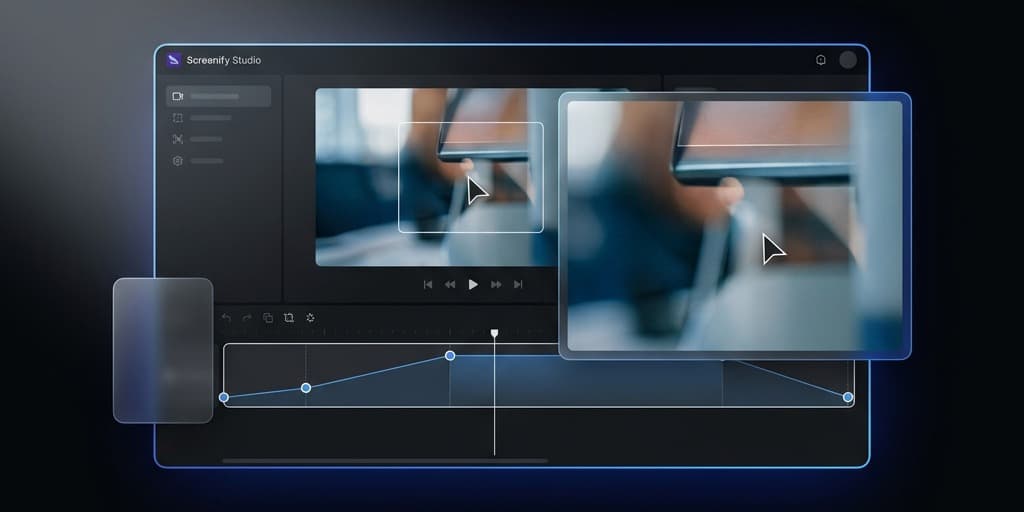
Screenify Studio approaches cropping differently from traditional editors. Instead of manually drawing a crop box over the footage and hoping you guessed the right position, it uses auto-zoom to dynamically crop and pan based on where your cursor moved during a screen recording. The result is a video that automatically frames the most relevant part of the screen at any given moment — no keyframing, no manual positioning.
This is particularly effective for software tutorials, product demos, and bug report recordings where the action moves across different parts of the screen throughout the clip.
Steps
-
Open Screenify Studio and find the recording in your library. Recent recordings appear at the top. You can also search by name or scroll by date.
-
Click the clip to open the editor. The timeline with a waveform overlay loads below the preview, showing audio peaks that help you navigate the recording.
-
Enable auto-zoom. Toggle the auto-zoom switch in the editing toolbar. Screenify analyzes cursor movement throughout the recording and generates zoom keyframes automatically. The preview immediately shows the result — you will see the virtual camera panning and zooming to follow your cursor.
-
Adjust zoom intensity. Use the zoom slider to control how aggressively the camera follows the cursor. A low setting produces gentle pans with the full screen mostly visible; a high setting keeps a tight crop centered on the cursor at all times, making small UI elements much larger and easier for viewers to read.
-
Manual crop regions (optional). If there is a specific section where auto-zoom does not frame the area you want — for example, a dialog box appears away from the cursor — click on that segment in the timeline and manually set a crop region. This overrides auto-zoom for that segment only while keeping auto-zoom active everywhere else.
-
Change the output aspect ratio. In the export settings, choose from preset ratios: 16:9, 9:16, 4:3, 1:1, or enter custom dimensions. Screenify re-frames the content to fit the chosen ratio using the same cursor-tracking data. A 16:9 screen recording can become a 9:16 vertical video without manual adjustment — the auto-zoom engine ensures the important content stays centered in the vertical frame.
-
Export or share. Click Export for a local
.mp4file rendered with Metal-accelerated encoding (fast, even on long recordings), or click Share to generate an instant link that anyone can view in a browser. The share link is ready in seconds and does not require the recipient to install any software.
When to use Screenify Studio
- Your source is a screen recording and the "crop" you need is really about focusing on the active area of the screen.
- You need to reformat from 16:9 to 9:16 or 1:1 without manually positioning the content.
- You want cursor-following zoom instead of a static crop rectangle.
- You prefer a one-click share link over exporting and uploading separately.
Try Screenify Studio — free, unlimited recordings
Auto-zoom, AI captions, dynamic backgrounds, and Metal-accelerated export.
Method 3: DaVinci Resolve (Free Edition)
DaVinci Resolve is a professional-grade editor from Blackmagic Design. The free edition includes everything you need for cropping — numeric input fields, on-screen handles, keyframeable crop values, and full control over output resolution. It is heavier than the other options (the installer is over 3 GB and the app uses significant RAM), but if you already have it installed or plan to do serious color grading and editing alongside your crop, the tools are precise.
Steps
-
Open DaVinci Resolve and create a new project from the Project Manager. Give it a name and double-click to open it.
-
Switch to the Edit page by clicking the Edit tab (film strip icon) in the bottom toolbar. DaVinci has seven pages — Media, Cut, Edit, Fusion, Color, Fairlight, Deliver — and Edit is where you do crop operations.
-
Import your clip. Right-click in the Media Pool (top-left panel on the Edit page) and choose Import Media > Import Media Files. Navigate to your file and select it. Alternatively, drag the file from Finder directly into the Media Pool.
-
Drag the clip to the timeline. If the clip's resolution does not match the project settings, DaVinci may ask whether to change the project settings — choose "Change" to match the source, or "Don't Change" to keep your target resolution (useful if you are deliberately cropping from a larger source to a smaller output).
-
Select the clip in the timeline by clicking on it.
-
Open the Inspector. If the Inspector panel is not visible on the right side, click the Inspector button in the top-right toolbar (it looks like a small rectangle with a slider). Make sure the Video tab is selected at the top of the Inspector.
-
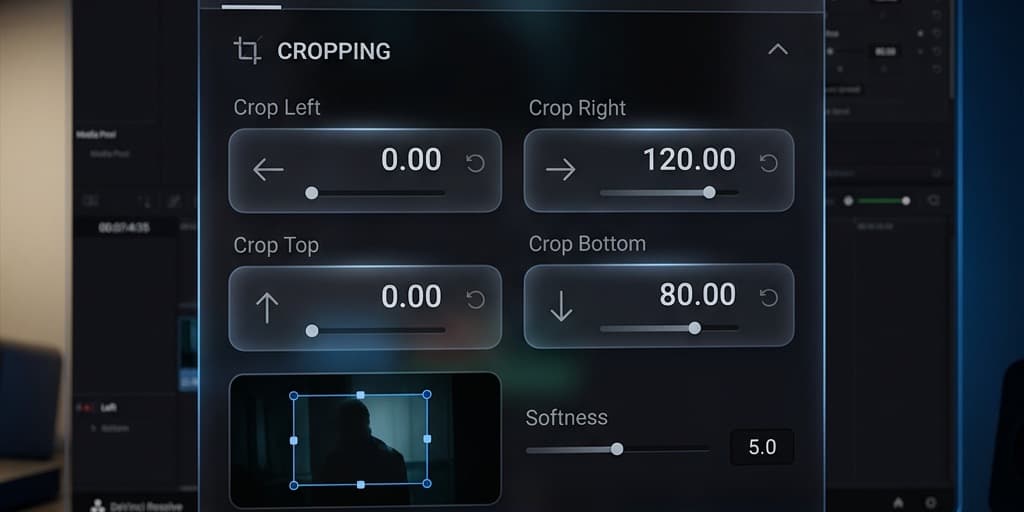
Use the Crop controls. Scroll down in the Inspector to the Cropping section. You will see four fields: Crop Left, Crop Right, Crop Top, Crop Bottom. Enter pixel values to remove from each edge. For example, to remove 200 pixels from each side of a 1920x1080 video, set Crop Left and Crop Right to 200. The preview updates in real time.
-
Alternatively, use the on-screen transform. In the viewer toolbar (bottom-left of the preview), click the dropdown that says "Transform" and select Crop. Drag handles directly on the preview window to visually adjust the crop region. This is faster than typing numbers if you are cropping by eye.
-
Scale up after cropping (optional). Cropping alone leaves black borders where the removed pixels were. To fill the frame, go back to the Transform section in the Inspector and increase the Zoom value until the cropped content fills the viewer. Alternatively, right-click the clip in the timeline and choose Scale to Fill or Scale to Fit.
-
Reframe for a different aspect ratio. To change the output ratio (e.g., 1080x1920 for vertical), go to File > Project Settings > Master Settings and change Timeline Resolution to your target dimensions. Then use the crop and zoom controls to position the content within the new frame. This gives you pixel-perfect control over exactly which region of the original footage appears in the vertical output.
-
Render. Switch to the Deliver page (rocket icon in the bottom toolbar). Choose a preset (YouTube, Vimeo, Custom) or set your codec manually (H.264 for broad compatibility, H.265 for smaller files). Click Add to Render Queue, then click Render All.
Keyframed (animated) cropping
DaVinci Resolve supports crop keyframes, which means the crop region can change over time. In the Inspector, click the small diamond icon next to any Crop field to add a keyframe at the current playhead position. Move the playhead to a later point, change the crop value, and a second keyframe is added automatically. DaVinci interpolates between them, creating a smooth animated crop — useful for following a moving subject or gradually revealing more of the frame.
Limitations
- Steeper learning curve than iMovie or Screenify — the seven-page interface is powerful but intimidating for first-time users.
- The free edition does not include some advanced features (Neural Engine AI tools, HDR grading, multiple GPUs), but all cropping functionality is fully available.
- Project setup requires choosing resolution upfront, which can be confusing if you are not sure what output size you want.
- Uses significant system resources — 16 GB of RAM is recommended, and the app can be sluggish on older Macs.
Method 4: FFmpeg (Command-Line)

FFmpeg's crop video filter lets you specify exact pixel dimensions with a single command. Combined with shell scripting, it can batch-crop hundreds of files unattended. There is no GUI — everything happens in Terminal. If you know the exact pixel coordinates you want, this is the fastest and most repeatable method.
Install FFmpeg
brew install ffmpegVerify with ffmpeg -version. If you do not have Homebrew, install it first from brew.sh.
Steps
-
Open Terminal (Applications > Utilities > Terminal, or press Cmd + Space and type "Terminal").
-
Find your video's dimensions. Run:
ffprobe -v error -select_streams v:0 -show_entries stream=width,height -of csv=p=0 input.mp4Output example: 1920,1080 (width, height).
- Decide the crop dimensions. The crop filter syntax is:
crop=out_w:out_h:x:yout_w— width of the output regionout_h— height of the output regionx— horizontal offset from the left edge of the source framey— vertical offset from the top edge of the source frame
For example, to crop a 1920x1080 video to a centered 1280x720 region:
ffmpeg -i input.mp4 -vf "crop=1280:720:320:180" -c:a copy cropped.mp4The offsets are calculated as: x = (1920 - 1280) / 2 = 320, y = (1080 - 720) / 2 = 180.
- Crop to 9:16 vertical (center-crop). For a 1920x1080 source, keeping full height and cropping the width to approximately 9:16:
ffmpeg -i input.mp4 -vf "crop=608:1080:656:0" -c:a copy vertical.mp4This takes a 608-pixel-wide strip from the center. The offset x = (1920 - 608) / 2 = 656 centers it horizontally. The result is a 608x1080 video at approximately 9:16 ratio.
- Crop to 1:1 square (center-crop). Take the center 1080x1080 square from a 1920x1080 source:
ffmpeg -i input.mp4 -vf "crop=1080:1080:420:0" -c:a copy square.mp4The offset x = (1920 - 1080) / 2 = 420 centers the square region.
- Crop and scale in one step. If you want to crop to a region and then scale it up to a specific output size:
ffmpeg -i input.mp4 -vf "crop=960:540:480:270,scale=1920:1080" -c:a copy upscaled.mp4This crops the center 960x540 quarter of the frame, then scales it back to 1920x1080. The result will be softer because you are upscaling, but it is useful when you need a specific output resolution.
- Verify. Open the output in QuickTime or check dimensions with:
ffprobe -v error -select_streams v:0 -show_entries stream=width,height -of csv=p=0 cropped.mp4Batch cropping
To crop all .mp4 files in a folder to a 1:1 square:
for f in *.mp4; do
  ffmpeg -i "$f" -vf "crop=1080:1080:420:0" -c:a copy "cropped_${f}"
done
This processes every file sequentially. For large batches, you can run multiple FFmpeg processes in parallel using & and wait, but be aware of CPU and disk I/O limits.
Using variables for readability
For complex crops, using shell variables makes the command easier to adjust:
W=1280
H=720
X=$(( (1920 - W) / 2 ))
Y=$(( (1080 - H) / 2 ))
ffmpeg -i input.mp4 -vf "crop=${W}:${H}:${X}:${Y}" -c:a copy cropped.mp4
Troubleshooting
The cropped video has black bars on the sides
This usually means the output container resolution does not match the crop dimensions. In iMovie, this happens when the project is 16:9 but you positioned the Crop to Fill box incorrectly — reset the crop and try again. In FFmpeg, double-check that out_w and out_h match your intended dimensions. In DaVinci Resolve, ensure the Timeline Resolution in File > Project Settings > Master Settings matches the final crop size, or use "Scale to Fill" after cropping.
iMovie Crop to Fill is not removing enough of the frame
Crop to Fill maintains the 16:9 aspect ratio and has a minimum crop size. If you need to crop to a very small region (for example, just a single window on a large display), iMovie is the wrong tool. Use DaVinci Resolve's numeric crop fields or FFmpeg's pixel-precise filter for tighter crops.
Video looks blurry after cropping
When you crop into a small region and then scale it up to fill a 1080p or 4K output frame, you are stretching fewer source pixels across more screen space. The fix is to start with the highest resolution source material you can. If you are recording specifically for a crop workflow, record at 4K so that a 50% crop still gives you 1080p of real pixel data. See our guide to 4K screen recording on Mac for setup tips.
FFmpeg crop filter produces an error about odd dimensions
Some codecs (especially H.264) require even width and height values. If your calculation results in an odd number, round down to the nearest even number. For example, use 608 instead of 607. Alternatively, tell FFmpeg to make the dimensions even automatically:
ffmpeg -i input.mp4 -vf "crop=607:1080:656:0,pad=608:1080:1:0" -c:a copy output.mp4Or simply adjust your crop calculation to use even numbers from the start.
Crop position is wrong — the content is off-center
When using FFmpeg, remember that x and y are offsets from the top-left corner of the frame, not the center. Use (source_width - crop_width) / 2 for x and (source_height - crop_height) / 2 for y to center the crop. In DaVinci Resolve, use the numeric fields in the Inspector rather than dragging handles for precise centering.
Try Screenify Studio — free, unlimited recordings
Auto-zoom, AI captions, dynamic backgrounds, and Metal-accelerated export.
FAQ
Q: What is the difference between cropping and trimming a video?
Trimming changes the duration — it removes time from the start, end, or middle of a clip. Cropping changes the frame — it removes pixels from the edges of every frame. You might trim a 60-second clip down to 30 seconds, but you crop a 1920x1080 frame to 1080x1080 to make it square. Both are non-destructive in the sense that the original file is not modified (you export a new file). For trimming, see our guide on how to trim a video on Mac.
Q: Can I crop a video on Mac without installing anything?
Yes, but with limitations. iMovie is free from the App Store and handles basic 16:9 cropping. It comes pre-installed on new Macs purchased from Apple. QuickTime Player cannot crop video frames — it can only trim duration. For arbitrary aspect ratios (9:16, 1:1, custom), you will need a different tool.
Q: How do I crop a screen recording to focus on one window?
If the recording is already captured at full-screen size, use the crop methods above to isolate the window region. For future recordings, a better approach is to record only the specific window or region from the start — this avoids quality loss from cropping after the fact. macOS Screenshot (Cmd + Shift + 5) lets you select Record Selected Portion to draw a custom capture area. Screenify Studio also offers window-specific capture that automatically sizes the recording to the window. See our Mac screen recording guide for details.
Q: How do I crop a video to 9:16 for Instagram Reels or TikTok?
In DaVinci Resolve, set Timeline Resolution to 1080x1920 under Project Settings, then reposition your footage to center the important content. In FFmpeg, use crop=608:1080:656:0 for a centered vertical strip from a 1920x1080 source. Screenify Studio can export in 9:16 by selecting the vertical preset in export settings — auto-zoom automatically repositions the content to keep the subject (cursor activity) centered in the vertical frame.
Q: Does cropping reduce video quality?
Cropping itself does not degrade quality — it simply discards the pixels outside the crop region. However, if you crop a small region and then scale it up to fill a larger output frame (e.g., cropping to 480x270 and upscaling to 1920x1080), the result will look softer because fewer source pixels are stretched over more display area. The key is to start with the highest resolution recording you can. Recording at 4K gives you room to crop by 50% and still retain 1080p of genuine pixel data.
Q: Can I crop different parts of a video at different times?
Yes — this is called dynamic cropping or keyframed cropping. DaVinci Resolve supports crop keyframes in the Inspector: click the diamond icon next to a crop field to set keyframes at different points in the timeline, and Resolve interpolates between them smoothly. Screenify Studio's auto-zoom achieves a similar effect automatically by panning and zooming to follow cursor activity throughout the recording. iMovie does not support keyframed cropping natively — the Ken Burns mode pans and zooms but offers limited control over the animation.
Q: How do I crop a video and keep the original aspect ratio?
In iMovie's Crop to Fill mode, the crop rectangle always maintains 16:9 (the project's fixed aspect ratio). In DaVinci Resolve, you can lock the aspect ratio in the crop controls before dragging handles. In FFmpeg, calculate your crop dimensions to match the original ratio — for 16:9, ensure out_w / out_h = 16 / 9 (e.g., 1280x720, 960x540, 640x360).
Q: Is there a shortcut to crop in iMovie?
There is no single keyboard shortcut to open the crop panel. Select the clip in the timeline, then click the Crop button in the viewer toolbar. Some versions respond to Shift + Cmd + C to toggle the crop controls. Once in Crop to Fill mode, adjust the rectangle and press Enter to confirm.
Q: How do I undo a crop in iMovie?
Select the cropped clip in the timeline, open the crop controls (click the Crop button in the viewer toolbar), and choose Fit instead of Crop to Fill. This resets the clip to its original full-frame view. You can also press Cmd + Z immediately after cropping to undo the last action.
Wrapping Up
iMovie's Crop to Fill is the fastest free option for simple 16:9-to-16:9 crops where you just need to zoom into a portion of the frame. Screenify Studio's auto-zoom is the best fit when your source is a screen recording and you want the crop to follow the action dynamically without manual keyframing. DaVinci Resolve gives pixel-level numeric precision and keyframeable crop values for professional workflows. And FFmpeg handles everything through the command line — including batch cropping dozens of files in a single command.
For recordings that need both cropping and trimming, check out our guide to screen recording on Mac with audio to start with the cleanest possible source material.
Try Screenify Studio
Record your screen with auto-zoom, AI captions, dynamic backgrounds, and Metal-accelerated export. Free plan, unlimited recordings.
Download Free


