How to Convert Video to GIF on Mac
4 ways to turn any screen recording or video into a GIF on Mac — Shortcuts app, Screenify Studio, Gifski, and Permute compared.

GIFs play everywhere without a video player — GitHub README files, Slack messages, Notion docs, Jira tickets, email signatures, and tweets. They loop automatically, need no click-to-play, and render inline. That makes them the ideal format for short UI demos, bug reproductions, reaction clips, and tutorial snippets under 15 seconds.
The tradeoff: GIFs use a 256-color palette with no audio and balloon in file size for anything longer than a few seconds. A 10-second 1080p GIF can easily hit 30 MB. The tools below handle palette optimization, dithering, and frame rate reduction so your GIFs stay sharp without choking Slack's upload limit.
Quick Comparison
| Tool | Price | Max Colors | Frame Rate Control | Difficulty |
|---|---|---|---|---|
| Shortcuts App (built-in) | Free | 256 (fixed) | No | Easy |
| Screenify Studio | Free / Pro $9.99/mo | Optimized per-frame | Yes | Easy |
| Gifski | Free (open-source) | Up to 256 per-frame | Yes (1-50 FPS) | Easy |
| Permute | $14.99 one-time | 256 (fixed) | Yes | Easy |
Method 1: macOS Shortcuts App (Built-in)
Create the shortcut
- Open Shortcuts from the Applications folder or Spotlight (⌘ + Space, type "Shortcuts")
- Click the + button in the top toolbar to create a new shortcut
- Name it something descriptive: Convert to GIF
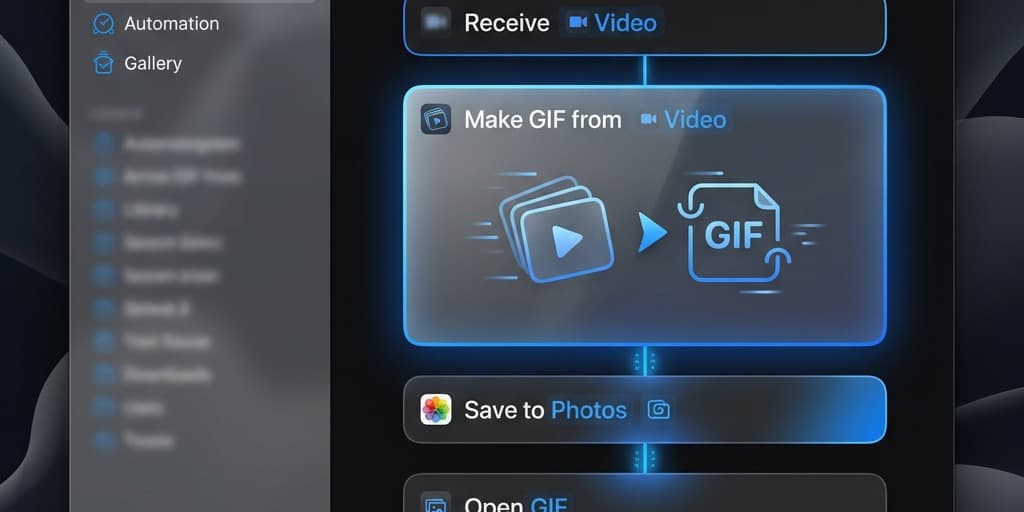
- In the right-hand actions panel, search for "Make GIF"
- Drag the Make GIF from Video action into the workflow area. This action has two configurable parameters:
- Seconds per Photo — controls the delay between frames. Leave at the default (0.033 for ~30 FPS) unless you want a slower, smaller GIF
- Auto Size — when enabled, Shortcuts picks a resolution that balances quality and file size. Disable it and set a custom width if you need specific dimensions
- Before the "Make GIF" action, add Receive Input → set type to Files → check Show in Share Sheet so you can trigger the shortcut from Finder's right-click menu
- After the "Make GIF" action, add a Save File action. Set Ask Where to Save to true so you choose the output location each time
- Click Done
Use the shortcut
- In Finder, right-click any video file (
.mov,.mp4,.m4v) - Select Quick Actions → Convert to GIF (your shortcut name appears here because you enabled Share Sheet)
- Shortcuts processes the video — a progress bar appears briefly
- Choose where to save the resulting
.giffile - The GIF opens in Preview by default. Scroll through frames to verify quality
Limitations
- No frame rate control — Shortcuts converts every frame, which produces unnecessarily large files for long clips. A 10-second 30 FPS video generates 300 frames, resulting in a 20-40 MB GIF.
- No trimming — you must trim the video to the desired segment before running the shortcut. Use QuickTime Player: open the video, press ⌘ + T to enter trim mode, drag the yellow handles, click Trim, then File → Export As → 1080p to save the trimmed clip.
- No color optimization — Shortcuts generates a single global 256-color palette for the entire GIF. Scenes with varied colors (like switching between apps with different UI themes) show visible banding.
- No width/height control beyond Auto Size — you can't set exact pixel dimensions like 800x450.
This method works for quick, one-off conversions where file size doesn't matter. For production-quality GIFs that need to stay under 5 MB for Slack or GitHub, use a dedicated tool.
Method 2: Screenify Studio
Screenify Studio's GIF export is designed specifically for screen recordings. It understands that screen content has large areas of flat color, sharp text edges, and localized motion — and optimizes the palette accordingly. The result: smaller files with crisper text than generic video-to-GIF converters.
Steps
- Open Screenify Studio and select a recording from your library, or start a new one
- In the editor, trim the clip to the exact segment you want as a GIF:
- Drag the left handle on the timeline to set the start point
- Drag the right handle to set the end point
- For screen recordings, the sweet spot is 3-10 seconds. Anything longer produces oversized GIFs that platforms may reject or compress aggressively
- Apply any edits — auto-zoom to track cursor movement is particularly effective in GIFs because viewers can't pause or scrub. Making the action area fill the frame eliminates the "squinting at a tiny cursor on a full desktop" problem
- Click Export in the top-right corner
- Select GIF from the format dropdown
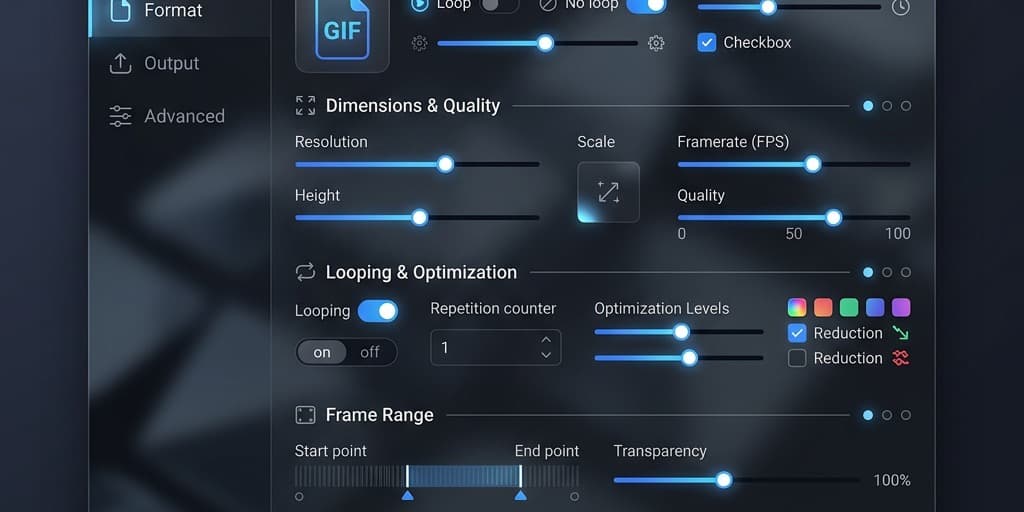
- Configure GIF-specific settings:
- Width — 640px is ideal for Slack and GitHub. 800px for Notion or blog embeds. Full 1080px for email headers (though file size increases quadratically with resolution)
- Frame rate — 12 FPS keeps file sizes manageable while looking smooth enough for UI interactions. Use 15 FPS if the recording involves fast mouse movements. Avoid 30 FPS for GIFs — it doubles file size with minimal perceptual improvement
- Quality — Screenify's quality slider adjusts dithering aggressiveness and per-frame palette complexity. Higher quality means more accurate colors but larger files
- Loop — toggle between infinite loop, play once, or a specific loop count
- The export preview shows the estimated file size before you commit. Adjust width or frame rate if the estimate exceeds your target (5 MB for Slack, 10 MB for GitHub)
- Click Export — Screenify's Metal-accelerated encoder handles palette generation and dithering on the GPU, finishing most 5-10 second GIFs in under 3 seconds on Apple Silicon
When to use GIF vs. MP4
Screenify supports both formats, so choose based on context:
- GIF — inline previews in Slack, GitHub, Jira, Notion, email. No click-to-play. Silent by definition.
- MP4 — longer recordings, audio narration, higher quality, smaller file size. Requires a player or
<video>tag.
For screen recordings specifically, GIFs under 10 seconds are the format of choice for bug reports, PR descriptions, and documentation snippets. Anything longer should stay as MP4 with a linked player.
Try Screenify Studio — free, unlimited recordings
Auto-zoom, AI captions, dynamic backgrounds, and Metal-accelerated export.
Method 3: Gifski (Free, Open-Source)
Gifski produces the highest-quality GIFs of any tool on this list. It uses pngquant's palette quantization algorithm, which generates a unique 256-color palette for each frame rather than a single global palette. The result: noticeably fewer color bands, smoother gradients, and crisper text — at the cost of slightly larger file sizes compared to tools that use a global palette.
Install Gifski
- Download Gifski from the Mac App Store (free) or from gif.ski
- The app is notarized by Apple, so it opens without security warnings
Convert a video to GIF
- Launch Gifski — the app opens with a single drop zone and no clutter
- Drag a
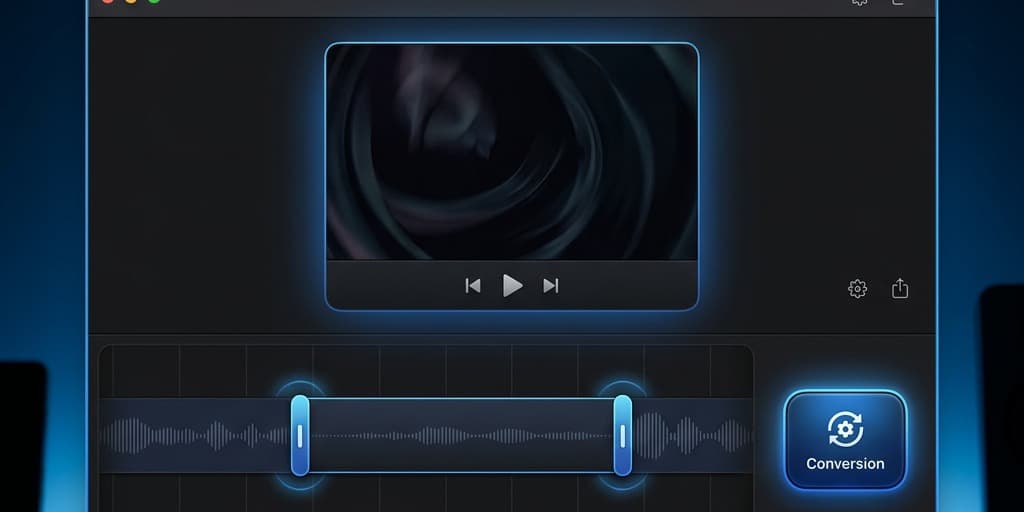
.mov,.mp4, or any video file onto the drop zone - Gifski displays a trim interface:
- A filmstrip timeline shows thumbnails for each second of the video
- Drag the left handle to set where the GIF starts
- Drag the right handle to set where it ends
- The duration and estimated frame count update in real-time as you adjust the handles
- Below the timeline, configure output settings:
- FPS — drag the slider between 1 and 50. For screen recordings, 10-15 FPS is optimal. The app shows frame count in real-time (e.g., "5s at 12 FPS = 60 frames")
- Quality — a slider from 1 (smallest file, visible artifacts) to 100 (best quality, largest file). The sweet spot for screen content is 80-90
- Width — enter pixel width. Height calculates automatically to maintain aspect ratio. 640px is a solid default
- Bounce — toggle to make the GIF play forward then backward in a loop. Useful for showcasing a before/after UI state
- Click Convert (or press Enter)
- Choose a save location and filename
- Gifski processes the video frame-by-frame. A progress bar shows percentage and estimated time. A 10-second clip at 12 FPS typically finishes in 5-10 seconds on M-series Macs
- The resulting GIF opens in Preview. Check the file size in Finder (⌘ + I on the file) — if it exceeds your target, re-export with a lower FPS, narrower width, or reduced quality
Why Gifski produces better GIFs
Most GIF encoders analyze the entire video and pick a single 256-color palette. This works for clips with consistent colors but falls apart when the content changes — switching between a dark IDE and a bright browser, for example. Gifski computes a new palette for every frame, so each frame uses its 256 colors optimally. The difference is visible: text edges stay sharp, gradient backgrounds avoid harsh banding, and icons maintain their color accuracy.
The per-frame palette approach does produce slightly larger files (10-20% bigger than global palette GIFs at the same resolution). For most use cases — Slack messages, GitHub PRs, documentation — the quality improvement justifies the size increase.
Method 4: Permute ($14.99)
Permute handles GIF conversion alongside its broader media conversion capabilities. If you already own it for MOV-to-MP4 conversion, adding GIF output requires no additional purchase.
Steps
- Launch Permute
- Drag your video file (
.mov,.mp4, or any supported format) onto the Permute window - Click the format dropdown in the bottom-left corner and select GIF Animation
- To customize the output before converting:
- Click the gear icon on the file card → Video Settings
- Set Width and Height — Permute respects aspect ratio when you change one dimension
- Set FPS — lower values reduce file size significantly. 10-15 FPS is ideal for screen content
- Set Quality — controls global palette accuracy and dithering
- Click the Play button (▶) to start conversion
- Permute processes the file and saves the GIF alongside the original by default. Check Permute → Settings → Output Folder to change the save location
Batch conversion
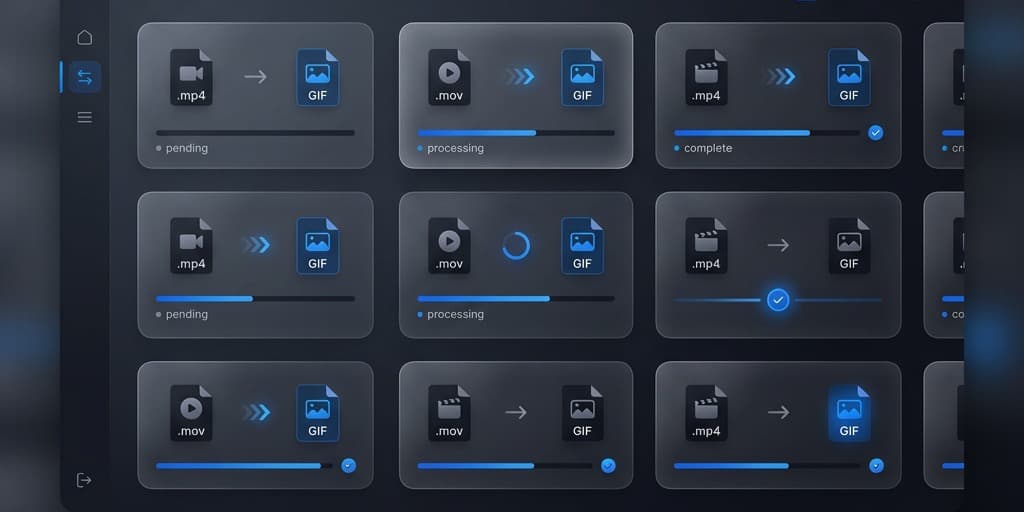
Permute's strength is handling multiple files at once:
- Drag an entire folder of video files onto the window
- Set the format to GIF Animation
- Click ▶ — Permute converts every file in parallel, using all available CPU threads
- Each file card shows individual progress and estimated time remaining
Watch folder automation
If you regularly record short clips that need GIF conversion:
- Go to Permute → Settings → Watch Folders
- Add the folder where your screen recordings save (e.g.,
~/Desktopor a custom recording folder) - Set the action to Convert to GIF Animation
- Every new video file dropped into that folder gets automatically converted — no manual intervention needed
Permute doesn't match Gifski's per-frame palette quality, but it handles batch workflows and automation better. If you convert GIFs occasionally, Gifski is the better free option. If you convert dozens of files weekly as part of a documentation or support workflow, Permute's $14.99 pays for itself quickly.
Troubleshooting
GIF file is too large for Slack (over 5 MB limit)
Slack auto-compresses GIFs larger than 5 MB, often ruining quality. To stay under the limit:
- Reduce width to 480-640px. Most Slack conversations render images at ~360px width anyway; anything wider is wasted pixels.
- Lower FPS to 8-10. Screen recordings with slow mouse movements look fine at 8 FPS.
- Trim aggressively. Every extra second adds dozens of frames. A 5-second GIF at 10 FPS is 50 frames; a 15-second one is 150 frames — tripling file size.
- Crop the recording area before conversion. If only a portion of the screen matters (a single dialog box, for example), crop in your editor first. A 400x300 GIF is dramatically smaller than a 1920x1080 one.
GIF has visible color banding in gradients
The 256-color limit causes banding in areas with smooth gradients — dark mode UI backgrounds are common culprits. Solutions:
- Use Gifski, which generates per-frame palettes and minimizes banding
- Increase the dithering setting in your converter. Dithering adds a subtle noise pattern that masks banding at the cost of slightly larger files
- If the gradient area isn't the focus, crop it out entirely
GIF animation looks choppy or too fast
Different tools interpret frame timing differently. If your GIF plays at warp speed:
- Verify the FPS setting during export. Some tools default to the source video's frame rate (30 or 60 FPS), which produces enormous files and may render faster than expected in some viewers
- Test playback in multiple applications — Preview, Chrome, Firefox, and Slack all handle GIF frame timing slightly differently
- Re-export at 10-12 FPS with an explicit frame delay. In Gifski, the FPS slider directly controls inter-frame delay
Converted GIF has a black frame at the start
Some screen recordings include a brief black frame during initialization. The GIF converter faithfully includes it. Fix this by trimming the first 0.5 seconds in your video editor before converting. In QuickTime Player: ⌘ + T → drag the left handle past the black frame → Trim.
GIF quality is significantly worse than the source video
This is expected — GIFs are limited to 256 colors with no inter-frame compression (each frame is a full image). For screen content, the quality loss is most visible in:
- Photos and realistic images within the recording (a browser showing photos, for example)
- Smooth color gradients in UI backgrounds
- Semi-transparent overlays
If quality matters more than format compatibility, consider using a short looping MP4 instead. Most modern platforms (Slack, GitHub, Notion) now support inline MP4 playback. GitHub accepts .mp4 files in issue descriptions and PR comments, playing them inline with a single click.
FAQ
Q: What's the maximum length for a GIF?
There's no technical limit, but practical constraints kick in fast. Every additional second at 12 FPS adds 12 full-resolution frames to the file. A 30-second 640px GIF easily exceeds 20 MB. Keep GIFs under 10 seconds for inline sharing. For anything longer, use MP4 with a video player — it's smaller, higher quality, and supports audio.
Q: Can I add text or captions to a GIF on Mac?
Not directly during conversion. You need to add text in a video editor first, then convert to GIF. Screenify Studio lets you add auto-generated captions to recordings, which get baked into the GIF export. For simple text overlays, Preview can add text annotations to individual frames, but this is tedious for multi-frame GIFs.
Q: How do I make a GIF from a screen recording without any extra software?
Use the macOS Shortcuts app (Method 1 above). Create a shortcut with the "Make GIF from Video" action, then right-click any video file in Finder and select your shortcut from Quick Actions. The entire process takes about 5 seconds once the shortcut is set up.
Q: What resolution should I use for GIFs?
Match the context where the GIF will be viewed:
- Slack / Discord: 480-640px wide (messages render small)
- GitHub README / PR descriptions: 640-800px wide
- Notion / Confluence docs: 800px wide
- Blog posts / email: 800-1000px wide
- Full-width web embeds: 1200px wide (but expect 10+ MB file sizes)
Q: GIF or APNG — which is better for screen recordings?
APNG (Animated PNG) supports 24-bit color (16.7 million colors vs. GIF's 256), alpha transparency, and generally produces smaller files for the same quality. However, APNG has limited platform support: Slack doesn't display APNGs correctly, many email clients ignore them, and GitHub renders them but with inconsistent behavior. GIF remains the safer choice for broad compatibility. If your target is exclusively web browsers (Chrome, Firefox, Safari all support APNG), APNG is technically superior.
Q: How do I reduce GIF file size without losing too much quality?
Three levers, ranked by impact:
- Reduce frame rate — dropping from 30 FPS to 10 FPS cuts file size by ~65% with minimal perceived quality loss for screen content
- Reduce resolution — halving width (1080px → 540px) cuts file size by ~75%
- Reduce duration — trimming from 10 seconds to 5 seconds halves the file
Adjust these in combination. A 5-second, 640px, 10 FPS GIF typically lands at 1-3 MB — well under Slack's 5 MB limit.
Q: Can I convert a Live Photo to a GIF on Mac?
Yes. Open the Live Photo in the Photos app, then drag it onto Gifski or Permute. Both tools recognize Live Photo .mov files and convert them normally. Alternatively, in the Photos app: open the Live Photo, click Edit, click the Live Photo icon in the toolbar, select Loop or Bounce to set the playback style, then use File → Export → Export GIF (available in macOS Ventura and later through the Shortcuts integration).
Q: Why does my GIF look different in Slack vs. a browser?
Slack recompresses GIFs larger than 5 MB using its own encoder, which often reduces colors, resolution, and frame rate. The version you see in Slack may not match the original. To ensure consistent quality, stay under 5 MB before uploading. Browsers (Chrome, Safari, Firefox) display the original GIF data without modification, so they're a more reliable preview of what others will see in web-based contexts.
Related reading
- How to Convert MOV to MP4 on Mac — when you need a video file rather than a GIF, this guide covers the best MP4 conversion methods
- How to Screen Record on Mac — start here if you haven't recorded your screen yet and need the source video for GIF conversion
- How to Record Screen in 4K on Mac — recording at higher resolution gives you more room to crop and scale down for crisp, compact GIFs
Try Screenify Studio
Record your screen with auto-zoom, AI captions, dynamic backgrounds, and Metal-accelerated export. Free plan, unlimited recordings.
Download Free


