How to Record Your Screen with Narration
Add voiceover to screen recordings — mic setup, noise reduction, recording workflow, and editing tips for 4 tools on Mac.

A screen recording without narration forces viewers to guess what they're looking at. They watch your cursor drift across menus, click through dialogs, and toggle settings — with zero context. Adding voiceover transforms a silent walkthrough into a tutorial someone can actually follow.
But narration quality separates amateur recordings from professional ones. A tinny built-in mic, keyboard clatter bleeding into every sentence, and inconsistent volume levels will make viewers click away faster than no audio at all. The recording tool matters less than how you set up your microphone and treat your room.
This guide covers mic selection, room acoustics, recording workflow across four tools, and post-production techniques to clean up your narration audio.
Quick Comparison
| Tool | Price | Separate Audio Tracks | Noise Reduction | AI Captions | Audio Editing | Difficulty |
|---|---|---|---|---|---|---|
| Screenify Studio | Free / Pro $9.99/mo | Yes | AI-powered | Yes | Per-track controls | Easy |
| macOS Screenshot Toolbar | Free (built-in) | No | No | No | None | Easy |
| OBS Studio | Free (open-source) | Yes | RNNoise filter | No | Filters only | Moderate |
| QuickTime + GarageBand | Free (built-in) | Manual (post-edit) | GarageBand plugin | No | Full DAW | Moderate |
Mic Setup: The Foundation of Good Narration
Your microphone choice and placement have more impact on narration quality than any software filter. No amount of noise reduction will fix a mic that's three feet away picking up room echo and fan noise.
Choosing Your Input Device
Open System Settings → Sound → Input to see every audio input your Mac recognizes. Each device shows a real-time input level meter — speak at your normal narration volume and watch the bars. You want the level hitting roughly two-thirds of the meter. If it barely moves, the mic is too far away or the gain is too low. If it's constantly maxed out, you'll get clipping distortion that no filter can repair.
Click the device you want to use. This becomes the system default, and most recording apps will pick it up automatically. Some apps (OBS, Screenify Studio) let you override the input device per-recording, which is useful if you switch between a headset for calls and a desk mic for recordings.
External Mic Recommendations
USB microphones plug directly into your Mac — no extra hardware needed:
- Elgato Wave:3 — capacitor condenser with a built-in digital mixer (Wave Link software). The clipguard feature uses a second, quieter signal path to prevent distortion if you suddenly raise your voice. Strong choice for narration because it handles dynamic volume well.
- Blue Yeti — the most common USB mic you'll find. Cardioid mode works for solo narration; the gain knob on the back needs to be set lower than you'd expect (around 25-30%) to avoid picking up room noise. Place it 6-8 inches from your mouth.
- Rode NT-USB Mini — compact, flat-response condenser. Less sensitive to room reflections than the Yeti because of its tighter polar pattern. No gain knob — you control level in software.
XLR microphones require an audio interface (Focusrite Scarlett Solo, Universal Audio Volt 1) but offer better preamps and more control:
- Shure SM7B — dynamic mic that rejects room noise aggressively. Used in podcasting and broadcasting specifically because it doesn't pick up reflections from untreated rooms. Needs 60 dB of gain, so pair it with a Cloudlifter or an interface with enough clean gain.
- Rode PodMic — similar rejection characteristics to the SM7B at a third of the price. Needs less gain (45-50 dB).
Lavalier (clip-on) microphones work when you're recording yourself on camera alongside the screen capture:
- Rode Wireless Go II — clips to your shirt, transmits wirelessly to a USB receiver. Consistent distance from your mouth regardless of how you move.
- Wired lavs (Rode smartLav+) connect via 3.5mm — you'll need a USB adapter for modern Macs.
Built-in Mic: Making the Best of It
MacBook built-in microphones sit in the chassis near the keyboard — on M-series MacBooks, the mic array is between the speaker grilles flanking the keyboard. This placement means every keystroke, trackpad click, and palm rest is inches from the mic capsules.
If the built-in mic is your only option:
- Distance from keyboard matters. Sit upright and speak toward the screen, not down at the keyboard. The extra 6 inches of distance between your mouth and the chassis reduces keyboard bleed significantly.
- Disable keyboard sounds. Go to System Settings → Keyboard and turn off key click sounds if they're enabled.
- Use an external keyboard. Place your MacBook on a stand as a display and type on a separate keyboard further from the mic. This single change eliminates the most common noise complaint with built-in mic narration.
- Close the lid (clamshell mode). If you're using an external display, close the MacBook lid. The mic still works, and the closed lid dampens keyboard and fan noise.
Room Acoustics: 60-Second Treatment
Sound bounces off hard, flat surfaces — your desk, monitor, walls, windows. Those reflections reach the mic milliseconds after your direct voice, creating a "roomy" or echoey quality that makes narration sound unprofessional.
You don't need acoustic panels. Here's what actually helps:
- Hang a blanket or thick curtain behind your monitor. This absorbs the reflections coming back at you from the wall you're facing. It's the single most effective treatment for a desk setup.
- Close the door. Obvious, but the hallway and adjacent rooms contribute more ambient noise than people realize.
- Turn off fans and AC units during recording. A consistent 40 dB hum sounds quiet in person but becomes immediately noticeable on playback.
- Record in a carpeted room if possible. Hard floors reflect sound upward into the mic.
- Closets work. Clothes absorb sound. If you need dead-quiet narration for a course or product video, recording in a walk-in closet surrounded by hanging clothes is a legitimate technique used by voiceover professionals.
Pop Filter and Boom Arm
A pop filter (the circular mesh screen) blocks plosive air bursts from "P" and "B" sounds that cause low-frequency thumps in recordings. A $12 mesh filter clamped to your desk eliminates the problem entirely. Foam windscreens (the kind that slip over the mic) work too but reduce high-frequency clarity slightly.
A boom arm (Rode PSA1, Elgato Wave Mic Arm) suspends the mic in front of your face at mouth level. This achieves two things: consistent distance from your mouth (critical for even volume), and decoupling from desk vibrations. When your mic sits on a desk stand, every bump, keyboard press, and mouse click transmits through the surface into the mic body.
Method 1: Screenify Studio — AI Captions + Separate Audio Tracks
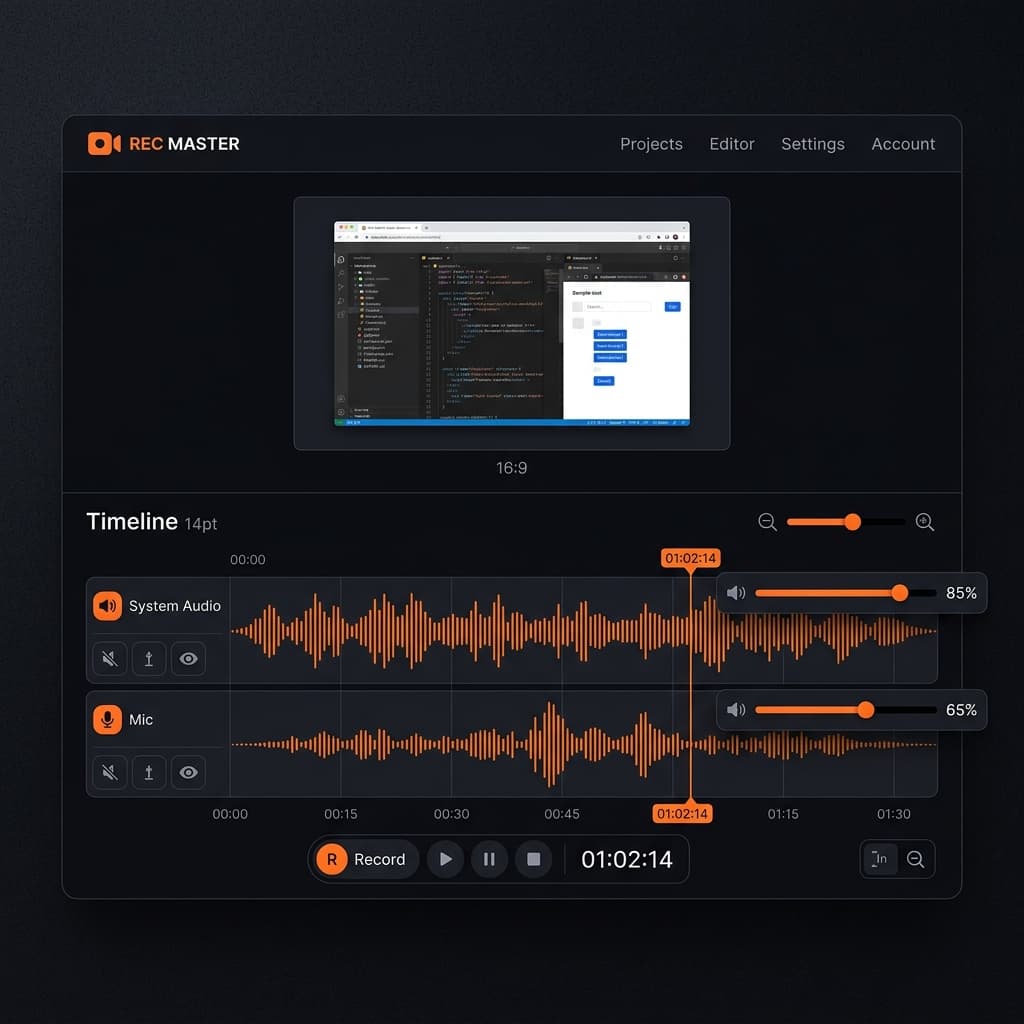
Screenify Studio records your narration on a dedicated mic track, separate from system audio. In the editor, you see individual waveforms for each source, so you can adjust narration volume without affecting app sounds — or mute system audio entirely to isolate your voiceover.
Recording with Narration
- Download Screenify Studio if you haven't already — free plan includes mic recording and AI features
- Open the app and choose your capture area (Full Screen, Window, or Custom Region)
- In the audio panel:
- Enable Microphone and select your input device from the dropdown
- Enable or disable System Audio depending on whether you need app sounds
- If both are enabled, adjust the balance slider to favor your mic — narration should be louder than app audio
- Toggle AI Noise Reduction on. This runs real-time noise suppression on your mic track, removing keyboard clatter, fan hum, and room tone without affecting your voice clarity. Unlike traditional noise gates that cut audio below a threshold, the AI model isolates human speech frequencies and preserves them while suppressing everything else.
- Press ⌃ + ⌘ + R to start recording
- Narrate at a steady pace. The separate tracks mean you don't need to worry about your voice competing with notification sounds or app audio — you'll balance them in the editor.
- Press ⌃ + ⌘ + R again to stop
Post-Recording: Captions from Narration
In the Screenify Studio editor:
- Click AI Captions to generate subtitles from your narration track. The transcription runs locally and produces timed captions synced to your voiceover. This is valuable for tutorials because viewers can follow along even with sound off — and it reinforces complex instructions by showing them as text simultaneously.
- Adjust per-track volume: boost your mic track if the narration is too quiet, lower system audio if app sounds compete with your voice
- Trim dead air at the beginning and end of the recording where you were setting up
The separate-track architecture means you can re-record narration without re-recording the screen. Export the screen capture, then record a new voiceover pass with just the mic and combine them.
For a broader walkthrough of capture modes and export options, see our complete guide to screen recording on Mac.
Try Screenify Studio — free, unlimited recordings
Auto-zoom, AI captions, dynamic backgrounds, and Metal-accelerated export.
Method 2: macOS Screenshot Toolbar + Mic
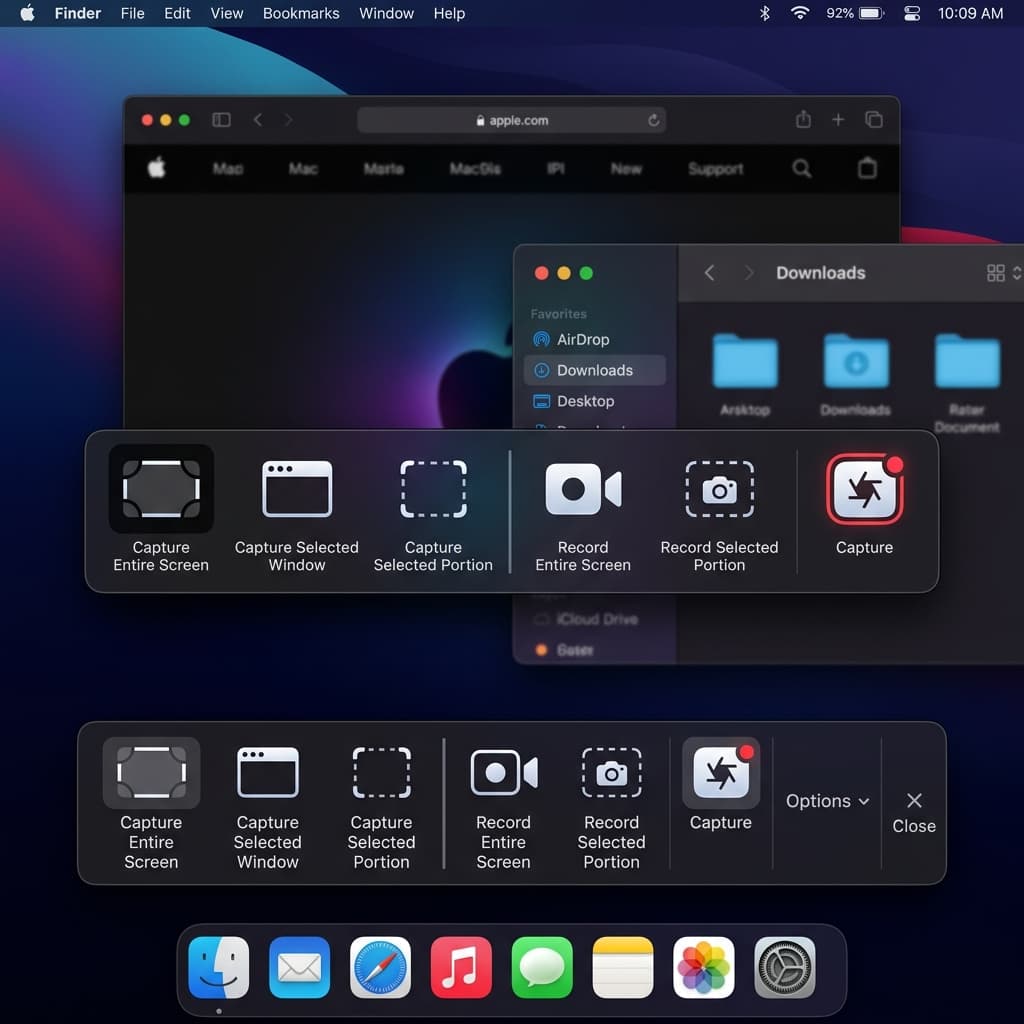
The built-in macOS recorder captures microphone audio natively. It's the fastest path to a narrated screen recording — no downloads, no configuration.
Steps
- Press ⌘ + Shift + 5 to open the Screenshot toolbar
- Choose Record Entire Screen or Record Selected Portion
- Click Options
- Under Microphone, select your input device. Every connected mic appears as a separate entry:
- Built-in Microphone
- AirPods (if connected)
- USB mic (shows device name, e.g., "Elgato Wave:3")
- Enable Show Mouse Clicks — for narrated tutorials, the visual click indicator helps viewers track what you're describing
- Click Record or press Enter
- Narrate while recording. There's no audio level meter, so maintain consistent mic distance and volume. If you're using the built-in mic, speak toward the screen, not down at the keyboard.
- Stop with the ⏹ button in the menu bar or ⌘ + Control + Esc
- Click the floating thumbnail to quickly trim the start and end
Limitations for Narration
- No noise reduction. Whatever the mic picks up goes directly into the file — room echo, keyboard sounds, fan noise, all of it.
- No system audio. If you're narrating over an app that produces sound, viewers won't hear the app. For recording with system audio, see our guide to recording with audio on Mac.
- Single audio track. Your narration is baked into the video file. You can't adjust voice volume separately from any other audio after the fact.
- No level meter during recording. You won't know if your audio is clipping or too quiet until you play it back.
The Screenshot toolbar works for quick, informal narrated recordings — explaining a bug to a colleague, walking through a design in Figma, or leaving a voice note over a document. For anything that needs consistent audio quality, use a tool with noise reduction and level monitoring.
Method 3: OBS Studio — Audio Mixer + Filters
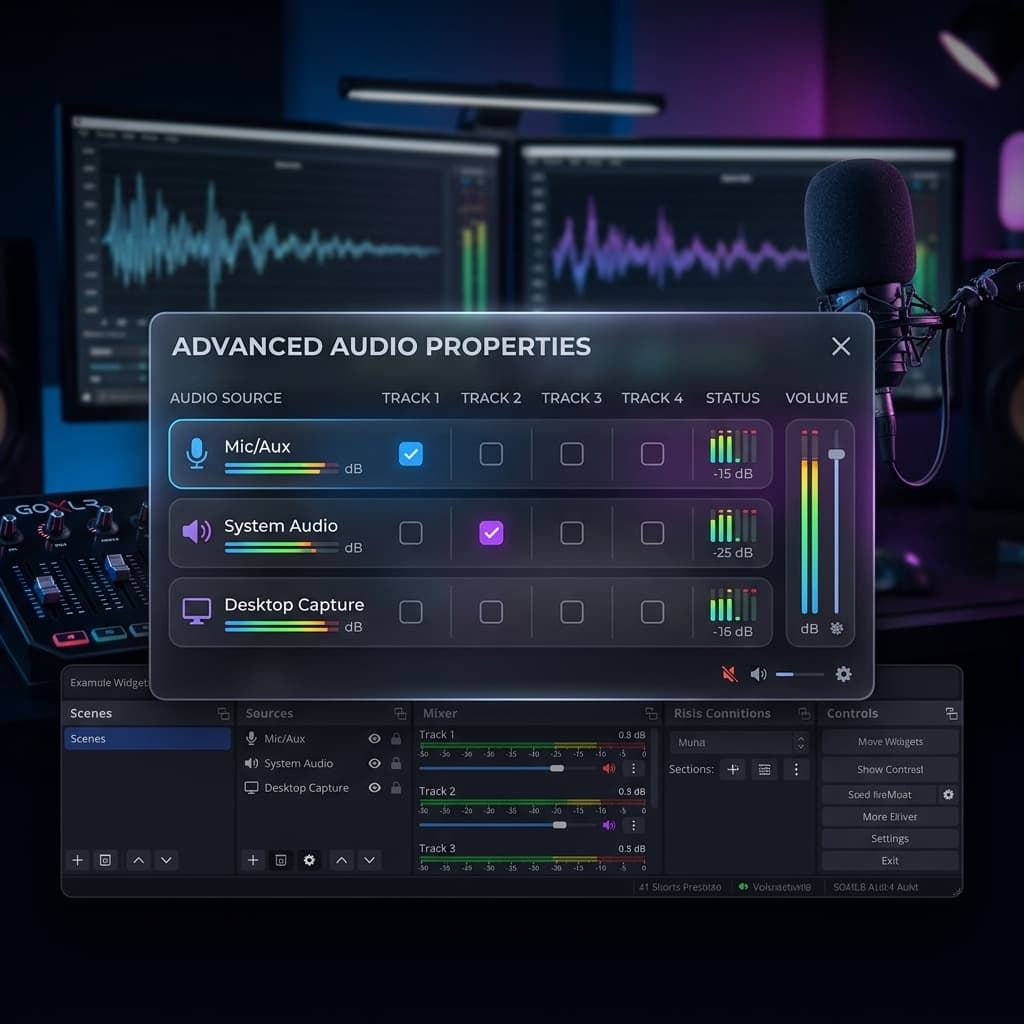
OBS gives you a full audio mixer with real-time filters. For narration, this means you can apply noise suppression, compression, and gating before the audio hits the recording — no post-production needed if you configure it correctly.
Setup
- Download OBS from obsproject.com and install
- In Sources, click + → Display Capture (or Window Capture for a single app)
- In Sources, click + → Audio Input Capture → select your microphone
- If you need system audio, you'll need BlackHole installed as a virtual audio device. See our guide to recording internal audio on Mac for the full setup.
Configuring Audio Filters for Narration
Right-click your mic source in the Audio Mixer panel → Filters. Add these in order (order matters — each filter processes the output of the previous one):
1. Noise Suppression
- Method: RNNoise (AI-based, built into OBS)
- This filter uses a neural network trained on speech to separate voice from background noise. It handles fan hum, air conditioning, and distant traffic effectively. It struggles with sharp transient noises like keyboard clicks — for those, add a Noise Gate.
2. Noise Gate
- Close Threshold: -32 dB — audio below this level gets muted entirely
- Open Threshold: -26 dB — audio above this level passes through
- Attack Time: 10 ms — how quickly the gate opens when you start speaking
- Hold Time: 200 ms — keeps the gate open for pauses between words
- Release Time: 100 ms — how quickly audio fades out when you stop speaking
- These values work for a quiet room. If you're in a noisier environment, raise the close threshold to -26 dB and the open threshold to -20 dB, but test that it doesn't cut off the beginnings of your sentences.
3. Compressor
- Ratio: 4:1
- Threshold: -18 dB
- Attack: 6 ms
- Release: 60 ms
- Output Gain: 4 dB
- The compressor evens out your volume — when you lean closer to the mic or get excited, it reduces the loud parts. When you speak softly, the output gain brings those quieter moments up. The result is narration that stays at a consistent level without you having to monitor it manually.
4. Limiter (optional)
- Threshold: -1.5 dB
- Release: 60 ms
- A safety net that prevents any audio from exceeding -1.5 dB, which would cause digital clipping. If your compressor is set correctly, the limiter should rarely activate.
Recording
- Set Output Mode to Advanced in Settings → Output
- Under the Recording tab, set Audio Encoder to AAC and Audio Bitrate to 192 kbps (sufficient for voice; 320 kbps if you're also capturing music)
- Set Recording Format to MKV (can be remuxed to MP4 later — MKV is crash-safe)
- Click Start Recording or press your configured hotkey
- Monitor the audio meter in the mixer — your voice should peak between -12 dB and -6 dB (green to yellow). If it hits red, lower your mic gain or increase the distance.
- Click Stop Recording when done
- Remux to MP4: File → Remux Recordings → select your MKV → click Remux
OBS is the most configurable option for narration, but the setup investment is significant. If you're recording narrated tutorials regularly, save your filter chain as a profile so you don't have to reconfigure it each session.
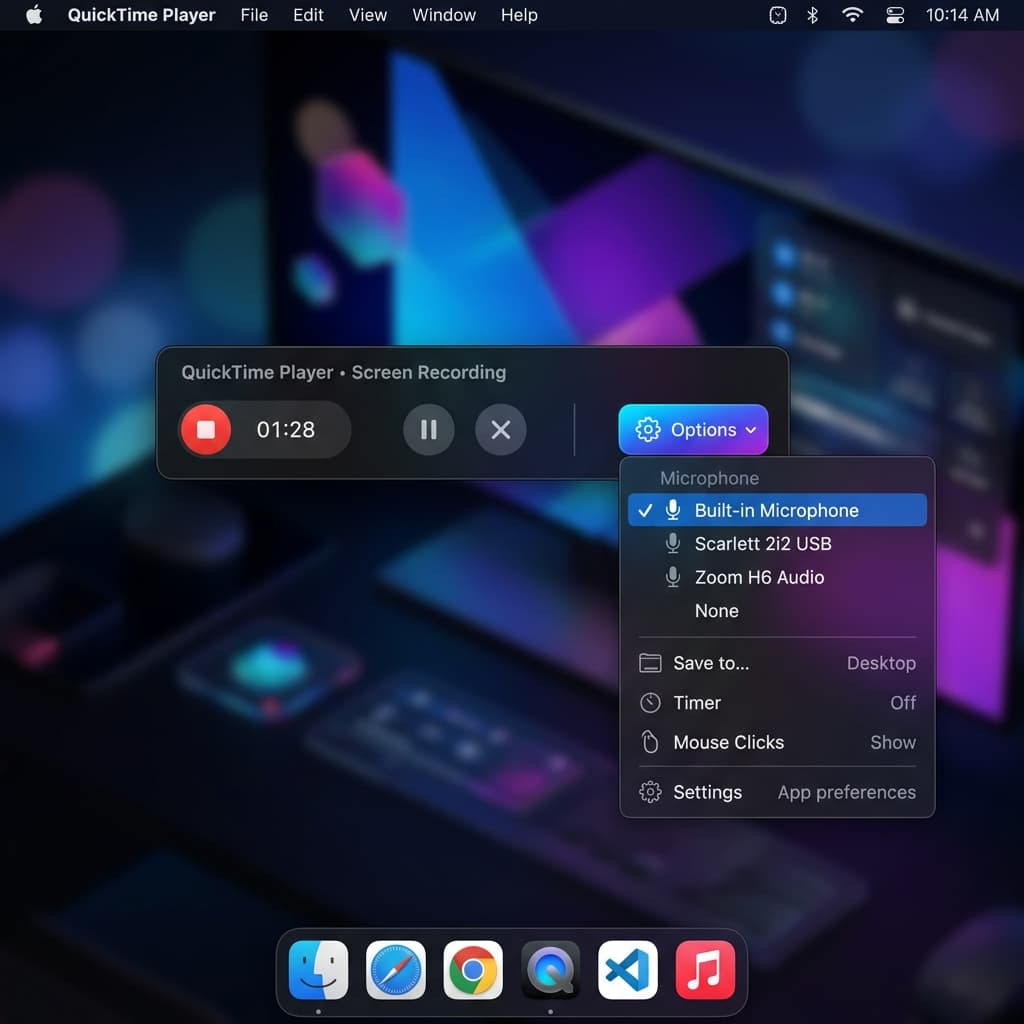
Method 4: QuickTime Player + GarageBand Post-Edit
This method splits the workflow: record the screen with QuickTime (with mic audio), then clean up the narration audio in GarageBand. It's entirely free and uses apps already on your Mac, but it requires manual post-production work.
Screen Recording with QuickTime
- Open QuickTime Player → File → New Screen Recording (or press ⌃ + ⌘ + N)
- Click the dropdown arrow next to the record button
- Select your microphone from the list
- Set quality to Maximum — this records at your display's native resolution
- Click the red Record button, then click anywhere on screen (full screen) or drag to select a region
- Narrate while recording
- Click the Stop button in the menu bar when finished
- Save the recording: File → Save (or ⌘ + S)
Cleaning Narration Audio in GarageBand
QuickTime recordings often have background noise, inconsistent levels, and room echo baked into the audio. GarageBand can fix most of these issues.
- Open GarageBand → create a new Empty Project → choose Audio as the track type (microphone icon)
- Import your recording: Drag the QuickTime
.movfile directly onto the GarageBand timeline. GarageBand extracts the audio track automatically. - Apply Noise Reduction:
- Select the audio region on the timeline
- Open the Editor panel (press E or click the scissors icon)
- Check Noise Gate and set it to a medium level — this silences the audio when you're not speaking, eliminating room tone between sentences
- Normalize volume:
- Select all regions (⌘ + A)
- Go to Edit → Normalize Region Parameters — this brings the loudest peak to 0 dB and scales everything else proportionally
- Remove "ums" and long pauses:
- Use the Split tool (⌘ + T) to cut at the boundaries of unwanted sounds
- Select the unwanted region and press Delete
- Drag the remaining regions together to close the gap, or leave a brief 0.5-second silence as a natural pause
- EQ for voice clarity:
- Click the Smart Controls button (knob icon)
- Apply the Natural Vocal preset — this rolls off low-frequency rumble below 80 Hz and adds subtle presence boost around 3-5 kHz, making narration cut through more clearly
- Export the cleaned audio:
- Share → Export Song to Disk
- Format: AAC or WAV
- Quality: High
- Recombine with video: Open the original QuickTime recording in iMovie or any video editor, mute the original audio, and add the cleaned GarageBand export as a new audio track.
Dual-Take Workflow: Screen First, Voice Later
The QuickTime + GarageBand combination enables a dual-take workflow that produces significantly better results than narrating live:
- First pass: Record your screen in complete silence. Focus on performing the actions smoothly, at a deliberate pace, with clear mouse movements. Don't worry about explaining anything.
- Second pass: Play back the screen recording and record your voiceover in GarageBand while watching. You can pause the video, re-record a sentence, and edit freely.
This approach eliminates the cognitive load of doing two things at once — demonstrating and explaining. Your screen actions are smoother because you're not splitting attention, and your narration is clearer because you can see exactly what's happening and describe it precisely. Professional tutorial creators almost always work this way.
Narration Best Practices
Script vs. Improvised
Scripted narration produces tighter, more concise results. Write your script in bullet points rather than full sentences — reading verbatim from a script sounds flat and unnatural. Bullet points give you the structure and key terms to hit while letting your delivery stay conversational. For tutorials under 5 minutes, a bullet-point outline takes 10 minutes to write and saves you multiple re-recording attempts.
Improvised narration works for informal recordings — bug reports, quick walkthroughs for teammates, async standup updates. The risk is rambling: without a plan, you'll fill silence with "um," "so," "basically," and tangents. If you improvise, do one practice run without recording to identify the flow, then record the second take.
Pacing
Aim for 130-150 words per minute for tutorial narration. Normal conversation runs 160-180 WPM — deliberately slowing down gives viewers time to watch your actions while processing your explanation. Time yourself: read a 150-word paragraph and it should take roughly one minute.
Pause for 1-2 seconds after visual transitions. When you switch apps, open a menu, or navigate to a new screen, stop talking for a beat. Let the viewer register the visual change before you describe the next step. Narrating over transitions is the most common pacing mistake in tutorials — the viewer's eyes are scanning for the new context while your voice is already explaining the next action.
Slow down for complex steps. If you're explaining a multi-part configuration (like the OBS filter chain above), narrate each parameter individually with a pause between them. Rattling off "set ratio to 4:1, threshold to negative 18, attack 6 milliseconds, release 60" as one continuous sentence guarantees the viewer retains none of it.
Voice Technique
- Speak from your diaphragm, not your throat. A chest voice sounds warmer and fatigues less over long recording sessions.
- Keep water nearby. Mouth clicks and lip smacks become more frequent as your mouth dries out. Take a sip between sections.
- Maintain consistent distance from the mic. 6-8 inches for condensers, 2-4 inches for dynamic mics. Mark the spot with a piece of tape on your desk if needed.
- Stand up if possible. Standing opens your diaphragm and naturally projects your voice. Many voiceover professionals record standing, even for casual content.
Troubleshooting: Common Narration Audio Issues
1. Recording is silent or extremely quiet
Cause: Wrong input device selected, or mic gain set to minimum.
Fix: Open System Settings → Sound → Input. Confirm the correct device is selected and the input level meter moves when you speak. If using an XLR mic, check that phantom power is enabled on your audio interface (condenser mics require 48V phantom power to function). In OBS, verify the mic source isn't muted in the Audio Mixer.
2. Audio clips and distorts on loud syllables
Cause: Input gain too high, or mic too close to your mouth.
Fix: Reduce the input gain in System Settings or on the mic/interface itself. In OBS, add a Limiter filter set to -1.5 dB as the last filter in your chain. Move back 1-2 inches from the mic. In Screenify Studio, the AI noise reduction handles dynamic range automatically, but you should still reduce hardware gain if the input is clipping at the source.
3. Keyboard and mouse clicks audible in narration
Cause: Mic picking up mechanical vibrations through the desk (structure-borne noise) or airborne noise from nearby keys.
Fix: Use a boom arm to decouple the mic from the desk surface. Switch to a dynamic mic (SM7B, PodMic) which rejects off-axis noise better than condensers. If using the built-in MacBook mic, place the laptop on a stand and use an external keyboard positioned further away. In OBS, a Noise Gate with a close threshold of -32 dB will mute audio between sentences, hiding clicks during pauses — but clicks that happen while you're speaking will still get through.
4. Echo or "hollow" room sound
Cause: Sound reflecting off walls, desk, and monitor back into the mic.
Fix: Hang a thick blanket or moving blanket on the wall directly behind your monitor. This single treatment absorbs the primary reflection path. Close windows and doors. If the problem persists, a reflection filter (the curved foam shield that mounts behind the mic) blocks reflections from reaching the mic capsule from the sides and rear. Cost is $30-50 and makes a noticeable difference in untreated rooms.
5. Inconsistent volume — some sentences loud, others barely audible
Cause: Moving toward and away from the mic while narrating, or natural volume variation in speech.
Fix: Use a compressor. In OBS, the compressor filter with a 4:1 ratio and -18 dB threshold evens out the dynamic range. In Screenify Studio, per-track volume controls let you boost quiet sections after recording. In GarageBand, normalize the audio and apply light compression via the Compressor plugin. The physical fix is more important: maintain consistent mic distance. A boom arm at a fixed position eliminates the problem at the source.
Try Screenify Studio — free, unlimited recordings
Auto-zoom, AI captions, dynamic backgrounds, and Metal-accelerated export.
FAQ
Do I need an external mic for narration, or is the built-in MacBook mic good enough?
The built-in mic is usable for informal recordings — quick walkthroughs, bug reports, team messages. For anything public-facing (tutorials, courses, product demos), an external mic makes an immediately audible difference. A $50-70 USB mic like the Rode NT-USB Mini or Elgato Wave:3 eliminates most background noise and keyboard clatter issues. The investment pays for itself after a few recordings.
Should I narrate while recording or add voiceover afterward?
Both approaches work. Live narration is faster for casual recordings and captures natural reactions. Post-recording voiceover (the dual-take workflow described in Method 4) produces higher quality because you can focus on smooth screen actions first, then craft your narration while watching playback. For tutorials longer than 3 minutes, the dual-take approach almost always yields better results.
What sample rate and bit depth should I use for narration?
44.1 kHz / 16-bit is sufficient for voice narration. Higher settings (48 kHz / 24-bit) provide more headroom during editing but produce larger files with no audible difference in the final output. Most screen recording tools default to 44.1 kHz, which is fine. Don't change it unless your workflow specifically requires 48 kHz (e.g., syncing with video shot at 48 kHz audio).
How do I remove background noise from a recording I already made?
If you recorded without noise reduction, import the audio into GarageBand and apply the Noise Gate to silence gaps between speech. For persistent hum or hiss, use the Channel EQ plugin: identify the frequency of the noise (fan hum is usually 100-200 Hz) and cut that band by 6-10 dB. For more aggressive cleanup, Screenify Studio's AI noise reduction can process existing recordings, or use the free Audacity app with its built-in noise reduction effect (select a silent section as the noise profile, then apply to the full track).
What's the ideal audio level for narration in a screen recording?
Target peaks between -12 dB and -6 dB. This leaves headroom so loud syllables don't clip while keeping the narration well above the noise floor. In OBS, the audio mixer shows these levels in real time. In Screenify Studio, the per-track waveform display in the editor shows relative levels. If your narration and system audio are both present, keep narration 6-10 dB louder than the app sounds so your voice remains dominant.
Can I record narration in one language and auto-generate captions in another?
Screenify Studio's AI captions transcribe your narration into text that matches the spoken language. Translation to other languages would require a separate step using a translation tool on the exported caption file. The captions follow your narration timing, so even viewers who speak a different language can follow the visual actions with the synced text as a reference.
How long should a narrated screen recording be?
Keep tutorials under 10 minutes for maximum engagement. If your topic requires more time, split it into a series (Part 1: Setup, Part 2: Configuration, Part 3: Advanced Features). Viewer retention drops sharply after the 8-minute mark in tutorial-format videos. For bug reports and async updates, 1-3 minutes is the sweet spot — say what matters and stop.
My narration audio and video are out of sync. How do I fix this?
Audio drift usually happens when the audio and video are recorded at different sample rates or when system load causes frame drops. In Screenify Studio, audio tracks are synced to the video timeline automatically, so drift doesn't occur. In OBS, make sure your audio sample rate (Settings → Audio) matches your system's output sample rate (System Settings → Sound → Output → check the format). If you recorded with QuickTime and the audio drifts, import both tracks into iMovie and manually align them using a visual/audio cue (like a mouse click that's both visible and audible).
Recording your screen is the easy part. Recording narration that sounds clear, professional, and properly balanced with your visuals takes a bit more setup — but the payoff is a recording that actually teaches instead of just showing.
Start with your microphone placement and room treatment. Get those right, and every recording tool on this list will produce good results. Get them wrong, and no software filter will fully compensate.
Ready to record narrated tutorials with AI noise reduction and automatic captions? Download Screenify Studio — the free plan includes everything you need.
Try Screenify Studio
Record your screen with auto-zoom, AI captions, dynamic backgrounds, and Metal-accelerated export. Free plan, unlimited recordings.
Download Free


