How to Screen Record Without Lag on Mac
Eliminate stutter, dropped frames, and lag in Mac screen recordings — settings, encoders, and hardware tips that actually work.

Lag in a screen recording is one of the most frustrating problems you can hit: you finish a five-minute tutorial, hit stop, and the playback stutters every couple of seconds. Your cursor jumps. The audio drifts. Text scrolls in uneven bursts. You can either redo the whole thing or ship a recording that makes you look unprepared.
The fix is almost never "buy a faster Mac." In most cases the hardware is fine — it's the encoder choice, the capture settings, or something running in the background that's stealing CPU cycles at exactly the wrong moment. This guide walks through how to diagnose where the lag is coming from and four different tools you can use to record smoothly on macOS, from the built-in Screenshot toolbar to heavier workflows like OBS.
Quick Comparison
| Tool | Price | Best For | Default Encoder | Difficulty |
|---|---|---|---|---|
| Screenshot Toolbar | Free | Short clips, casual recording | Apple VideoToolbox | Very easy |
| Screenify Studio | Free tier + Pro | Tutorials, async demos, social content | Apple VideoToolbox (HEVC/H.264) | Easy |
| OBS Studio | Free | Live streaming, heavy customization | x264 (CPU) by default — switchable | Advanced |
| Screen Studio | $229 one-time | Polished marketing clips | Apple VideoToolbox | Easy |
The encoder column is the part most people ignore, and it's usually the single biggest factor in whether a recording lags.
Why Recordings Lag: Diagnose Before You Fix
Before changing any settings, figure out which kind of lag you're dealing with. "Lag" is a catch-all word that covers at least three different problems, and the fixes are different for each.
Is it the recording or the playback?
Open the recorded file in QuickTime Player and also in VLC. If it plays smoothly in VLC but stutters in QuickTime (or vice versa), the recording is fine — it's a playback issue, usually caused by HEVC decode on an older Intel Mac or a player that doesn't handle variable frame rate gracefully. If it stutters in both players, the recording itself dropped frames and the fix has to happen at capture time.
Also try playing the file on a different machine. A recording that plays smoothly on an M2 MacBook but stutters on a 2019 Intel iMac is almost certainly HEVC decode lag, not a recording problem.
Common causes of actual recording lag
- Software encoder hogging the CPU. x264, the default encoder in OBS, runs entirely on the CPU. At 1080p60 on an M1 Air it can push the CPU past 80%, and any spike from a background process will cause dropped frames.
- Resolution plus framerate combo. Recording a full 4K display at 60fps is roughly 4x the data of 1080p60. The encoder, the disk, and the RAM all have to keep up in real time.
- Disk write speed. A sustained recording at 1080p60 needs roughly 30-50 MB/s of continuous write throughput. External USB-2 drives and some older SD cards can't hold that and will stall the encoder.
- Thermal throttling. Fanless Macs — MacBook Air and the 13" M1 — will slow the CPU down after 5-10 minutes of sustained load to protect the chip. Recordings that start smooth and get worse are usually thermal.
- Background apps. Spotlight mid-index, Time Machine running a backup, Dropbox or iCloud syncing a big folder — any of these can saturate the disk or the CPU right in the middle of your take.
- Low free RAM. macOS will start swapping to disk when physical memory runs out, and swap competes with your recording for the same SSD.
Open Activity Monitor, sort by CPU, and do a 30-second test recording. If anything other than your recording app is near the top of the list, close it before the real take.
The M-series Mac advantage
Every Apple Silicon Mac — M1 through M4 — has a dedicated media engine that handles H.264 and HEVC encoding in hardware. When you use the hardware encoder (Apple VideoToolbox), the CPU is barely involved in encoding. You can record 4K60 while compiling a project in the background and not drop a frame. This is why the encoder choice matters more than anything else on modern Macs: software encoding leaves a huge amount of performance on the table.
Method 1: Screenify Studio
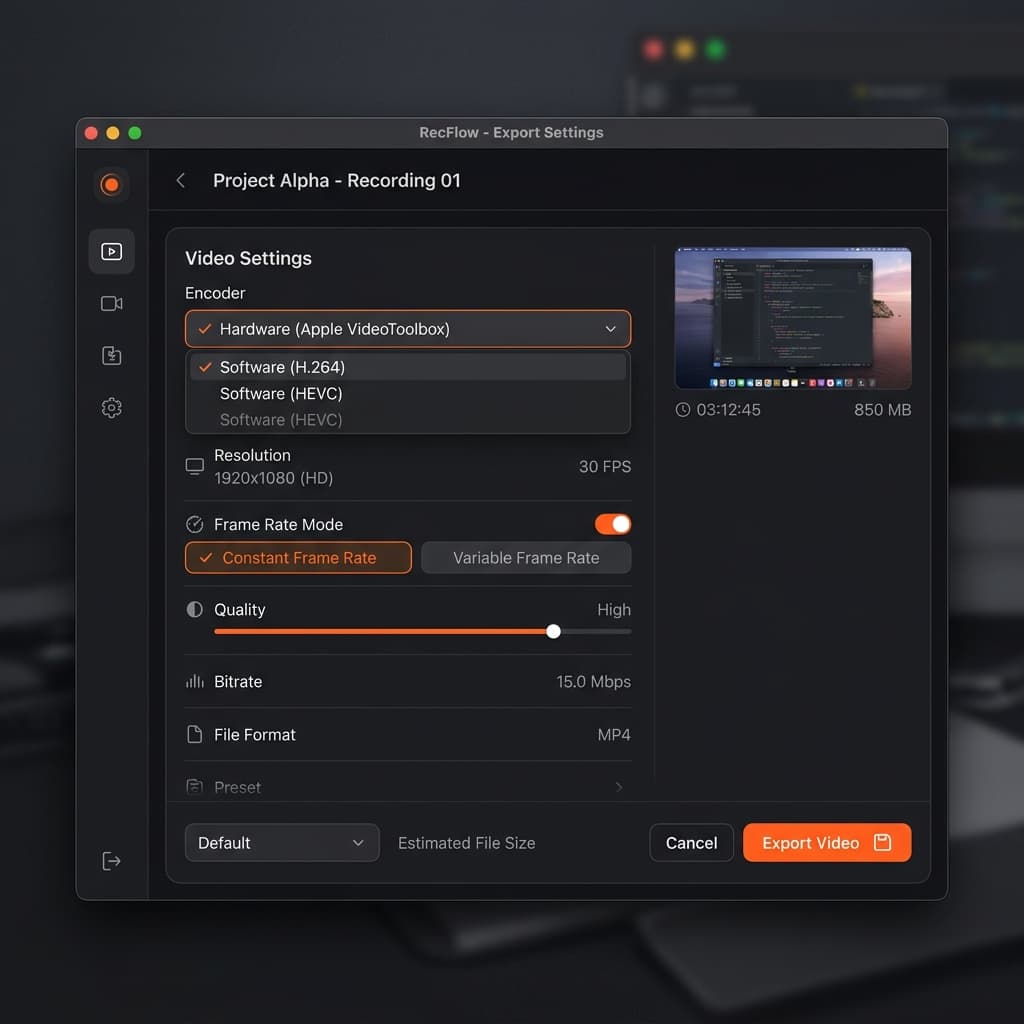
Screenify uses Apple VideoToolbox by default on every Mac, which is the right call for anyone who isn't streaming to Twitch. Encoding runs on the dedicated media engine rather than the CPU cores, so the rest of the system stays responsive during capture.
Setup for smooth recording
- Download Screenify Studio from /download and open it.
- Open the capture picker from the menu bar and choose Region. Drag a 1920×1080 selection instead of grabbing the whole display — you get a cleaner crop and half the pixels to encode.
- In Preferences → Recording, confirm the encoder is set to Hardware (Apple VideoToolbox). Choose H.264 if you want maximum playback compatibility, HEVC if file size matters more.
- Set framerate to 30fps for tutorials and walkthroughs. 60fps is only worth the extra cost for gameplay or fast animation demos.
- Start recording from the menu bar or with the global shortcut.
Why this path avoids lag
Because the encode work lives on the media engine, CPU headroom stays free for everything else — app switching, cursor smoothing, the background audio capture process. On an M1 Air, a 1080p30 recording with Screenify typically sits at 8-15% CPU total, which leaves plenty of room for whatever you're actually demoing.
Screenify also records at a constant frame rate. Constant frame rate matters because editors like Final Cut and DaVinci Resolve handle it cleanly, whereas variable frame rate recordings from some tools drift out of sync with audio during editing.
If you need a step-by-step walkthrough of the basic capture flow, the complete Mac screen recording guide covers the full setup.
Download Screenify Studio → Get it free. Hardware encoding is on by default; there's nothing to configure.
Try Screenify Studio — free, unlimited recordings
Auto-zoom, AI captions, dynamic backgrounds, and Metal-accelerated export.
Method 2: OBS Studio — Tuning x264 vs Apple VT
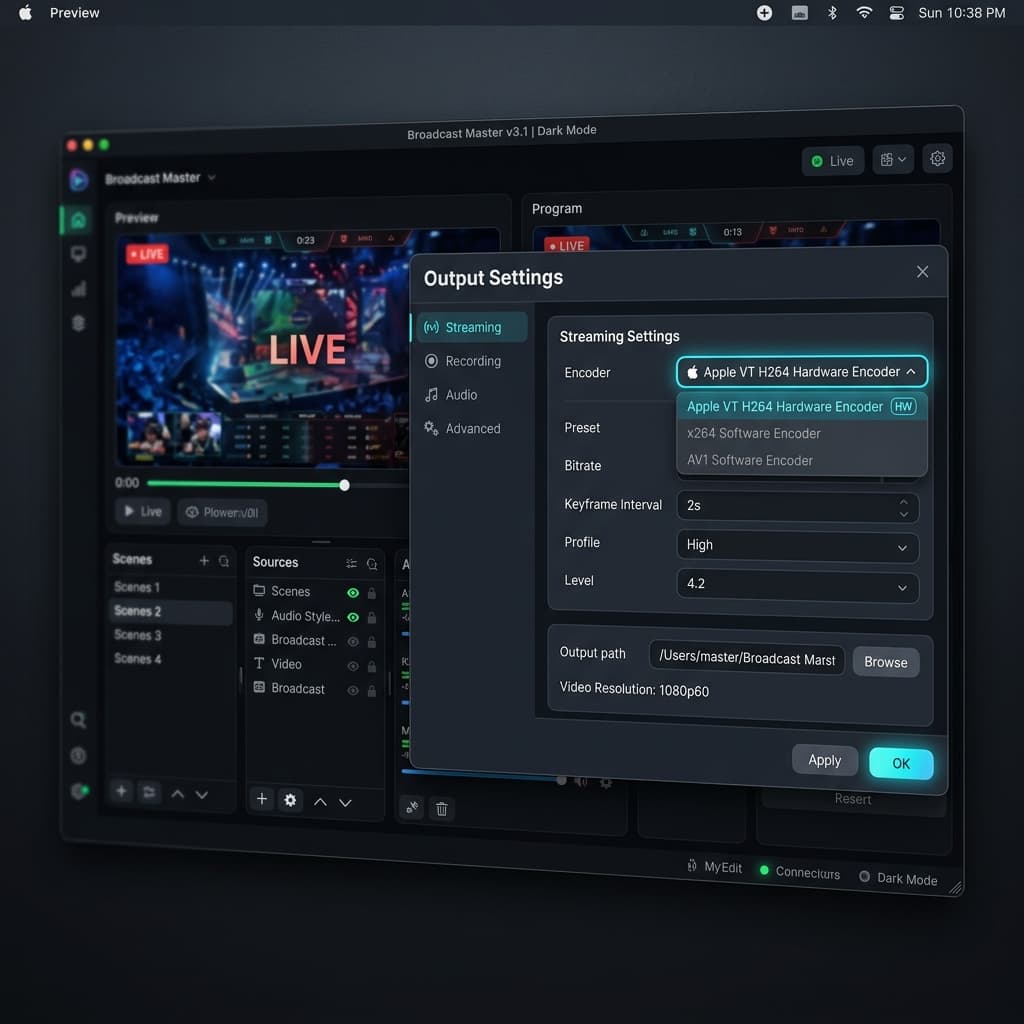
OBS is free and powerful, but its defaults on macOS are wrong for anyone who isn't deliberately streaming. Out of the box OBS uses x264, which runs on the CPU and is the main reason people say "OBS makes my Mac lag." Switching to the hardware encoder takes 30 seconds and usually eliminates the problem entirely.
The single setting that matters
- Open OBS → Settings → Output.
- Switch Output Mode to Advanced.
- Go to the Recording tab.
- Change Encoder from x264 to Apple VT H264 Hardware Encoder (or Apple VT HEVC Hardware Encoder for smaller files).
- Set Rate Control to CRF and CRF to 23. CRF 23 is a good balance — lower numbers = higher quality and bigger files.
- Set Keyframe Interval to 2 seconds.
Other settings that affect lag
- Video → Base (Canvas) Resolution: set this to match the region you're actually capturing, not your full display. Downscaling in OBS uses CPU.
- Video → Output (Scaled) Resolution: 1920×1080 is a sweet spot. 2560×1440 is fine on M2 and above. Avoid 3840×2160 unless you specifically need 4K.
- Video → Common FPS Values: start at 30. Only go to 60 if you've tested that your specific setup handles it without dropping frames.
- Advanced → Process Priority: set to Above Normal.
- Advanced → Color Format: NV12 is faster than I420 on Apple Silicon.
Verify nothing is dropping
OBS has a Stats panel (View → Stats) that shows dropped frames, rendering lag, and encoding lag in real time. Do a one-minute test recording and watch the panel. If "Skipped frames due to encoding lag" stays at 0 and "Rendering lag" stays under 1%, you're clean. If either number climbs, lower the resolution or framerate and test again.
When OBS still lags after switching encoder
If you switched to Apple VT and it's still dropping frames, the bottleneck has moved somewhere else — usually disk write speed or a background process. Check Activity Monitor's Disk tab during a test recording. If the write rate is pegged near the disk's limit, you're disk-bound and need to either lower the bitrate or record to a faster drive.
Method 3: Screenshot Toolbar — The Lightweight Default
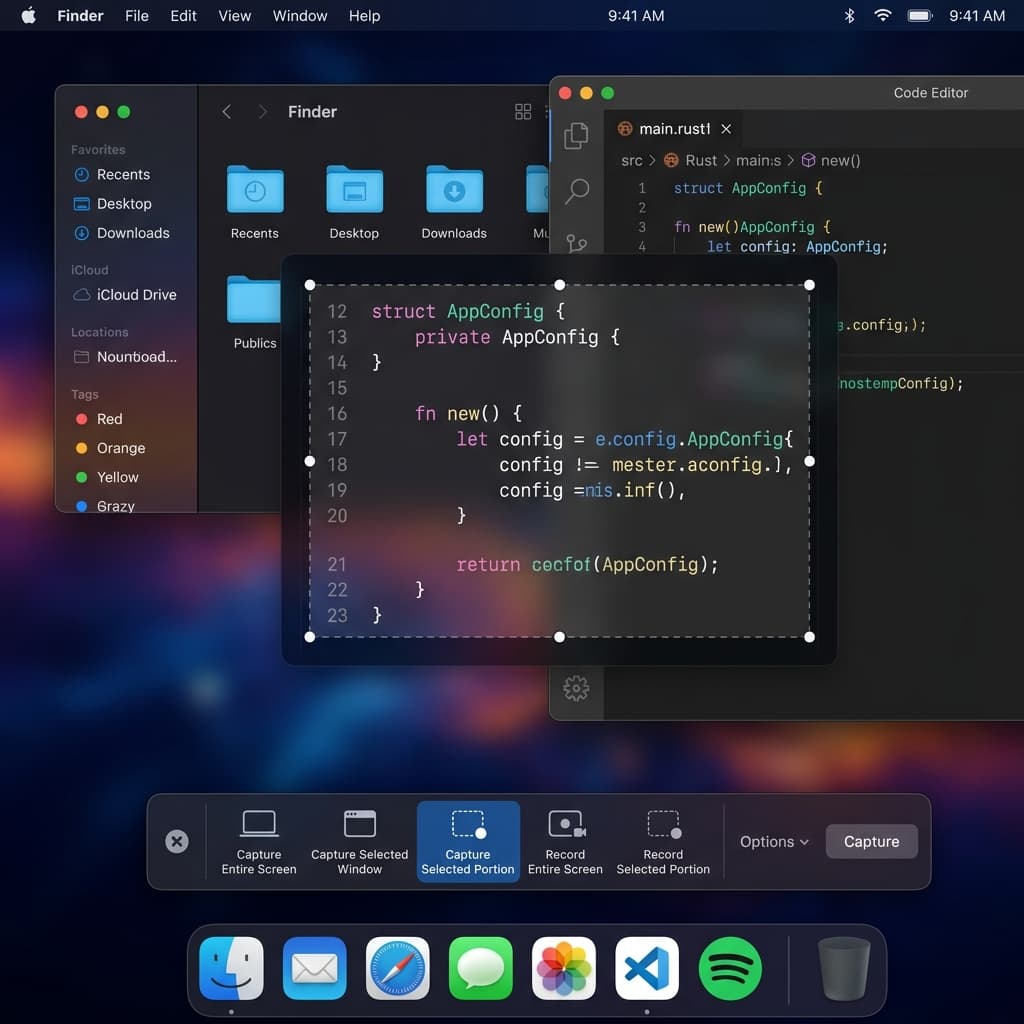
The built-in macOS Screenshot toolbar is the lowest-overhead option on any Mac. It hooks directly into the system capture pipeline, uses hardware encoding, and has almost no UI to get in the way. For anyone who just needs a quick clip and doesn't want to worry about settings, it's hard to beat.
When to use it
- Quick bug reports
- Short demos under two minutes
- Situations where you need the smallest possible CPU footprint — e.g. recording while a build is running
Steps
- Open the Screenshot controls from Launchpad or Spotlight (search for "Screenshot").
- Choose Record Selected Portion.
- Drag a rectangle around just the area you need.
- Click Record.
- Click the stop button in the menu bar when done.
Limitations to know about
- No system audio capture without a virtual audio device (BlackHole, Loopback).
- No explicit framerate control — it captures at the display's refresh rate.
- The file lands on your Desktop by default, which can be a problem if your Desktop is synced to iCloud. Move it before iCloud starts uploading, or change the save location in the Screenshot toolbar Options menu.
- No cursor highlighting, no zoom, no editing.
For a two-minute how-to where the goal is to ship fast and the polish doesn't matter, Screenshot is the right tool. For anything you'll hand to a customer or post publicly, one of the other methods will give you a better result without costing you any lag.
Method 4: Screen Studio — Capture Plus Process
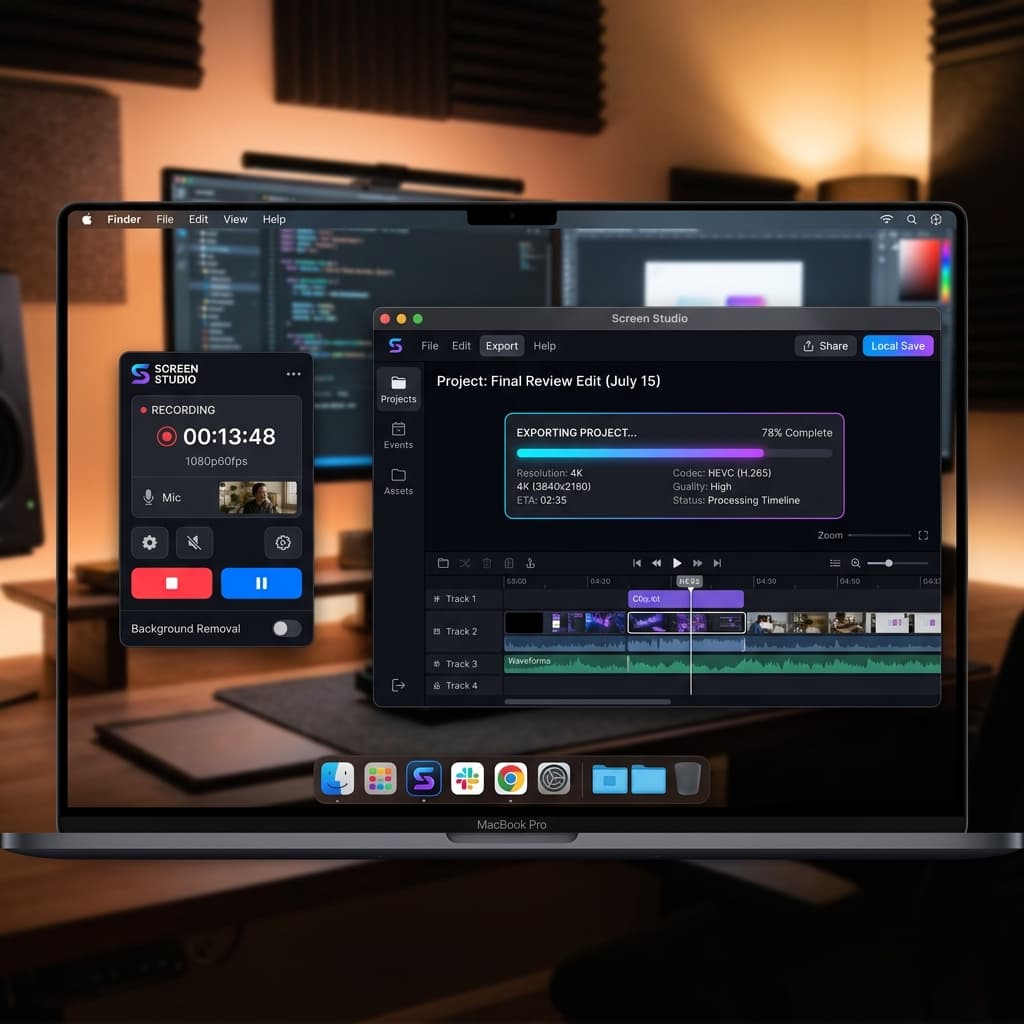
Screen Studio takes a different approach: it captures a raw high-quality source, then processes it on export. This is clever for quality — the raw capture is simple and cheap, and all the fancy stuff (smooth zoom, cursor effects, export compression) happens afterwards — but it means lag during recording is rare, while lag during export can be significant.
Setup
- Open Screen Studio and click New Recording.
- Choose the display or a specific area.
- Hit record. The capture itself is lightweight — Screen Studio is explicitly designed to make the recording phase fast.
- Stop recording. The editor opens with your capture.
- Export. This is where the work happens.
Export lag and how to manage it
On an M1 Air, exporting a 3-minute Screen Studio recording at 1080p can take 2-5 minutes. On an M3 Pro, it's closer to 30-60 seconds. If your export is taking unreasonably long:
- Close other apps first — Screen Studio's export is CPU-bound on Apple Silicon media engine.
- Export at 30fps if you captured at 60fps and don't need the motion smoothness.
- Choose H.264 over HEVC for faster export at the cost of file size.
Screen Studio's one-time license is $229, which is a real commitment. If you only need polished clips occasionally, it's worth it. If you're recording every day, the ongoing export wait can add up.
Troubleshooting Deep-Dive
Issue 1: Recording looks smooth, playback stutters
Try the file in VLC. If VLC is smooth and QuickTime isn't, it's an HEVC decode issue — HEVC needs more horsepower to play back than to record, and older Macs can record it fine but struggle to decode during playback. Fix: re-encode to H.264 using HandBrake or ffmpeg:
ffmpeg -i input.mov -c:v h264_videotoolbox -b:v 8M -c:a copy output.mp4This uses the hardware H.264 encoder and takes about 30 seconds per minute of video on an M1.
Issue 2: Drops start after 5-10 minutes
Classic thermal throttling. The Mac ran hot, hit its thermal limit, and slowed the CPU to cool down. Test by running a short 30-second recording (usually clean) then a 15-minute one (starts dropping partway through).
Fixes:
- Raise the laptop off the desk for airflow. Even lifting the back edge on two erasers helps.
- Use a laptop cooling stand with fans for MacBook Air or fanless Minis.
- Drop the resolution or framerate. 1080p30 produces far less heat than 4K60.
- Switch encoder to Apple VT if you haven't. The media engine runs much cooler than CPU-based encoding.
- Record in a cooler room. Ambient temperature matters more than people expect.
Issue 3: Dropped frames during fast cursor movement
If the recording is smooth during typing but drops frames when you whip the cursor across the screen, the capture layer is struggling to keep up with screen composition. Fixes:
- Lower the display's native resolution temporarily (System Settings → Displays → Scaled).
- Close apps with heavy GPU usage — browser windows with lots of video thumbnails, Figma files with huge assets.
- Disable any screen effects (wallpaper animation, Stage Manager transitions).
Issue 4: Audio drifts out of sync with video
Almost always a variable frame rate problem. Some tools record VFR (variable frame rate) to save disk space, but VFR confuses editors and audio-sync logic. Fix: re-encode to constant frame rate:
ffmpeg -i input.mov -r 30 -c:v h264_videotoolbox -b:v 8M -c:a aac output.mp4The -r 30 forces 30fps constant. If the source was 60fps, use -r 60. From there, use your NLE to trim and export as normal.
Issue 5: OBS says "Encoder overloaded, try turning down video settings"
This message means OBS can't encode frames fast enough to keep up with capture. If you're on x264, switching to Apple VT H264 Hardware solves it 95% of the time. If you're already on hardware encoder, lower the resolution or framerate. If neither helps, check disk write speed — you may be encoding fine but writing too slowly.
Issue 6: Recording works but the file is huge and laggy to scrub
This is a bitrate/keyframe issue, not a recording issue. If keyframes are 10+ seconds apart (the OBS default for streaming), scrubbing has to decode a long chain of frames to reach any random point. Fix: set keyframe interval to 2 seconds. File gets slightly bigger, scrubbing gets dramatically smoother.
Issue 7: Everything stutters only when recording a specific app
Some apps (browsers with hardware acceleration, games, video editors) compete with the screen recorder for GPU resources. For browsers, toggle hardware acceleration off in the browser's settings during recording. For games, lower the in-game graphics settings — you don't need ultra quality if you're only going to watch it back at 1080p anyway.
Related Performance Guides
- Recording at higher resolution? The 4K recording guide for Mac covers the encoder and bitrate settings that matter at 3840×2160.
- On a MacBook Air specifically? The fanless chassis has its own set of rules — the MacBook Air screen recording guide goes deep on thermal management and session length.
- New to Mac recording? Start with the how-to-screen-record-on-Mac overview for the basics before tuning for performance.
Try Screenify Studio for a zero-config fast path → Download free. Hardware encoding is on by default.
Try Screenify Studio — free, unlimited recordings
Auto-zoom, AI captions, dynamic backgrounds, and Metal-accelerated export.
FAQ
Why does my recording stutter even though my Mac feels fast?
Because "feeling fast" is usually measured by how quickly apps open and windows animate, both of which use the GPU. Recording stutter usually comes from CPU encoding (if you're using a software encoder like x264), disk write speed, or a background process. Switch to a hardware encoder first — it solves most cases.
Is H.264 or HEVC better for avoiding lag?
For recording: identical. Both use the same hardware media engine on Apple Silicon. For playback: H.264 is lighter to decode and less likely to stutter on older machines. For file size: HEVC is roughly half the size at equivalent quality. If compatibility matters, use H.264. If disk space matters and your playback machines are modern, use HEVC.
What framerate should I record at to avoid lag?
30fps for tutorials, walkthroughs, and anything with text. 60fps only for gameplay, animation demos, or content where motion smoothness is the point. 60fps doubles the encoding and disk workload and usually doesn't improve the viewer experience for tutorial content.
Why does Activity Monitor show high CPU during recording even on an M-series Mac?
If you're using a software encoder (x264), this is expected — all the encode work is on the CPU. Switch to Apple VT Hardware and the CPU load during recording should drop to 10-20%. If it's still high after switching, something else is running — check what process is using the CPU and close it.
Can I fix a laggy recording after the fact?
Partially. You can re-encode to constant frame rate to fix audio sync drift, and you can re-encode to H.264 to fix HEVC playback stutter. You cannot recover frames that were actually dropped at capture time — if the encoder skipped a frame, that moment is gone. This is why the test-recording step matters before the real take.
How much free disk space do I need?
Rule of thumb: 1 GB per 5 minutes at 1080p30 with Apple VT, more for 4K or 60fps. Keep at least 20 GB free on the drive you're recording to — macOS gets unhappy with very low free space and will slow down.
Why does OBS lag on my Mac but QuickTime doesn't?
QuickTime uses the system capture pipeline and hardware encoder by default. OBS defaults to x264 on the CPU. Change OBS's encoder to Apple VT Hardware and the difference disappears.
Should I close Chrome before recording?
If Chrome is just sitting with a few tabs open, no. If it's playing video, running a Meet/Zoom call, or loaded up with 30+ tabs, yes — background Chrome can eat 20% CPU on its own. Activity Monitor tells the truth; don't guess.
Wrapping Up
Most lag in Mac screen recording comes down to one of three things: a software encoder eating the CPU, a resolution-plus-framerate combination that's too ambitious for the hardware, or a background app stealing resources mid-recording. The fixes are almost always free and take less than a minute: switch to Apple VideoToolbox, drop to 1080p30 for anything that isn't gameplay, and glance at Activity Monitor before you hit record.
If you want the fast path — hardware encoding on by default, constant frame rate, no settings to get wrong — Screenify Studio is configured that way out of the box.
Get Screenify Studio free → Download for Mac
Try Screenify Studio
Record your screen with auto-zoom, AI captions, dynamic backgrounds, and Metal-accelerated export. Free plan, unlimited recordings.
Download Free


