How to Record Screen with Annotations on Mac
Add arrows, highlights, text, and shapes to Mac screen recordings — live annotation tools and post-recording editors compared.

A screen recording without annotations is a silent movie asking viewers to guess what matters. Arrows, callouts, blur boxes, and text labels turn a raw capture into something a teammate can actually follow — but macOS ships with almost no native tools for annotating video. The built-in Markup editor works on screenshots and PDFs; the moment you hit record, you're on your own.
This guide covers four real paths to annotated Mac recordings, when each one makes sense, and the practical details most tutorials skip — like why your red arrow disappears against a dark terminal, or how to fade a callout in at the exact frame someone clicks a button.
Quick comparison
| Tool | Price | Annotation style | Best for | Difficulty |
|---|---|---|---|---|
| Screenify Studio | Free + Pro | Post-recording, animated | Tutorials, bug reports, product demos | Easy |
| CleanShot X | $29 one-time | Live drawing + post | Quick Slack clips, live teaching | Easy |
| OBS + ScreenBrush | Free | Live only | Streaming, webinars | Medium |
| iMovie / Final Cut | Free / $300 | Post, title-based | Polished video with chapter labels | Medium–Hard |
No single option wins every scenario. Live annotation is unbeatable when you want viewers to watch you think through a problem. Post-recording annotation wins when you need clean, precise callouts that land on the exact frame. Most people need both tools in their workflow.
Live vs post annotation — the two paradigms
Before picking a tool, decide which paradigm fits the recording you're about to make.
Live annotation means you draw on the screen while recording. The viewer sees your cursor turn into a marker, watches you circle a button, then sees the circle fade away as you keep talking. It's intimate and conversational — closer to how a teacher uses a whiteboard than how a filmmaker edits. The downside: you're juggling narration, mouse control, and drawing at the same time. Set-up is distracting (switching tools mid-recording breaks flow), and mistakes are baked into the file.
Post annotation means you record a clean capture, then add arrows, text, and shapes in an editor afterward. Callouts can fade in exactly when a user clicks, arrows can animate from off-screen, and you can erase mistakes by deleting a layer instead of re-recording. It's more polished — but it takes real editing time. A 3-minute tutorial can easily turn into 30 minutes of annotation work if you're perfectionist about timing.
Rule of thumb: if the recording is under two minutes and will be watched by fewer than ten people, annotate live. If it will live on a docs page, landing page, or YouTube channel, annotate in post.
One more thing worth knowing: macOS does have a Markup tool, but it only works on stills. When you take a screenshot and click the floating thumbnail, you get access to arrows, shapes, text, and a signature tool. Those same tools are unavailable for video files — Preview simply won't open a .mov. This is why every method below requires a third-party app.
Method 1: Screenify Studio (post-recording annotations)

Screenify Studio is built around the post-annotation paradigm. You record first, then layer annotations on a timeline where each one has in/out points, so a callout can appear at 0:12 and fade out at 0:15 without any manual keyframing.
Step-by-step
- Open Screenify Studio and pick the area you want to capture. For UI tutorials, record at the app's native window size rather than full screen — fewer pixels to annotate over, and the zoom level won't jump around in the final video.
- Do your recording. Don't worry about narrating the visual beats ("as you can see here, the button is...") — you'll add visual callouts in post, so your voiceover can focus on the why rather than the where.
- When recording stops, the editor opens automatically with your clip loaded. Click the Annotate tab on the right panel.
- Drop annotations onto the timeline: arrows, rectangles, circles, text labels, blur rectangles, spotlight, and animated callout numbers. Each annotation becomes its own track, so you can stack multiple items on the same frame.
- Drag the edges of an annotation bar on the timeline to change when it appears and disappears. A typical callout lives for 1.5–3 seconds — long enough to read, short enough to not clutter.
- Adjust the easing. Screenify defaults to a soft fade-in/fade-out, but you can switch to pop or slide for emphasis.
- Export. Screenify uses Apple's Metal pipeline for hardware-accelerated rendering, so even a 10-minute 4K recording with 40 annotations typically exports in under a minute on Apple Silicon.
What makes it work
The feature most relevant to annotation is smart auto-zoom. Screenify watches your cursor during recording and automatically zooms toward whatever you click. When you add an arrow pointing at a button, the zoom is already framing that area, so your annotation lands inside a visually-emphasized region instead of floating on a wide shot. You get the clarity of a well-composed shot without having to plan camera moves.
The blur tool is the other underrated feature. Drag a rectangle over an email address, customer name, or API token, and Screenify tracks it as a static region (or you can key it to follow a window if you drag the window around). For recordings that go to customers or public docs, this is non-negotiable — you will eventually record something with a private Slack notification visible in the corner.
Annotations in Screenify auto-add a subtle shadow and stroke, which matters more than it sounds. A plain red arrow is invisible against a dark terminal and washed out against a white browser. Stroke + shadow means annotations are legible on every background without you manually styling each one.
Download Screenify Studio — free plan includes all annotation tools, no watermark.
Try Screenify Studio — free, unlimited recordings
Auto-zoom, AI captions, dynamic backgrounds, and Metal-accelerated export.
Method 2: CleanShot X (live + post)
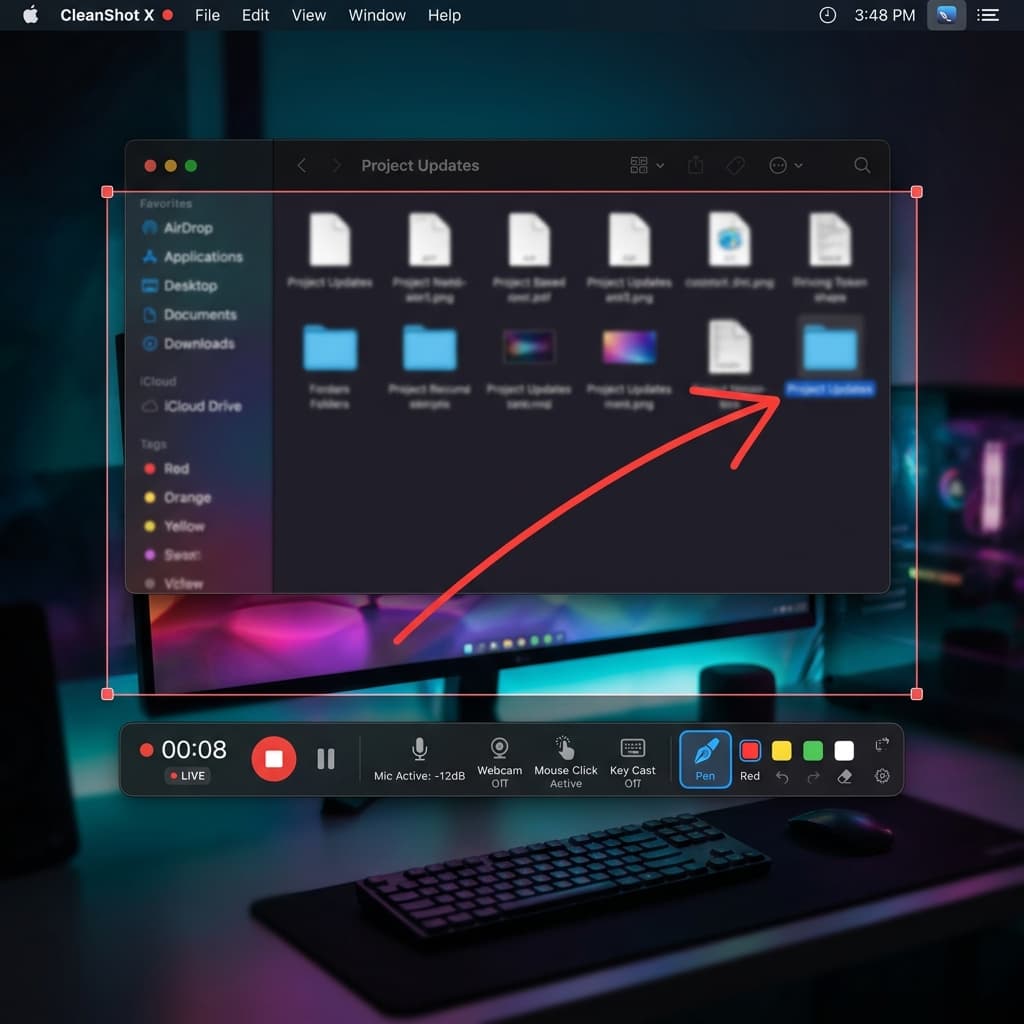
CleanShot X is the long-time favorite of Mac power users for screenshots, and its video mode supports both paradigms. You can draw on screen while recording, and you can also annotate the captured file afterward.
Live drawing while recording
- Start a CleanShot recording of your area or window.
- A floating toolbar appears with a pen icon. Click it (or use the configured hotkey) to enter drawing mode. Your cursor becomes a brush.
- Pick a color and stroke width from the mini-palette. CleanShot defaults to red, which is usually wrong — see the color note below.
- Draw arrows, circles, or freehand marks. They stay on screen until you erase them or finish recording.
- Click the brush icon again to exit drawing mode and resume normal cursor control.
The annotations are baked into the video. If you scribble wrong, you re-record or live with it.
Post annotation
After recording, CleanShot opens the file in its own editor with the same annotation toolset it uses for screenshots: arrows (with arrowhead styles), text, shapes, highlight, blur, step counters, and a crop tool. You can't animate these — they appear for the entire clip duration — but for short clips that's often fine.
When to pick CleanShot
Short Slack clips where live annotation feels conversational. Walkthroughs where you want to teach by pointing rather than by editing. It's also the best option if you need quick one-shot clips with permanent overlays (a screenshot-style arrow on a 5-second clip).
Where it falls short: timed annotations. If you want a callout to appear exactly when a user clicks a button, CleanShot makes you do it live or not at all. For multi-minute tutorials with precise pacing, post-annotation in a timeline-based editor wins.
Method 3: OBS + ScreenBrush (live-only, free)
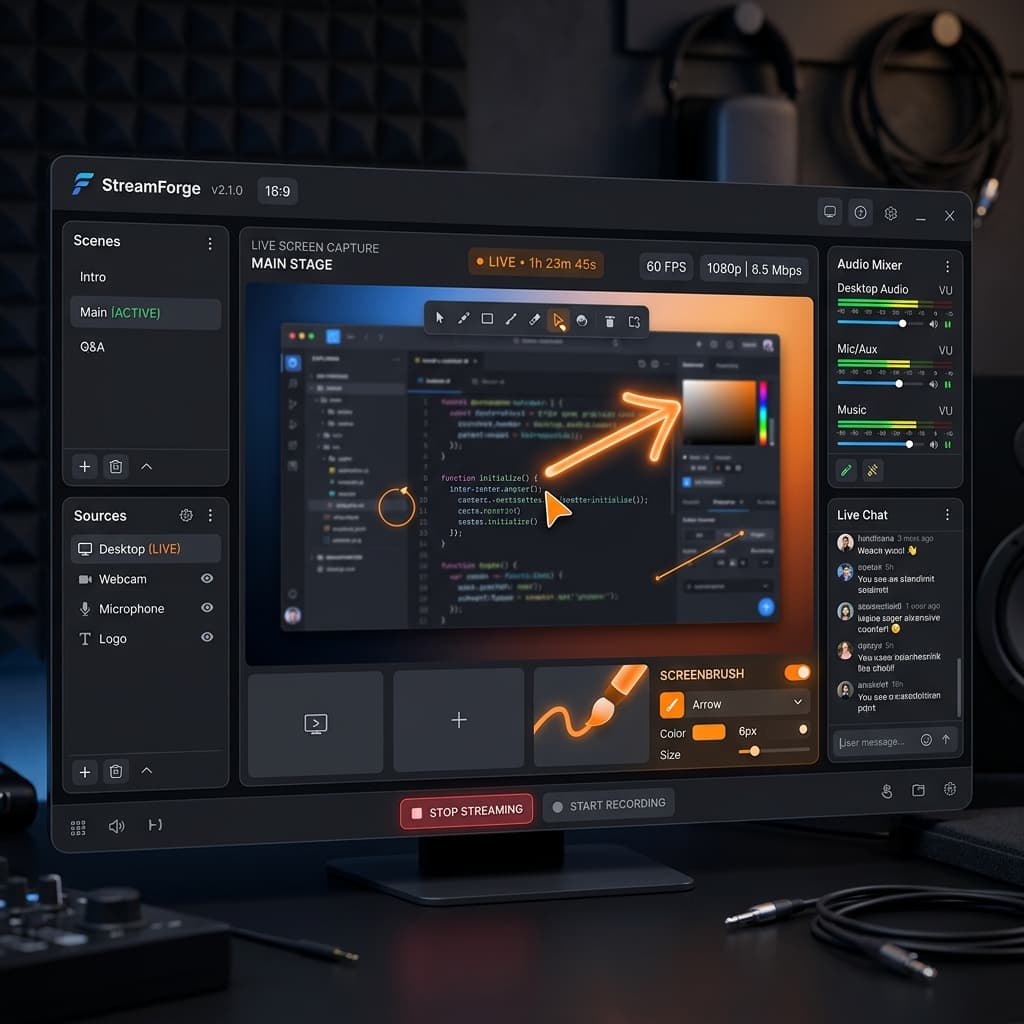
If you need live annotations without paying for anything, the open-source combo is OBS Studio for recording and ScreenBrush (free, Mac App Store) for on-screen drawing.
Setup
- Install OBS Studio from obsproject.com. Give it Screen Recording permission in System Settings → Privacy & Security → Screen Recording.
- Install ScreenBrush from the Mac App Store. It's a menu bar app that lets you draw on top of anything.
- In OBS, add a Display Capture source for your main screen, or a Window Capture source if you want a specific app. Set output resolution to match your display (1920×1080 for most Macs, 2560×1440 for 5K displays downscaled).
- Set encoder to Apple VT H264 Hardware. Software encoding will pin your CPU to 100% and drop frames during annotation.
- Start recording in OBS first, then activate ScreenBrush from the menu bar.
- Use ScreenBrush keyboard shortcuts to switch between arrow, rectangle, highlighter, and text tools. Drawing appears instantly on screen and gets captured by OBS.
- Press Escape to clear all ScreenBrush marks and keep recording cleanly.
Alternatives for the drawing layer
Presentify ($5, Mac App Store) — designed for presentations. Has a cursor highlighter that makes your mouse pointer glow yellow or red, which is particularly useful for recordings where viewers struggle to track where you're pointing.
Annotate (free trial, then $25) — more drawing tools than ScreenBrush, including step counters and an eraser that removes individual marks instead of wiping the whole screen.
Where this combo breaks down
OBS has no built-in annotation timeline. Everything you draw is live, and the drawing tool (ScreenBrush, Presentify, etc.) has no concept of "fade out after 3 seconds" — marks stay until you clear them. You can't blur sensitive information after the fact; if a notification pops up mid-recording, it's in the file forever.
For webinars and live streams, this stack is excellent — OBS is genuinely the standard for streaming, and live drawing tools pair naturally with live broadcasts. For short async tutorials, the setup cost isn't worth it compared to Method 1 or Method 2.
Need a deeper intro to OBS on Mac? See the complete Mac screen recording guide for full OBS setup and alternatives.
Method 4: iMovie or Final Cut Pro (post, title-based)
For recordings that need to look broadcast-quality — product launch videos, marketing assets, onboarding sequences — a real video editor gives you annotation capabilities nothing else can match. The trade-off is that iMovie and Final Cut weren't designed for annotation specifically, so you're working with generic title cards, shapes, and keyframe animation to build what simpler tools do in one click.
iMovie (free)
- Record your screen first with QuickTime, Screenify, or any recorder that outputs a
.movfile. - Drag the clip into a new iMovie project.
- For text annotations, use the Titles browser. The "Lower Third" and "Gradient" styles work well as callout labels. Drag a title onto the timeline above your clip and adjust the duration by dragging its edges.
- iMovie has no native arrow or shape tool. The workaround is to overlay a second clip containing a transparent PNG with an arrow in it — which means you need to create the arrow in Keynote or Pixelmator first, export as PNG, then drop it onto the timeline as a picture-in-picture element.
- For blur, iMovie offers a censor-blur effect under Clip Filters, but it blurs the entire frame, not a selectable region. True regional blur requires cropping the blur clip and layering it.
Honest take: iMovie is a workaround, not a solution, for video annotations. Fine for the occasional title card, painful for anything more.
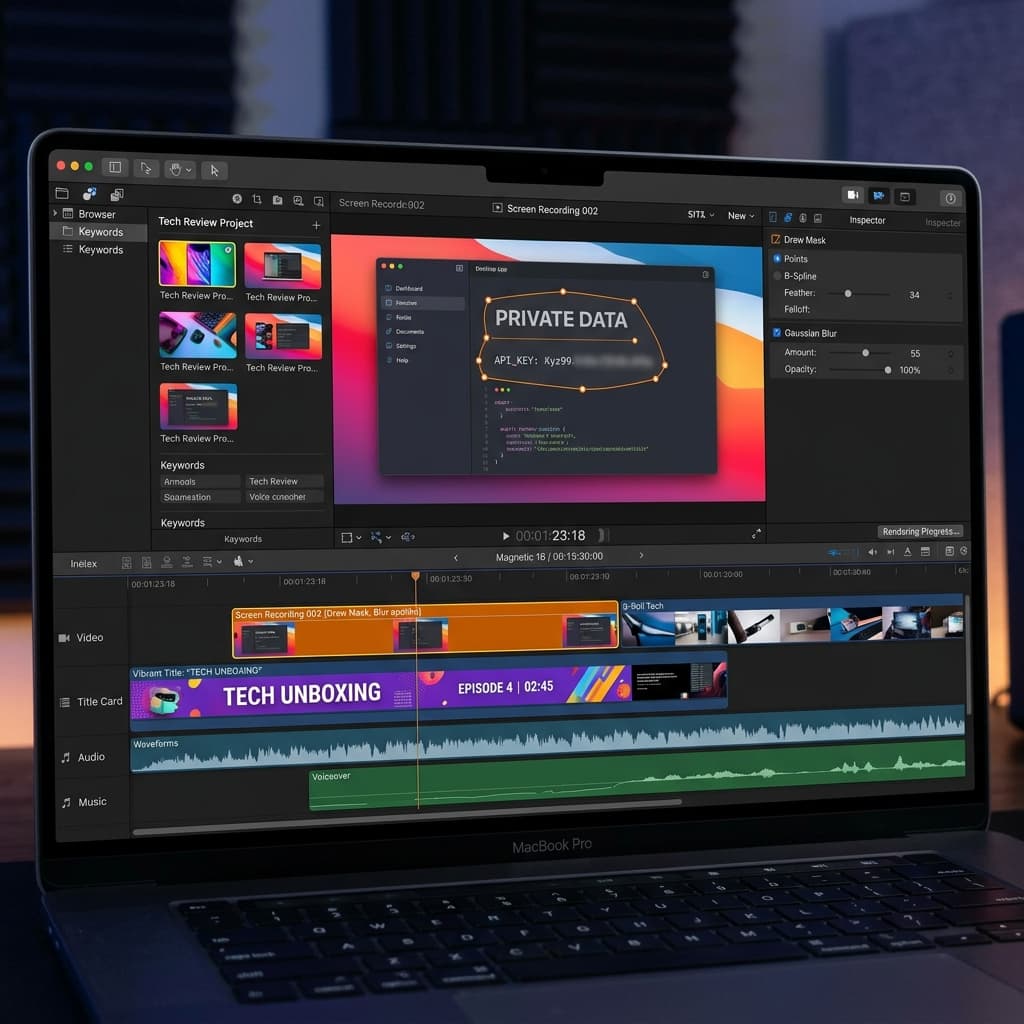
Final Cut Pro ($299.99 one-time)
Final Cut is a different beast. It has real shape generators, text tools with full typographic control, and a Draw Mask tool that lets you create regional blur by drawing a freehand region on any frame. You can keyframe opacity, position, and scale on every element, which is how professional tutorial creators build animated callouts that fly in from off-screen and rotate into place.
The learning curve is steep — if you haven't used a node-based editor before, expect a weekend of fumbling before your first clean annotation. But if you're producing recurring video content (weekly tutorials, a product changelog channel, onboarding for a SaaS), the investment pays back fast because annotation becomes a template you copy between projects.
For most people reading this, Final Cut is overkill. For people who publish video weekly, it's the right tool.
Troubleshooting
Red arrows disappear against dark backgrounds. Red on a dark terminal is nearly invisible, and red on a macOS dark-mode UI is almost as bad. Use yellow for dark backgrounds and dark red for light backgrounds, and always enable stroke + shadow on annotations. Screenify adds these by default; in CleanShot and iMovie you have to set them manually. A 2px black stroke around a colored shape gives you legibility on every background.
Annotations flicker or jitter in the final export. This is almost always a framerate mismatch. If you recorded at 60 fps but your editor is set to a 30 fps timeline, annotations interpolate between frames and shimmer. Check your project framerate before adding annotations, and match it to your source clip.
Blur box drifts off the thing you're trying to hide. Static blur rectangles are fine when the recording doesn't move, but if you scroll, drag a window, or switch apps, the blur stays put while the content slides underneath. The fix is tracking blur (Screenify's blur follows windows automatically; in Final Cut you use a tracker on a Draw Mask). If your tool doesn't support tracking, keep the blur region large enough to cover the sensitive area through its entire motion path.
Live drawing tools lag during recording. If your cursor drawing stutters or trails behind your motion, you're probably running the drawing tool with a CPU-heavy recorder (OBS software encode, screen mirroring apps). Switch OBS to Apple VT H264 Hardware, close Chrome tabs, and disable any other screen-capture apps running in the background.
Exported file is huge because of annotations. Annotations themselves don't add much, but the combination of high framerate + annotations + ProRes output can balloon a 2-minute clip to 1GB. Export to H.264 or HEVC instead of ProRes for sharing, and keep ProRes only for master files you'll re-edit.
Try Screenify Studio — free, unlimited recordings
Auto-zoom, AI captions, dynamic backgrounds, and Metal-accelerated export.
FAQ
Can I use macOS Markup to annotate a video? No. Markup works on screenshots, PDFs, and images, but Preview won't open video files. The only way to annotate video on Mac is with a third-party tool — Screenify, CleanShot X, iMovie, Final Cut, or an OBS + live-drawing combo.
What's the difference between a callout and an annotation? Annotation is the umbrella term for anything drawn on top of a recording — arrows, text, shapes, blur, highlight. A callout is a specific type of annotation that points to something, usually a numbered marker or a labeled arrow ("1 — Click here"). In most tools the terms are used interchangeably.
Is live annotation or post annotation faster overall? Live is faster in total wall-clock time — you're done the moment recording stops. Post takes longer because you add an editing step, but the result looks significantly more polished and forgiving (one wrong word in narration no longer ruins a recording). For internal sharing, live wins. For anything public-facing, post wins.
Can I blur sensitive information without re-recording? Yes. Screenify and Final Cut both let you add a blur region to a finished recording. CleanShot X lets you blur static regions in post. iMovie's blur is clumsy — better to re-record if the clip is short, or use Final Cut if it's long.
How do I add chapter markers or section labels to a tutorial? For YouTube, use timestamp chapters in the video description — viewers click to jump. For embedded video, use a timeline-based editor (Screenify's annotation labels, iMovie title cards, or Final Cut generators) to render section headers onto the video itself. The YouTube approach is less work and doesn't bake labels into the file.
Do annotations slow down export? Slightly. Each annotation is an additional composite layer the renderer has to process. On Apple Silicon with Metal-accelerated export (Screenify, Final Cut), the cost is negligible — a handful of annotations adds seconds, not minutes. On software-rendered exports (iMovie on older Intel Macs), expect a noticeable slowdown with 20+ annotations.
Can I animate annotations to appear at specific timestamps? Only in timeline-based editors. Screenify Studio supports this natively — drag an annotation's bar on the timeline to set when it appears and disappears, with automatic fade transitions. Final Cut lets you keyframe opacity manually. CleanShot X does not support timed annotations; whatever you add lives for the whole clip. iMovie supports it via title durations.
What about narration — can I combine annotations with voiceover? Absolutely, and the two are complementary. Annotations show; narration tells. A good rule: don't say "as you can see here" — let the annotation do the pointing while your voice explains the why. For more on pairing narration with recordings, see our screen recording with narration guide.
Wrapping up
Annotation is the difference between a screen recording and a tutorial. The tool you pick depends on which paradigm fits your workflow:
- Post-recording with timeline control — Screenify Studio. Animated callouts, tracking blur, Metal-accelerated export, free plan.
- Quick live drawing + one-shot post markup — CleanShot X. Strong for fast Slack clips and teaching moments.
- Free, live-only, streaming context — OBS + ScreenBrush or Presentify. Good for webinars, overkill for async tutorials.
- Broadcast-quality, template-driven — Final Cut Pro. Worth it if you publish video weekly.
If you're coming from QuickTime screen recording and wondering why your recordings feel flat, annotations are usually the missing piece. Record clean, annotate deliberately, and your viewers will actually follow what you're showing them.
Try Screenify Studio free — no watermark, all annotation tools included, works on Apple Silicon and Intel Macs.
Try Screenify Studio
Record your screen with auto-zoom, AI captions, dynamic backgrounds, and Metal-accelerated export. Free plan, unlimited recordings.
Download Free


