How to Screen Record with QuickTime Player
Record your Mac screen with QuickTime Player — step-by-step setup, trim editing, export options, and what to do when you need more.

QuickTime Player has been on every Mac since OS X 10.6 Snow Leopard. Most people open it to watch videos and never touch its recording features. That's a mistake — QuickTime can record your screen, trim clips, export at multiple resolutions, and even mirror an iPhone or iPad display. All without installing anything.
This guide covers everything QuickTime can do for screen recording, where it falls short, and what to reach for when you hit those limits.
Quick Comparison
| Tool | Price | System Audio | Webcam Overlay | Editing | Best For |
|---|---|---|---|---|---|
| QuickTime Player | Free (built-in) | No (needs BlackHole) | No | Trim only | Quick recordings, iOS mirroring |
| macOS Screenshot Toolbar | Free (built-in) | No | No | None | Fast partial-screen captures |
| Screenify Studio | Free / Pro $9.99/mo | Yes (built-in) | Yes | Auto-zoom, captions, backgrounds | Polished tutorials and demos |
| OBS Studio | Free (open-source) | Yes (via plugin) | Yes | None (record only) | Multi-source streaming setups |
Method 1: QuickTime New Screen Recording (Primary)
This is the classic way to record your screen with QuickTime — and on older macOS versions (pre-Mojave), it's the only built-in option.
Opening the recorder
- Open QuickTime Player from Applications (or search with Spotlight: ⌘ + Space, type "QuickTime")
- In the menu bar, go to File → New Screen Recording
What happens next depends on your macOS version:
- macOS Mojave (10.14) and later: This command opens the Screenshot toolbar (the same bar you get with ⌘+Shift+5). QuickTime effectively hands off to the system-level recording interface. The QuickTime window stays open but isn't driving the recording.
- macOS High Sierra (10.13) and earlier: A small dedicated QuickTime recording window appears with a red record button, a volume slider, and a dropdown arrow for options. This legacy UI gave you direct control within QuickTime itself.
If you're on Mojave or later, the File → New Screen Recording path and the ⌘+Shift+5 shortcut land you in the same place. The difference is cosmetic: going through QuickTime keeps the player window open for immediate playback after recording.
Configuring recording options
Once the recording interface is open:
- Choose your capture area:
- Record Entire Screen — the solid rectangle icon
- Record Selected Portion — the dotted rectangle icon; drag the handles to define a region
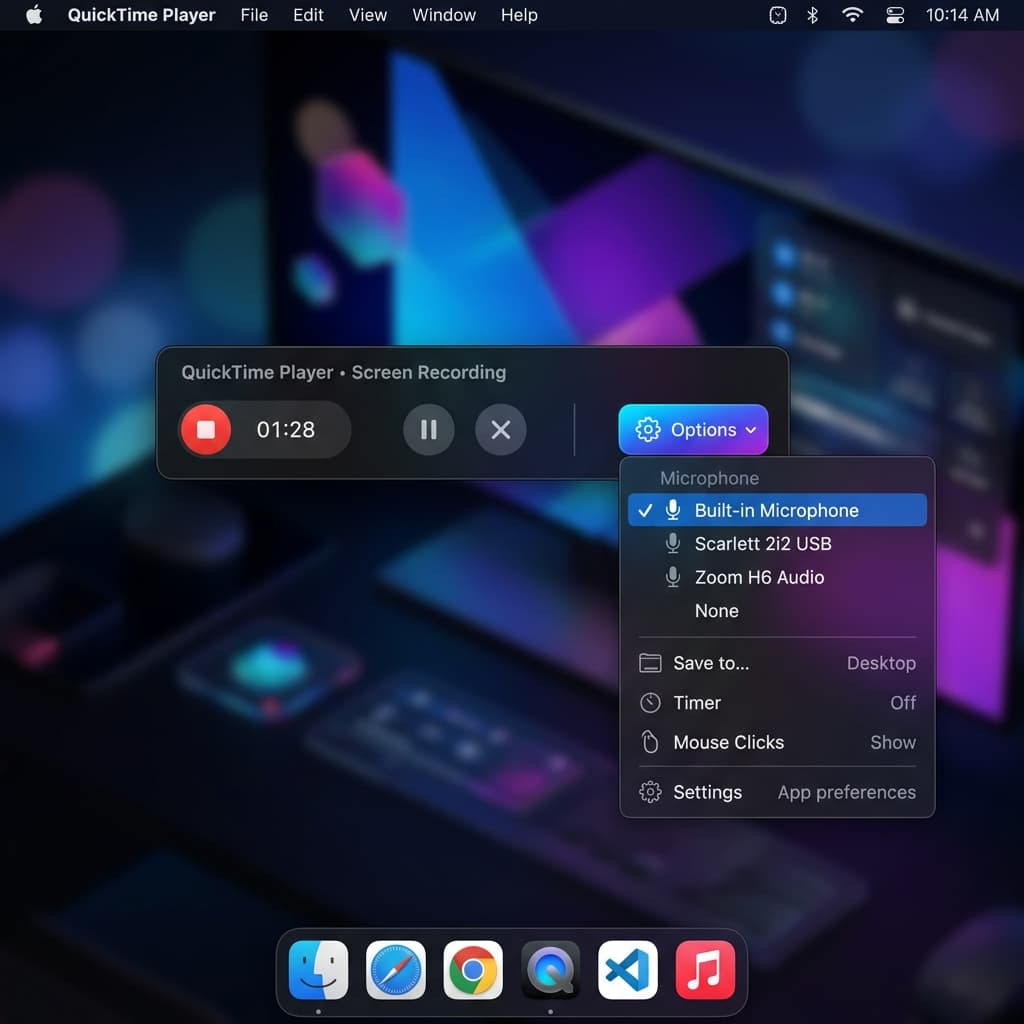
- Click Options to configure:
- Save to — Desktop (default), Documents, Clipboard, or a custom folder
- Timer — None, 5 seconds, or 10 seconds countdown
- Microphone — select your audio input device (Built-in Microphone, AirPods, external USB mic). This records voice narration only — not system audio
- Show Mouse Clicks — renders a dark circle around each click during playback
- Show Floating Thumbnail — shows a thumbnail in the bottom-right corner after recording stops, letting you preview or drag the file immediately
Recording quality: Maximum vs. High
On the legacy QuickTime recording UI (pre-Mojave), clicking the dropdown arrow next to the record button reveals a Quality setting:
- Maximum — records uncompressed or near-lossless video. File sizes are large (hundreds of MB per minute for a Retina display), but every pixel is preserved. This is the right choice if you plan to edit the recording in Final Cut Pro or DaVinci Resolve.
- High — records with H.264 compression. File sizes are dramatically smaller, and quality is visually identical for screen content. This is the default and the better choice for most use cases.
On macOS Mojave and later, the Screenshot toolbar doesn't expose this setting. Recordings use HEVC (H.265) on Apple Silicon Macs and H.264 on Intel Macs, both at high quality. You can't switch to maximum/uncompressed through the toolbar — one reason some professionals still prefer third-party tools.
Starting and stopping
- Click Record or press Enter
- If you selected "Record Entire Screen," the recording begins immediately. If you selected a region, click inside the region to start.
- To stop: click the Stop button in the menu bar (the square icon in the top-right area) or press ⌘ + Control + Esc
The recording opens automatically in a QuickTime Player window. From here, you can play it back, trim it, or export it.
Where the file lives
If you used the default settings, the .mov file saves to your Desktop with a name like Screen Recording 2026-04-10 at 3.45.12 PM.mov. Change the save location in Options before recording if you want it elsewhere.
QuickTime's Trim Editor
QuickTime includes a lightweight clip editor that most people overlook. It handles basic trimming and splitting — enough to cut dead air from the beginning and end of a recording.
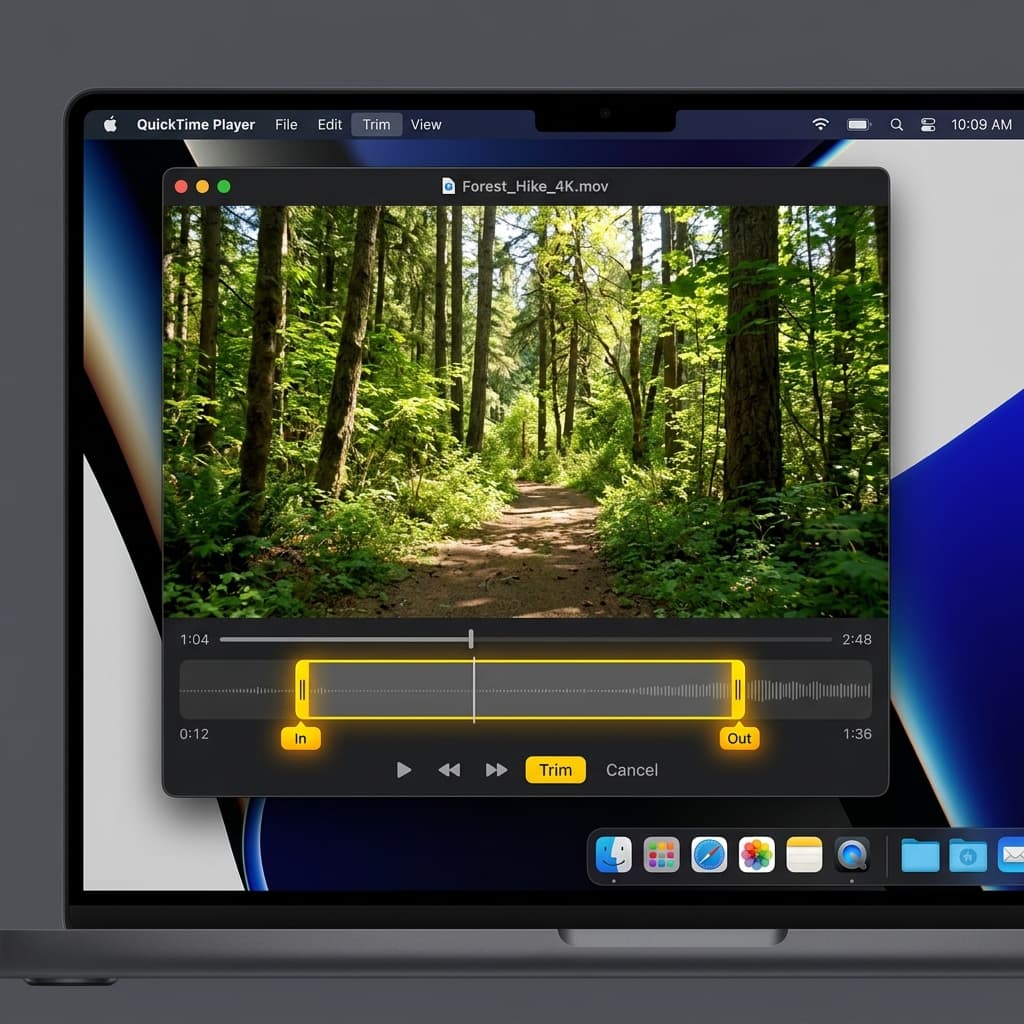
Trimming a clip
- Open the recording in QuickTime Player (it opens automatically after recording, or double-click the .mov file)
- Go to Edit → Trim or press ⌘ + T
- A timeline scrubber appears at the bottom of the video with yellow handles on each end
- Drag the left yellow handle to set where the clip should start
- Drag the right yellow handle to set where it should end
- Everything outside the yellow handles will be removed
- Click Trim to apply
The trimmed video replaces the current file when you save (⌘ + S). If you want to keep the original, use File → Export As or File → Duplicate (⌘ + Shift + S) before trimming.
Splitting clips
You can split a recording at any point on the timeline:
- Open Edit → Trim (⌘ + T) to show the timeline
- Move the playhead (the red vertical line) to the frame where you want to split
- Press ⌘ + Y to split the clip at the playhead
After splitting, you'll see two separate segments in the timeline. You can select a segment and press Delete to remove it, or rearrange segments by dragging.
Undoing edits
QuickTime supports multiple levels of undo:
- ⌘ + Z — undo the last edit (trim, split, delete)
- You can press ⌘ + Z repeatedly to step back through your edit history
- ⌘ + Shift + Z — redo
If you've made several edits and want to start fresh, close the file without saving and reopen the original.
Limitations of QuickTime's editor
- No annotations (text, arrows, highlights, shapes)
- No transitions between clips
- No audio editing — you can't adjust volume, add music, or separate audio tracks
- No way to add a webcam overlay or picture-in-picture
- No export presets for social media aspect ratios
For anything beyond basic trimming, you'll need a dedicated editor — or a tool like Screenify Studio that handles recording and editing in one app.
File → Export As vs. File → Save
This distinction confuses many QuickTime users. They do different things.
File → Save (⌘ + S)
Save writes the recording as a .mov container without re-encoding the video. The original codec (HEVC or H.264, depending on your Mac and macOS version) and resolution are preserved exactly. This is fast because no transcoding happens — QuickTime just writes the existing data to disk.
Use Save when:
- You want to keep the original quality
- You plan to edit the file in another application
- Speed matters (it's nearly instant)
File → Export As
Export As re-encodes the video into a new file at a specific resolution and codec. Go to File → Export As and choose from:
| Export Option | Resolution | Codec | Use Case |
|---|---|---|---|
| 4K | 3840 × 2160 | HEVC (H.265) | Archival, large-screen presentations |
| 1080p | 1920 × 1080 | H.264 | Standard sharing, uploads, presentations |
| 720p | 1280 × 720 | H.264 | Email attachments, smaller file sizes |
| 480p | 854 × 480 | H.264 | Legacy devices, low bandwidth |
| Audio Only | — | AAC | Extract narration from a recording |
A few things to know:
- The 4K option only appears if your original recording is at least 4K resolution. If you recorded a 1440p display, 4K won't be listed.
- Export As always produces an
.m4vfile (for video) or.m4a(for audio only), not.mov. The.m4vcontainer uses H.264 or HEVC encoding, while.movpreserves whatever codec the original used. - Re-encoding takes time — a 10-minute screen recording at 1080p might take 30–60 seconds to export on an M-series Mac, longer on Intel.
- Each export creates a new file. The original
.movis untouched.
When to use which
- Quick save to send to a colleague → File → Save (keeps original quality, instant)
- Uploading to a website or LMS that requires 1080p H.264 → File → Export As → 1080p
- Need to reduce file size for email → File → Export As → 720p or 480p
- Extracting voiceover audio → File → Export As → Audio Only
Recording an iPhone or iPad Screen via QuickTime
QuickTime can mirror and record an iOS or iPadOS device connected to your Mac. This is one of QuickTime's most underrated features — no third-party app required.
Requirements
- A Lightning or USB-C cable connecting your iPhone/iPad to your Mac
- macOS Yosemite (10.10) or later
- iOS 8 or later on the device
- The device must be unlocked and trusted (you'll see a "Trust This Computer?" dialog on first connection)
Steps
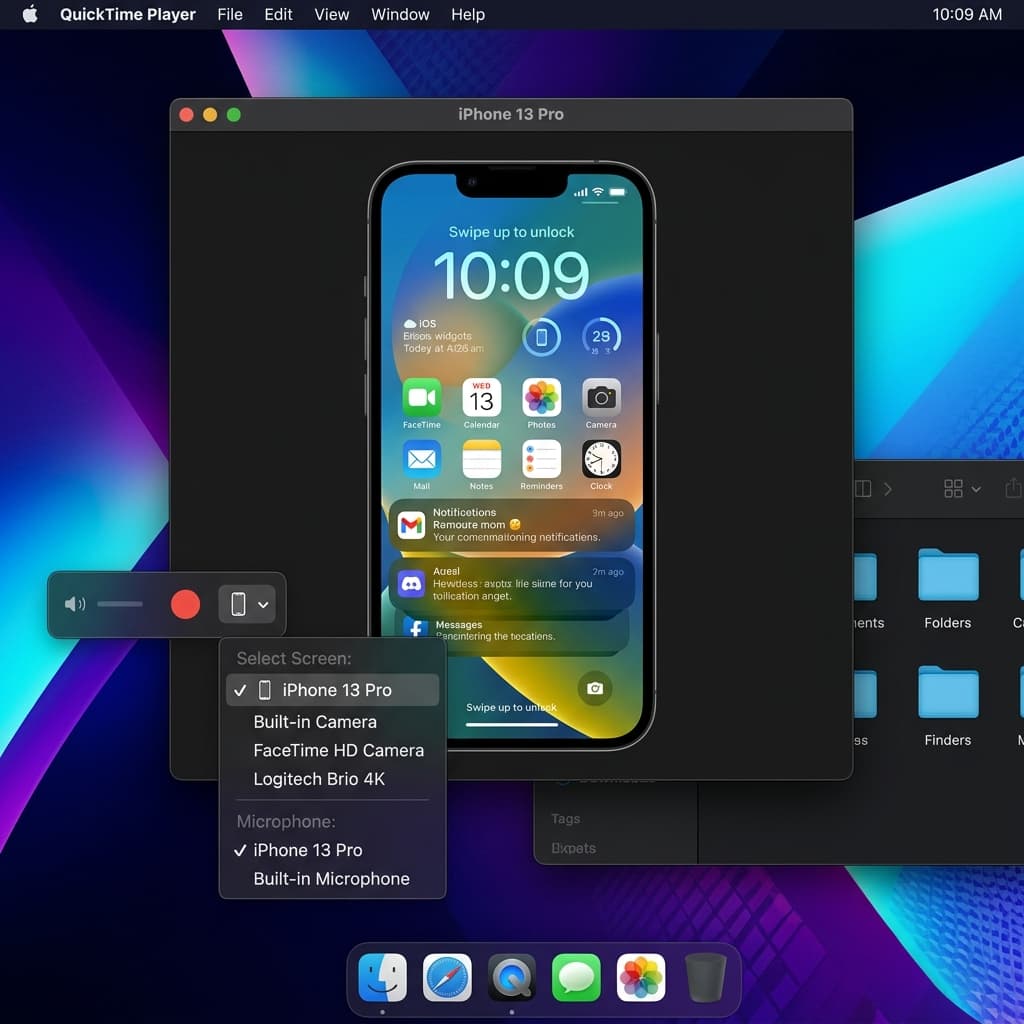
- Connect your iPhone or iPad to your Mac via cable
- Open QuickTime Player
- Go to File → New Movie Recording (not New Screen Recording)
- A recording window opens showing your Mac's camera by default
- Click the dropdown arrow next to the red record button
- Under Camera, select your iPhone or iPad from the device list — the device name appears alongside FaceTime Camera and other video sources
- Your iOS device screen now mirrors in the QuickTime window
- Under Microphone, select the same device to capture the iPhone/iPad's audio output
- Click the red record button to start recording
- Interact with your iOS device — everything happening on screen is captured in QuickTime
- Click the stop button to end recording
Tips for iOS recording via QuickTime
- Set the iOS device to Do Not Disturb before recording. Incoming calls, notifications, and banners will appear in the recording otherwise.
- The recording captures at the device's native resolution. An iPhone 15 Pro records at 2556 × 1179. You can use File → Export As to downscale afterward.
- Audio routing: selecting the iOS device as the microphone source captures the device's internal audio (app sounds, UI sounds). If you also want your voice narration, you'll need to use a separate mic and combine audio tracks in post-production.
- Wireless mirroring doesn't work for recording. AirPlay mirrors your screen to the Mac, but QuickTime's recording feature requires a wired connection to access the device as a camera source.
- Performance: some games or graphically intensive apps may show slight frame drops in the mirrored view. The recording file typically looks smoother than the live preview.
This method works well for recording app demos, mobile game footage, or walkthrough videos for iOS apps. It's how many developers record App Store preview videos.
Method 2: macOS Screenshot Toolbar (⌘+Shift+5)
On macOS Mojave and later, pressing ⌘ + Shift + 5 opens the Screenshot toolbar — the same interface that QuickTime's File → New Screen Recording redirects to. But there's a subtle difference: launching from the keyboard shortcut doesn't require QuickTime to be open at all.
For a full walkthrough of the Screenshot toolbar, see How to Screen Record on Mac. Here's the condensed version:
Steps
- Press ⌘ + Shift + 5
- Select Record Entire Screen or Record Selected Portion
- Click Options to set save location, timer, microphone, and mouse click visibility
- Click Record or press Enter
- Stop with the menu bar stop button or ⌘ + Control + Esc
How it differs from QuickTime's File → New Screen Recording
| Aspect | QuickTime File Menu | ⌘+Shift+5 Toolbar |
|---|---|---|
| Requires QuickTime open | Yes | No |
| Recording UI | Identical on Mojave+ | Identical on Mojave+ |
| Post-recording behavior | File opens in QuickTime for immediate playback/editing | Floating thumbnail appears; file saves to disk |
| Pre-Mojave behavior | Opens legacy QuickTime recording window | Not available |
| Quick trim | Open in QuickTime → Edit → Trim | Click floating thumbnail → trim handles |
On modern macOS, the functional difference is minimal. The Screenshot toolbar is faster to access (one keyboard shortcut), while the QuickTime path is better if you want the recording to open directly in the player for editing.
Output format
Same as QuickTime: .mov file using HEVC on Apple Silicon or H.264 on Intel Macs. Files save to the location set in Options (Desktop by default).
Method 3: Screenify Studio (When You Need More)
QuickTime records a raw screen capture. If you need system audio, a webcam overlay, auto-zoom on cursor movements, or AI-generated captions, you'll need a dedicated tool.
Screenify Studio captures everything QuickTime does and adds production features on top:
What Screenify adds over QuickTime
- System audio capture — built-in audio driver, no BlackHole setup. Toggle it on in one click. See How to Record Internal Audio on Mac for details on how this works.
- Webcam overlay — circular or rectangular camera feed, positioned anywhere on screen. Resize and reposition in the editor.
- Auto-zoom — the camera follows your cursor and zooms into the active area. Viewers see the detail without squinting at a full-screen recording.
- AI captions — automatic transcription overlaid on the video. Editable, with multiple styles.
- Custom backgrounds — replace the desktop background with gradients, images, or solid colors. No need to clean up your desktop before recording.
- Pause and resume — press the shortcut to pause mid-recording. QuickTime has no pause — you have to stop and start a new file, then stitch them together.
- Metal-accelerated export — leverages Apple GPU for fast rendering. A 10-minute recording exports in under a minute on M-series Macs.
- Instant sharing — upload to Screenify's sharing platform and get a link. No manual file upload to Google Drive or Dropbox.
Quick setup
- Download Screenify Studio — free plan, no watermark, no time limit
- Open the app and grant Screen Recording and Microphone permissions when prompted
- Toggle on System Audio and Microphone in the recording panel
- Select your capture area and press ⌃ + ⌘ + R to record
- Press the same shortcut to stop
- Edit in the built-in editor: trim, apply auto-zoom, add captions
- Export or share with a link
If your workflow is "record screen, trim, share," QuickTime handles it. If your workflow includes any of the features above, Screenify eliminates the need to juggle multiple apps.
Try Screenify Studio — free, unlimited recordings
Auto-zoom, AI captions, dynamic backgrounds, and Metal-accelerated export.
Method 4: OBS Studio (Advanced Free Option)

OBS (Open Broadcaster Software) is a free, open-source tool built for livestreaming but capable of local recording. It's the most powerful free option, but the learning curve is steep.
When to use OBS over QuickTime
- You need to record multiple sources simultaneously (screen + webcam + slides)
- You're streaming to Twitch, YouTube, or another platform while recording locally
- You need precise control over encoding settings (bitrate, keyframe interval, encoder selection)
- You want scene transitions, source layering, and audio mixing
Basic screen recording setup
- Download OBS from obsproject.com
- Open OBS and go through the Auto-Configuration Wizard (optimize for recording, not streaming)
- In the Sources panel, click + and select macOS Screen Capture
- Choose your display from the dropdown
- In Settings → Output, set:
- Recording Path — where files save
- Recording Format — MKV or MP4 (MKV is safer against crashes; remux to MP4 afterward via File → Remux Recordings)
- Encoder — Apple VT H264 Hardware Encoder for Apple Silicon Macs
- Click Start Recording in the bottom-right
System audio in OBS
On macOS 13 Ventura and later, OBS supports macOS Audio Capture natively:
- In Sources, click + → macOS Audio Capture
- Select the application whose audio you want to capture, or choose "All Applications"
- This captures system audio without any virtual audio driver
On older macOS versions, you'll need BlackHole or a similar virtual audio device, similar to the QuickTime workaround.
Downsides of OBS
- No built-in editing. You get a raw file and need a separate editor.
- The interface is designed for power users. Configuring scenes, sources, and encoding settings takes time.
- No auto-zoom, no captions, no post-processing. What you record is what you get.
- File sizes can be large if encoding settings aren't tuned properly.
OBS is worth learning if you do live production or need multi-source recording. For straightforward screen capture, QuickTime or Screenify Studio are faster to set up.
QuickTime Audio: What It Can and Can't Capture
Audio is QuickTime's biggest limitation for screen recording. Here's the full picture:
What works
- Microphone audio — select any connected mic (built-in, USB, Bluetooth) in the recording options. Your voice narration records alongside the screen capture in a single audio track.
What doesn't work
- System audio — QuickTime cannot capture the sound playing through your Mac's speakers. If you're recording a presentation with embedded video, a browser tab playing music, or a video call, that audio won't appear in the recording. This is a macOS-level restriction, not a QuickTime bug. Apple's Core Audio framework doesn't expose system output as a recordable input.
The workaround: BlackHole
BlackHole is a free, open-source virtual audio driver that creates a bridge between your system audio output and a virtual input device.
- Install BlackHole 2ch from existential.audio/blackhole
- Open Audio MIDI Setup (Applications → Utilities)
- Click + → Create Multi-Output Device
- Check both Built-in Output (your speakers/headphones) and BlackHole 2ch
- Set this Multi-Output Device as your system sound output in System Settings → Sound → Output
- In QuickTime's recording options, select BlackHole 2ch as the microphone input
- Record — system audio now routes through BlackHole into QuickTime
For the complete walkthrough with screenshots and troubleshooting, see How to Record Internal Audio on Mac.
Important caveats:
- You won't hear audio through your speakers while recording unless you set up the Multi-Output Device correctly (Built-in Output must be checked alongside BlackHole)
- After recording, remember to switch your system audio output back to your normal speakers/headphones
- Some audio DRM (Netflix, Apple TV+) blocks virtual audio routing at the system level
If this setup sounds like too much work, Screenify Studio handles system audio capture automatically with a built-in driver — no Audio MIDI Setup configuration required.
QuickTime Playback Controls You Might Not Know
QuickTime Player has hidden playback features useful when reviewing recordings:
Speed controls
- Click the fast-forward button to cycle through 2×, 5×, 10×, 30×, and 60× speed
- Hold Option and click the fast-forward or rewind button to step through speeds in finer increments: 1.1×, 1.25×, 1.5×, 2× — useful for reviewing long recordings at a slightly faster pace without losing comprehension
- Press ⌘ + → to skip forward and ⌘ + ← to skip backward
Frame-by-frame navigation
- Press → (right arrow) to advance one frame
- Press ← (left arrow) to go back one frame
- This is invaluable for finding the exact frame to start or end a trim
Keyboard shortcuts reference
| Shortcut | Action |
|---|---|
| Space | Play / Pause |
| → | Next frame |
| ← | Previous frame |
| ⌘ + → | Skip forward |
| ⌘ + ← | Skip backward |
| ⌘ + T | Open trim editor |
| ⌘ + Y | Split clip at playhead |
| ⌘ + S | Save |
| ⌘ + Shift + S | Duplicate |
| ⌘ + Z | Undo |
| ⌘ + Shift + Z | Redo |
QuickTime Scripting with AppleScript and Shortcuts
QuickTime Player is scriptable via AppleScript, which means you can automate recording sessions. This is useful for scheduled captures, automated testing workflows, or recording scripts that run unattended.
Basic AppleScript example
tell application "QuickTime Player"
    set newRecording to new screen recording
    delay 2
    start newRecording
    delay 60 -- record for 60 seconds
    stop newRecording
    export newRecording in (POSIX file "/Users/you/Desktop/automated-recording.mov") using settings preset "1080p"
end tell
This script starts a screen recording, captures for 60 seconds, stops, and exports at 1080p. You can trigger it from Terminal with osascript, from a cron job, or from a Shortcuts automation.
Practical automation ideas
- Scheduled recording: Use macOS Calendar alerts or
launchdto trigger an AppleScript at a specific time — record a live webinar, a dashboard at the end of each day, or a time-lapse of a long process. - Testing workflows: QA teams can script QuickTime to start recording before running automated UI tests (via Xcode UI Testing or Selenium), then stop recording when tests complete. The video provides evidence of what happened during the test run.
- Shortcuts app integration: In the Shortcuts app, use a "Run AppleScript" action to wrap QuickTime recording commands. Combine with other actions (open a URL, wait, send a notification) to build multi-step automations.
Caveats
- The macOS Screen Recording permission dialog may interrupt the first automated run. Grant permission to Script Editor (or whatever app is running the AppleScript) in System Settings → Privacy & Security → Screen Recording.
- AppleScript controls are limited — you can start, stop, and export, but you can't configure recording quality, select a region, or choose a microphone source programmatically. Those settings use whatever was last configured in the QuickTime UI.
- On macOS Ventura and later, security prompts may require user interaction for automation permissions. Fully unattended recording on a locked Mac isn't reliable without additional configuration.
Troubleshooting
"Screen Recording" permission denied
QuickTime shows a black screen or refuses to record.
Fix: Go to System Settings → Privacy & Security → Screen Recording. Make sure QuickTime Player is in the list and its toggle is enabled. If it's already enabled, toggle it off, wait 3 seconds, toggle it back on. You may need to quit and reopen QuickTime for the change to take effect.
Recording has no audio
You selected a microphone in options, but the exported file is silent.
Fix: Check three things:
- The correct microphone is selected in Options (not "None")
- The mic isn't muted in System Settings → Sound → Input
- The mic's input level is high enough — speak and watch the level indicator in Sound settings
If you expected system audio, remember that QuickTime cannot capture it natively. You need BlackHole or a similar virtual audio driver. See the internal audio guide.
Recording is choppy or low frame rate
The exported video stutters or plays at less than 30fps.
Fix:
- Close resource-heavy apps during recording. Screen recording competes for GPU and CPU cycles.
- If you're recording a Retina display at native resolution, the encoder has more pixels to process per frame. Try recording a smaller region instead of the full screen.
- On Intel Macs, check Activity Monitor for CPU usage. If it's above 80% during recording, quality will degrade.
- Disable the "Show Mouse Clicks" option — on older Macs, the click animation overlay can cause frame drops.
Exported file is much larger than expected
A 5-minute recording is several GB.
Fix: You may have recorded at "Maximum" quality on the legacy QuickTime UI (pre-Mojave), which uses minimal compression. Use File → Export As → 1080p to re-encode with H.264 compression. On modern macOS, recordings use HEVC by default, which produces much smaller files — a 5-minute 1080p recording is typically 100–300 MB.
QuickTime won't open the recording file
Double-clicking the .mov file shows an error or a blank player.
Fix:
- The file may be corrupted if the recording was interrupted (Mac crashed, ran out of disk space, force-quit QuickTime during recording). There's no built-in recovery — the file is likely unrecoverable.
- If the file plays in VLC but not QuickTime, the codec may not be supported. This can happen with recordings from other apps saved as .mov. QuickTime only plays codecs it knows: H.264, HEVC, ProRes, and a few legacy formats.
Try Screenify Studio — free, unlimited recordings
Auto-zoom, AI captions, dynamic backgrounds, and Metal-accelerated export.
FAQ
Can QuickTime record system audio without third-party software?
No. QuickTime can only capture microphone input. To record system audio (app sounds, browser audio, video call audio), you need a virtual audio driver like BlackHole. See How to Record Internal Audio on Mac for the setup process.
Can I pause and resume a QuickTime screen recording?
No. QuickTime's screen recording has no pause function. Once you stop, the recording ends and a new file is created. If you need to pause mid-recording, you'll need to make multiple recordings and join them in iMovie, or use a tool like Screenify Studio which supports pause and resume natively.
What format does QuickTime save screen recordings in?
QuickTime saves recordings as .mov files. On Apple Silicon Macs running macOS Big Sur or later, the video codec is HEVC (H.265). On Intel Macs, it's typically H.264. Both are wrapped in the QuickTime .mov container. When you use File → Export As, the output is .m4v (an MPEG-4 container) instead.
How long can a QuickTime screen recording be?
There's no built-in time limit. The only constraint is available disk space. QuickTime records until you stop it or your disk fills up. At 1080p with HEVC compression, expect roughly 1–3 GB per hour depending on the visual complexity of what's on screen. Static content (a text editor) compresses much better than fast-moving content (a video playing full-screen).
Can I record a specific window with QuickTime?
Yes, but only through the Screenshot toolbar (macOS Mojave+). After pressing ⌘+Shift+5, select "Record Selected Portion" and drag the selection to match the window. There's no automatic "snap to window" for recording — unlike screenshots, which let you click a window to capture just that window. You'll need to manually align the selection.
Does QuickTime screen recording capture at 60fps?
QuickTime records at the refresh rate of the captured content, up to 60fps on supported displays. However, the actual frame rate depends on your Mac's hardware and current load. Most screen recordings settle around 30fps because typical desktop usage (moving windows, typing, scrolling) doesn't change every frame. Fast-moving content like games or video playback may trigger higher frame rates. You can verify the frame rate of a completed recording by opening it in QuickTime and pressing ⌘ + I to view the file inspector.
Is QuickTime screen recording the same as ⌘+Shift+5?
On macOS Mojave and later, yes — both launch the same Screenshot toolbar. The only practical difference is that going through QuickTime (File → New Screen Recording) opens the recording in a QuickTime window afterward, while ⌘+Shift+5 saves the file and shows a floating thumbnail. On pre-Mojave macOS, they're completely different: ⌘+Shift+5 doesn't exist, and QuickTime has its own dedicated recording interface.
Can QuickTime record my iPhone or iPad screen?
Yes. Connect your iOS device via Lightning or USB-C cable, open QuickTime, choose File → New Movie Recording, then select your device from the camera dropdown. QuickTime mirrors the device screen and records it as a .mov file on your Mac. This requires a wired connection — AirPlay screen mirroring doesn't work for QuickTime recording. See the "Recording an iPhone or iPad Screen" section above for full steps.
The Bottom Line
QuickTime Player is a capable screen recorder hiding in plain sight. It handles basic screen capture, iOS device recording, trimming, and multi-resolution export without any downloads. For quick, no-fuss recordings, it's the fastest path from "I need to record this" to a shareable file.
Where QuickTime falls short — system audio, webcam overlays, pause/resume, annotations, and any form of post-processing — is where dedicated tools take over. If you regularly create tutorials, product demos, or course content, Screenify Studio fills those gaps while keeping the simplicity of a single-app workflow. If you need multi-source streaming and don't mind configuration, OBS covers the power-user end.
Start with QuickTime. Graduate when you need to.
Try Screenify Studio
Record your screen with auto-zoom, AI captions, dynamic backgrounds, and Metal-accelerated export. Free plan, unlimited recordings.
Download Free


