Screen Recording Keyboard Shortcuts on Mac
Every Mac screen recording shortcut — built-in toolbar, QuickTime, Screenify Studio, OBS — plus how to remap them yourself.

Your hands should never leave the keyboard when you hit record. Every second spent hunting for a menu item is a second your demo, your bug repro, or your tutorial intro loses momentum. macOS and its recording tools expose a lot of hotkeys — the problem is they're scattered across four different apps, two System Settings panes, and a handful of undocumented modifiers.
This is the reference page I wish existed when I started recording daily. Every shortcut you can use to start, stop, pause, or configure a screen recording on Mac, organized by tool, with the remap instructions you need when a shortcut collides with something else.
Quick comparison — default shortcuts per tool
| Tool | Open capture UI | Start recording | Stop recording | Pause | Cancel |
|---|---|---|---|---|---|
| Screenshot Toolbar | ⌘ Shift 5 | Return (after framing) | ⌘ Control Esc | — | Esc |
| QuickTime Player | Control ⌘ N | Click red button | ⌘ Control Esc | — | Esc |
| Screenify Studio | ⌃ ⌘ R | ⌃ ⌘ R (toggle) | ⌃ ⌘ R | ⌃ ⌘ P | ⌃ ⌘ . |
| OBS Studio | Unassigned (set in Settings → Hotkeys) | Custom | Custom | Custom | Custom |
Two things jump out. First, the built-in macOS tools share ⌘ Control Esc as a universal stop command — that's the one hotkey worth memorizing no matter which app you use. Second, OBS ships with zero default hotkeys, which is a feature, not a bug: you configure exactly what you want and nothing fires by accident.
Download Screenify Studio if you want a recorder that's fully keyboard-driven from the first launch — no hotkey setup required.
Method 1 — macOS Screenshot Toolbar (the complete shortcut set)
The Screenshot Toolbar (Monterey and later) is the fastest path from idea to recording on any Mac. It also has the most hidden hotkeys, because a lot of behavior is bound to plain keys like Space and Return once the toolbar is visible. Here's the exhaustive list.
Opening and framing
| Shortcut | What it does |
|---|---|
⌘ Shift 5 | Summon the Screenshot Toolbar overlay |
⌘ Shift 3 | Capture full screen (screenshot, not recording — same family of shortcuts) |
⌘ Shift 4 | Capture selection (screenshot) |
⌘ Shift 4 then Space | Capture a specific window (screenshot) |
⌘ Shift 6 | Capture the Touch Bar (MacBook Pro models that still have one) |
The last two rows matter even for recording workflows. A lot of tutorials combine stills and video, and these shortcuts let you snap a reference frame without leaving the toolbar you already have open.
Inside the toolbar
Once ⌘ Shift 5 has the overlay up, these keys work:
| Shortcut | What it does |
|---|---|
Return | Start recording (or take screenshot) with current settings |
Esc | Dismiss the toolbar without capturing |
Space | Toggle between window-picker and selection modes when hovered over a recording mode |
Tab | Move focus between toolbar buttons |
| Arrow keys | Nudge the selection rectangle by 1 pixel (hold Shift for 10) |
⌘ . | Close the toolbar |
The Return-to-start flow is the hotkey that most people miss. You don't need to click the "Record" button — frame your selection, press Return, and recording begins immediately.
Stopping a recording
| Shortcut | What it does |
|---|---|
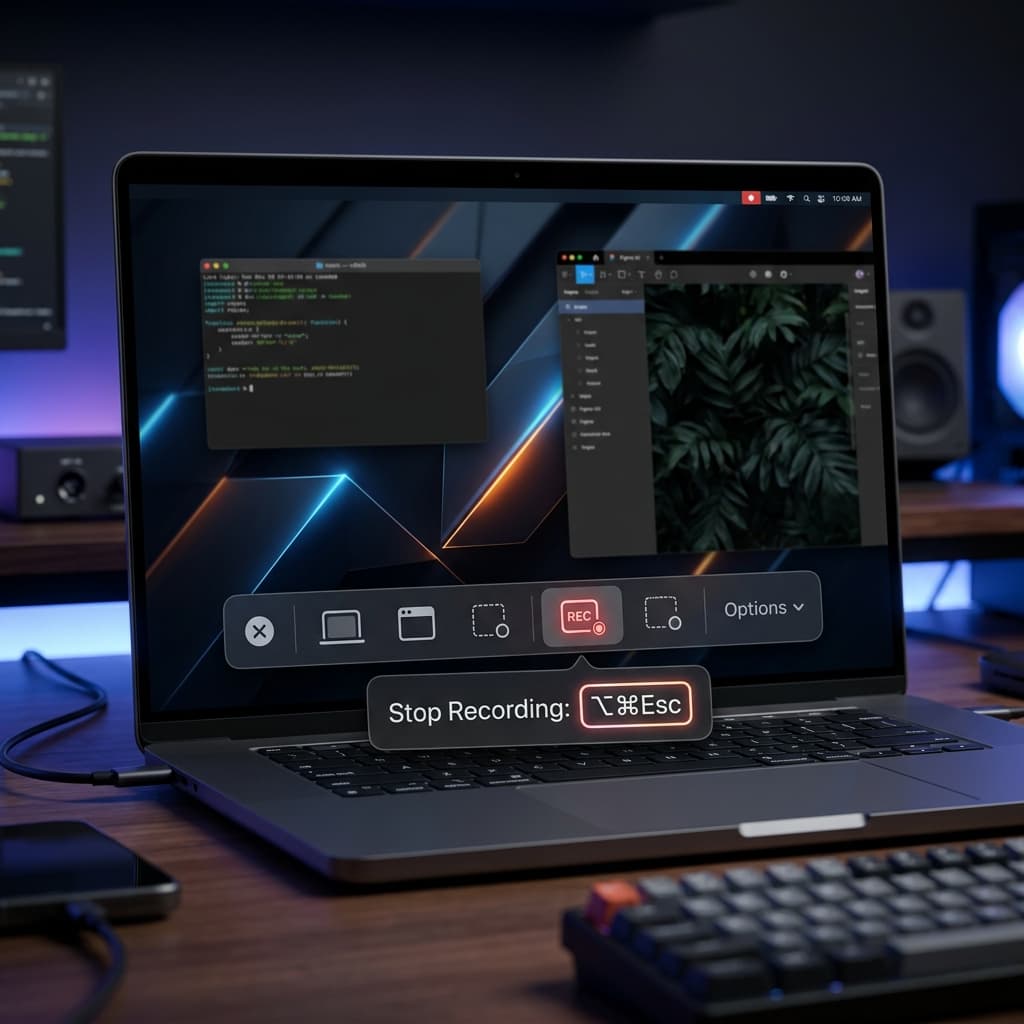
⌘ Control Esc | Stop the current screen recording |
| Click stop icon in menu bar | Manual stop |
⌘ Shift 5 then click stop | Reopen toolbar and stop from there |
⌘ Control Esc is the one. It works whether the toolbar is visible or not, from inside any fullscreen app, and during both Screenshot Toolbar and QuickTime recordings. If you memorize one shortcut from this entire post, make it this one.
Options menu shortcuts
Inside the toolbar's "Options" dropdown, there are no keyboard shortcuts — you have to click. But you can tab through the options with Tab and toggle checkboxes with Space, which is enough to stay on the keyboard.
For a full walkthrough of the toolbar's non-shortcut features, see the macOS Screenshot Toolbar guide.
Method 2 — Screenify Studio shortcuts
Screenify Studio is designed around a single idea: you should be able to start a recording from anywhere on your Mac without breaking focus. That means one global shortcut that works whether you're in Xcode, Figma, Safari, or a fullscreen game.
Global hotkeys (work from any app)
| Shortcut | What it does |
|---|---|
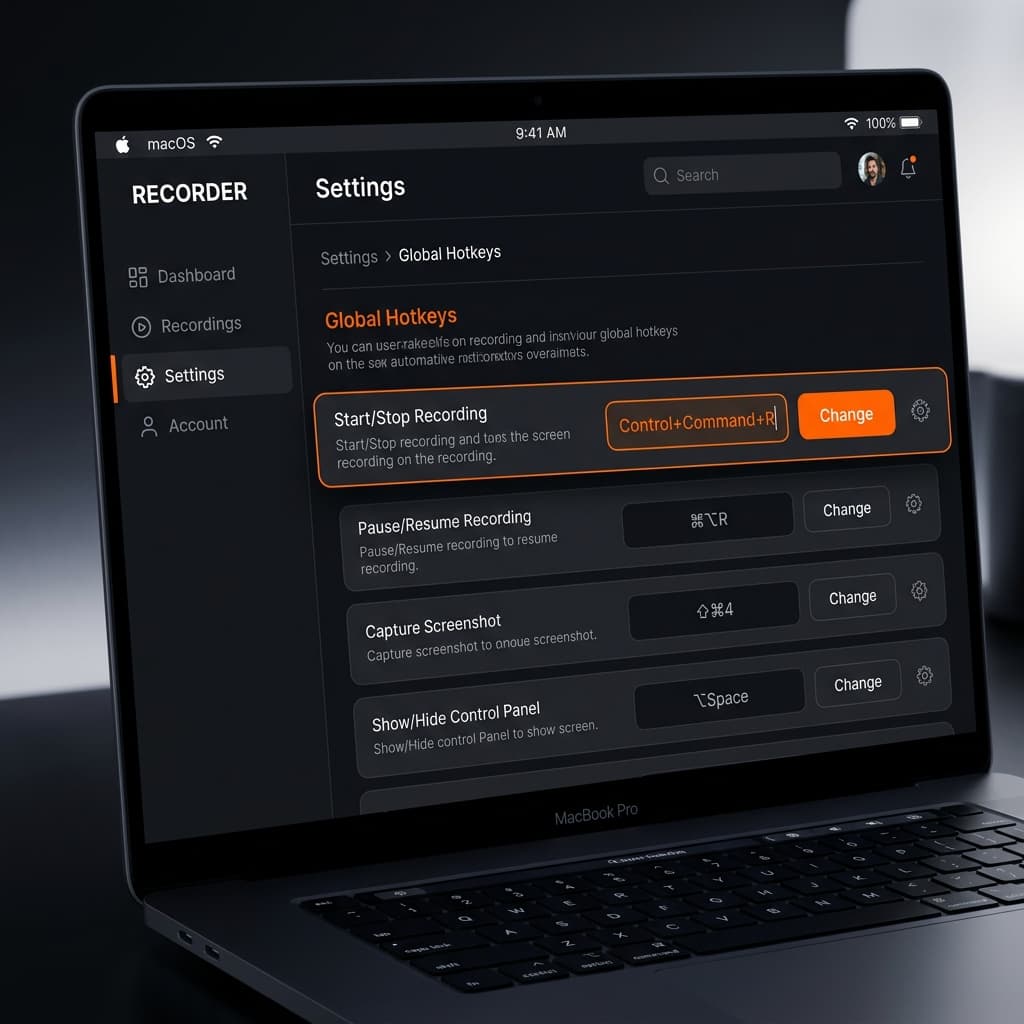
⌃ ⌘ R | Toggle recording (start if idle, stop if recording) |
⌃ ⌘ P | Pause / resume the current recording |
⌃ ⌘ . | Cancel recording and discard |
⌃ ⌘ W | Toggle webcam overlay on/off mid-recording |
⌃ ⌘ M | Toggle microphone mute |
⌃ ⌘ S | Toggle system audio capture |
The toggle model is the key difference from the built-in tools. With the Screenshot Toolbar, ⌘ Shift 5 opens a UI and ⌘ Control Esc stops — two different shortcuts for two different phases. Screenify uses the same shortcut for both, so muscle memory gets you in and out of a recording with zero conscious thought.
Region and source hotkeys
| Shortcut | What it does |
|---|---|
⌃ ⌘ 1 | Record full screen |
⌃ ⌘ 2 | Record active window |
⌃ ⌘ 3 | Record custom region |
⌃ ⌘ 4 | Record from last-used source |
These fire whether Screenify's window is focused or not. The last one — "last-used source" — is the shortcut you'll end up hitting most. Once you've framed a specific region for your demo, ⌃ ⌘ 4 snaps right back to it for retakes.
Playback and editor shortcuts
After recording, Screenify drops you into the editor. Standard media keys plus:
| Shortcut | What it does |
|---|---|
Space | Play / pause preview |
J K L | Rewind / pause / fast-forward |
I / O | Set in / out points for trim |
⌘ ⌫ | Delete selected clip |
⌘ E | Export |
Download Screenify Studio to get the full shortcut set preconfigured — no System Settings trip required.
Try Screenify Studio — free, unlimited recordings
Auto-zoom, AI captions, dynamic backgrounds, and Metal-accelerated export.
Method 3 — OBS Studio hotkeys

OBS doesn't ship with any recording hotkeys turned on. This is deliberate: OBS is used by streamers who already have complex hotkey layouts, and a default that collides with a Stream Deck button would break more setups than it would help. You assign everything yourself in Settings → Hotkeys.
The hotkeys worth setting
| Action | Suggested shortcut | Why |
|---|---|---|
| Start Recording | F9 | Function keys rarely clash with other apps |
| Stop Recording | F10 | Mirrors Start for muscle memory |
| Pause Recording | F11 | Sequential with Start/Stop |
| Mute Mic | F12 | Fast panic mute |
| Push-to-Talk | ` (backtick) | Held key, needs something reachable |
| Push-to-Mute | ⌥ M | Inverse of PTT for always-on setups |
| Start Replay Buffer | ⌃ F9 | Variant of Start Recording |
| Save Replay | ⌃ F10 | Capture the last 30 seconds |
A few things to know about OBS hotkeys on macOS specifically:
- Global vs. focused. OBS hotkeys are global by default — they fire even when OBS isn't the frontmost app. That's what you want for recording, and it's why you shouldn't pick something like
⌘ Sthat's used constantly in other apps. - Function keys need a setting change. By default, macOS treats F1–F12 as brightness/volume keys. Either hold
fnwhen pressing them, or flip System Settings → Keyboard → "Use F1, F2, etc. keys as standard function keys". - Hotkeys need Accessibility permission. OBS will prompt you the first time you try a global hotkey. Grant it in System Settings → Privacy & Security → Accessibility, or global hotkeys silently fail.
Push-to-Talk specifics
Push-to-Talk is the one OBS hotkey pattern the built-in tools can't match. You pick a key, hold it to unmute your mic, release to mute again. For voiceover work on a Mac keyboard, backtick (`) or right-side ⌥ are ergonomic picks because they're held by the thumb or pinky while your other fingers stay on demo-relevant keys.
Method 4 — QuickTime Player + Shortcuts.app automation
QuickTime has exactly one native keyboard shortcut for starting a screen recording, and a few playback shortcuts once a recording is loaded. The real power comes from wrapping it in Shortcuts.app.
QuickTime's native shortcuts
| Shortcut | What it does |
|---|---|
Control ⌘ N | New Screen Recording (opens the legacy recording window) |
⌥ ⌘ N | New Movie Recording (camera) |
⌃ ⌘ N | New Audio Recording |
⌘ Control Esc | Stop current recording |
Space | Play / pause preview after recording |
⌘ → / ⌘ ← | Jump to end / beginning of clip |
⌘ T | Trim clip |
⌘ E | Export |
The catch: Control ⌘ N only works if QuickTime is already the frontmost app. You have to ⌘ Tab to QuickTime first, then fire the shortcut. For a walkthrough of QuickTime's full recording workflow, see the QuickTime screen recording guide.
Wrapping QuickTime in a Shortcut
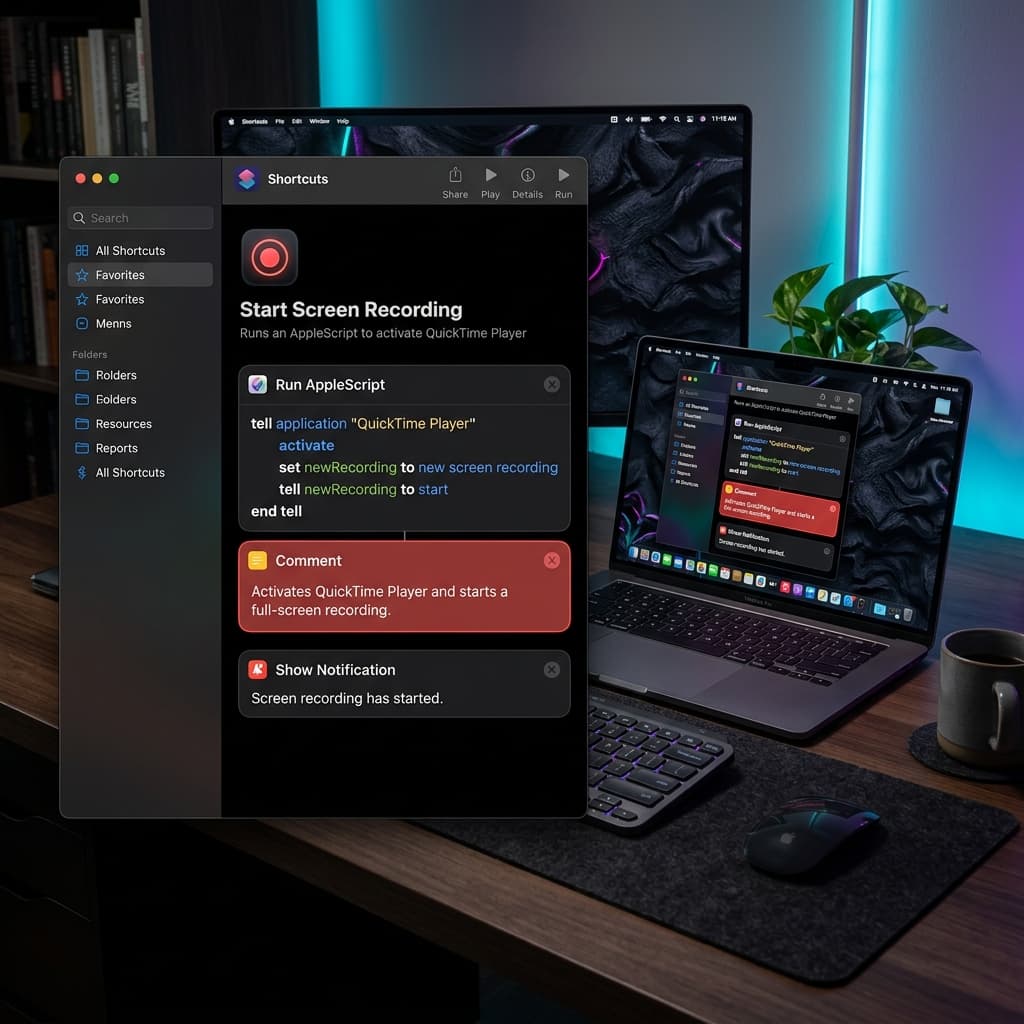
Shortcuts.app (built into macOS) can run an AppleScript that activates QuickTime, creates a new screen recording, and starts it — all in one keystroke. Here's the recipe:
-
Open Shortcuts.app.
-
Click
+to create a new shortcut, name it "Start Screen Recording". -
Add a Run AppleScript action with this script:
tell application "QuickTime Player" activate set newRecording to new screen recording tell newRecording to start end tell -
Click the info panel (
iicon), enable Use as Quick Action and Pin in Menu Bar. -
Under Keyboard Shortcut, click Add Keyboard Shortcut and press your preferred combo — something like
⌥ ⌘ R.
Now ⌥ ⌘ R starts a QuickTime screen recording from anywhere. Pair it with ⌘ Control Esc to stop, and you've replicated Screenify's toggle behavior using only built-in tools. It's not quite as seamless — there's a half-second of QuickTime window flash — but it's free and scriptable.
You can do the same for stopping:
tell application "QuickTime Player"
    tell document 1 to stop
    tell document 1 to save
end tell
Bind that to ⌥ ⌘ S and you have a keyboard-only capture loop that never touches a mouse.
Custom shortcuts via System Settings
macOS lets you remap many built-in shortcuts without installing anything. This is where you go when the defaults collide with something else.
Remapping Screenshot and recording shortcuts
- Open System Settings → Keyboard.
- Scroll to Keyboard Shortcuts and click the button.
- Select Screenshots in the left sidebar.
- You'll see entries for:
- Save picture of screen as a file (
⌘ Shift 3) - Copy picture of screen to clipboard (
⌃ ⌘ Shift 3) - Save picture of selected area as a file (
⌘ Shift 4) - Copy picture of selected area to clipboard (
⌃ ⌘ Shift 4) - Screenshot and recording options (
⌘ Shift 5)
- Save picture of screen as a file (
- Double-click any shortcut to record a replacement.
Deleteclears it.
One common remap: if you use ⌘ Shift 5 constantly and hate the double-modifier reach, remap it to ⌘ Shift 2 (unused by default on most systems). Your thumb and index finger do all the work.
Remapping the stop shortcut
⌘ Control Esc isn't in the Screenshots pane — it's listed under Accessibility as "Stop screen recording". Scroll to that section if you want to remap it to something easier like ⌃ ⌘ S.
Assigning app-specific shortcuts
For any menu item in any app (QuickTime, OBS, or Screenify's editor), you can assign a custom shortcut:
- System Settings → Keyboard → Keyboard Shortcuts → App Shortcuts.
- Click
+. - Pick the app from the dropdown.
- Type the exact menu title, including punctuation — for example,
New Screen Recordingfor QuickTime. - Record your new shortcut.
This is how you give QuickTime a one-modifier recording shortcut without scripting.
Karabiner-Elements for the hard cases
Some remaps are outside System Settings' reach — mapping caps lock to start a recording, chording two keys, or creating layers. For those, Karabiner-Elements is the standard answer. Example: map right_option (a key nobody uses) to ⌃ ⌘ R so you start a Screenify recording with a single thumb press.
Karabiner runs as a kernel extension, so grant it Input Monitoring permission when macOS asks. It's battle-tested — Apple engineers use it — and the one tool I'd recommend for anyone serious about keyboard-driven workflows.
Download Screenify Studio and pair it with a Karabiner single-key bind for the fastest possible start-recording action on macOS.
Troubleshooting keyboard shortcuts
The shortcut does nothing
Most common cause: another app has claimed the same combo. macOS doesn't warn you about conflicts — the first app to register the hotkey wins, and everything else silently fails. Check:
- System Settings → Keyboard → Keyboard Shortcuts for every category — the conflicting binding might be in Mission Control, Spotlight, or Input Sources.
- Any launcher app (Raycast, Alfred, LaunchBar) — these grab global hotkeys aggressively.
- Screenshot utilities like CleanShot X, which rebind
⌘ Shift 5on first launch.
Disable the conflicting binding or move your recording shortcut to an unused combo.
⌘ Control Esc doesn't stop my recording
This shortcut only works during an active macOS screen recording. If you're recording with OBS or a third-party tool that doesn't use macOS's ReplayKit framework, the shortcut has nothing to stop. Use that tool's own stop hotkey instead.
Global hotkeys work sometimes but not in fullscreen apps
Grant the recording app Accessibility and Input Monitoring permissions in System Settings → Privacy & Security. Without them, the app can open UIs but can't receive keystrokes while another app has focus — which is exactly when you need global hotkeys most.
Function keys do brightness instead of firing the shortcut
macOS treats F1–F12 as media keys by default. Either hold fn when pressing them, or enable System Settings → Keyboard → "Use F1, F2, etc. keys as standard function keys". The latter is better for OBS users who rely on F9/F10 for Start/Stop.
Shortcut fires twice
This usually means two apps registered the same hotkey and both are responding. The symptom: recording starts and immediately stops, or a screenshot fires alongside the recording. Audit your launcher app's hotkey list and disable duplicates.
Try Screenify Studio — free, unlimited recordings
Auto-zoom, AI captions, dynamic backgrounds, and Metal-accelerated export.
FAQ
Is there one universal "start recording" shortcut on Mac?
No — macOS doesn't ship one. ⌘ Shift 5 opens the toolbar but doesn't start a recording on its own. If you want a single keystroke that begins recording from any app, you either need a third-party tool like Screenify Studio (which uses ⌃ ⌘ R as a toggle) or a Shortcuts.app automation that wraps QuickTime.
Can I start a recording without touching the mouse at all?
Yes, with the built-in toolbar: ⌘ Shift 5, then Return to confirm the default framing, and you're recording. With Screenify: ⌃ ⌘ R and you're done. With OBS: your custom Start Recording hotkey after initial configuration.
What's the difference between ⌘ Shift 5 and ⌘ Shift 6?
⌘ Shift 5 opens the Screenshot Toolbar for screen recording and screenshots. ⌘ Shift 6 captures the Touch Bar on MacBook Pro models that have one — it's a static image of the Touch Bar, not a recording. Most users never need it.
How do I stop a recording if the menu bar is hidden in fullscreen?
⌘ Control Esc works even when the menu bar is hidden. The recording stops and the file saves automatically. This is the single most valuable shortcut in this post for anyone recording fullscreen apps, games, or presentations.
Can I pause a macOS screen recording and resume it?
Not with the built-in Screenshot Toolbar or QuickTime — they only support start and stop. If you need pause/resume, you need a third-party recorder. Screenify Studio supports it via ⌃ ⌘ P. OBS supports it via a custom Pause Recording hotkey.
How do I create a global shortcut that works inside any app?
Shortcuts.app + Quick Action + a keyboard binding is the free path (see Method 4). For more reliable global hotkeys with lower latency, use a dedicated recorder like Screenify Studio or configure OBS's global hotkeys. Karabiner-Elements is the nuclear option for single-key binds.
Why do my OBS hotkeys work on Windows but not macOS?
Accessibility permission. macOS blocks global hotkeys by default. Open System Settings → Privacy & Security → Accessibility, enable OBS, then restart OBS. This is the single most common "OBS hotkeys don't work on Mac" issue.
Is there a shortcut to start recording and automatically include webcam + mic?
With the Screenshot Toolbar, you set the mic once in the Options menu and it persists — after that, ⌘ Shift 5 → Return records with mic every time. For webcam overlay, the toolbar doesn't support it natively; you need Screenify Studio (webcam is configured once and toggled with ⌃ ⌘ W during recording) or OBS with a video capture source preconfigured.
Keyboard shortcuts are the difference between a recording workflow that feels like work and one that fades into the background. The built-in macOS shortcuts get you most of the way — memorize ⌘ Shift 5, Return, and ⌘ Control Esc and you can capture anything on your screen without breaking focus. When you outgrow the defaults, pick a dedicated tool with global hotkeys, or script your own with Shortcuts.app and Karabiner.
Whichever you choose, the goal is the same: hands on keys, eyes on the work, recording running in the background until you're done.
Try Screenify Studio
Record your screen with auto-zoom, AI captions, dynamic backgrounds, and Metal-accelerated export. Free plan, unlimited recordings.
Download Free


