How to Screen Record on iMac
Record your iMac's 4.5K or 5K display — 4 methods plus tips for handling large resolutions and external displays.

The iMac's Retina display records at 4480x2520 (24-inch M1/M3/M4) or 5120x2880 (previous 27-inch models). That produces sharp, detailed footage — and massive files. A five-minute recording at native 4.5K resolution can exceed 1.5 GB, which is a real problem on the 256 GB base model where macOS and apps already consume half the drive.
This guide covers four ways to record your iMac screen, with specific attention to managing high-resolution output, capturing from Thunderbolt-connected external displays, and avoiding the color-shift issues that come with the iMac's P3 wide-gamut panel.
Quick Comparison
| Tool | Price | System Audio | Webcam | Resolution Control | Difficulty |
|---|---|---|---|---|---|
| macOS Screenshot Toolbar | Free (built-in) | No | No | Full screen or region only | Easy |
| Screenify Studio | Free / Pro $9.99/mo | Yes | Yes (Center Stage support) | Scaled or native, selectable | Easy |
| OBS Studio | Free (open-source) | Yes (via plugin) | Yes | Custom canvas & downscale | Moderate |
| QuickTime Player | Free (built-in) | No | No | Full screen or region only | Easy |
Method 1: macOS Screenshot Toolbar (Built-in)
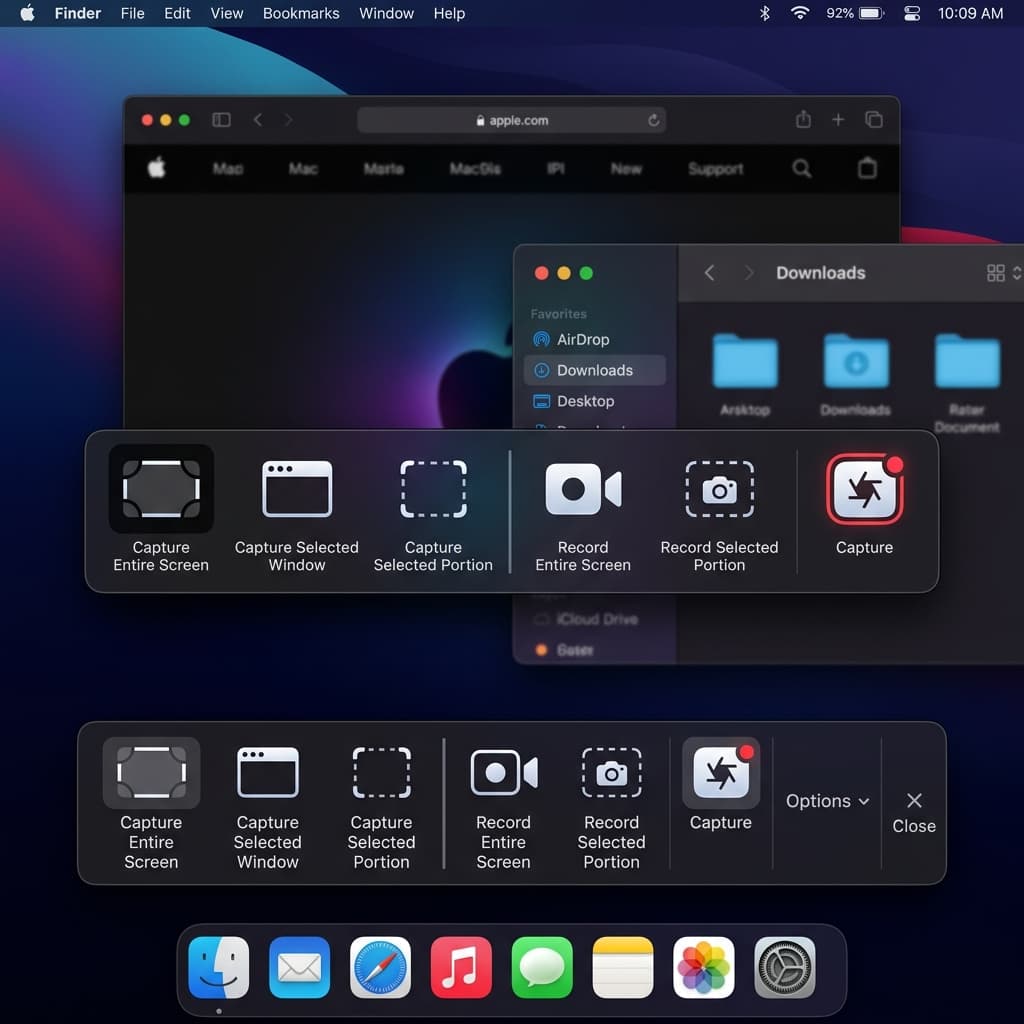
The Screenshot toolbar is the fastest path to a screen recording on any iMac running macOS Mojave or later. No installation, no configuration.
Steps
- Press Cmd + Shift + 5 to open the Screenshot toolbar at the bottom of your screen.
- Click Record Entire Screen (the icon with a solid screen outline) or Record Selected Portion (the icon with a dashed outline).
- If you chose Record Selected Portion, drag the handles to define your capture region. On a 4.5K iMac display, dragging a 1920x1080 region reduces file size by roughly 75% compared to full-screen capture.
- Click Options to choose your microphone source. The iMac's three-microphone array appears as "MacBook Pro Microphone" or "iMac Microphone" depending on your macOS version. Select it for voice narration.
- Click Record. A small stop icon appears in the menu bar.
- Click the stop icon in the menu bar or press Cmd + Shift + 5 and click Stop to end the recording.
- A thumbnail preview appears in the bottom-right corner. Click it to trim, or let it save automatically to your desktop.
iMac-Specific Notes
- Resolution: The Screenshot toolbar records at your iMac's actual pixel resolution. If your display scaling is set to "Looks like 2560x1440" in System Settings > Displays, the toolbar still captures every physical pixel — all 4480x2520 of them. There is no way to change this behavior.
- File size: Expect 150-300 MB per minute at native 4.5K. The 256 GB base iMac fills up quickly. Check available storage in System Settings > General > Storage before long recordings.
- External displays: If a Thunderbolt display is connected to your iMac, the Screenshot toolbar prompts you to choose which screen to record. It captures one display at a time — no multi-monitor composite.
- No system audio: The Screenshot toolbar captures microphone input only. It cannot record the audio output from your iMac's six-speaker system or any audio playing through apps.
Best For
Quick recordings where you need zero setup — grabbing a bug reproduction, saving a video call moment, or recording a short walkthrough for a colleague.
Method 2: Screenify Studio
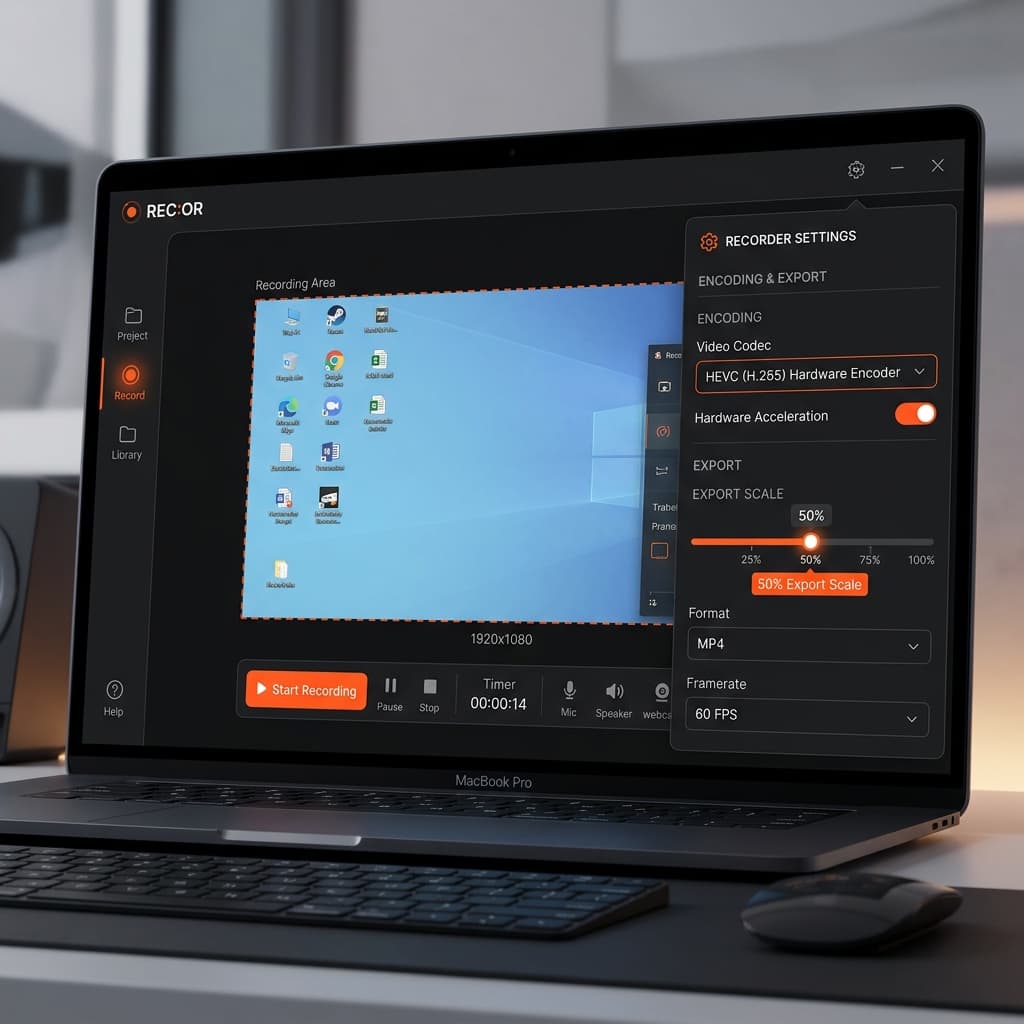
Screenify Studio adds system audio capture, webcam overlays with Center Stage tracking, and post-recording editing features like auto-zoom and captions — without the configuration overhead of OBS.
Steps
- Download Screenify Studio and open it. Grant Screen Recording, Microphone, and Camera permissions when prompted.
- In the capture menu, choose your recording source. Display Capture lists each connected display separately — your iMac's built-in 4.5K panel and any Thunderbolt-connected monitors appear as distinct options.
- Set resolution scaling. This is the critical step for iMac users. Screenify lets you record at the display's scaled resolution (e.g., 2560x1440 or 1920x1080) instead of native 4.5K. Scaled recording drops file size dramatically while preserving visual sharpness for content viewed at normal distance. For tutorials and demos, recording at the "Looks like 1920x1080" scaled resolution produces files that are 70-80% smaller than native captures and look identical when played back on standard 1080p or 1440p monitors.
- Toggle System Audio to capture sound from any app — music, browser tabs, or video calls routed through the iMac's speakers.
- Toggle Webcam to enable your iMac's 1080p FaceTime HD camera. On M3 and M4 iMacs, Center Stage automatically tracks your movement within the frame, keeping you centered even if you lean back or shift to a whiteboard beside your desk.
- Click Record or press the global shortcut to start.
- Stop the recording via the menu bar icon or the same shortcut.
- The editor opens with your footage. Use Auto-Zoom to punch into cursor movements — especially useful on a 4.5K recording where small UI elements can be hard to see at playback size. Auto-Captions transcribe your voiceover, which is handled by the iMac's three-microphone array with strong noise rejection from the beamforming design.
iMac-Specific Advantages
- Scaled resolution capture: Record at your display's logical resolution instead of every physical pixel. A "Looks like 1920x1080" capture on a 4.5K iMac produces a 1920x1080 video — perfectly legible, shareable everywhere, and small enough to store dozens of recordings on the 256 GB base model.
- Center Stage webcam: The M3 and M4 iMac's FaceTime HD camera supports Center Stage. Screenify leverages this so your webcam overlay tracks you as you move — useful for standing-desk or whiteboard recordings.
- Multi-display selection: If you have a Thunderbolt display daisy-chained to your iMac, pick which monitor to capture from the source list. Record your iMac's main screen while keeping notes open on the external display, or vice versa.
- Color-aware export: Screenify exports in H.264/H.265 with standard sRGB color tagging. Your iMac's P3 wide-gamut display shows more saturated colors than most viewers' screens — Screenify's export pipeline converts the color space so recordings look consistent on sRGB displays, avoiding the washed-out or over-saturated appearance that raw screen captures sometimes produce.
Best For
Tutorials, product demos, and any recording where you need system audio, a webcam overlay, or post-recording polish without wrestling with encoder settings.
If you haven't tried it yet, grab Screenify Studio free — the free tier handles unlimited recordings with no watermark.
Try Screenify Studio — free, unlimited recordings
Auto-zoom, AI captions, dynamic backgrounds, and Metal-accelerated export.
Method 3: OBS Studio (Free, Open-Source)
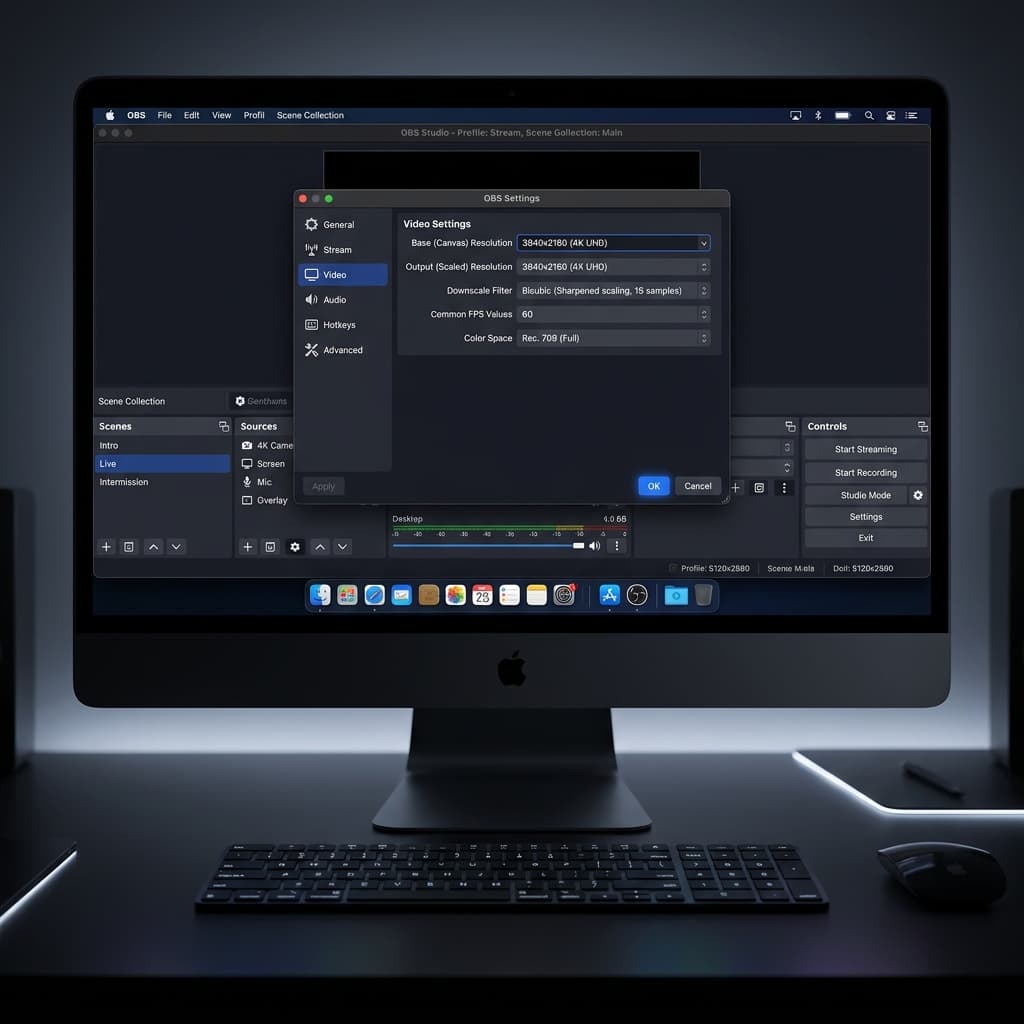
OBS is built for streaming but doubles as a capable screen recorder. Its custom canvas system gives you full control over output resolution — important when your source display runs at 4480x2520 and you want to produce a 1920x1080 file.
Steps
- Download OBS Studio from obsproject.com and install it. Grant Screen Recording and Microphone permissions in System Settings > Privacy & Security.
- Open OBS. Go to Settings > Video. Set Base (Canvas) Resolution to your intended output — for most iMac users, 1920x1080 or 2560x1440 works well. Set Output (Scaled) Resolution to the same value.
- In the Sources panel, click + and add a macOS Screen Capture source. Select your iMac's display from the dropdown. If a Thunderbolt external display is connected, it appears as a separate entry.
- The 4.5K source will be downscaled to fit your 1080p or 1440p canvas. This is intentional — it produces a sharp, right-sized recording without the massive file sizes of native-resolution capture.
- To capture system audio, install a loopback driver like BlackHole (free, open-source). After installation, create a Multi-Output Device in Audio MIDI Setup that includes both your iMac speakers and BlackHole. In OBS, add an Audio Input Capture source pointed at the BlackHole device.
- For webcam, click + in Sources, add Video Capture Device, and select "FaceTime HD Camera." Note that OBS does not support Apple's Center Stage — the camera captures a static, wide-angle frame.
- Click Start Recording. Recordings save to the path configured in Settings > Output.
- Click Stop Recording when done.
iMac-Specific Notes
- Canvas downscaling is your friend. Recording your iMac's 4.5K display through a 1080p OBS canvas applies a high-quality downscale filter (Lanczos is recommended in Settings > Video > Downscale Filter). The result is sharper than recording at 1080p natively because the downscale uses all 4480x2520 source pixels.
- CPU vs GPU encoding: On Apple Silicon iMacs (M1/M3/M4), use the Apple VT H264 Hardware Encoder in Settings > Output > Recording. This offloads encoding to the media engine, which has zero impact on CPU performance. Since your iMac is always plugged in, there is no battery-vs-performance tradeoff — set the encoder bitrate as high as you need.
- No Center Stage: OBS accesses the raw camera feed without Apple's Center Stage processing. If you move around during recording, the webcam frame stays fixed.
- Multi-monitor: To record both your iMac and an external Thunderbolt display, add two macOS Screen Capture sources in OBS and position them side by side on a wider canvas (e.g., 3840x1080 for two 1080p-scaled displays).
Best For
Users who need granular control over encoding, bitrate, multi-source compositing, or who plan to livestream directly from their iMac to Twitch/YouTube.
Method 4: QuickTime Player
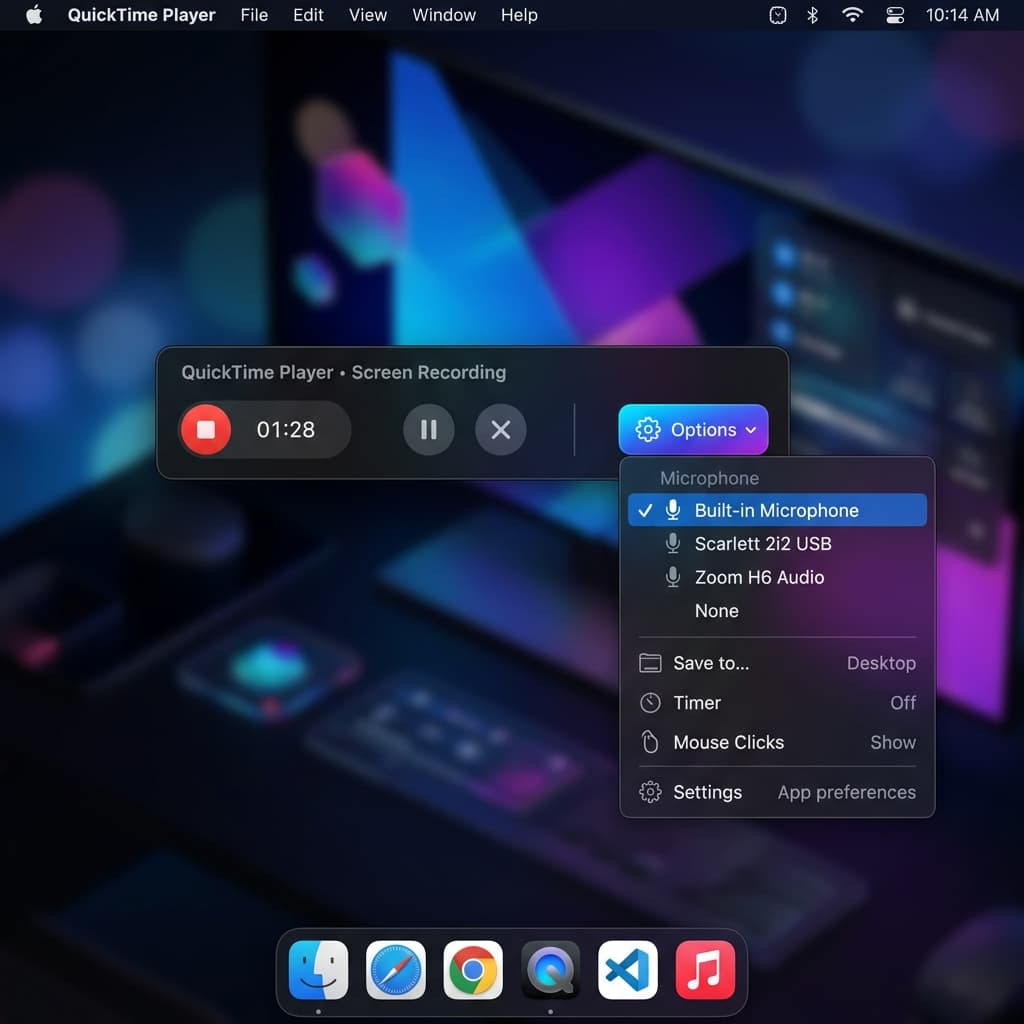
QuickTime Player predates the Screenshot toolbar and still works on every macOS version. It offers slightly different controls for audio source selection and is sometimes more reliable for longer recordings.
Steps
- Open QuickTime Player from Applications or Spotlight.
- Go to File > New Screen Recording (or press Ctrl + Cmd + N).
- This opens the same Screenshot toolbar from Method 1 — with one difference: on older macOS versions (pre-Catalina), QuickTime shows its own recording interface with a dedicated volume slider and microphone selector.
- Click the dropdown arrow next to the record button (or use the Options menu in the toolbar) to select your iMac's built-in microphone. The three-mic array provides directional pickup, so position yourself in front of the iMac — not off to the side — for the clearest voice capture.
- Click Record, then click anywhere on the screen to record the full display or drag to select a region.
- Click the stop button in the menu bar to end recording.
- QuickTime opens the recording for playback. Use Edit > Trim (Cmd + T) to cut the beginning and end.
- Go to File > Export As and choose a resolution. QuickTime offers 4K, 1080p, 720p, and 480p export presets. For iMac recordings, 1080p is the best balance of quality and file size. The 4K export on a 4.5K source rounds down to 3840x2160 — still a large file, but smaller than native.
iMac-Specific Notes
- Export downscaling: QuickTime's "Export As > 1080p" option is the simplest way to get a smaller file from a 4.5K recording — no third-party tools needed. The quality is acceptable for most uses, though dedicated tools produce sharper results.
- Long recording stability: QuickTime handles multi-hour recordings more reliably than the Screenshot toolbar on some macOS versions. If you're recording a long lecture or workshop from your iMac, QuickTime is worth testing.
- Storage format: QuickTime saves .mov files. A one-minute full-screen 4.5K recording typically lands between 100-250 MB depending on screen content complexity. Static slides produce smaller files; video playback or fast-moving UI generates larger ones.
- No system audio: Like the Screenshot toolbar, QuickTime cannot capture system audio without a loopback driver.
Best For
Users who prefer a standalone app window over the Screenshot toolbar overlay, or who need QuickTime's built-in export presets to downscale 4.5K footage to 1080p without additional software.
Handling iMac Display Resolutions: Native vs. Scaled
This deserves its own section because it is the single biggest factor affecting file size, quality, and shareability of iMac recordings.
The Resolution Problem
Your 24-inch iMac renders at 4480x2520 pixels. macOS applies display scaling so text and UI elements appear at a comfortable size — typically "Looks like 1440p" or "Looks like 1080p." But the screen is still rendering all 4480x2520 pixels. Most recording tools capture those physical pixels, producing a 4.5K video file regardless of your scaling setting.
When to Record at Native 4.5K
- You're creating archival footage that may be viewed on 4K or 5K displays.
- You plan to crop or zoom in post-production — the extra resolution gives headroom.
- You're recording for a YouTube channel that benefits from 4K uploads (YouTube allocates higher bitrate to 4K videos).
When to Record at Scaled/Downscaled Resolution
- You're sharing via Slack, email, or a link where viewers watch in a browser window — 1080p is more than sufficient.
- You need to store many recordings on a 256 GB or 512 GB iMac.
- Your audience watches on 1080p laptops or phone screens — they cannot see the difference between 4.5K and 1080p at their display size.
- You want faster export times — encoding a 1080p file finishes 3-4x faster than encoding 4.5K on the same M-series chip.
How Each Tool Handles It
| Tool | Record at Scaled Res? | Downscale After? |
|---|---|---|
| Screenshot Toolbar | No — always native pixels | No built-in option |
| Screenify Studio | Yes — selectable in capture settings | Yes — export at chosen resolution |
| OBS Studio | Yes — via canvas resolution | Yes — output resolution setting |
| QuickTime Player | No — always native pixels | Yes — Export As presets |
The practical recommendation: Record at 1920x1080 or 2560x1440 unless you have a specific need for 4.5K footage. The quality difference is invisible in most contexts, and the storage savings are substantial.
For more on recording a precise portion of your display, see our guide on how to record a specific area on Mac.
Color Management: P3 Wide Gamut on iMac
Your iMac's display uses the DCI-P3 color space, which covers roughly 25% more colors than the sRGB standard used by most monitors, phones, and web browsers. This matters for screen recordings in two ways:
-
Colors in your recording may look different on other screens. A vibrant red on your iMac might appear slightly muted on a viewer's sRGB laptop. This is not a quality loss — it is a color space conversion. The content is accurate; the display gamut is simply narrower.
-
Some recording tools embed the P3 color profile in the video file. If the playback device or app does not support P3, colors can shift unpredictably — sometimes appearing oversaturated, sometimes washed out.
Recommendations
- Screenify Studio converts to sRGB on export, producing consistent colors across devices.
- OBS Studio records in the color space of the source display. You can force sRGB output in Settings > Advanced > Color Space by setting it to sRGB and Color Range to Full.
- Screenshot Toolbar and QuickTime embed the display's color profile. Viewers on sRGB screens may notice slight color differences.
If color accuracy matters for your recordings (design reviews, photo editing tutorials), test playback on an sRGB display before sharing.
Troubleshooting
1. Recordings Are Extremely Large (1 GB+ for a Few Minutes)
You are recording at native 4.5K (4480x2520) resolution. Every frame contains over 11 million pixels.
Fix: Use Screenify Studio or OBS to record at a scaled resolution — 1920x1080 or 2560x1440. In Screenify, select the scaled resolution in capture settings. In OBS, set the canvas resolution to 1080p or 1440p. If you've already recorded at 4.5K, use QuickTime's Export As > 1080p to create a smaller copy, or re-export from Screenify's editor at a lower resolution.
2. External Thunderbolt Display Not Showing as a Recording Source
macOS Screen Recording permission must be granted to the specific app. Some apps need to be re-authorized after connecting a new display.
Fix: Go to System Settings > Privacy & Security > Screen Recording. Remove the app from the list, then re-add it. Restart the app. Your Thunderbolt display should now appear as a selectable source. If you're daisy-chaining displays (Thunderbolt passthrough), ensure both monitors are recognized in System Settings > Displays first.
3. Colors Look Wrong When Sharing Recordings
Your iMac recorded in P3 wide gamut, but the viewer's screen is sRGB. The color profile embedded in the .mov file does not match the playback device's capabilities.
Fix: Export or convert the recording to sRGB color space. In Screenify Studio, this is handled automatically. In OBS, change Advanced > Color Space to sRGB before recording. For already-recorded files, open in QuickTime and export as 1080p — QuickTime performs a basic color space conversion during export. For precise control, use Handbrake or FFmpeg with the -colorspace bt709 -color_primaries bt709 -color_trc bt709 flags.
4. Three-Microphone Array Sounds Muffled or Echoes
The iMac's beamforming microphone array is optimized for a speaker positioned directly in front of the display. If you're off-axis (sitting to the side) or too far away (more than a meter), audio quality degrades.
Fix: Position yourself within arm's length of the iMac, centered in front of the screen. In System Settings > Sound > Input, ensure "iMac Microphone" is selected — not a Bluetooth device or external audio interface that may have disconnected. If echo persists, check that your recording app is not capturing both microphone input and speaker output simultaneously. In OBS, verify you don't have duplicate audio sources in the mixer.
5. 256 GB Storage Fills Up During Recording
The base iMac ships with 256 GB of storage. macOS and apps consume 50-80 GB. At native 4.5K, you have room for roughly 30-60 minutes of screen recording before the drive is full.
Fix: Record at scaled 1080p resolution to reduce per-minute file size by 70-80%. Move completed recordings to an external Thunderbolt SSD — the iMac's Thunderbolt 3/4 ports support drives at full NVMe speed. Alternatively, configure your recording tool to save directly to an external drive. In OBS, change the recording path in Settings > Output. Delete old recordings regularly — check ~/Desktop and ~/Movies for files from the Screenshot toolbar and QuickTime.
Try Screenify Studio — free, unlimited recordings
Auto-zoom, AI captions, dynamic backgrounds, and Metal-accelerated export.
FAQ
Does the iMac's 4.5K display make screen recordings look better than recordings from a MacBook?
The source resolution is higher, but the improvement is only visible if you export at 4K or above. When both an iMac and a MacBook record at 1080p output, the results are visually identical. The iMac's advantage is density — downscaling from 4.5K to 1080p produces marginally sharper text edges than a MacBook Air's native 1080p-equivalent output, but the difference is subtle.
Can I record my iMac screen and an external Thunderbolt display at the same time?
The built-in Screenshot toolbar and QuickTime record one display at a time. Screenify Studio lets you select which display to capture but records one at a time. OBS Studio can capture multiple displays simultaneously by adding separate macOS Screen Capture sources and arranging them on a wider canvas. For a side-by-side recording of two 1080p-scaled displays, set the OBS canvas to 3840x1080.
Should I record at native 4.5K or at the scaled "Looks like 1080p" resolution?
Record at 1080p or 1440p for anything shared via Slack, email, or embedded in a website. Record at native 4.5K only for YouTube 4K uploads, archival purposes, or footage you plan to crop heavily in post-production. The file size difference is roughly 4-5x — a 10-minute recording at 4.5K might be 2-3 GB, while the same content at 1080p is 400-600 MB.
How do I stop my iMac recordings from looking oversaturated on other people's screens?
Your iMac's P3 display shows a wider range of colors than most viewers' sRGB screens. Use a recording tool that exports in sRGB color space — Screenify Studio does this automatically. In OBS, set Color Space to sRGB in Settings > Advanced. If you've already recorded, re-encode with Handbrake using the BT.709 color profile.
Can I use the iMac's Center Stage camera in screen recordings?
Center Stage works with the M3 and M4 iMac's FaceTime HD camera. It is supported in FaceTime, Zoom, and apps that use Apple's camera framework — including Screenify Studio. OBS accesses the raw camera feed and does not support Center Stage, so your webcam overlay stays fixed in a wide-angle view. The Screenshot toolbar and QuickTime do not include webcam overlays at all.
Is the iMac's three-microphone array good enough for narration, or do I need an external mic?
For tutorials, demos, and casual recordings, the three-mic array is excellent. It uses beamforming to focus on the speaker positioned in front of the display, rejecting background noise from the sides and rear. For podcast-quality audio or recordings in noisy environments, a dedicated USB or XLR microphone still outperforms it — but for most screen recordings, the built-in array eliminates the need for extra hardware.
My iMac has only 256 GB of storage. How many screen recordings can I store?
At native 4.5K, roughly 30-60 minutes of total footage before you run out of space (assuming 100-150 GB is available after macOS and apps). At 1080p scaled resolution, that extends to 3-5 hours of footage. The most practical approach: record at 1080p, and offload finished projects to an external Thunderbolt SSD. The iMac's Thunderbolt 3/4 ports deliver full NVMe speeds, so transfers are fast.
Does being always plugged in affect recording performance on iMac?
Yes — positively. Unlike a MacBook that throttles CPU and GPU under battery power, the iMac always runs at full performance. macOS does not apply Low Power Mode on desktop Macs. This means encoding, especially hardware-accelerated H.264/H.265 via the media engine on M-series chips, runs at maximum throughput with no thermal throttling concern for typical recording workloads. You get consistent frame rates and faster exports.
Summary
The iMac's high-resolution display produces exceptional screen recordings — if you manage the resolution and file size trade-offs. For the majority of recordings, capture at 1080p or 1440p scaled resolution to keep files manageable, especially on the 256 GB base model.
For general guidance on screen recording across all Mac models, see our complete Mac screen recording guide. If you need to capture system audio alongside your recording, the screen record with audio guide covers that in detail.
Ready to record your iMac's screen with system audio, webcam, and one-click editing? Download Screenify Studio free and start capturing in under a minute.
Try Screenify Studio
Record your screen with auto-zoom, AI captions, dynamic backgrounds, and Metal-accelerated export. Free plan, unlimited recordings.
Download Free


