How to Record Screen with Transparent Background
Capture screen content with a transparent background on Mac — alpha-channel video for compositing, overlays, and webcam-only effects.

"Record with a transparent background" sounds like it should be a checkbox in QuickTime. It isn't — and the reason matters before you pick a tool. macOS captures the display buffer, which is fully opaque by design. There is no alpha channel to preserve, because the compositor already flattened every layer before the recorder ever sees it.
What you can do is rebuild transparency at one of three points: at the camera (background removal), at the source (record onto a known color and key it out later), or at the export (use a codec that supports alpha and isolate the visible region). Each path produces a different kind of "transparent recording," and the right one depends on what you're going to composite it into.
Quick Comparison
| Method | What It Captures | Output Codec | Best For |
|---|---|---|---|
| Screenify Studio | Webcam with auto background removal, exportable as alpha | HEVC alpha / WebM VP9 | Presenter overlays, course videos |
| OBS + chroma key + ProRes 4444 | Window or display, keyed against a green source | ProRes 4444 (.mov) | Compositing into Final Cut / Premiere |
| Final Cut Pro from raw recording | Any source, manually rotoscoped or chroma-keyed | ProRes 4444 / Animation | Logos, UI mockups, motion graphics |
| Webcam-only with virtual green screen | Webcam feed only | ProRes 4444 / WebM | PIP overlays, vertical Reels presenters |
Why True Transparent Recording Doesn't Exist
The display server on macOS composites every window, the desktop wallpaper, the menu bar, and any system overlays into a single opaque framebuffer before the screen recording API reads it. ScreenCaptureKit (the modern API since macOS 12.3) can filter to a specific window, but it still hands you opaque pixels — it just trims everything outside that window's bounds.
That means every "transparent background recording" workflow is actually one of these:
- Webcam with background removed — segmentation runs on the camera feed, replacing everything that isn't a person with transparent pixels. This is the most common interpretation when someone asks for transparent recording.
- Window captured and the desktop hidden behind it — the captured pixels are still opaque, but you've made the background uniform (solid color, blurred, or removed) so a downstream editor can key it out cleanly.
- Animation or UI element on a known background — for designers who need to composite a UI mockup into a marketing video, the workflow is record onto solid green, chroma-key in post, export with alpha.
Each method below tackles one of these three jobs.
Codec & Container Compatibility (Read This First)
The codec you export to determines whether the alpha channel survives. Pick the wrong one and you'll spend an hour producing a "transparent" file that plays back with a black background.
| Codec | Alpha Support | File Size | Where It Plays |
|---|---|---|---|
| H.264 (.mp4) | No | Small | Everywhere |
| HEVC / H.265 (regular) | No | Smaller than H.264 | Most modern players |
| HEVC with alpha | Yes | Medium | Safari, Final Cut, QuickTime (macOS 11+) |
| ProRes 4444 (.mov) | Yes | Very large | Pro editors (Final Cut, Premiere, Resolve) |
| ProRes 4444 XQ (.mov) | Yes | Massive | Pro editors |
| Animation codec (.mov) | Yes | Large | Older Apple workflows |
| PNG sequence (.png) | Yes | Huge (per-frame) | Any image-aware tool |
| WebM VP9 with alpha | Yes | Medium | Chrome, Firefox (NOT Safari) |
| Lottie / GIF | Limited (1-bit alpha for GIF) | Small | Web, animations |
The two practical answers for most workflows:
- Editing locally → ProRes 4444 .mov — universal in Apple/pro pipelines, no playback weirdness, just very large files.
- Embedding on the web → WebM VP9 alpha for Chrome/Firefox or HEVC alpha for Safari, depending on your audience.
If you're going to composite the clip in Final Cut Pro and never touch a browser, use ProRes 4444 and forget the web codecs.
Method 1: Screenify Studio — Webcam Background Removal with Alpha Export
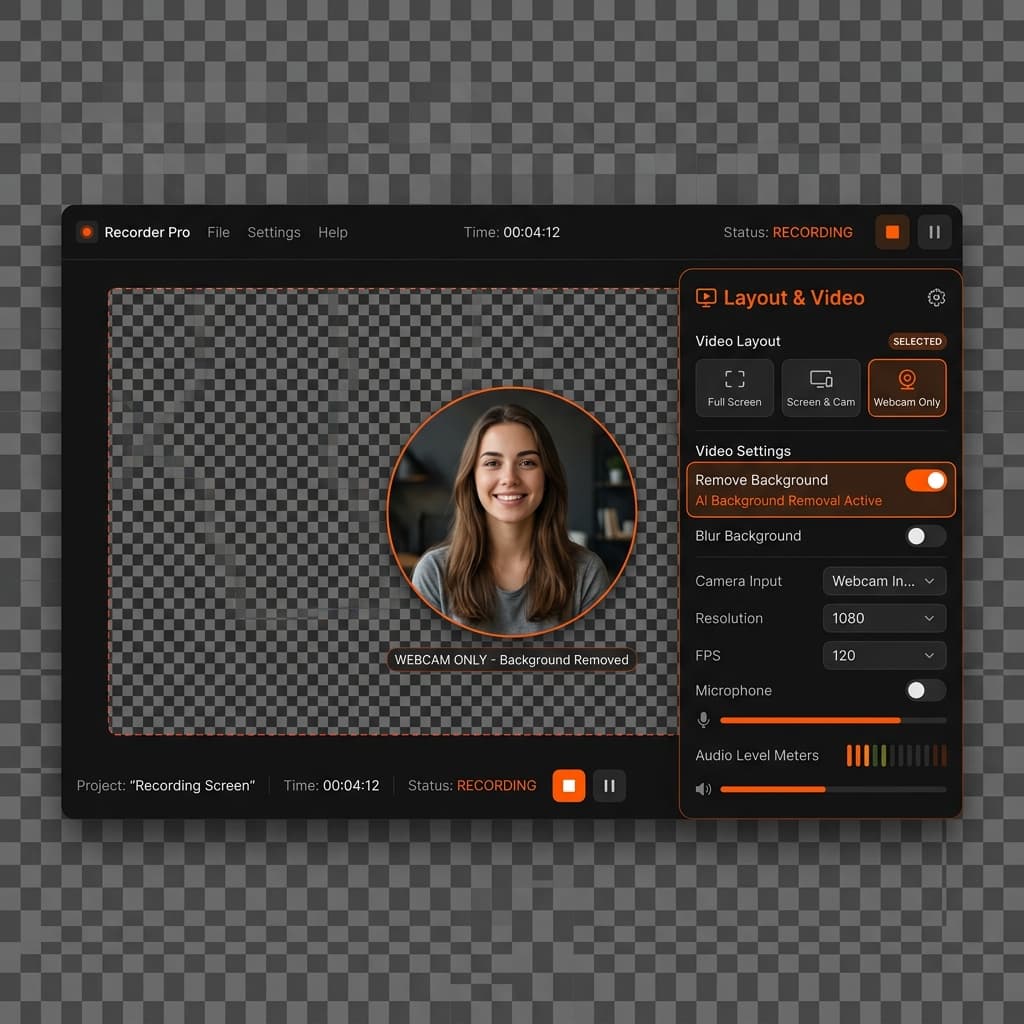
If your goal is "record me, transparent everywhere else," Screenify Studio handles this without any chroma key setup. The webcam pipeline runs real-time segmentation on-device — no green screen, no wall behind you.
Steps
- Download Screenify Studio and open it.
- In the recording panel, enable Webcam and set the layout to Webcam Only (not the floating overlay — you want the camera as the primary source, not a corner inset).
- Open the webcam settings and turn on Remove Background. A live preview shows the cutout — you should see your face on a checkered transparency pattern.
- (Optional) Adjust the edge feathering slider. A value around 2-3px softens the matte without making it look like a halo. Hard edges look like a paper cutout in slow motion; over-softened edges blur into the background you composite onto.
- Press ⌃ + ⌘ + R to start recording. Talk, gesture, move around — the segmentation tracks frame by frame.
- Stop with the same shortcut. The editor opens.
- Open the Export panel. Under Format, choose one of:
- HEVC with alpha (.mov) — for Final Cut Pro, Safari embeds, or any Apple pipeline
- WebM VP9 alpha (.webm) — for Chrome/Firefox web embedding
- ProRes 4444 (.mov) — for cross-platform editing pipelines
- Export. The resulting file plays with your background fully transparent — drop it onto a timeline and your real background composites through.
What this is actually for
- Course videos — overlay the presenter on top of slides without a hard rectangle around the face
- Picture-in-picture for tutorials — float the presenter in a corner of the screen recording, no rectangular border breaking the visual
- Vertical Reels/Shorts — composite the presenter onto a phone-shaped background generated separately
The on-device segmentation isn't perfect. It struggles with hair against busy backgrounds, fast hand motion at the matte edge, and contrast-poor lighting. If you're doing professional work for client delivery, you'll still want a real green screen and chroma key. For solo creator work and internal videos, on-device segmentation is good enough that nobody will notice.
Try Screenify Studio — free, unlimited recordings
Auto-zoom, AI captions, dynamic backgrounds, and Metal-accelerated export.
Method 2: OBS Studio + Chroma Key + ProRes 4444
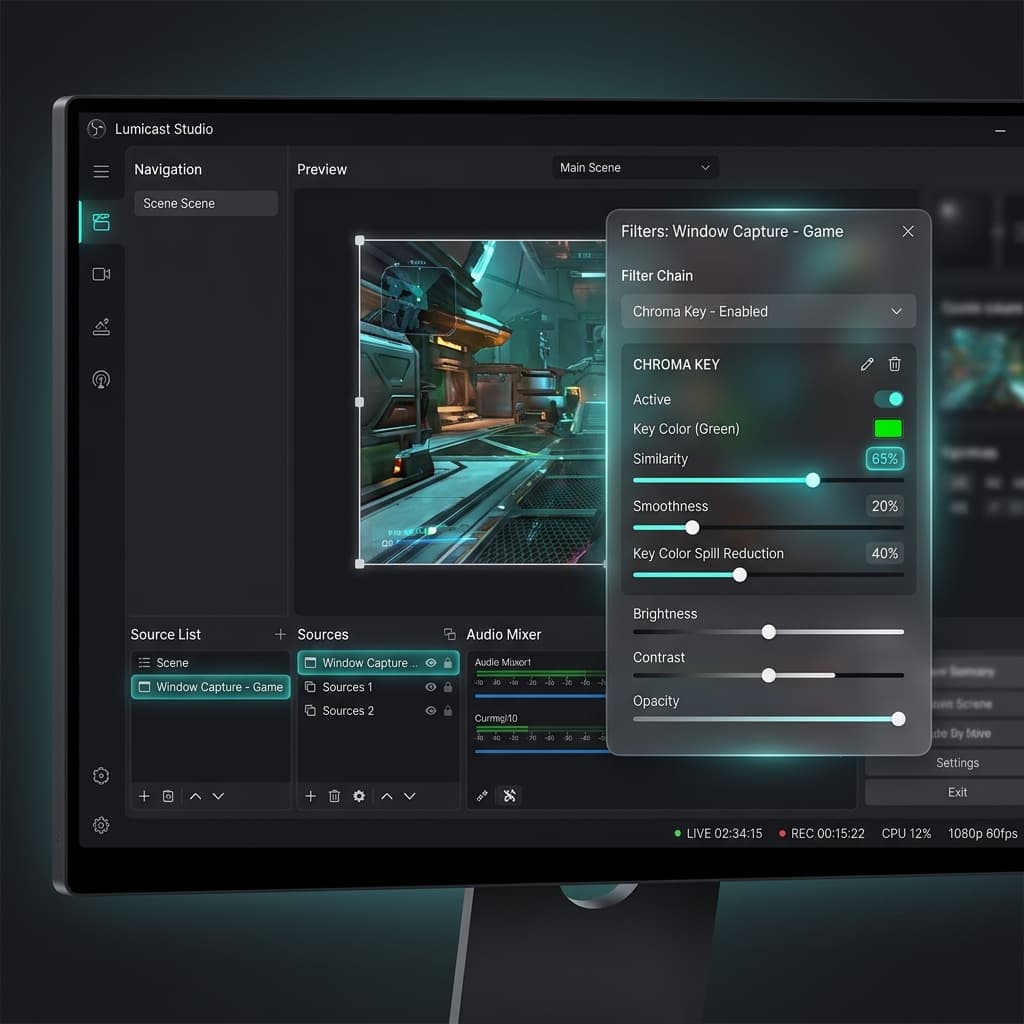
OBS doesn't ship a "transparent recording" mode, but you can build one out of three pieces: capture the window, apply a chroma key filter to the source, and record to a codec that preserves the alpha channel.
This method captures window content with transparency, not the webcam. Use it when you want to record an app window (a UI mockup, an animated demo, a transparent overlay) and composite it into a video later.
Step 1: Set the canvas to match your source
- Open OBS → Settings → Video.
- Set Base (Canvas) Resolution to match the window you'll capture (e.g., 1280×720 for a small UI demo).
- Set Output (Scaled) Resolution to the same value — no rescaling, you want pixel-perfect alpha.
Step 2: Add the source on a green background
- In the scene, click + under Sources → Window Capture → pick your app window.
- Behind that source, add a Color Source filling the canvas with pure green (#00FF00).
- Position the Color Source below the Window Capture in the source list.
You now have your app window rendered on top of a known green background.
Step 3: Apply the chroma key filter
- Right-click the Window Capture source → Filters → + Effect Filter → Chroma Key.
- Set Key Color Type to Green.
- Adjust Similarity (default 400 is usually fine) and Smoothness (around 80) until the green disappears cleanly.
- The preview now shows the window contents with checkered transparency where green used to be.
Step 4: Record to ProRes 4444
OBS by default writes H.264, which has no alpha. You need to switch the encoder.
- Settings → Output → Recording Output Mode → Advanced.
- Recording Format:
mov - Encoder:
Apple ProRes(available on macOS) or useFFmpegoutput type with codecprores_ksand pixel formatyuva444p10le. - Profile: 4444 (this is the ProRes variant that supports alpha).
- Apply settings and start recording.
Step 5: Verify the alpha survived
After stopping, open the file in QuickTime Player. The transparent areas should appear black in QuickTime preview (it doesn't render alpha) but when you drop the file into Final Cut Pro or Premiere, the transparent regions should pass through to whatever's on the lower track.
Limitations
- ProRes 4444 files are large — expect 200-500 MB per minute at 1080p.
- The chroma key approach fails if your captured window contains pure green (a green button, a green logo) — that pixel becomes transparent too. Pick a different key color in that case (magenta is rarely used in UIs).
- Window Capture in OBS uses macOS Window Sharing, which has occasional flicker during window resize — record the window at a fixed size.
Method 3: Final Cut Pro from a Raw Recording
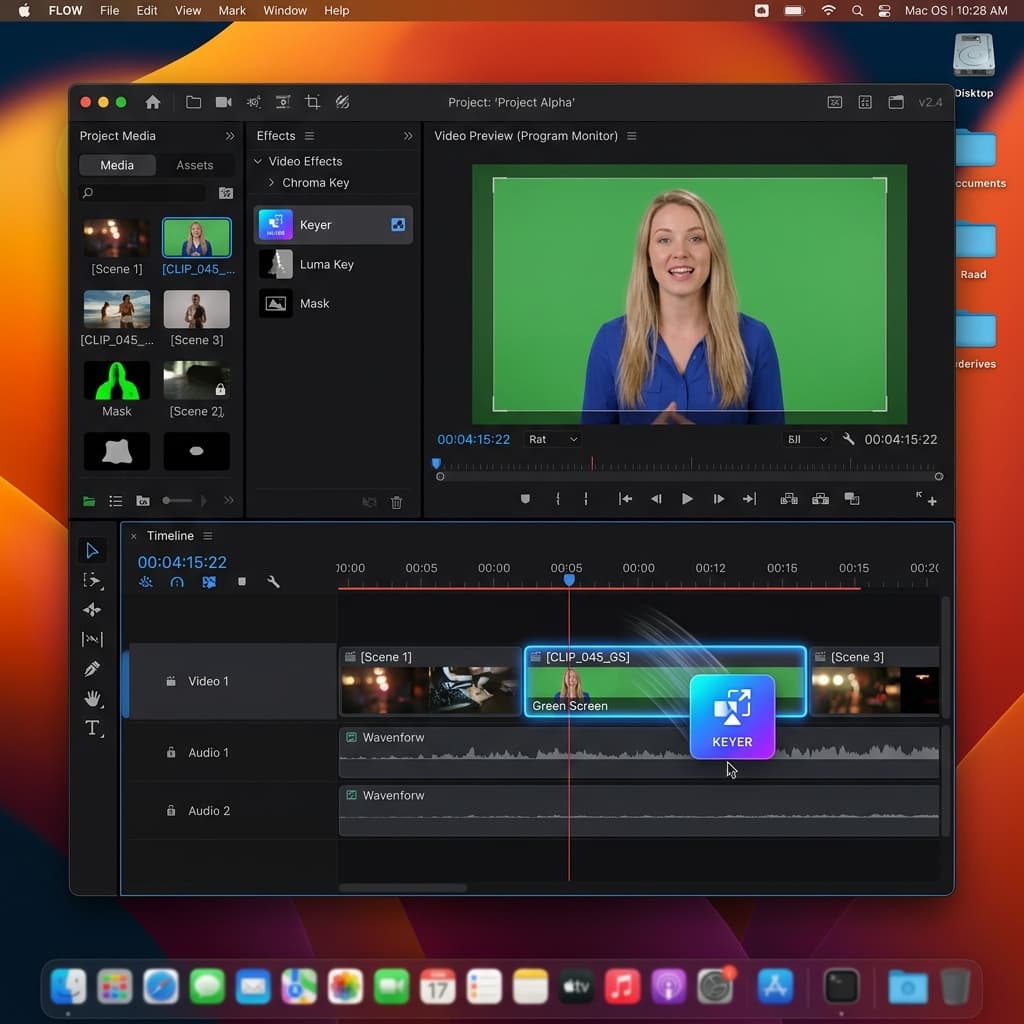
If you already have a regular screen recording (no transparency planned at capture time) and now need to extract the foreground with alpha, Final Cut Pro is the answer. This is the rotoscope or post-key path.
Approach A: Chroma key from a known background
If your raw recording was made against a solid color (you set your desktop wallpaper to pure green before recording, or recorded an app window over a green canvas), Final Cut keys it out in two clicks.
- Drop the recording on the timeline.
- Effects browser → Keying → Keyer.
- Drag Keyer onto the clip. Final Cut auto-samples the dominant color and keys it.
- If the auto-sample picks the wrong color, switch to Sample Color in the inspector and click the green area manually.
- Use Strength, Soft, and Erode sliders to refine.
- File → Share → Master File → set Codec to Apple ProRes 4444 → Export.
Approach B: Mask out the unwanted region
If you didn't record on a solid background, you can manually mask out everything except the region you want to keep. This works well for small static elements (a logo, an icon, a UI fragment).
- Add a Draw Mask effect to the clip (Effects → Masks).
- Draw a closed shape around the region you want to keep.
- In the inspector, set the mask to Invert: No (keep what's inside the shape).
- Animate mask points if the region moves — keyframe the control points.
- Export as ProRes 4444 or HEVC with alpha.
This is tedious for any clip longer than a few seconds with motion. Use it for short hero shots, not full tutorials.
Approach C: Roto Brush via DaVinci Resolve (free)
Final Cut doesn't ship an AI rotoscope tool. DaVinci Resolve (free version) has Magic Mask in the Color page which auto-tracks a subject and produces a per-frame matte. Workflow: import the recording → switch to Color page → Magic Mask → click the subject → Track Forward → switch to Deliver page → export ProRes 4444.
Method 4: Webcam-Only Recording with a Virtual Green Screen
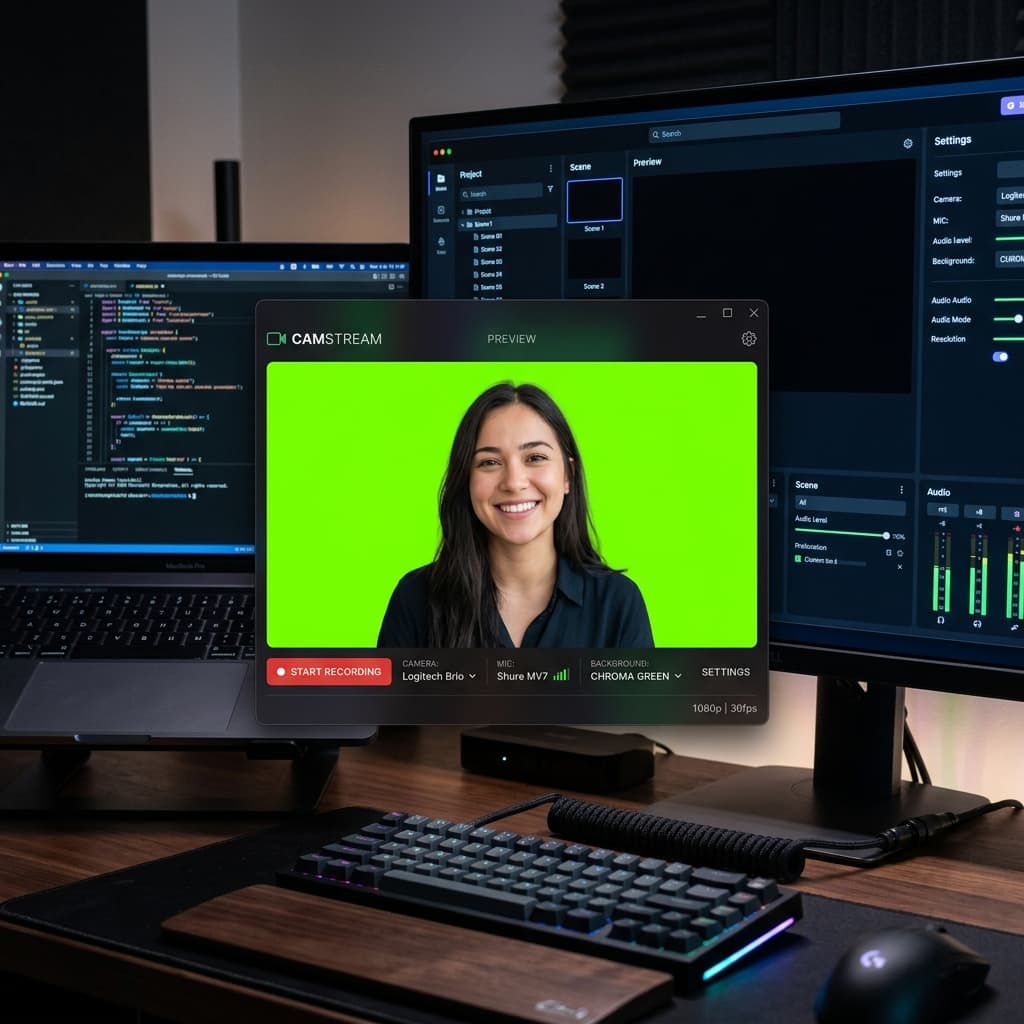
This method blends Method 1 and Method 2: you record only the webcam (no screen content) but instead of relying on segmentation, you composite onto a virtual green screen that any chroma keyer can later remove.
Why bother if Method 1 already does background removal?
Two reasons:
- Quality control — virtual green screen plus a real chroma key in post produces a cleaner edge than real-time segmentation, especially around hair and glasses.
- Tool compatibility — your editor (Premiere, Resolve, After Effects) has a mature chroma key but doesn't natively read alpha-channel webcam files from every recording app.
Steps
- Open a virtual webcam source app — Screenify Studio, OBS Virtual Camera, or any tool that lets you composite a webcam onto a colored background.
- Set the background to a solid green (#00FF00) or blue (#0000FF) — green is standard but blue avoids problems if your subject wears green.
- Record the webcam output to a video file.
- Import into your editor.
- Apply the chroma key effect.
- Export with alpha.
This is the workflow used by many YouTube creators who want a clean cutout but don't have a physical green screen behind them.
When to Skip Alpha Entirely
Alpha-channel video is heavyweight. Files are 5-10x larger than equivalent H.264, and not every player supports them. Before committing to a transparent recording workflow, ask whether you actually need alpha or whether a simpler approach works:
- Just hiding the desktop wallpaper? Set your wallpaper to a solid color before recording, then record normally. Composite by setting that color as the chroma key in your editor — no alpha export needed.
- Just wanting a webcam in a corner without a hard rectangle? Use the circular webcam layout in your recording app. The output is still opaque, but the visible shape is a circle, which usually looks better than a hard rectangle anyway.
- Embedding on the web with a colored background behind it? Skip alpha and use CSS
mix-blend-modeor a video with the right background baked in.
Reach for true alpha-channel recording only when you genuinely need to composite the clip onto multiple different backgrounds.
Troubleshooting
The exported file plays with a black background instead of transparency. The codec or container doesn't support alpha. Re-export using ProRes 4444 (.mov) or HEVC with alpha. If you used H.264, the alpha was discarded at encode time — there's no way to recover it from the H.264 file.
Final Cut Pro shows the alpha channel correctly but Premiere shows black. Premiere doesn't read every Apple codec the same way. Re-export from the source as ProRes 4444 .mov specifically (not "HEVC with alpha") and Premiere will read it.
The webcam segmentation has a green halo around hair. Real-time segmentation under-mattes around hair edges and bleeds the original background through. Increase edge feathering slightly (3-4px), or switch to a real green screen with chroma key in post for cleaner edges.
The chroma key in OBS removes parts of the window I want to keep. Pixels in your window match the key color. Either change the key color (try magenta #FF00FF) or change the window's content so it doesn't contain pure green.
The ProRes 4444 file is enormous — 2 GB for a 3-minute clip. That's expected. ProRes 4444 is an intermediate codec, not a delivery codec. Export it for editing, then re-encode the final composited result to H.264 or HEVC for delivery.
Try Screenify Studio — free, unlimited recordings
Auto-zoom, AI captions, dynamic backgrounds, and Metal-accelerated export.
FAQ
Can macOS record the screen with a transparent background natively? No. The Screenshot toolbar and QuickTime both record the opaque display buffer. There is no built-in option to capture only a window with surrounding transparency. You need a third-party tool plus an alpha-supporting codec.
What's the difference between "transparent background" and "alpha channel"? Alpha channel is the technical mechanism — a per-pixel opacity value (0 = transparent, 255 = opaque). Transparent background is what you see when alpha is applied. You need a codec that stores the alpha channel for transparency to survive export.
Does H.264 support alpha? No. H.264 stores RGB or YUV pixels with no opacity information. If you export to H.264, every transparent pixel becomes black (or whatever fill color the encoder picks).
What about HEVC? Standard HEVC doesn't support alpha. HEVC with alpha is a separate variant introduced in macOS 11 / Safari 13 — it's an Apple-flavored extension that works in Apple platforms but has limited support elsewhere.
Can I record a transparent webcam without a green screen? Yes — use a recording app with on-device background segmentation (Screenify Studio, OBS background removal plugins, or Apple's built-in Center Stage doesn't do this). Quality is good enough for solo creator work, not for broadcast.
Will the recording show on my Mac with transparency, or only after compositing? Only after compositing. The transparent recording file looks like a window of "checkered transparency" or solid black depending on the player — it only becomes a real background-free clip when you place it on top of another clip in an editor.
Can I post a transparent video to YouTube or Instagram? No. YouTube and Instagram re-encode uploads to H.264, which strips alpha. To use a transparent clip on those platforms, composite it onto a real background before uploading.
Is there a way to make existing recordings transparent without re-recording? Only if the original recording has a clean, uniform background you can chroma key. Otherwise, you'd need to manually rotoscope the foreground in DaVinci Resolve or After Effects — possible but very time-consuming.
Wrap Up
True transparent screen recording isn't a setting — it's a pipeline decision. The recording captures opaque pixels, your tool either segments out the foreground at capture (webcam) or chroma keys against a known color (window), and your export uses a codec that preserves the alpha channel.
For most creators, the right answer is the webcam-only path with on-device background removal. For pro compositing into Final Cut or Premiere, ProRes 4444 with a chroma key from a green source gives the cleanest edges. Either way, decide on the codec before you press record — it's the one piece you can't fix in post.
Want a fast path to alpha-channel webcam exports? Try Screenify Studio for free. Or check out how to record screen with webcam on Mac if you need the webcam overlay without alpha, or how to record screen in 4K on Mac for high-resolution capture without the codec gymnastics. If you want to add visual polish to an opaque recording instead, recording with annotations on Mac covers arrows, callouts, and blur overlays.
Try Screenify Studio
Record your screen with auto-zoom, AI captions, dynamic backgrounds, and Metal-accelerated export. Free plan, unlimited recordings.
Download Free


