Record Retina Display Without Huge File Sizes
Why Retina screen recordings balloon to gigabytes — codec choices, scaling tricks, and post-recording compression that actually work.

A five-minute screen recording on a MacBook Pro can easily land at 1.2 GB. A one-hour tutorial? Try 8 to 15 GB if you're unlucky with codec defaults. That's not a bug in your recorder — it's Retina math colliding with codec choices most people never touch.
This article walks through the four realistic ways to keep Retina recordings watchable and sharable, with the exact codec, bitrate, and scaling settings for each. Screenify Studio is one of the four methods — the others are the built-in Screenshot toolbar (plus ffmpeg post-processing), OBS Studio, and QuickTime with manual export.
Quick comparison
| Tool | Default codec | Typical 1hr size | Best for | Difficulty |
|---|---|---|---|---|
| Screenify Studio | HEVC (hardware) | 600 MB – 1.2 GB | Tutorials you need to share today | Easy |
| Screenshot Toolbar + ffmpeg | H.264 → HEVC post | 2–4 GB → 800 MB | People comfortable with the terminal | Medium |
| OBS Studio | Configurable (HEVC/H.264) | 700 MB – 2 GB | Fine-grained bitrate control | Hard |
| QuickTime + Export As | H.264 | 1.5–3 GB | Quick one-offs, no extra software | Easy |
Pricing is identical across all four — every option listed has a functional free tier. What differs is how much friction sits between you and a 700 MB file instead of a 7 GB one.
Why Retina recordings are enormous
The number on your System Settings display page is a lie, or at least a convenience. A 14" MacBook Pro that "looks like 1512×982" is actually driving 3024×1964 physical pixels behind the glass. A 16" MBP set to "looks like 1728×1117" drives 3456×2234. The Studio Display and Pro Display XDR push 5K and 6K respectively.
macOS screen recording captures at native pixel resolution, not the scaled "looks like" resolution. This is usually what you want — tiny UI elements stay legible, text edges stay crisp — but it blows up the pixel count the encoder has to process.
The raw numbers
A quick back-of-envelope for a 14" MBP recording at 60fps for one hour:
- Frame size: 3024 × 1964 = ~5.94 megapixels
- Raw 8-bit 4:2:0: ~8.9 MB per frame uncompressed
- One hour at 60fps: 8.9 MB × 60 × 3600 = ~1.9 TB uncompressed
Obviously nobody stores 1.9 TB per hour. That's where codecs come in, and codec choice is where the size difference between "annoying to email" and "fills my SSD" actually lives.
Codec size comparison (same 1-hour recording)
| Codec | Approx size | Encode speed (Apple Silicon) | Playback compatibility |
|---|---|---|---|
| ProRes 422 | 80–120 GB | Real-time | Mac/pro tools only |
| H.264 (software) | 2–4 GB | Slow, CPU-heavy | Universal |
| H.264 (hardware) | 2–4 GB | Real-time | Universal |
| HEVC / H.265 (hardware) | 1–2 GB | Real-time | Mac, iOS, modern browsers |
| HEVC (software, slow preset) | 600 MB – 1.2 GB | 3–5× real-time | Same as above |
| AV1 (software) | 400–800 MB | 10–20× real-time | Chrome/Edge/Firefox, not Safari < 17 |
Hardware HEVC via Apple's VideoToolbox framework is the sweet spot on any Apple Silicon Mac. It encodes in real time (no slowdown during recording), produces files 40–50% smaller than H.264, and plays everywhere Apple products exist. AV1 is smaller still but too slow for live capture today.
The three levers
Every size reduction strategy ultimately pulls one of three levers:
- Encode smarter — switch from H.264 to HEVC (or crank the CRF). Free quality/size tradeoff.
- Lower the framerate — 30fps instead of 60fps cuts encode work in half. Tutorials rarely need 60.
- Downscale resolution — record native, export at 1920×1200 or 1600×1000. Viewers can't tell.
The tools below differ mostly in which levers they expose and how much manual work is involved.
Method 1: Screenify Studio — HEVC + scaled export
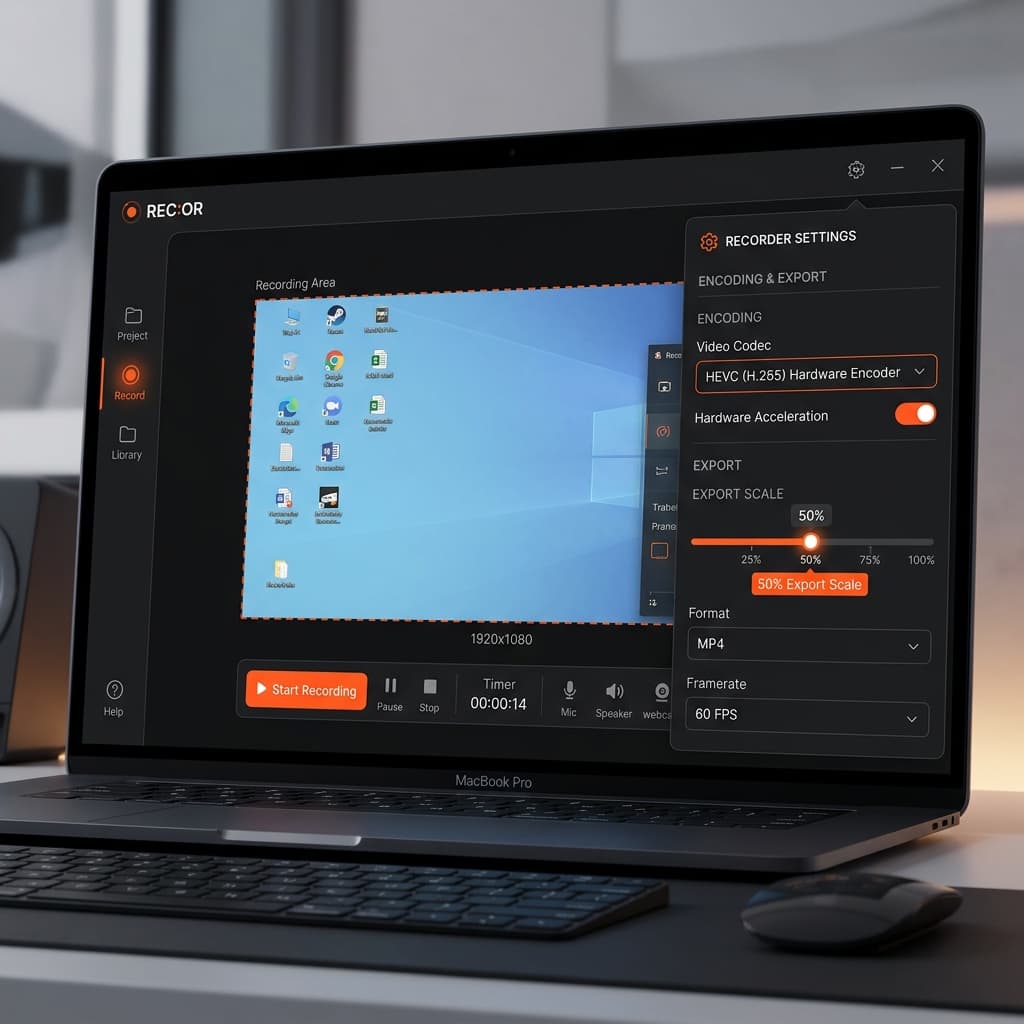
Screenify defaults to hardware HEVC on Apple Silicon and exposes the three levers without making you learn codec theory. Here's the practical flow.
Pick a capture region. The smaller the region, the smaller the file — linear relationship. If your tutorial is a browser demo, capture the browser window, not the whole 16" display. A full-screen Retina capture is ~6 megapixels; a 1600×1000 window region is ~1.6 megapixels. That's a 4× reduction before any codec touches the bits.
Set framerate to 30fps for tutorials. Screenify's recorder settings panel has a framerate dropdown — 24, 30, 60. For anything that isn't a gameplay capture or rapid animation demo, 30fps halves the encoder's workload and halves the output size. The Cursor Highlight and Auto-Zoom features still look perfectly smooth at 30 because they use motion interpolation during playback.
Record with HEVC hardware encoding. This is the default on Apple Silicon. You don't need to toggle anything, but if you want to confirm it, look for "HEVC (hardware)" in the recording settings badge.
Export at a scaled resolution. After you finish the recording, the export dialog offers preset scales: 100% (native), 75%, 50%, and custom. For a 3024×1964 source, 50% gives you a clean 1512×982 output — exactly the "looks like" size your display was showing you anyway. The difference is invisible on any screen where the viewer isn't zooming in with their nose pressed to the glass.
A typical 10-minute tutorial recorded this way lands between 90 and 180 MB, which fits inside an email attachment limit on most providers.
Try Screenify Studio — free, unlimited recordings
Auto-zoom, AI captions, dynamic backgrounds, and Metal-accelerated export.
When to record at native resolution anyway
Two cases justify keeping the full 2×/3× pixel count:
- You're zooming into UI details in post. If you plan to crop the recording to show a specific panel, record native so the crop still looks sharp.
- The audience is reviewing pixel-perfect design work. Designers checking kerning or stroke weight benefit from seeing the native render.
For everything else, export at 50% and move on. Related reading if you're weighing resolution tradeoffs: how to record screen at 4K on Mac and how to screen record without lag.
Method 2: Screenshot Toolbar + ffmpeg post-compression
The built-in macOS Screenshot toolbar records everything at whatever codec Apple decides that month — historically H.264, recently HEVC on some Mac models, always at a higher bitrate than you need. File sizes from this tool are consistently 2–3× larger than they should be.
The fix is post-processing with ffmpeg. This method has a steeper learning curve but costs nothing and gives you total control.
Step 1: Record with the Screenshot toolbar. Open the capture HUD with the standard keyboard shortcut (the one mapped to Command-Shift-5 by default). Click Options → set the save location somewhere easy to find. Pick "Record Selected Portion" and drag over the region you actually want. Click Record.
Step 2: Install ffmpeg. If you don't already have it:
brew install ffmpegHomebrew's ffmpeg build includes hevc_videotoolbox which lets you use Apple Silicon's hardware HEVC encoder from the command line.
Step 3: Inspect the file first. Before compressing, check what you're dealing with:
ffprobe -v error -select_streams v:0 \
  -show_entries stream=width,height,r_frame_rate,bit_rate,codec_name \
  -of default=noprint_wrappers=1 input.mov
You'll see something like width=3024, height=1964, bit_rate=22000000 (22 Mbps). That bitrate is the problem — it's about 3× what HEVC needs for equivalent quality.
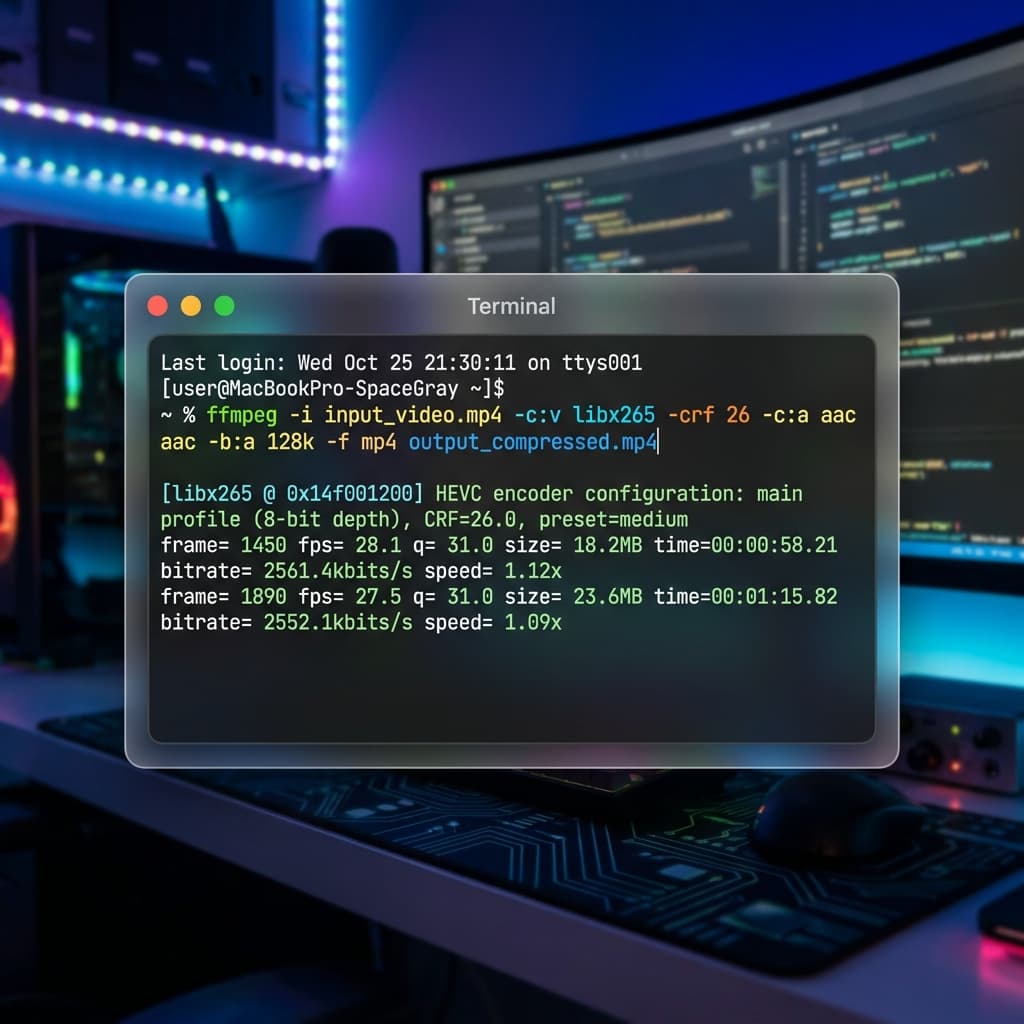
Step 4: Compress with HEVC. The standard one-liner:
ffmpeg -i input.mov -c:v libx265 -crf 28 -preset medium -c:a copy output.mp4Breakdown:
libx265— software HEVC encoder (better compression than hardware, slower)crf 28— constant rate factor, see the table belowpreset medium— encoding speed/efficiency tradeoff-c:a copy— don't re-encode audio, just copy it
CRF values decoded
CRF is a quality target, not a file size target. Lower CRF = higher quality = bigger file.
| CRF | Visual quality | Use case |
|---|---|---|
| 18 | Visually lossless | Archival, source material |
| 23 | Default, excellent | Finished tutorials you care about |
| 28 | Small file, still good | Email attachments, quick shares |
| 32 | Noticeable softening | Preview drafts only |
Start with CRF 28 and bump to 26 if text edges look too mushy. For pure UI recordings, CRF 28 is usually fine because the source is flat colors and sharp edges — HEVC loves that kind of content.
Step 5: Or use hardware HEVC + downscale. Software libx265 is slower than real-time. If you want faster compression and are willing to trade 10% compression efficiency for a 5× speedup:
ffmpeg -i input.mov -vf scale=1920:-2 -c:v hevc_videotoolbox -b:v 4M output.mp4Breakdown:
scale=1920:-2— scale to 1920 wide, keep aspect ratio, round height to even numberhevc_videotoolbox— hardware HEVC encoder-b:v 4M— 4 Mbps target bitrate (VideoToolbox doesn't support CRF reliably)
4 Mbps is plenty for 1920×1200 tutorial content. A 10-minute recording lands around 300 MB and encodes in under a minute.
Step 6: Verify the output. Run the same ffprobe command on output.mp4 and confirm the bitrate and resolution look right. Open it in QuickTime and scrub through a few sections to make sure nothing looks broken.
Method 3: OBS Studio — HEVC hardware encoder
OBS gives you more recording-time control than any of the other options. If you're recording regularly and want to dial in settings once, this is the most efficient path.
Step 1: Install OBS. Download from obsproject.com. The Mac build is universal and runs native on Apple Silicon.
Step 2: Add a Display Capture source. In the Sources panel, click +, pick Display Capture, select your display. OBS will grab the native Retina resolution automatically.
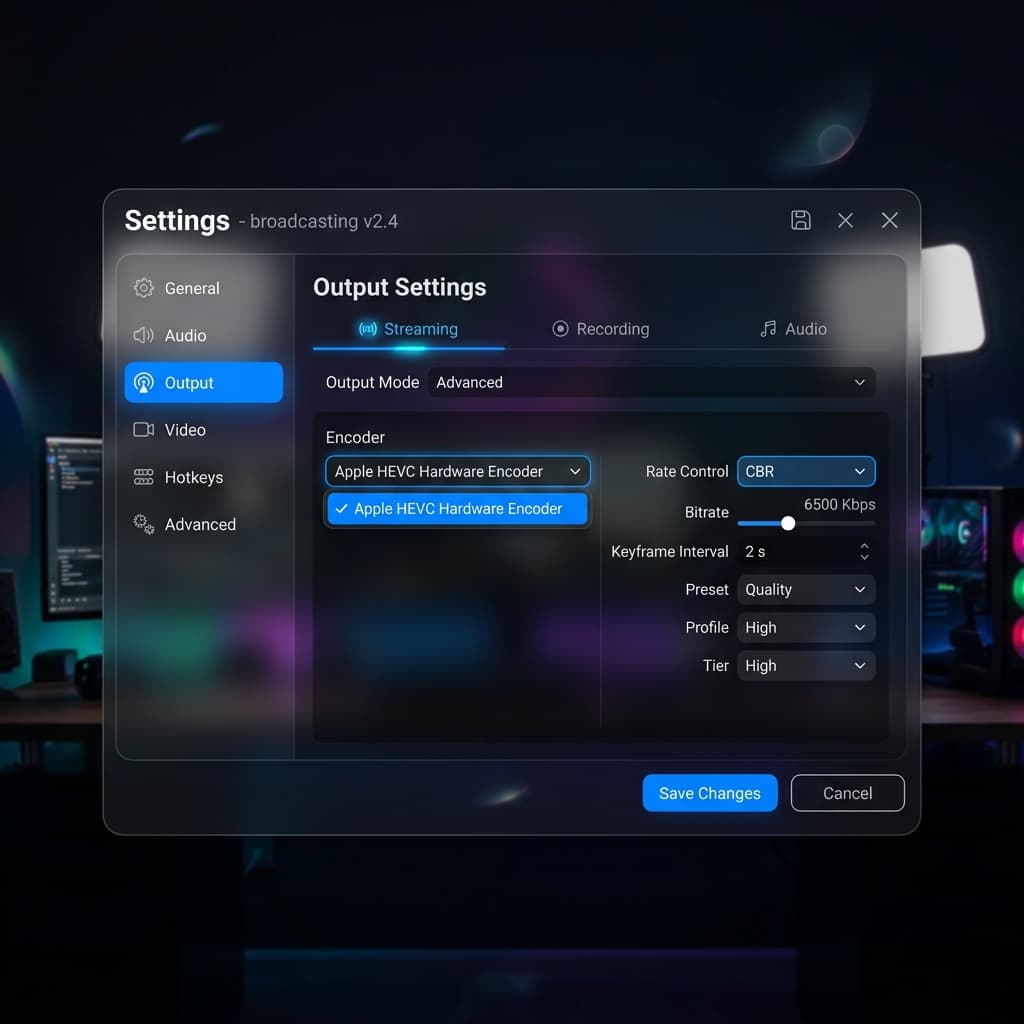
Step 3: Configure output. Settings → Output → switch to Advanced mode. On the Recording tab:
- Type: Standard
- Recording Format: MP4 (or Fragmented MP4 if you're paranoid about crash recovery)
- Video Encoder: Apple HEVC Hardware Encoder
- Rate Control: CBR
- Bitrate: 6000 Kbps (for native Retina) or 4000 Kbps (if scaling)
Step 4: Scale in the Video tab. Settings → Video:
- Base (Canvas) Resolution: your full Retina size (e.g. 3024×1964)
- Output (Scaled) Resolution: 1920×1246 (keeps the same aspect ratio)
- Downscale Filter: Lanczos (sharpest for text)
- Common FPS: 30
The Base/Output split is OBS's killer feature. It captures at full Retina resolution but scales down in real time using a high-quality filter, so you get the crispness of native capture with the file size of 1080p output.
Step 5: Set a recording directory. Settings → Output → Recording Path. Pick a fast SSD, not an external USB 2 drive.
Step 6: Record. Hit "Start Recording" in the main window. Test with a 30-second recording first and check the file size — a 30-second test at these settings should land between 12 and 20 MB. If it's dramatically larger, your rate control or bitrate setting didn't take effect.
OBS trades ease-of-use for control. The first setup takes 15 minutes; after that, recording is one click.
Method 4: QuickTime + Export As lower resolution
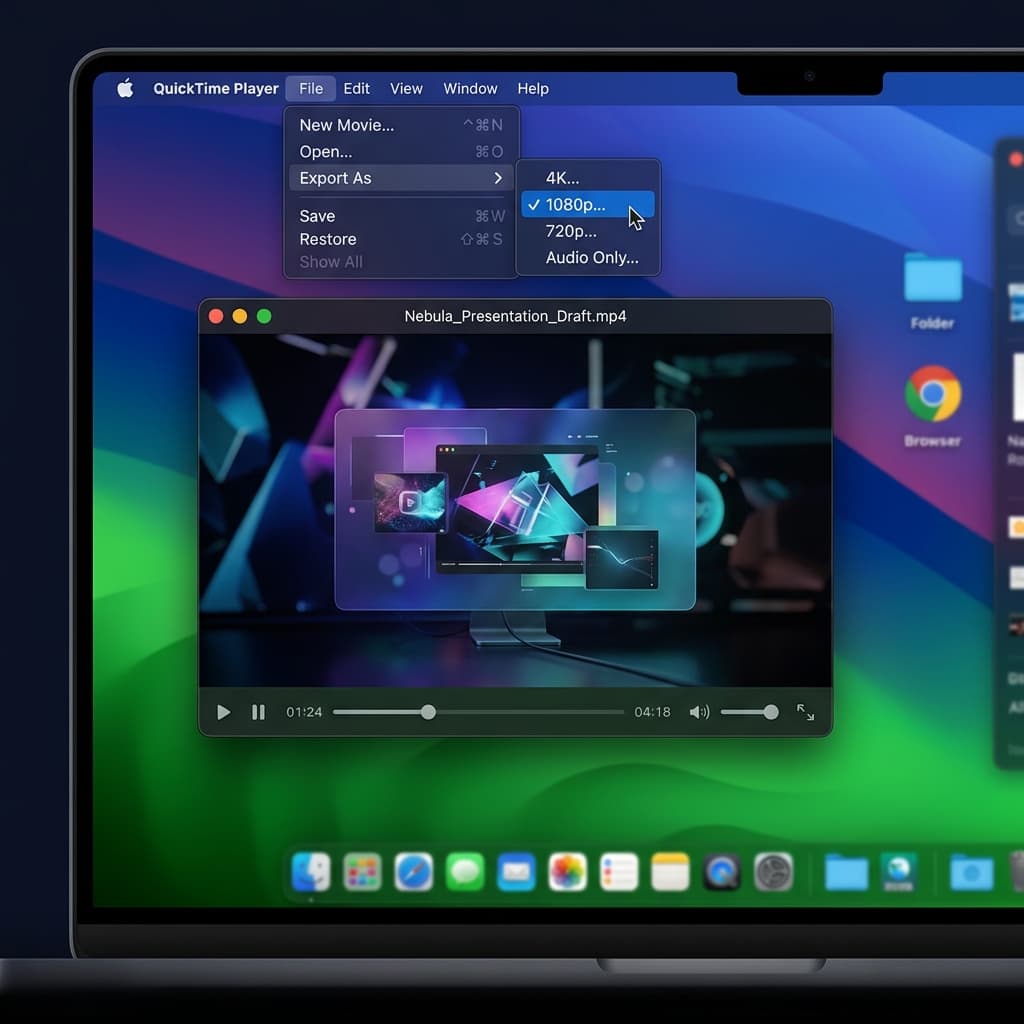
QuickTime Player's File → New Screen Recording captures at native Retina resolution and writes a big file. The workaround is to use File → Export As to transcode to a smaller size after recording.
Step 1: Record with QuickTime. File → New Screen Recording. A small floating controller appears. Click the red record button, drag to select a region (or click once for full screen), click Start Recording. Click the stop icon in the menu bar when done.
Step 2: Export As → 1080p. With the recording open in QuickTime, File → Export As → 1080p. QuickTime transcodes to H.264 at 1920×1080 with a reasonable bitrate. A typical 10-minute native Retina recording that started at 1.8 GB exits Export As around 350 MB.
Step 3: Delete the original. Don't forget this step. The native recording is still sitting in your temp location eating disk space. Move it to Trash after you've verified the export looks good.
Why Export As isn't ideal
QuickTime's Export As uses H.264, not HEVC. You're leaving roughly 40% size savings on the table compared to the HEVC routes. It also doesn't let you pick the bitrate or framerate — you get what Apple's preset gives you. For occasional use it's fine; for frequent recording, one of the other three methods will save you noticeable disk space over a month.
Related: recording on a desktop Mac changes the math a bit because of the larger panel. See how to screen record on an iMac for the iMac-specific considerations.
Troubleshooting
"My HEVC file won't play on Windows"
HEVC playback on Windows requires the HEVC Video Extensions from the Microsoft Store ($0.99) or a player like VLC that bundles its own decoder. If your audience is mostly Windows users on default Media Player, transcode to H.264 for delivery even if you recorded HEVC. One ffmpeg command:
ffmpeg -i input.mp4 -c:v libx264 -crf 23 -preset fast -c:a copy output_h264.mp4The file will be ~40% bigger but will play on any Windows machine made in the last decade.
"The file is still huge after switching to HEVC"
Check two things with ffprobe. First, the actual codec — some tools label output "HEVC" but actually produce H.264 if the hardware encoder init fails silently. Second, the bitrate. If you see 20+ Mbps on a 1080p recording, something overrode your rate control setting. In OBS this usually means you left the encoder preset at "Quality" instead of switching to CBR with an explicit bitrate.
"Text looks blurry after scaling"
Two fixes. First, use Lanczos or Bicubic as the scaling filter instead of Bilinear — Lanczos preserves edge sharpness much better on text. In ffmpeg, add -sws_flags lanczos before the -vf flag. Second, don't scale to weird non-integer ratios. Scaling 3024 → 1920 (ratio 1.575) looks worse than scaling 3024 → 1512 (exactly 50%). If your output resolution has a clean integer or simple fraction relationship to the source, subpixel artifacts disappear.
"My recording dropped frames"
Dropped frames during recording usually mean the encoder couldn't keep up with the capture rate. Fixes, in order of effort: drop to 30fps, shrink the capture region, close Chrome tabs (seriously, Chrome alone can starve the encoder), and make sure you're writing to the internal SSD not an external USB drive. If you're on an Intel Mac, the hardware HEVC encoder is much slower than on Apple Silicon — consider H.264 hardware instead.
"ffmpeg says 'Unknown encoder hevc_videotoolbox'"
Your ffmpeg build was compiled without VideoToolbox support. Homebrew's default build includes it, but if you installed ffmpeg through a different channel (conda, a static binary, an old MacPorts version), you may have a stripped-down build. Reinstall via Homebrew:
brew uninstall ffmpeg
brew install ffmpeg
Verify support with ffmpeg -encoders | grep videotoolbox — you should see hevc_videotoolbox and h264_videotoolbox in the list.
Try Screenify Studio — free, unlimited recordings
Auto-zoom, AI captions, dynamic backgrounds, and Metal-accelerated export.
FAQ
How much smaller is HEVC compared to H.264 for screen recordings?
Roughly 40–50% smaller at equivalent visual quality. Screen content compresses even better than live-action video because large areas are flat color and repeated frames are common — HEVC's larger block sizes exploit this better than H.264. A 2 GB H.264 tutorial typically becomes a 1 GB HEVC file with no perceptible quality difference.
Should I record at 30fps or 60fps for a tutorial?
30fps for anything that isn't demonstrating animation, gameplay, or sub-second interactions. Tutorials showing menus, typing, and clicks look identical at 30 and 60fps to 99% of viewers, but the 60fps file is about twice as large. Save 60fps for recordings where smooth motion is the point.
Does recording a smaller region actually help file size?
Yes, dramatically. File size scales with pixel count, so capturing a 1600×1000 region instead of a full 3024×1964 display is a 3.8× reduction before any codec runs. This is the single biggest lever for shrinking recordings and it costs nothing. Resize your browser window to the exact region you want to demo before hitting record.
Why does the Screenshot toolbar produce such large files?
The built-in recorder targets "good quality, zero configuration" and errs on the side of higher bitrates to avoid quality complaints. The bitrate is usually 18–25 Mbps regardless of content complexity, which is overkill for UI capture. The tool also doesn't expose any settings to change this — the only fix is post-processing with ffmpeg or switching to a recorder that lets you set bitrate directly.
Can I just use AV1 and get even smaller files?
Technically yes — AV1 is 20–30% smaller than HEVC at equivalent quality — but the practical answer in 2026 is still "not yet for live recording." Software AV1 encoders (SVT-AV1, libaom) are too slow for real-time capture on most Macs. You can transcode finished recordings to AV1 offline for archival, but for everyday recording HEVC remains the best speed-to-size ratio on Apple Silicon.
How do I know what bitrate my file actually has?
Run ffprobe on it:
ffprobe -v error -show_entries format=bit_rate -of default=noprint_wrappers=1 input.mp4That returns the overall bitrate in bits per second. Divide by 1,000,000 to get Mbps. A well-compressed 1080p screen recording should be 2–5 Mbps; a 4K screen recording should be 5–10 Mbps. If you see 15+ Mbps, there's room to shrink.
When does file size stop mattering?
Three cases where you should ignore the size entirely. First, when you're editing — edit from the source file at native resolution and codec, then compress only the final export. Second, when the recording lives locally and never leaves your Mac. Third, when you're archiving source material for a project you might revisit. File size matters for sharing, uploading, and storing many recordings long-term; it doesn't matter for one-shot local workflows.
Does downscaling from Retina lose meaningful quality?
For viewers on non-Retina displays: no, because their displays can't show the extra pixels anyway. For viewers on Retina displays watching at normal distances: barely perceptible on UI content, and invisible once you add any amount of video compression. The mental model that helps: the Retina pixels exist so your eye can't see individual pixels — if they were already invisible, downsampling and re-expanding for display doesn't remove anything your eye was using.
Picking the right method
If you're recording weekly and want the smallest ongoing friction, Screenify's defaults plus a 50% export scale will get you 80% of the way to optimal file sizes with zero terminal commands.
If you're already comfortable with ffmpeg and record occasionally, the Screenshot toolbar + ffmpeg combo costs nothing and gives you exact control per file.
If you need different recording profiles for different content types (tutorials vs. gameplay vs. demos), OBS with saved scene collections is worth the 15-minute setup.
And if you record once a month and just want it to work, QuickTime's Export As is perfectly fine — you'll leave some MB on the table, but not enough to matter at that volume.
Try Screenify Studio
Record your screen with auto-zoom, AI captions, dynamic backgrounds, and Metal-accelerated export. Free plan, unlimited recordings.
Download Free


