How to Record Multiple Monitors on Mac
Capture multiple displays on Mac — record one, both, or stitched layouts. 4 methods plus tips for mixed-resolution setups.

Recording a single display on Mac is easy. Recording two displays — or picking the right one when a window spans both — is where most tutorials fall apart. macOS treats every connected screen as a separate capture target, so almost every recording tool on the platform grabs one display at a time by default. If you want both, you either record them as two files or stitch them into a single canvas manually.
This guide walks through every realistic scenario on a multi-monitor Mac: recording just the primary, recording just the secondary, recording each as its own file, and compositing both into one video. It also covers the weird edge cases — Sidecar iPads, AirPlay mirrors, DisplayLink adapters, and mixed-resolution setups where a 4K external lives next to a 1440p built-in panel.
Quick Comparison
| Tool | Price | Best Scenario | Stitches Displays? | Difficulty |
|---|---|---|---|---|
| Screenshot Toolbar | Free (built-in) | Quick capture of one chosen display | No | Easy |
| Screenify Studio | Free + Pro | Picking a display with clean output and auto-zoom | No (one at a time) | Easy |
| OBS Studio | Free | Recording multiple displays stitched into one canvas | Yes (manual) | Advanced |
| QuickTime Player | Free (built-in) | Long unattended recording of one display | No | Easy |
None of the built-in Mac tools capture two displays simultaneously into a single file. If you need both displays on one canvas, OBS is the only free option. If you need each display as a separate file, you run two recorders at once or record them in sequence.
Multi-Display Concepts You Need to Know First
Before picking a tool, there are four macOS quirks that determine what you can actually record.
Each display is a separate capture target. When you open a screen recorder on a multi-monitor Mac, you'll see a picker listing something like "Display 1 (2560×1440)" and "Display 2 (3840×2160)". The OS exposes them individually through the ScreenCaptureKit API. Tools that claim to "record both" are really running two capture sessions in parallel.
Display arrangement affects the coordinate space. Open System Settings → Displays → click the Arrange button (or drag the tiled previews). The virtual desktop is a single coordinate plane built from however you arranged those tiles. If your external is to the left of the built-in, its pixels live at negative X values relative to the built-in. This matters when you're compositing in OBS or dragging a window between monitors mid-recording.
The "main" display is whichever has the menu bar. In the Arrange view, drag the tiny white bar at the top of a display preview to make that display the main one. Some recorders default to capturing the main display, so if you're recording the wrong screen, check this first.
Sleep and arrangement changes break recordings. If a display goes to sleep or you unplug a monitor mid-recording, most tools will either crash, stop recording, or finalize the file early. Disable Energy Saver display sleep before long sessions.
Now the methods.
Method 1: Screenshot Toolbar — Per-Display Selection
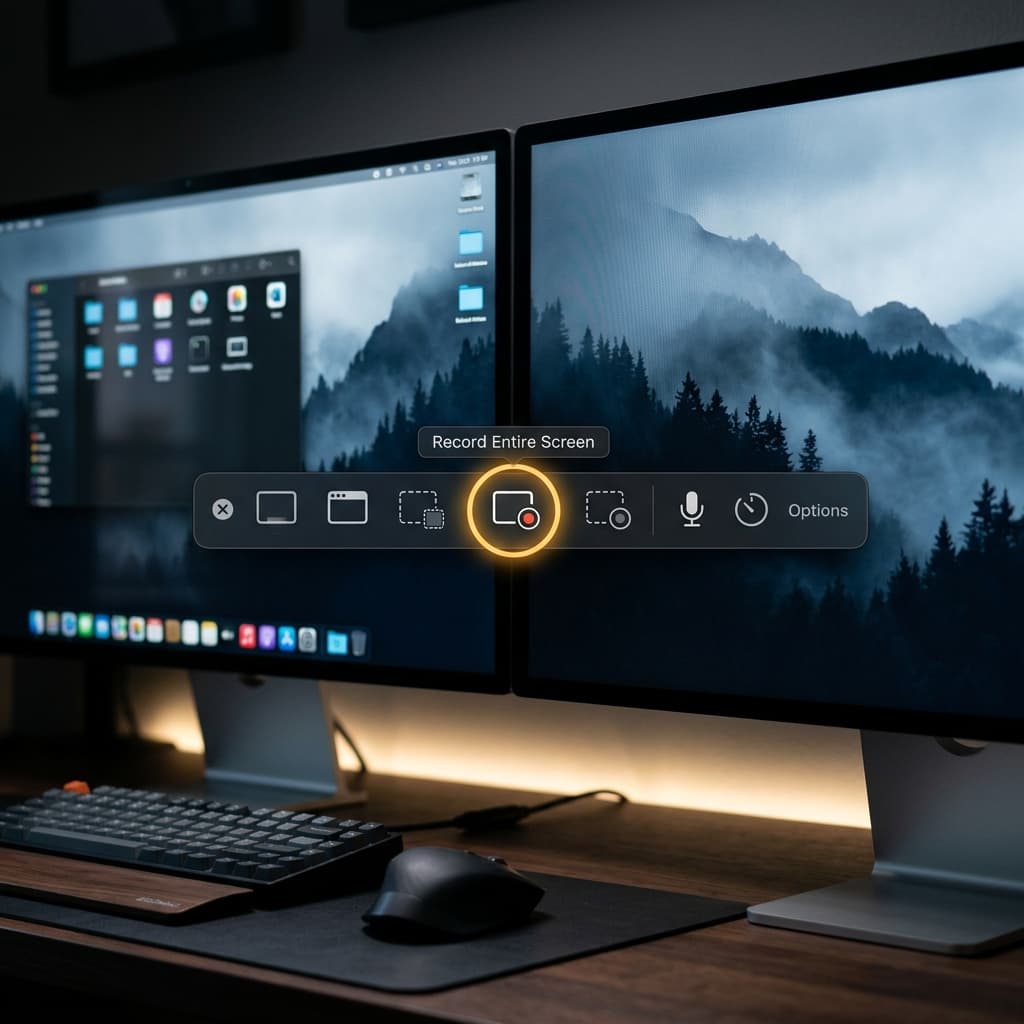
The macOS Screenshot Toolbar (the overlay that appears with the screenshot keyboard shortcut) is the fastest way to record a specific display. It's built in, zero-setup, and always available.
How display selection works here: when you invoke the toolbar, the controls appear on whichever display your cursor is on. The "Record Entire Screen" button records that display only. To switch displays, move your cursor to the other monitor first, then invoke the toolbar again — the overlay will jump across, and the recording target follows it.
Step-by-step for recording the primary display:
- Move your cursor to the primary display.
- Open the Screenshot Toolbar.
- Click the "Record Entire Screen" icon (the solid rectangle, fourth from left).
- Click the Options menu to pick a microphone input and choose a save location. Turn on "Show Mouse Clicks" if you're making a tutorial.
- Click the Record button that appears.
- Stop from the menu bar icon when done.
Step-by-step for recording the secondary display:
- Move your cursor onto the secondary monitor — any part of it works.
- Open the Screenshot Toolbar. The overlay now appears on the secondary display.
- "Record Entire Screen" now targets the secondary.
- Same Options, same Record button.
Recording both as separate files: you can't run two Screenshot Toolbar sessions at once — the second invocation cancels the first. Your only option is sequential: record display 1, stop, record display 2. Fine for static demos, useless for live workflows.
Limitations:
- No stitching across displays.
- Can't start a recording on one display and have it follow a window to another.
- Cursor effects are minimal.
- No way to label files per display — you'll get two identical timestamps and have to rename manually.
Good for: a quick one-off where you know exactly which display you want.
Method 2: Screenify Studio — Display Picker With Clean Output
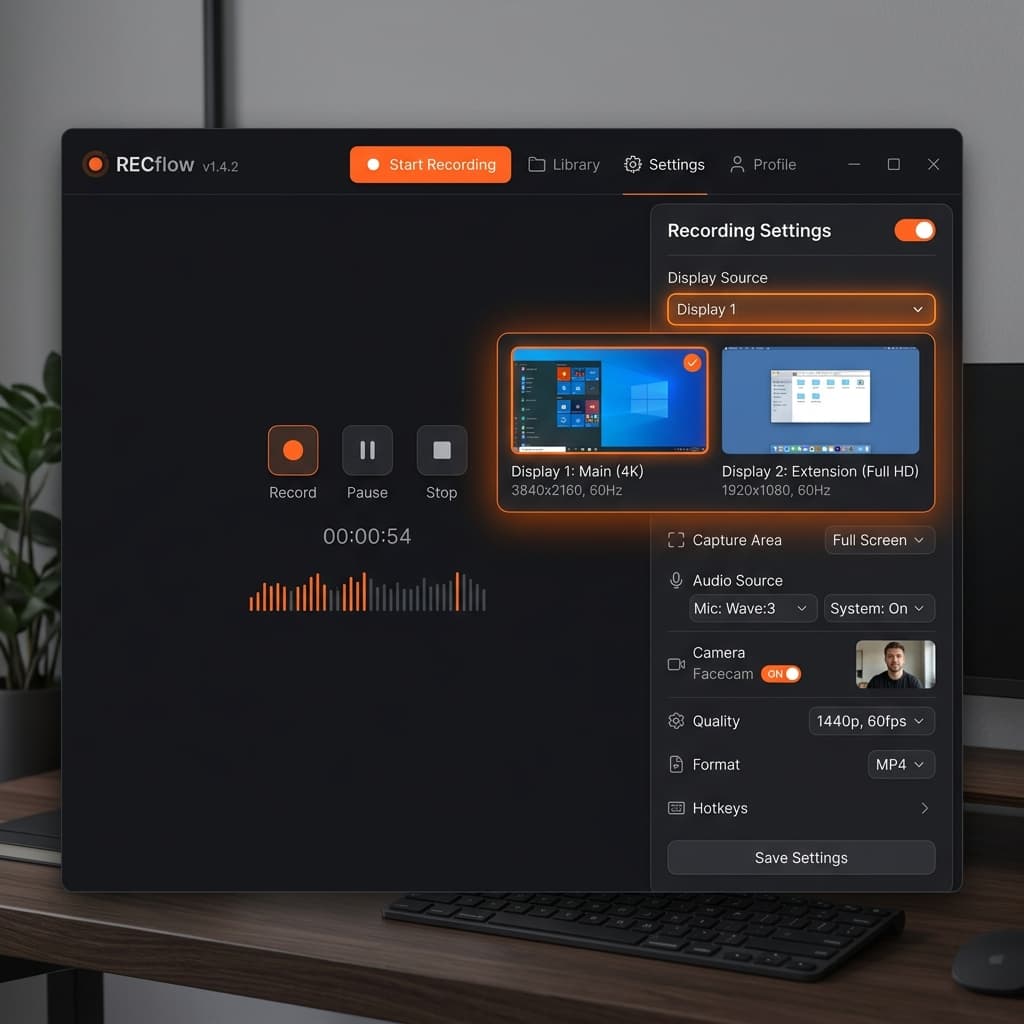
Screenify Studio is a native Mac screen recorder built specifically for people who ship videos, not just capture them. On a multi-monitor Mac, it shows an explicit display picker during setup: you pick Display 1 or Display 2, confirm resolution, and start. No guessing based on cursor location.
Download Screenify Studio if you want to follow along.
Why it handles multi-monitor setups well:
- The capture source panel lists each display by name, resolution, and refresh rate, so you don't accidentally record the wrong 4K panel.
- Recording at native resolution per display — if you pick your 3840×2160 external, the output is 3840×2160, not downscaled.
- Smart auto-zoom follows your cursor and keeps action readable even when you're on a large external where the content is tiny relative to the canvas.
- Cursor smoothing and click highlights make multi-display demos watchable — jumping from one screen to another is less jarring when the cursor is visually exaggerated.
Step-by-step:
- Launch Screenify Studio.
- In the capture source panel, open the display picker.
- Select Display 1, Display 2, or whichever external is listed. Each entry shows its pixel dimensions, so mixed-resolution setups are unambiguous.
- Set your mic input. Toggle system audio on if you need app sound (Screenify captures it without extra drivers).
- Click Start. There's a 3-second countdown on the selected display.
- Stop from the menu bar bezel.
- The recording opens in the editor where you can trim, apply auto-zoom, and export.
Recording both displays: Screenify records one display per session. To capture both in parallel, run two separate recordings back-to-back, or — for simultaneous capture — launch a second instance of the app, pick the other display, and start. macOS allows multiple ScreenCaptureKit sessions to run at once as long as each targets a different display.
When Screenify is the right pick:
- You care about the final video looking presentable without manual editing.
- You want a clean display picker instead of the "move cursor to target display" dance.
- You're producing a lot of tutorials and want to avoid re-recording because the audio was wrong or the cursor was invisible.
Try Screenify Studio — free, unlimited recordings
Auto-zoom, AI captions, dynamic backgrounds, and Metal-accelerated export.
For more focused scenarios, see our guides on recording the full screen on Mac, screen recording on iMac, and screen recording on MacBook Pro.
Method 3: OBS Studio — Multiple Display Capture Sources Stitched
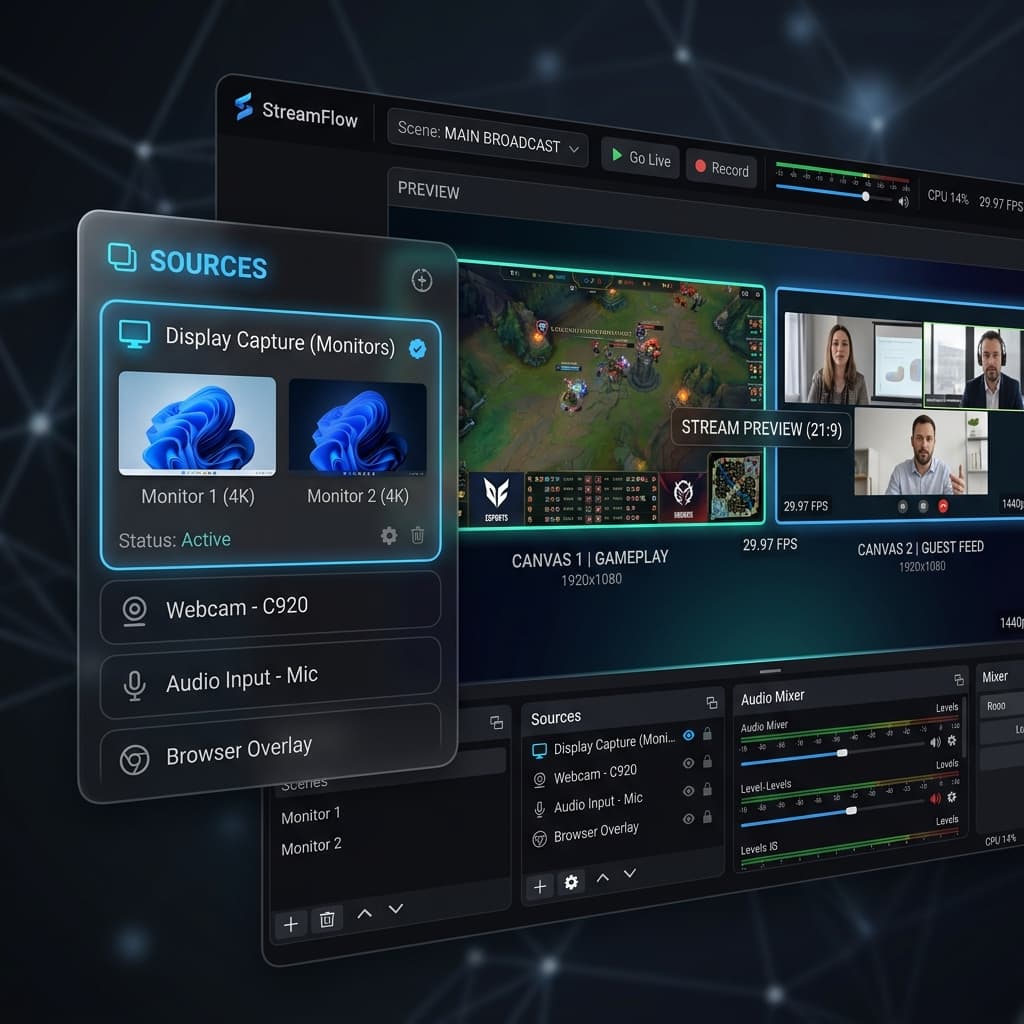
OBS Studio is the only free tool on Mac that can record two physical displays into one video file. It does this by treating each display as a Display Capture source, positioning both on a single canvas, and recording the canvas.
This is the path for: multi-display streaming demos, tutorials where you want both screens visible side-by-side, and any scenario where syncing two separate files in post is a non-starter.
Initial setup:
- Install OBS Studio from obsproject.com.
- On first launch, grant Screen Recording permission in System Settings → Privacy & Security, then restart OBS.
- Skip the auto-config wizard and pick "Optimize for recording" if prompted.
Building the scene:
- In the Sources panel, click +, select Display Capture, name it "Display 1".
- In the properties dialog, pick your primary display from the dropdown. Click OK.
- Click + again, add another Display Capture, name it "Display 2", pick your secondary.
- Both captures now sit on top of each other in the preview. You'll see just one — that's normal.
Positioning and canvas sizing: OBS's canvas has a fixed resolution set in Settings → Video → Base (Canvas) Resolution. To fit both displays side-by-side without distortion, add their widths together and take the taller height.
Example: 2560×1440 built-in + 3840×2160 external → canvas should be 6400×2160. Set that in Settings → Video, then go back to the scene:
- Click the Display 1 source, drag it to the left side of the canvas. Hold Shift while dragging a corner to resize proportionally; better yet, right-click → Transform → Edit Transform and enter exact X/Y coordinates.
- Place Display 1 at position (0, 0) with its native dimensions.
- Place Display 2 at position (2560, 0) with its native dimensions.
- Both displays now sit side-by-side, pixel-perfect.
Output settings:
- Settings → Output → switch to Advanced mode.
- Recording tab: pick Apple VT H.264 Hardware Encoder (Apple Silicon) or Apple VT HEVC for smaller files.
- Rate Control: CRF or CBR around 20,000–40,000 Kbps for a 6400×2160 canvas. Lower if you see dropped frames.
- Container: mov or mp4.
- Settings → Video → Output (Scaled) Resolution: keep at base, or scale down to 3840×1080 if your disk can't keep up with the full resolution.
Recording separate files instead of stitched: OBS can also record two sources to two files by setting up two Scenes and switching between them — but the simpler answer is to run two recording profiles in OBS sequentially, or use Screenify or Screenshot Toolbar for per-display files.
Realistic performance notes:
- A 6400×2160 canvas recording at 30fps is demanding. On M1/M2 base models, expect frame drops unless you use the hardware encoder.
- Audio captured from mic + system audio needs BlackHole or a similar virtual audio driver — OBS on Mac cannot capture app audio natively. See our audio-capture guides for setup.
- First-time setup takes 20–30 minutes. Worth it if you record multi-display content weekly; overkill for a one-off.
Get Screenify Studio if OBS feels like too much machinery for what you're trying to do.
Method 4: QuickTime Player — Choose Display
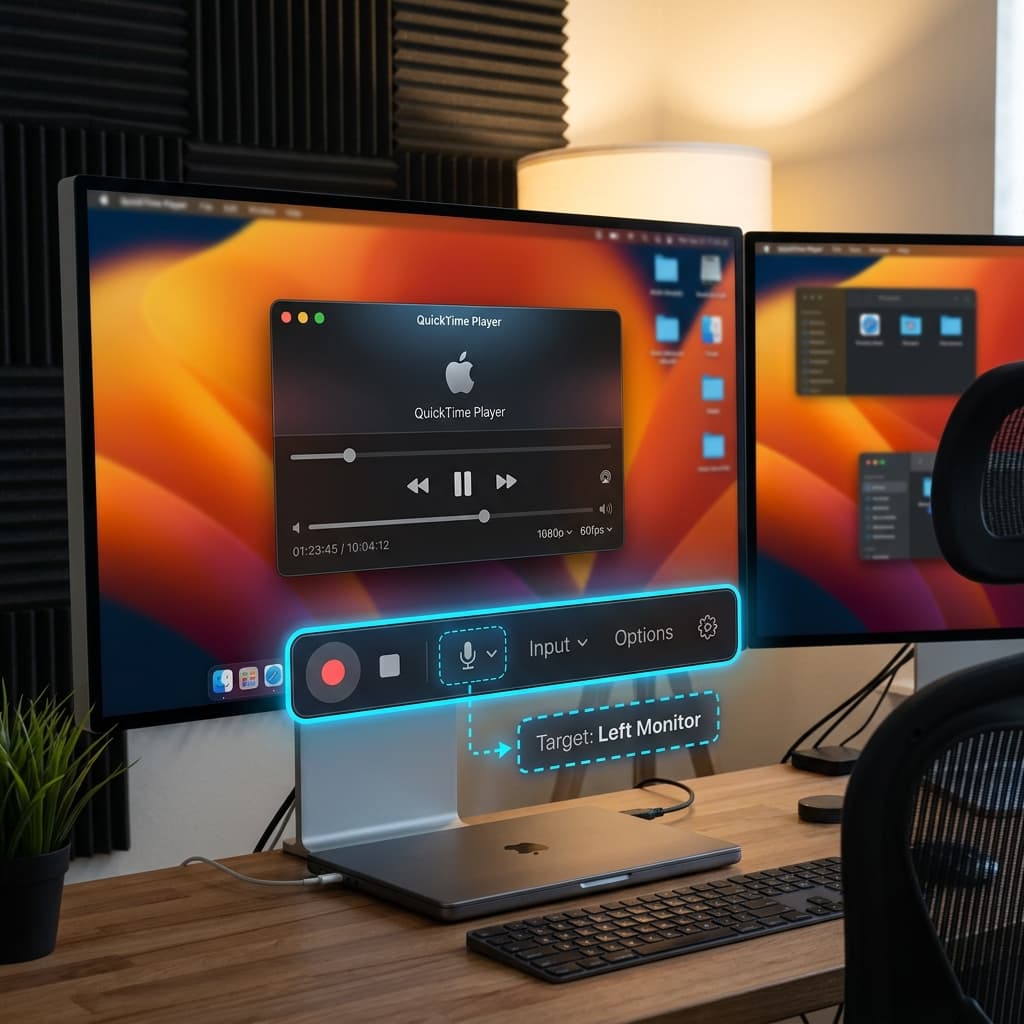
QuickTime Player still ships with macOS and still handles new recordings through ScreenCaptureKit under the hood. Its multi-display behavior is similar to the Screenshot Toolbar: you pick one display per session.
How display selection works: QuickTime's recording controls appear wherever you initiate the recording. Move the cursor to the target display before starting, or drag the floating controls panel across after it appears.
Step-by-step:
- Open QuickTime Player from Applications or Spotlight.
- File → New Screen Recording.
- The recording controls appear (identical to the Screenshot Toolbar overlay — Apple unified them in recent macOS versions).
- Move the controls overlay to the display you want to record.
- Click "Record Entire Screen".
- Choose audio input and save location from Options.
- Hit Record. Stop via the menu bar icon.
- QuickTime opens the finished file automatically.
Why use QuickTime over the Screenshot Toolbar? Honestly, there's not much difference on modern macOS — they share the same recording backend. QuickTime wins for long unattended recordings because it shows the file immediately and lets you trim within the same app. Screenshot Toolbar wins for speed.
Can QuickTime record both displays at once? No. Like Screenshot Toolbar, one session targets one display. You can launch two QuickTime recordings in sequence but not concurrently within the same app instance.
Mixed Resolutions: 4K External + 1440p Built-In
This is where multi-display recording gets messy. When your external is 3840×2160 and your built-in is 2560×1440 (or 2880×1800 for a Retina MacBook), the pixel densities and physical sizes don't match, which creates three headaches.
Headache 1: Stitched canvas has wasted space or cropping. If you put both on a 6400×2160 canvas in OBS, the 1440p display renders at native size in a 2160-tall slot — 720 pixels of empty space below it. Options: letterbox it (leave black), upscale the 1440p source to 2160 in OBS (soft output), or use a 6400×1440 canvas and crop the 4K (losing detail).
The cleanest fix in OBS: set canvas to 6400×2160, place the 1440 display vertically centered, and leave the gap. Add a dark background color source underneath both displays so the gap doesn't look empty — a #111 solid color source at the bottom of the scene list does it.
Headache 2: Scaling factors differ. macOS renders Retina displays at a "looks like" resolution (e.g., 1440p for a Retina panel that's physically 2880×1800). A non-Retina 4K at native 2160 scaling has tiny UI. When both displays appear in the same recording, the 4K screen shows cramped text while the Retina shows comfortably-sized text. Fix: set the external's scaling in System Settings → Displays to "Larger Text" (effectively 1920×1080 rendering) before recording. Your capture will be 1920×1080 instead of 3840×2160, but it'll match the other display visually.
Headache 3: Cursor size changes as you move between displays. macOS scales the cursor based on the display's DPI. On a 4K non-Retina, the cursor is small. Jumping to Retina, it gets bigger. For tutorials, use Screenify's cursor size override or enable "Shake mouse pointer to locate" in System Settings → Accessibility → Display.
For recording a single display on mixed-resolution setups, Screenify Studio's display picker is the least painful because it records each at native res and you compose later if needed.
Troubleshooting
1. My secondary display doesn't appear in the recorder's picker.
Most likely cause: the display is a DisplayLink USB adapter. DisplayLink uses a virtual frame buffer routed over USB, and macOS's ScreenCaptureKit API doesn't see it as a capturable display in most cases. Confirm by checking System Information → Graphics/Displays — if the display isn't listed under your GPU but is under USB, it's DisplayLink.
Workarounds: use a native DisplayPort/HDMI adapter instead, or record the DisplayLink output with OBS using a window capture on each app rather than a display capture.
2. Sidecar iPad doesn't show up as a recordable display.
Sidecar (iPad as second display) works with Display Capture in Screenify and OBS but is inconsistent with the Screenshot Toolbar depending on your macOS version. On macOS 14 and later, Sidecar displays appear in the capture picker. On older versions, the toolbar ignores Sidecar. Fix: use Screenify or OBS, which enumerate displays via the newer ScreenCaptureKit API and handle Sidecar correctly.
3. AirPlay receiver (another Mac or Apple TV as a display) isn't capturable.
AirPlay displays appear in the macOS display list and can be dragged windows to — but they're rendered remotely. ScreenCaptureKit can usually capture them as a display target if the receiver is currently active. If you see the display in System Settings → Displays → Arrange but not in your recorder, toggle "Use as separate display" vs "Mirror" and restart the recorder.
4. Recording drops frames when capturing the 4K display.
4K capture at 60fps produces ~500 MB/minute of raw frames. If your SSD or CPU can't keep up, the encoder drops frames. Fixes: switch to hardware encoding (Apple VT in OBS, default in Screenify), drop to 30fps, lower display scaling so the recorder captures a smaller effective resolution, or record to an internal SSD rather than external USB storage.
5. Windows jump to the wrong display when I invoke a recording overlay.
Some recorders steal focus on start and macOS Mission Control may move windows to "consolidate" them. Disable "Displays have separate Spaces" in System Settings → Desktop & Dock only if you want windows to freely span both displays; leave it enabled if you want each display isolated. Also turn off "Automatically rearrange Spaces based on most recent use" under Mission Control settings — it shuffles windows between displays unpredictably.
Try Screenify Studio — free, unlimited recordings
Auto-zoom, AI captions, dynamic backgrounds, and Metal-accelerated export.
FAQ
Can I record two displays at the exact same time into one file on Mac?
Not with any built-in tool. OBS Studio is the free option that stitches two Display Capture sources onto one canvas and records the result. Alternatively, run two separate recording sessions (e.g., two Screenify instances) and composite them in post with Final Cut Pro, DaVinci Resolve, or iMovie.
Does recording two displays double my CPU usage?
Roughly, yes. Each display is a separate ScreenCaptureKit session with its own encoder pipeline. On Apple Silicon, the hardware encoder handles multiple streams well — M1 Pro and up can comfortably record two 4K streams at 30fps. On Intel Macs, expect dropped frames above 1080p per display.
How do I pick which display to record when an app is spanning both?
macOS considers a window to "belong to" the display that contains most of its pixel area. Recording that display will capture the window. If the window straddles the boundary 50/50, the half on the non-recorded display is cut off. Move the window fully onto one display before recording, or use OBS Window Capture (which follows the window across displays) instead of Display Capture.
What happens if I drag a window from one display to another mid-recording?
With display capture, the window disappears from your recording the moment its center crosses into the other display — because your recorder is only watching one display. With OBS stitched capture, the window stays visible because both displays are on the canvas. With window capture, the window stays visible because the source follows it.
Can DisplayLink USB adapters be recorded?
Usually not via display capture — macOS's ScreenCaptureKit doesn't see them as real displays because DisplayLink uses a virtual frame buffer. Workaround: capture individual app windows with OBS Window Capture, or use native DisplayPort/HDMI/Thunderbolt outputs instead of DisplayLink.
Why does my stitched OBS recording look stretched?
The canvas resolution doesn't match the combined physical dimensions of your displays, so OBS is scaling sources to fit. Go to Settings → Video → Base Resolution and set it to the exact sum of widths × max height of your two displays. Then right-click each source in the scene → Transform → Fit to Screen and reposition.
Can I record my MacBook screen and an external monitor as separate files simultaneously?
Yes, by running two recorder instances targeting different displays. Launch two copies of Screenify (hold Option while clicking the dock icon, or use open -n /Applications/Screenify\ Studio.app in Terminal), pick a different display in each, and start both. Two files, two displays, in parallel.
How do I handle file naming when recording multiple displays?
Built-in tools use timestamps and don't distinguish between displays, so you'll have to rename. Screenify lets you set a custom filename per recording in the save dialog. OBS has filename formatting templates in Settings → Advanced → Recording — add a display identifier in the name.
Recording multiple monitors on Mac comes down to: pick a tool that handles your specific scenario (one display, both as files, both stitched), understand that macOS exposes each display separately, and account for mixed resolutions upfront instead of fixing them in post.
Download Screenify Studio if you record multi-display content regularly and want a recorder that shows you exactly which display you're capturing.
Try Screenify Studio
Record your screen with auto-zoom, AI captions, dynamic backgrounds, and Metal-accelerated export. Free plan, unlimited recordings.
Download Free


