How to Record a Live Stream on Mac
Capture live streams from Twitch, YouTube Live, and Kick on Mac — 4 methods including DRM workarounds and audio/video sync tips.

Recording a live stream on Mac sounds simple until you actually try it. The stream buffers for two seconds and your recording has a frozen frame. The audio drifts 400ms behind the video by minute 20. The Twitch desktop app refuses to let you capture its window. And if you were hoping to archive that four-hour marathon, congratulations — you now have a 38GB ProRes file eating your SSD.
This guide walks through four different ways to capture live streams on macOS, when to pick each one, and the specific pitfalls (audio drift, buffering stalls, DRM walls) that trip up most people.
Quick Comparison
| Tool | Price | Best For | Difficulty |
|---|---|---|---|
| Screenify Studio | Free tier + Pro | Live capture with synced system audio and clean exports | Easy |
| OBS Studio | Free | Long streams, precise bitrate control, multi-source | Medium |
| yt-dlp | Free (CLI) | Downloading VODs after the stream ends | Medium |
| QuickTime + BlackHole | Free | Quick one-off captures when you already have BlackHole | Easy |
Pick based on whether you need the stream as it happens (Screenify, OBS, QuickTime) or are fine waiting for the VOD (yt-dlp).
A Quick Note on Legality and Ethics
Before any method: you are responsible for what you record. Live streams are copyrighted content owned by the streamer, the platform, or both. Recording is fine in these cases:
- Your own streams — archiving your Twitch/YouTube Live broadcasts for editing, highlights, or backups.
- Explicit permission — a streamer said you can clip or mirror their content.
- Fair use clips — short excerpts for commentary, criticism, news reporting, or education (US; similar doctrines exist elsewhere but are narrower).
- Public domain or Creative Commons streams.
Recording entire streams to redistribute, monetize, or pass off as your own is copyright infringement and usually a ToS violation on top. Platforms like Twitch and YouTube have automated takedown systems that will find reuploads fast.
DRM-protected services are a hard no. Netflix, Disney+, HBO Max, Apple TV+, Amazon Prime Video and similar platforms use Widevine, FairPlay, or PlayReady DRM enforced at the OS and GPU level. On Mac, HDCP blocks the frames before they ever reach a screen recorder — you'll get a black rectangle where the video should be. This isn't a bug in your recorder; it's working exactly as the studios intended. Don't waste hours trying to "fix" it. If a service is DRM-protected, it cannot be screen-recorded on a stock Mac, and the methods that bypass it are illegal in most jurisdictions.
With that out of the way — here are the four methods for legitimate recording.
Method 1: Screenify Studio (Live Capture with System Audio)
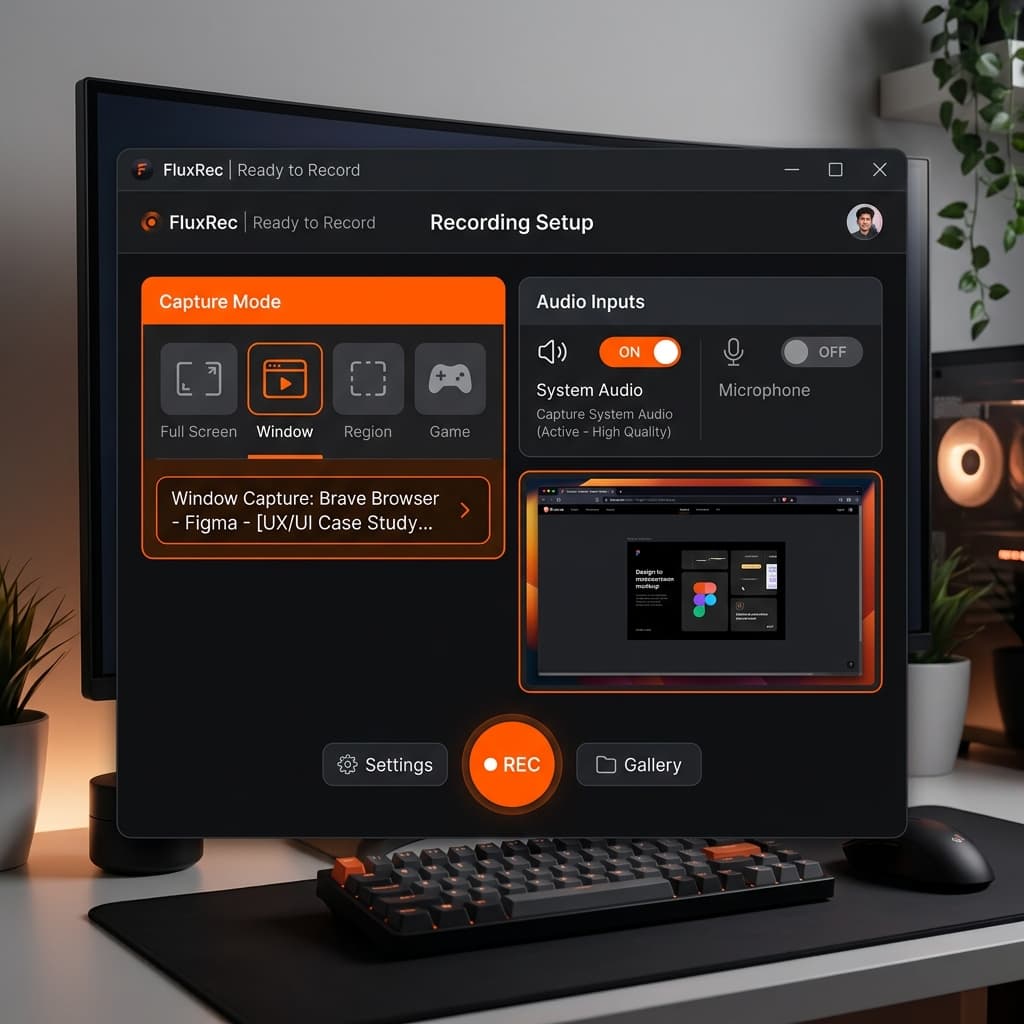
Screenify Studio is built specifically for capturing on-screen content with tight audio-video sync, which is exactly where live stream recording tends to fall apart. For capturing a Twitch, YouTube Live, Kick, or Facebook Gaming stream from your browser, this is the method with the fewest steps and the fewest sync problems.
Steps
- Install Screenify Studio. Download Screenify Studio and grant Screen Recording permission under System Settings → Privacy & Security → Screen Recording. Restart the app after granting.
- Open the stream in your browser. Full-screen the player or enable theater mode so you're not capturing the sidebar and chat unless you want them.
- Launch Screenify and choose Window capture. Click the Twitch/YouTube/Kick browser window. Window capture follows the window if you move it between spaces or displays, which matters for long streams.
- Enable system audio. Toggle "Record system audio" so the stream's audio goes directly into the recording. No BlackHole or Loopback needed — Screenify captures it via the CoreAudio taps introduced in macOS Sonoma.
- Check the framerate. For gameplay streams, set capture to 60fps. For talk shows, IRL, or Just Chatting streams, 30fps is fine and cuts file size in half.
- Start recording when the stream is stable. Wait 10-15 seconds after hitting play — most streaming platforms show a "connecting" or buffering frame for the first few seconds that you don't want baked into your file.
- Stop recording from the menu bar icon when the stream ends or you've got what you need.
Why this works for live streams
The two things that break live stream recordings are audio drift and buffering stalls. Screenify handles both:
- Audio-video sync. Live streams use variable bitrate (VBR) encoding where the audio chunks and video chunks arrive at slightly different rates. Naive recorders lock audio to the system clock, which means after 20 minutes of recording a VBR source you can be 300-500ms off. Screenify timestamps each audio chunk against the video frames it captures at the moment of capture, so drift stays under 20ms even on multi-hour recordings.
- Buffering recovery. When the stream stalls, the video frame freezes but the CoreAudio stream keeps ticking. Screenify detects frozen frames and holds the audio in a small buffer so when the stream resumes, audio and video snap back together instead of permanently offsetting.
- Smart zoom for highlights. If you're capturing gameplay or a reaction stream to edit later, Screenify's auto-zoom picks up on scene changes and cursor movement, giving you close-ups you can cut to without zooming manually in post.
- Manageable file sizes. A 2-hour 1080p60 recording lands around 3-5GB with Screenify's H.265 export, compared to 15-25GB for ProRes out of QuickTime.
For the audio side specifically, our guide on recording internal audio on Mac covers why system audio capture is the part most tools get wrong.
Download Screenify Studio to try it free.
Try Screenify Studio — free, unlimited recordings
Auto-zoom, AI captions, dynamic backgrounds, and Metal-accelerated export.
Method 2: OBS Studio (Window Capture from Browser)
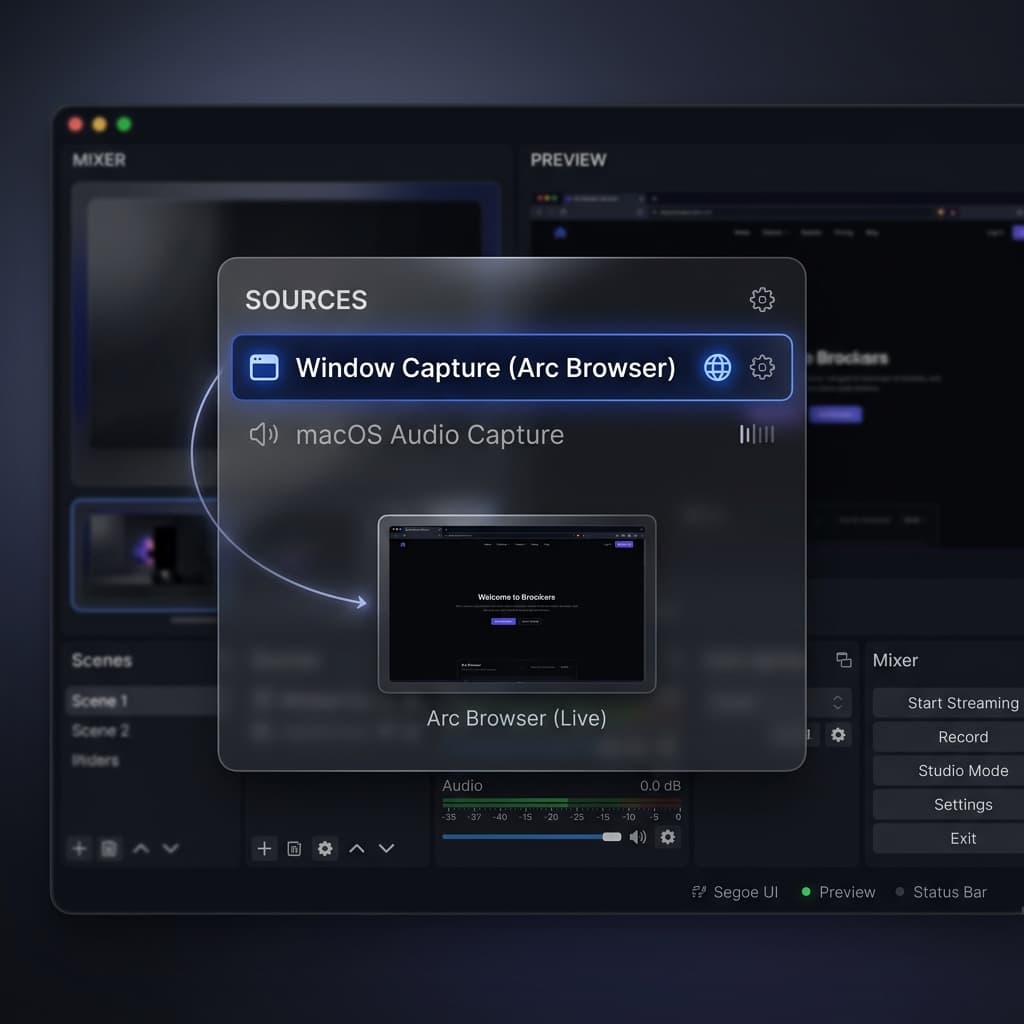
OBS Studio is the tool most streamers already have installed, and it's a solid choice for recording streams if you're willing to configure it properly. The advantages over Method 1: finer control over bitrate, multi-source compositing (stream + webcam + overlay), and it handles very long recordings (4+ hours) without breaking a sweat.
The disadvantage: setup is fiddly, and getting system audio to work still requires an extra step.
Steps
- Install OBS. Grab it from obsproject.com. Grant Screen Recording and Microphone permissions when prompted. Restart OBS after granting.
- Create a new scene. Click
+under Scenes, name it "Stream Capture." - Add a Window Capture source.
+under Sources → Window Capture → pick your browser window (e.g.,Google Chrome — Twitch). OBS's Window Capture on macOS uses ScreenCaptureKit, which handles occluded windows correctly — you don't need to keep the window on top. - Add a system audio source. On macOS 13+, add
macOS Audio Captureas a source and select the browser process. This pulls the browser's audio without needing BlackHole. On older macOS versions, you'll need BlackHole (see Method 4). - Set recording settings. Go to Settings → Output → Recording. Set Type to
Standard, Format toMKV(not MP4 — MKV is crash-safe for long recordings), Encoder toApple VT H.264 Hardware Encoder, and Rate Control toCBRat 8000 Kbps for 1080p60. - Match the stream framerate. Settings → Video → Common FPS Values → 60 for gameplay streams, 30 for talk streams. A 30fps recording of a 60fps stream will look juddery, so match the source.
- Click Start Recording. Let the stream play. When done, Stop Recording, then remux the MKV to MP4 via File → Remux Recordings.
When OBS beats Screenify
- Very long streams. 4-hour marathons, full-day IRL streams, multi-session tournament recordings. OBS is rock-solid for this; most consumer recorders aren't tested at that duration.
- Compositing. You want to capture the stream and overlay your webcam reaction, a second monitor showing chat, or a ticker. Scenes let you build that live.
- Bitrate control. You need a specific file size target (e.g., "under 4GB for a Discord upload"). CBR encoding lets you hit that precisely.
When OBS is overkill
If you just want "record this Twitch stream as cleanly as possible and move on," OBS's 15-minute setup isn't worth it compared to Method 1. OBS is a tool for producing streams, and recording is a side use case.
Method 3: yt-dlp (Download the VOD After the Stream Ends)
Here's the method most guides skip: if you don't need the stream as it's happening, the cleanest capture is no capture at all. Download the VOD after the streamer publishes it.
Twitch, YouTube Live, Kick, and most other platforms archive streams as VODs (Video on Demand) for a window after the broadcast ends — usually 14-60 days depending on platform and the streamer's subscription tier. yt-dlp downloads those VODs directly from the platform's own encoder output, which means you get the exact bitrate and framerate the streamer uploaded, with perfect audio sync and no recording overhead.
Legality caveat
Downloading VODs is in the same legal category as recording the live stream: fine for your own content, content you have permission for, fair-use clips, or public-domain material. It is not fine for redistributing someone else's work. Twitch and YouTube's ToS technically prohibit downloading content outside their official tools. yt-dlp is legal to install and use, but what you do with the download is your responsibility.
Steps
- Install Homebrew if you don't have it:
/bin/bash -c "$(curl -fsSL https://raw.githubusercontent.com/Homebrew/install/HEAD/install.sh)" - Install yt-dlp and ffmpeg.
brew install yt-dlp ffmpeg. ffmpeg is required for merging video and audio streams. - Wait for the VOD to publish. On Twitch, this is usually within 1-2 minutes of the stream ending. On YouTube, it can take 5-30 minutes for the live stream to be converted to a VOD.
- Grab the VOD URL. For Twitch, it's the URL after clicking into the VOD from the streamer's Videos tab (e.g.,
https://www.twitch.tv/videos/123456789). For YouTube, it's the normal watch URL. - Check available formats.
yt-dlp --list-formats <URL>. You'll see entries like1080p60,720p60,audio_only. - Download.
yt-dlp -f "bestvideo+bestaudio" -o "%(title)s.%(ext)s" <URL>. This grabs the highest quality video and audio and merges them into an MKV or MP4.
Streamlink as an alternative
If you want the live stream piped to a local file while it's happening (not after), streamlink is the sibling tool: brew install streamlink, then streamlink --output stream.ts https://www.twitch.tv/channelname best. This records the raw HLS stream the platform is already sending you, which is more efficient than screen-recording the browser playing the stream. Same legal caveats apply.
Why this is often the right choice
A screen recording of a live stream is always a lossy re-encode of a lossy source (the platform's transcode of the streamer's original feed). yt-dlp and Streamlink skip the re-encode step entirely — you get the exact file the platform serves, which is usually 40-60% smaller and visually cleaner than any screen recording.
Use this method when: you don't need the content immediately, the stream is archived as a VOD, and you want the best possible quality-per-byte.
Don't use it when: the streamer disables VOD archiving, the content you need is from a chat interaction or overlay that won't be in the VOD, or you need to capture only a specific moment in the stream (you'd still have to trim the full download).
Method 4: QuickTime + BlackHole
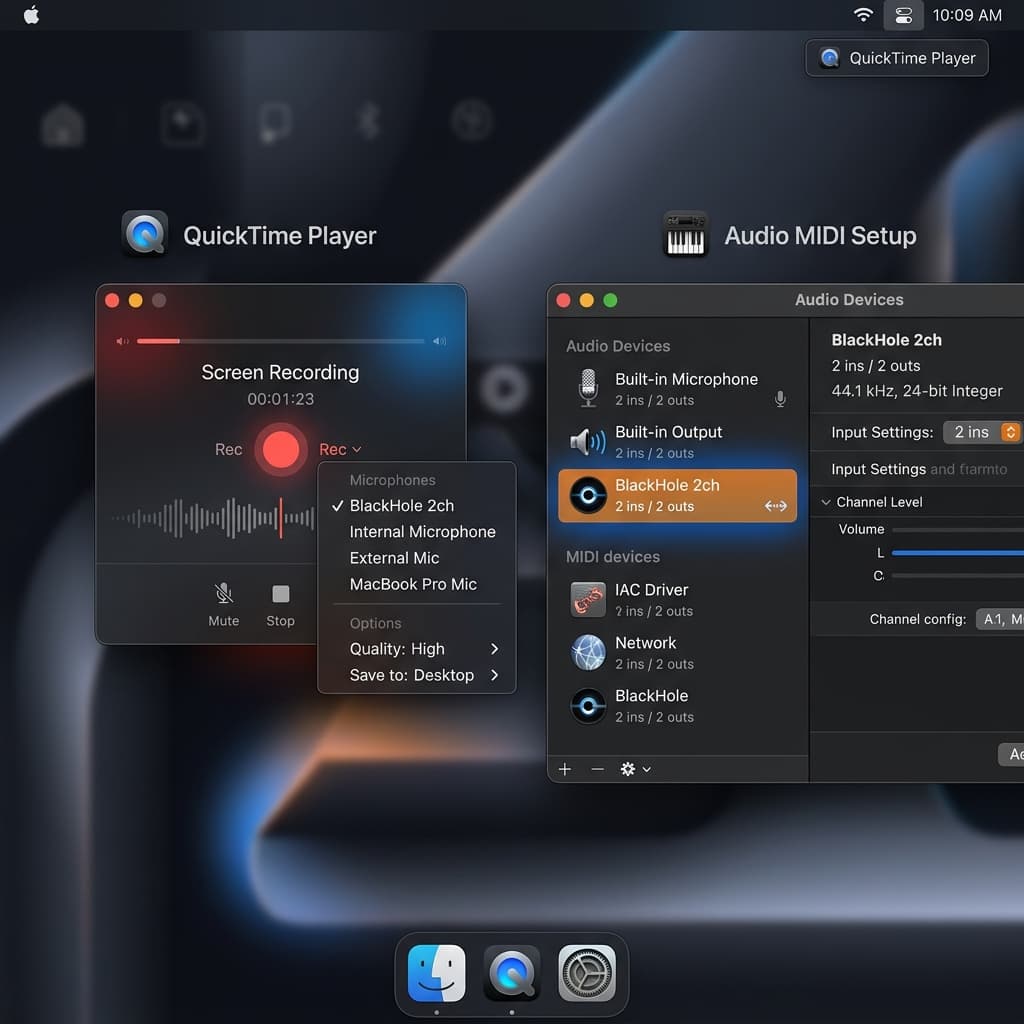
QuickTime Player is already on your Mac and will record any window, but it can't capture system audio on its own. Pair it with BlackHole, a free virtual audio driver, and you get a functional (if manual) live stream recorder.
This is the method to use when you don't want to install anything beyond a small audio driver, or when you need to record on a Mac where you can't install third-party recording software due to IT restrictions (BlackHole is a 2MB kernel extension that's easier to get approved than a full app in some corporate environments).
Steps
- Install BlackHole.
brew install blackhole-2chor download the installer from existential.audio/blackhole. Restart after install. - Create a Multi-Output Device. Open Audio MIDI Setup (⌘+Space, type "Audio MIDI"). Click
+in the bottom-left →Create Multi-Output Device. Check both your regular output (e.g., MacBook Pro Speakers) and BlackHole 2ch. This way you can still hear the stream while recording it. - Set the Multi-Output Device as your system output. System Settings → Sound → Output → select the Multi-Output Device.
- Open QuickTime Player. File → New Screen Recording.
- Click Options in the capture toolbar. Under Microphone, select
BlackHole 2ch. This tells QuickTime to record the audio being piped through BlackHole — i.e., the stream's audio. - Choose "Selected Window" in the capture toolbar, then click your browser window playing the stream.
- Click Record. When done, click the stop icon in the menu bar. Save the file.
- Switch your output back. Don't forget to set System Settings → Sound → Output back to your speakers directly, or every audio on your Mac will keep routing through BlackHole.
The catches
- Framerate is locked. QuickTime records screen content at whatever rate it feels like — usually 30fps on modern Macs, sometimes bumping to 60fps on high-refresh displays. You can't set it. For a 60fps gameplay stream this matters.
- Audio drift on long recordings. This is the biggest issue. QuickTime treats BlackHole as a microphone, and microphone audio clock-syncs independently from the video clock. On a 30-minute recording you'll usually be fine. On a 2-hour recording you can be 500-1500ms out of sync by the end, which is obvious and painful to fix in post.
- File sizes are large. QuickTime records in ProRes or H.264 at high bitrates. Expect 8-12GB per hour for 1080p.
- No buffering recovery. If the stream stalls, the stall is in your recording. No smart handling.
If you need more detail on the BlackHole setup side of things, our system audio + mic recording guide walks through aggregate device setups in more depth.
Troubleshooting
Audio drifts out of sync over time
This is the number one live stream recording problem. Causes:
- Variable bitrate source. Twitch, YouTube Live, and Kick all encode with VBR. Naive recorders can't keep up. Fix: use Screenify (Method 1) or OBS (Method 2), both of which timestamp audio against video frames. QuickTime (Method 4) cannot be fixed for this.
- Different sample rates. If your system is set to 48kHz output and the recorder captures at 44.1kHz (or vice versa), you'll accumulate drift. Check Audio MIDI Setup → your output device → Format. Match it to 48kHz for streaming content.
- CPU saturation. If the Mac is struggling to keep up (browser + game + recording), frames get dropped and audio keeps going. Fix: close other apps, lower recording framerate, or record to a faster SSD.
The recording has frozen frames from buffering stalls
Live streams buffer. When they do, video freezes but audio continues. Fixes:
- Increase the player's buffer. On Twitch, install the BetterTTV extension and enable "Clear Buffer" or adjust Twitch's built-in "Low Latency" setting — disable low latency mode before recording, which gives the player a bigger buffer and fewer stalls.
- Use a wired connection. Wi-Fi buffering accounts for most stalls. Ethernet essentially eliminates them.
- Record the VOD instead. If the content is archived, Method 3 (yt-dlp) has no buffering because it's downloading, not streaming in real time.
The Twitch desktop app window won't capture
Some versions of the Twitch desktop app render via a hardware-accelerated surface that window capture can't read, showing a black rectangle. Fix: don't use the desktop app — open the stream in Chrome, Safari, or Firefox instead. All four methods in this guide work fine on browser playback.
File size is enormous (30+ GB for a few hours)
Check your encoder settings. QuickTime and default OBS settings can output at 25-40 Mbps, which is overkill for a 1080p stream that was encoded by the platform at 6 Mbps. Fix: in OBS, set CBR to 8000 Kbps; in Screenify, use the default H.265 preset; for QuickTime, re-encode the output in HandBrake at 8 Mbps after recording.
Recording a DRM-protected video shows a black screen
This is not fixable. Netflix, Disney+, HBO Max, Apple TV+, Amazon Prime Video, and similar services use HDCP and Widevine/FairPlay DRM that blocks screen capture at the OS level. Stop trying. Screen recorder bugs don't cause black screens on these services — the DRM does, and it's working as designed.
Try Screenify Studio — free, unlimited recordings
Auto-zoom, AI captions, dynamic backgrounds, and Metal-accelerated export.
FAQ
Can I record Netflix or Disney+ on Mac?
No. Both services use DRM (Widevine and FairPlay respectively) that blocks screen recording at the operating system level. Any recording attempt will produce a black video frame with audio, or nothing at all. This applies to every recorder on macOS — it's not a limitation of a specific tool. The only legal way to save Netflix content is the official "Download" feature in the Netflix app for offline viewing.
Is it legal to record Twitch streams?
It depends on what you record and what you do with it. Recording your own streams: legal. Recording short clips for commentary, reaction, or criticism (fair use): generally legal in the US, narrower in other jurisdictions. Recording and redistributing someone else's full stream: copyright infringement and a Twitch ToS violation. Recording a stream for personal archival where you have the streamer's permission: legal. When in doubt, ask the streamer.
How do I record a 4-hour stream without running out of disk space?
Plan on roughly 3-5GB per hour at 1080p60 with efficient H.265 encoding (Screenify's default), or 8-12GB per hour with H.264 at higher bitrates (default OBS/QuickTime). For a 4-hour stream, reserve 20-50GB of free space before starting. If you're recording to an external drive, make sure it's USB 3.2 / Thunderbolt and formatted as APFS or exFAT — not HFS+, which has write-speed issues with large files. Better yet: record to the fastest internal SSD you have, then move the file after.
Will recording a stream slow down my internet or the stream itself?
Not directly. Screen recording is a local operation — it's your Mac's CPU and SSD doing work, not your network. What can slow things down: if your Mac is CPU-bound by the recording, the browser playing the stream may drop frames or buffer more often, which looks like a slowdown. Fix by lowering recording framerate or using hardware encoding (Apple VideoToolbox, which Screenify and OBS both support).
Can I capture the chat alongside the video?
Yes, if you include the chat panel in your capture region. On Twitch and YouTube Live, resize the browser window so both the video player and chat panel are visible, then capture the whole window. If you want chat as a separate file (for editing later), use Chatterino or Twitch's built-in chat export to save chat logs with timestamps, then overlay them in your editor during post.
How do I record in 60fps for smooth gameplay footage?
The source stream needs to actually be 60fps — check the stream's quality selector for "1080p60" or "Source." Then match that in your recorder: Screenify → set capture to 60fps; OBS → Settings → Video → Common FPS → 60. QuickTime can't be set and usually records at 30fps, so it's the wrong tool for gameplay. If the source stream is 30fps, recording at 60fps won't gain you anything — it'll just double the file size with duplicate frames.
What's the difference between recording a live stream and downloading the VOD?
Live recording captures the stream as it plays in real time — necessary if you want it now or if the streamer doesn't publish a VOD. VOD downloading (Method 3) fetches the platform's archived version after the broadcast ends, which is usually cleaner, smaller, and perfectly synced. Rule of thumb: if you can wait 10 minutes after the stream ends, download the VOD. If you can't, record live.
Does recording while streaming use more bandwidth?
No — recording is local. But if you're streaming out (broadcasting your own stream to Twitch) and recording at the same time, the upload bandwidth for streaming is unchanged, and local recording adds zero network load. CPU load is different: encoding twice (once for the outbound stream, once for the local recording) can tax older Macs. OBS and Screenify both support "record while streaming" modes that share the encode to avoid doubling the CPU cost.
Picking Your Method
- Quick live capture, minimal setup, clean audio sync → Method 1 (Screenify Studio).
- Long streams, multi-source compositing, precise bitrate control → Method 2 (OBS).
- VOD available, quality matters more than immediacy → Method 3 (yt-dlp).
- No new apps, BlackHole already installed, short recording → Method 4 (QuickTime + BlackHole).
For most creators archiving their own streams or capturing short clips for commentary, Method 1 is the fastest path from "I want to record this" to "I have a clean, synced file." Download Screenify Studio to try it free — the free tier handles unlimited recordings under 10 minutes, which covers most clip use cases.
For broader Mac recording context, our complete guide to screen recording on Mac covers the full landscape of tools beyond just live streams.
Whatever method you pick: record only what you have the rights to, watch your free disk space, and check the first 30 seconds of your recording before walking away for two hours. The worst live stream recording problem is the one you don't discover until the stream is over and un-replayable.
Try Screenify Studio
Record your screen with auto-zoom, AI captions, dynamic backgrounds, and Metal-accelerated export. Free plan, unlimited recordings.
Download Free


