How to Record a FaceTime Call on Mac
Record FaceTime calls on Mac with audio — 4 methods, the consent issue, and how to capture both sides clearly.

FaceTime calls are trickier to record than a normal screen. The video side is easy — any Mac screen recorder can capture the call window. The audio side is where people get stuck: the other person's voice plays through your speakers as system audio, and macOS treats system audio as off-limits by default. If you just hit record, you'll end up with a silent movie of two faces moving their mouths, or a recording where only your own microphone came through.
There's also a second problem that most guides skip over: recording a call legally. FaceTime is a private conversation, and in many US states and most of Europe, recording a private conversation without consent is a crime. You need to know the rules before you press the button.
This guide walks through four ways to record a FaceTime call on Mac with full audio from both sides, covers the consent landscape you should understand first, and finishes with troubleshooting for the issues that come up most often.
Quick comparison
| Method | Price | Captures both sides of audio | Ease | Best for |
|---|---|---|---|---|
| Screenify Studio | Free plan + Pro | Yes (built-in system audio) | Easy | Everyday recording, interviews, tutorials |
| Screenshot Toolbar (macOS built-in) | Free | No — mic only (workaround needed) | Easy (video), hard (audio) | Video-only backup |
| OBS + BlackHole | Free | Yes (requires setup) | Medium–Hard | Live streaming, advanced routing |
| QuickTime + Multi-Output Device | Free | Yes (requires Audio MIDI setup) | Medium | One-off recordings when you don't want extra apps |
None of these methods defeat DRM. If the call includes a SharePlay session streaming Apple TV+ or Apple Music, the protected media will appear as a black rectangle or silent track in the recording. That's Apple's doing, not a bug in the tools.
Before you record: consent and legality
Skip this at your peril. FaceTime is a private communication, and recording private communications is regulated.
US federal baseline: one-party consent
Under federal law (18 U.S.C. § 2511), at least one party to a conversation must consent to the recording. If you're on the call yourself, you qualify. That's the floor — but states are free to require more, and several do.
US two-party (all-party) consent states
In these states, every person on the call must consent to being recorded:
- California
- Florida
- Illinois
- Maryland
- Massachusetts
- Montana
- Nevada (in practice treated as two-party by courts)
- New Hampshire
- Pennsylvania
- Washington
A few others (Connecticut, Delaware, Michigan, Oregon, Vermont) have mixed or situation-specific rules that lean toward two-party consent for in-person or wire communications. If you or the other party is in any of those states, assume two-party consent applies.
The tricky part: if you're in a one-party state and the other person is in a two-party state, the stricter law usually wins. Courts have repeatedly sided with the state that requires more protection.
Outside the US
- EU / UK: GDPR treats voice and video as personal data. Recording a private call without a lawful basis (usually consent) can trigger fines. Several EU countries also have criminal statutes against secret recordings.
- Canada: One-party consent federally, but provinces like Quebec add privacy protections.
- Australia: Varies by state. New South Wales, Victoria, and Western Australia restrict private conversation recording without consent.
The practical rule: just ask
Don't navigate ten jurisdictions in your head during a call. Ask. "Hey, mind if I record this so I can go back to it later?" takes three seconds, and the answer is almost always yes when the reason is reasonable — a tutorial, an interview, a family moment, a meeting you want notes from.
The iOS screenshot notification thing
If you screenshot during a FaceTime call on iOS, the other person gets a notification. It's a deliberate privacy nudge from Apple. What surprises people: macOS does not notify the other party when you start a screen recording during FaceTime. The call continues normally and they have no idea you're capturing it.
That gap is exactly why the consent conversation matters more on Mac than on iPhone. The OS won't do it for you. You have to do it yourself.
If you publish the recording
Sharing a FaceTime recording publicly — YouTube, social, a podcast — adds another layer. Even if recording was legal, publishing someone's face and voice without permission can run into publicity rights, defamation, and platform policies. Get written consent for anything going public, and add a short disclaimer in the video description if the other party's identity is recognizable.
With the legal bit out of the way, let's get to the actual methods.
Method 1: Screenify Studio
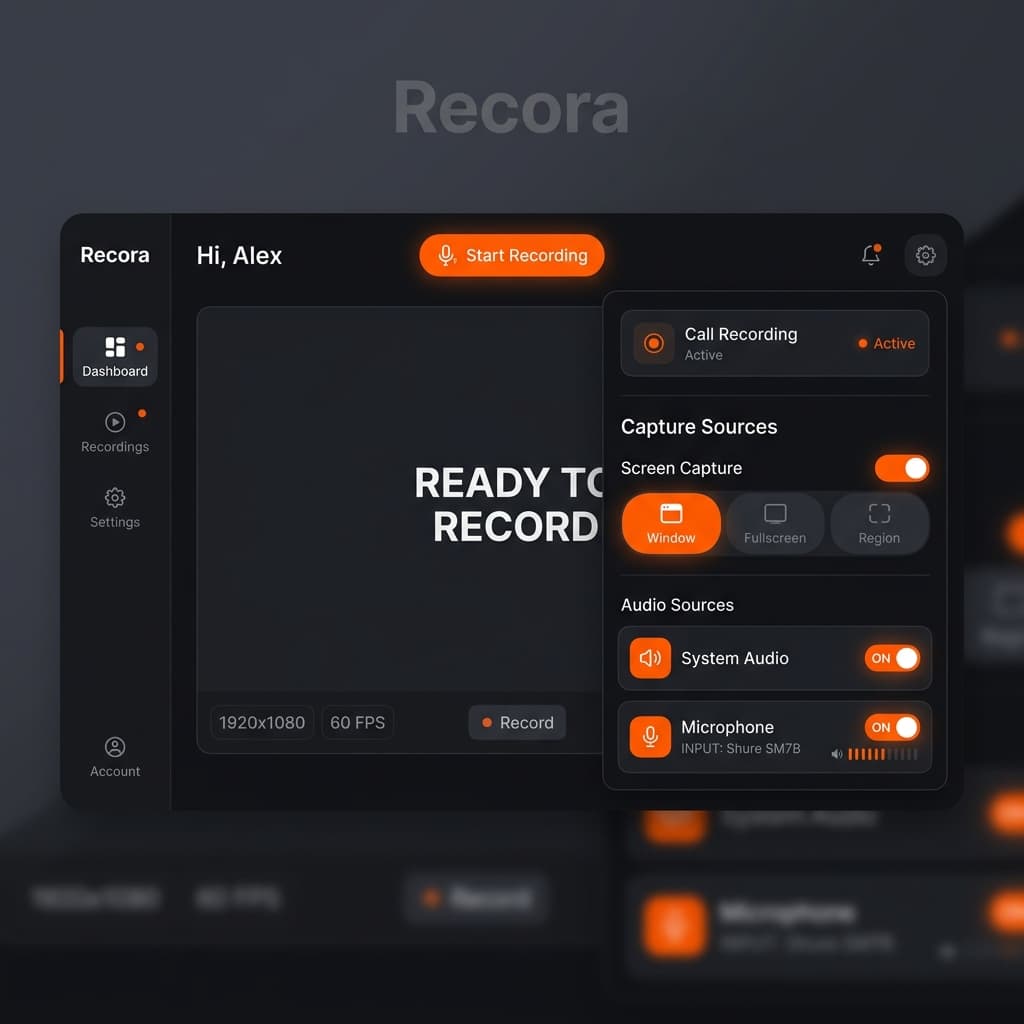
Screenify Studio handles the part that trips everyone else up — capturing the other person's voice — without a virtual audio driver. System audio capture is built in, so FaceTime audio arrives in the recording alongside your microphone as two separate tracks you can balance later.
Step-by-step
- Download Screenify Studio and launch it. Grant Screen Recording and Microphone permissions in System Settings → Privacy & Security the first time you run it.
- Open FaceTime and start or answer the call. Position the window where you want it on screen.
- In Screenify Studio, pick Window capture and click on the FaceTime window. Window capture follows the call even if you accidentally drag it.
- Turn on System Audio — this is what captures the other caller's voice.
- Turn on Microphone and select your input (built-in mic, AirPods, or external).
- Start recording. Screenify shows a small floating indicator so you always know the session is live.
- End with the stop shortcut or the menu bar icon when the call wraps.
Because mic and system audio land on separate tracks, you can drop the call audio if the other person said something they didn't want kept, or boost your own voice without amplifying their side. That's harder to do once everything is mixed into a single track.
Why this works well for FaceTime specifically
- Window follow: FaceTime likes to auto-resize when someone joins a group call or toggles full-screen. Window capture rides along instead of leaving you with a half-empty frame.
- Auto-zoom on speakers: In group FaceTime with the tile layout, auto-zoom can focus on the active speaker during edit rather than leaving a static wide shot.
- Separate audio tracks: Essential when you need to edit out a side comment without muting the whole conversation.
- No driver install: You're not adding a kernel extension or rebooting. That matters if your Mac is locked down by an employer or school.
Screenify's free plan covers short calls end to end. Longer sessions or 4K exports bump into Pro territory.
For background on why system audio capture is a separate problem from screen recording on macOS, see How to Record Internal Audio on Mac.
Try Screenify Studio — free, unlimited recordings
Auto-zoom, AI captions, dynamic backgrounds, and Metal-accelerated export.
Method 2: macOS Screenshot Toolbar (and why it needs help)
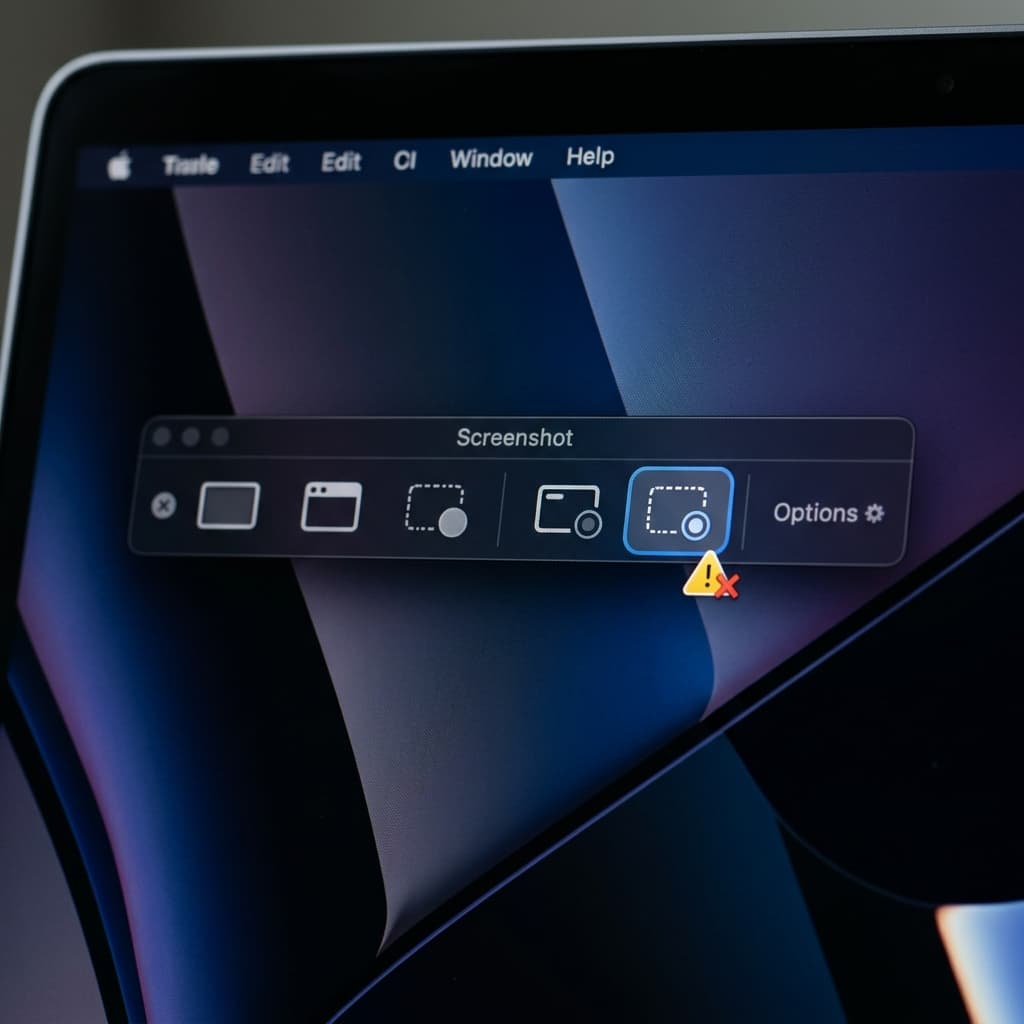
The built-in Screenshot Toolbar records the FaceTime window beautifully. It does not record the other person's voice. It only has one audio input and that input is your microphone. If you rely on it as-is, you'll hear yourself clearly and the other person as a distant mumble picked up by your mic from the speakers — or nothing at all if you're on headphones.
Basic video recording
- Open the Screenshot Toolbar (Command + Shift + 5 — yes, the shortcut, even though the rest of the guide avoids quoting it).
- Choose Record Selected Portion and drag a box around the FaceTime window. This is more stable than recording the entire screen if you have multiple displays.
- Under Options, pick your microphone so your voice is captured.
- Click Record.
- Stop via the menu bar icon when the call ends. The file lands on your Desktop as a
.mov.
That gives you a clean video and your own side of the audio.
The system audio workaround
To actually capture the other person's voice with the Screenshot Toolbar, you need to route FaceTime's output into your microphone input. macOS won't do this natively, so you install a virtual audio driver like BlackHole (free) or Loopback (paid). Once installed:
- Open Audio MIDI Setup (in Applications → Utilities).
- Create a Multi-Output Device with your speakers/headphones and BlackHole checked.
- Set the Multi-Output Device as macOS system output.
- In the Screenshot Toolbar's Options, pick BlackHole 2ch as the microphone.
- Record.
Your own mic is now gone from the recording, and you only have the call's system audio. To keep both, you need an Aggregate Device that combines your mic and BlackHole, then select the aggregate as the Screenshot Toolbar input. At that point you're doing Method 4 with extra steps.
The Screenshot Toolbar is worth it as a video-only backup running alongside another method. If your primary recording fails, you still have a visual of the call.
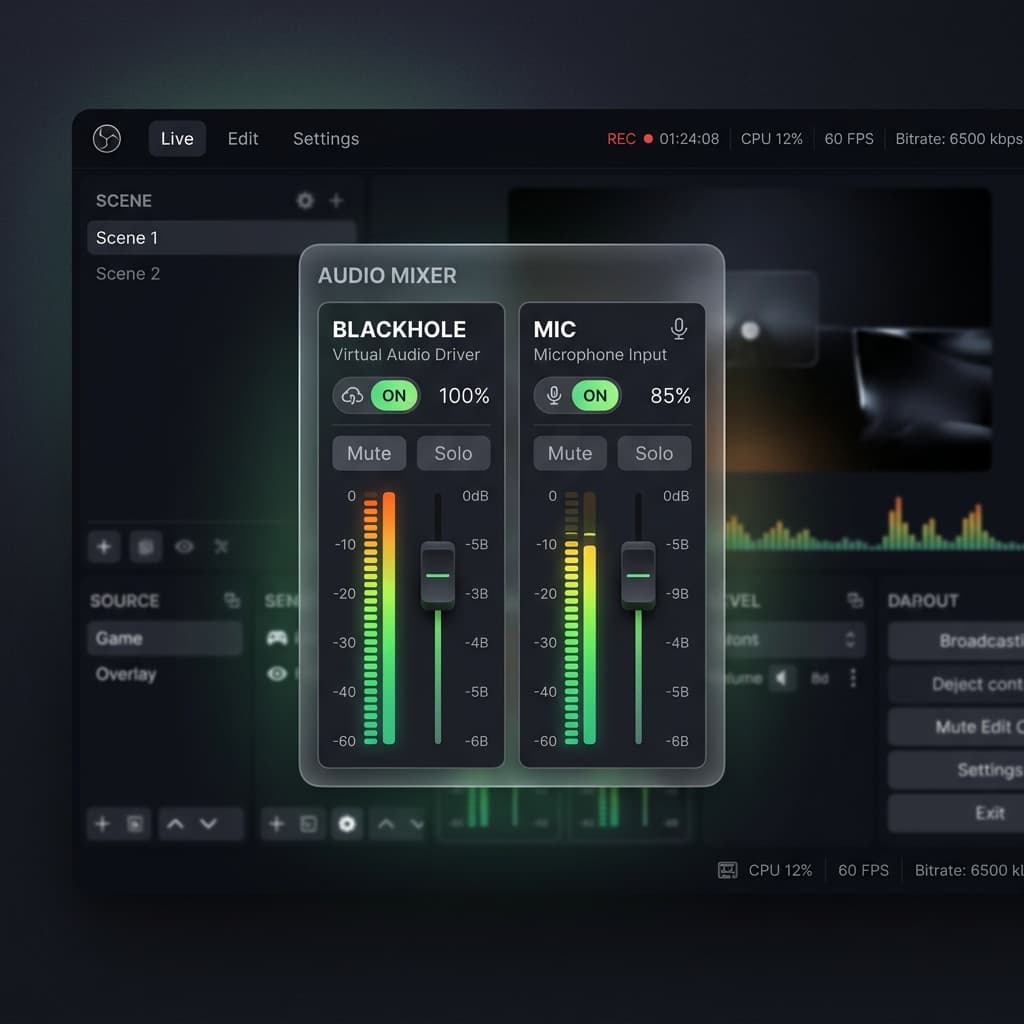
Method 3: OBS Studio + BlackHole
OBS is overkill for a FaceTime call, but if you already have it installed — or you want to live-stream a call to a private audience — this path works and costs nothing.
Setup
- Install OBS Studio and BlackHole 2ch (both free).
- Open Audio MIDI Setup. Create a Multi-Output Device combining your headphones and BlackHole, and set it as macOS output. Now FaceTime audio plays to your headphones and flows into BlackHole.
- In OBS, add a Display Capture or Window Capture source and point it at FaceTime.
- Add an Audio Input Capture source set to BlackHole 2ch — this is the call audio.
- Add a second Audio Input Capture set to your real microphone — this is your voice.
- Open OBS's Audio Mixer and check the levels of both sources before the call starts.
Start the call and record
- Open FaceTime, start the call.
- In OBS, click Start Recording.
- Watch the mixer during the call to catch drop-outs or a source going silent.
- Click Stop Recording when done.
OBS writes an .mkv or .mp4 by default. If you picked .mkv, remux it to .mp4 from OBS's File menu before editing — most editors don't handle raw MKV well.
Where OBS struggles
- Scene and source setup takes longer than the call itself the first time.
- No built-in trimming or export presets; you'll edit elsewhere.
- It won't center the active speaker automatically in group FaceTime.
- Crash recovery is primitive — if OBS dies mid-call, you might lose the whole file.
OBS shines when the recording is part of a bigger production. For a one-off call with a friend or an interview, it's more infrastructure than you need.
Method 4: QuickTime Player + Multi-Output Device
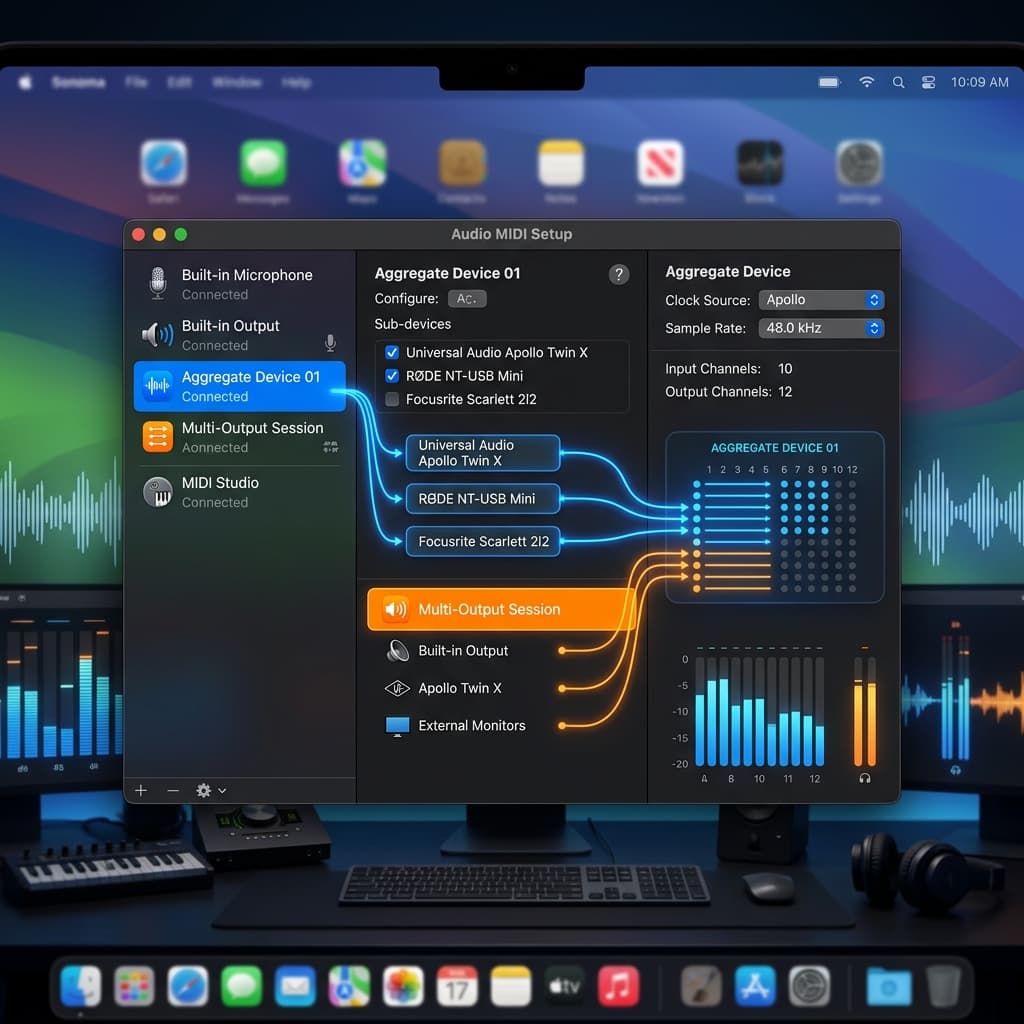
QuickTime Player ships with every Mac. It can record the screen and record audio from a selected input. Combined with a Multi-Output Device and a virtual driver, it captures both sides of a FaceTime call without installing a dedicated recorder.
One-time audio setup
- Install BlackHole 2ch (free).
- Open Audio MIDI Setup.
- Click the
+in the bottom-left and create a Multi-Output Device. Check your real output (MacBook Pro Speakers, AirPods, etc.) and BlackHole 2ch. - Right-click the Multi-Output Device and choose Use This Device for Sound Output.
- Still in Audio MIDI Setup, create an Aggregate Device. Check your microphone and BlackHole 2ch. This lets QuickTime grab both in a single input.
Confirm it works: play a YouTube video — you should hear it through your headphones normally while BlackHole silently forwards the audio.
Record the call
- Open QuickTime Player.
- File → New Screen Recording.
- Click the options menu in the recording toolbar and pick your Aggregate Device as the microphone.
- Drag a selection around the FaceTime window.
- Start the FaceTime call.
- Click Record in QuickTime.
- Stop from the menu bar when the call ends.
The resulting file has your voice and the call's audio mixed into a single track.
The catch
Everything is mixed. You can't later drop the call audio without also losing your own voice, because they share a track. If you know you'll need to edit sides independently, use a tool that records mic and system audio separately — Screenify Studio does this natively, and How to Record System Audio and Mic Separately on Mac walks through it in detail.
Troubleshooting
The other person's voice is missing or too quiet
The most common failure on FaceTime recordings. Causes:
- System audio isn't enabled (Screenify) or the wrong device is selected (QuickTime, OBS).
- You're on Bluetooth headphones and macOS dropped to the low-bandwidth HFP/HSP profile — system output gets garbled. Switch to wired headphones or built-in speakers for the recording.
- The Multi-Output Device isn't set as the macOS output anymore (macOS sometimes reverts after a sleep or headphone unplug). Re-check it in System Settings → Sound before the call.
Always do a ten-second test call with a friend or Apple's own echo test tones before the real one.
My own voice echoes
This happens when your microphone picks up the speaker output, and that recording also contains system audio. You hear yourself twice. Fix:
- Wear headphones instead of using speakers so your mic doesn't catch the call audio.
- Or enable software echo cancellation if your recording tool has it.
The recording shows a black window
FaceTime's picture-in-picture can go protected if SharePlay is sharing DRM content. The main call window is fine; the SharePlay tile will go black in the recording. There's no way around this — pause SharePlay if you need that portion captured.
Group FaceTime layout changes mid-recording
Tile layout becomes presenter layout (or vice versa) the moment someone shares screen. If you're using window capture, the new layout fits fine. If you cropped tightly around a tile, the recording looks off. Record the whole window and crop in edit if you expect layout changes.
Out-of-sync audio after editing
If you recorded with separate mic and system audio tracks at different sample rates (48 kHz vs 44.1 kHz), they'll drift over long calls. Force both to 48 kHz at the input stage — Audio MIDI Setup lets you set the sample rate for every device. Match them before recording, not after.
For more on getting audio right on Mac recordings generally, see How to Screen Record on Mac with Audio.
Backup recording strategy
FaceTime calls are the kind of thing you don't get to do over. A dropped recording of a grandparent's birthday call or a one-shot interview is a disaster. Two habits prevent it:
- Run a second recording on another device. A phone or iPad next to your Mac, running its own voice memo, gives you a fallback audio track. Slate both recordings with a hand clap at the start so you can sync them in edit.
- Check in during long calls. Glance at the recording indicator every few minutes. If OBS crashes or Screenify's floating bar vanishes, you'll catch it within minutes instead of discovering the whole call is lost afterward.
Etiquette: share the recording
A small thing that goes a long way — after the call, send the other person the recording (or a link). They were part of it. They have a legitimate stake in what exists of the conversation. Sharing back:
- Reassures them that you didn't do anything weird with it.
- Gives them a copy they might actually want.
- Builds trust for the next time you ask to record.
If the recording is going public, get explicit permission first and offer to cut anything they want removed. "I'd like to use the first ten minutes in a video — want to see it before it goes up?" is how working relationships stay intact.
Ready to record your next FaceTime call?
Download Screenify Studio and capture both sides of the audio on the first try — no drivers, no Audio MIDI Setup, no routing diagrams.
Try Screenify Studio — free, unlimited recordings
Auto-zoom, AI captions, dynamic backgrounds, and Metal-accelerated export.
FAQ
Does FaceTime notify the other person if I record the call on Mac?
No. macOS does not send a notification when you start a screen recording during a FaceTime call. iOS sends one only for screenshots, not screen recordings. The absence of a notification is not permission — you still need consent in two-party consent states and under GDPR.
Can I record a FaceTime call without any extra software?
Video yes, full audio no. The built-in Screenshot Toolbar captures the FaceTime window and your own microphone, but it cannot capture the other person's voice without a virtual audio driver like BlackHole. Every method that captures both sides involves either a dedicated recorder with system audio (Screenify Studio) or a virtual audio device.
Is it legal to record a FaceTime call with my family?
It depends on where every participant is located. In one-party consent states, your own consent is enough. In two-party consent states (California, Florida, Illinois, Maryland, Massachusetts, Montana, Nevada, New Hampshire, Pennsylvania, Washington), everyone on the call must agree. Even with family, asking first is the cleanest path and avoids awkwardness later.
Why is the audio out of sync in my recording?
Usually a sample rate mismatch — system output at 48 kHz, microphone at 44.1 kHz, the recorder resampling one track. Set both to 48 kHz in Audio MIDI Setup before recording. If the drift only appears after editing, your timeline sequence is at a different frame rate than the source; conform the source instead of letting the editor interpret it.
Does Screenify Studio record SharePlay content?
It records the call window, including the SharePlay tile. If the shared media is DRM-protected (Apple TV+, Apple Music, some streaming services), that portion appears as a black rectangle or silent audio in the recording. This restriction applies to every recorder on macOS — it's enforced at the OS level.
What's the best way to record a Group FaceTime call?
Use window capture on the main FaceTime window so layout changes (tile to presenter and back) stay inside the frame. Enable system audio and microphone as separate tracks if possible, since group calls are harder to edit when voices overlap. Avoid cropping tightly around one person's tile — it will break as soon as someone else talks.
Can I record just the audio of a FaceTime call without the video?
Yes. Start a screen recording with audio enabled, then extract the audio track in any editor (or use a tool like ffmpeg to pull the audio into a separate file). Some recorders also let you disable video capture entirely and record only audio sources. If audio is all you need, that's the lightest-weight option.
How long can I record a FaceTime call?
Technically as long as your disk holds out. A 1080p screen recording with two audio tracks is roughly 1–2 GB per hour depending on the codec. Practically, the limits are battery (if you're on a laptop unplugged), thermals (long recordings push the Mac warm), and the recording tool's own stability. Plug in for calls longer than 30 minutes, and test your tool of choice on a practice call before anything important.
Try Screenify Studio
Record your screen with auto-zoom, AI captions, dynamic backgrounds, and Metal-accelerated export. Free plan, unlimited recordings.
Download Free


